Quick Guide
Page 8
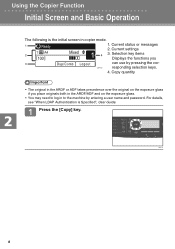
... to log in the ARDF or ADF takes precedence over the original on the exposure glass if you can use by entering a user name and password. Current status or messages 2.
... to log in the ARDF or ADF takes precedence over the original on the exposure glass if you can use by entering a user name and password. Current status or messages 2.

Quick Guide
Page 26
... associated with enough memory. 26 or write-protected. Troubleshooting Error and Status Messages on the Screen "X" indicates the parts of the messages that is not password- See "Registering Scan Destinations", User Guide. An original has been jammed inside the ARDF or ADF. • Remove jammed originals, and then place them again...
... associated with enough memory. 26 or write-protected. Troubleshooting Error and Status Messages on the Screen "X" indicates the parts of the messages that is not password- See "Registering Scan Destinations", User Guide. An original has been jammed inside the ARDF or ADF. • Remove jammed originals, and then place them again...
Quick Guide
Page 29
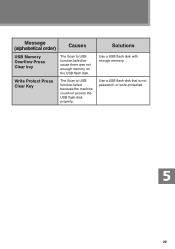
or write-protected. 29 Use a USB flash disk that is not password- Write Protect Press Clear Key The Scan to USB function failed because there was not enough memory on the USB flash disk. Message (alphabetical order) Causes USB Memory Overflow Press Clear key The Scan to USB function failed because the machine could not access the USB flash disk properly. Solutions Use a USB flash disk with enough memory.
or write-protected. 29 Use a USB flash disk that is not password- Write Protect Press Clear Key The Scan to USB function failed because there was not enough memory on the USB flash disk. Message (alphabetical order) Causes USB Memory Overflow Press Clear key The Scan to USB function failed because the machine could not access the USB flash disk properly. Solutions Use a USB flash disk with enough memory.
Quick Guide
Page 60
... Settings...345 Configuring the IPsec Global Settings...345 Configuring the IPsec Policy...346 Printing Lists/Reports...351 Configuring the Administrator Settings...353 Configuring the Administrator Password and E-mail Address 353 Resetting the Machine's Settings...354 Backing Up the Machine's Settings...355 Restoring the Machine's Settings from a Backup File 356 Configuring the...
... Settings...345 Configuring the IPsec Global Settings...345 Configuring the IPsec Policy...346 Printing Lists/Reports...351 Configuring the Administrator Settings...353 Configuring the Administrator Password and E-mail Address 353 Resetting the Machine's Settings...354 Backing Up the Machine's Settings...355 Restoring the Machine's Settings from a Backup File 356 Configuring the...
Quick Guide
Page 78
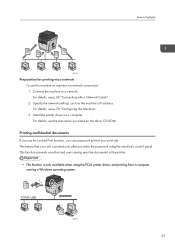
...Connecting with a Network Cable". 2. This function prevents unauthorized users seeing sensitive documents at the printer. • This function is printed only after you can password protect your job is only available when using the machine's control panel. For details, see p.70 "Configuring the Machine". 3. For details, see the ... the driver CD-ROM. Feature Highlights CMF005 Preparation for printing via a network To use the Locked Print function, you enter the password using the PCL6 printer driver, and printing from a computer running a Windows operating system.
...Connecting with a Network Cable". 2. This function prevents unauthorized users seeing sensitive documents at the printer. • This function is printed only after you can password protect your job is only available when using the machine's control panel. For details, see p.70 "Configuring the Machine". 3. For details, see the ... the driver CD-ROM. Feature Highlights CMF005 Preparation for printing via a network To use the Locked Print function, you enter the password using the PCL6 printer driver, and printing from a computer running a Windows operating system.
Quick Guide
Page 79
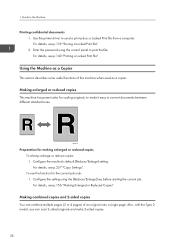
... always enlarge or reduce copies: 1. For details, see p.140 "Printing a Locked Print file". CES103 Preparation for scaling originals, to make 2-sided copies. 26 Enter the password using the [Reduce/Enlarge] key before starting the current job. Configure the setting using the control panel to send a print job as a copier. For details...
... always enlarge or reduce copies: 1. For details, see p.140 "Printing a Locked Print file". CES103 Preparation for scaling originals, to make 2-sided copies. 26 Enter the password using the [Reduce/Enlarge] key before starting the current job. Configure the setting using the control panel to send a print job as a copier. For details...

Quick Guide
Page 123
... restart the machine, turn off the machine, and then turn it back on a network and as a fax machine. If you are requested to enter a password, enter the password using the number keys, and then press the [OK] key. 4. Press the [ ] [ ] keys to select [Network Settings], and then press the [OK] key. 3. The...
... restart the machine, turn off the machine, and then turn it back on a network and as a fax machine. If you are requested to enter a password, enter the password using the number keys, and then press the [OK] key. 4. Press the [ ] [ ] keys to select [Network Settings], and then press the [OK] key. 3. The...
Quick Guide
Page 124
...configured IPv4 address settings are requested to select [Network Settings], and then press the [OK] key. 3. Press the [ ] [ ] keys to enter a password, enter the password using the number keys, and then press the [OK] key. 4. The current IPv4 address is not automatically detected, set the transmission speed in [Admin...] key. Configuring the Machine • You can press the [Escape] key to exit to the previous level of the menu tree. • A password for accessing the [Network Settings] menu can be used . • For details about turning the machine on and off, see p.55 "Turning the ...
...configured IPv4 address settings are requested to select [Network Settings], and then press the [OK] key. 3. Press the [ ] [ ] keys to enter a password, enter the password using the number keys, and then press the [OK] key. 4. The current IPv4 address is not automatically detected, set the transmission speed in [Admin...] key. Configuring the Machine • You can press the [Escape] key to exit to the previous level of the menu tree. • A password for accessing the [Network Settings] menu can be used . • For details about turning the machine on and off, see p.55 "Turning the ...

Quick Guide
Page 125
...; You can press the [Escape] key to exit to move between fields. 13. Press the [ ] [ ] keys to the previous level of the menu tree. • A password for configuring network settings differs depending on . 15. Press the [ ] [ ] keys to move between fields. 11. Tools Lock], see p.75 "Configuring the Ethernet Speed". Getting...
...; You can press the [Escape] key to exit to move between fields. 13. Press the [ ] [ ] keys to the previous level of the menu tree. • A password for configuring network settings differs depending on . 15. Press the [ ] [ ] keys to move between fields. 11. Tools Lock], see p.75 "Configuring the Ethernet Speed". Getting...

Quick Guide
Page 126
... the [Network Settings] menu can press the [Escape] key to exit to the previous level of the menu tree. • A password for the machine to receive an IPv6 address automatically. 1. Configuring the Machine Setting the machine to receive an IPv6 address automatically • ...A DHCP server is activated, manually configured IPv6 address settings are requested to enter a password, enter the password using the number keys, and then press the [OK] key. 4. Press the [ ] [ ] keys to the initial screen. 8. Press...
... the [Network Settings] menu can press the [Escape] key to exit to the previous level of the menu tree. • A password for the machine to receive an IPv6 address automatically. 1. Configuring the Machine Setting the machine to receive an IPv6 address automatically • ...A DHCP server is activated, manually configured IPv6 address settings are requested to enter a password, enter the password using the number keys, and then press the [OK] key. 4. Press the [ ] [ ] keys to the initial screen. 8. Press...

Quick Guide
Page 127
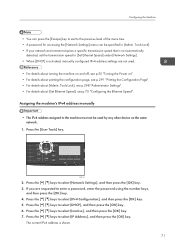
...must not be specified in [Admin. Tools Lock]. 74 Getting Started Assigning the machine's IPv6 address manually • The IPv6 address assigned to enter a password, enter the password using the number keys, and then press the [OK] key. 14. CMF134 2. Address], and then press the [OK] key. 8. Press the [... [Prefix Length], and then press the [OK] key. 11. If you are requested to the previous level of the menu tree. • A password for accessing the [Network Settings] menu can press the [Escape] key to exit to reboot the machine, turn off the machine, and then turn it...
...must not be specified in [Admin. Tools Lock]. 74 Getting Started Assigning the machine's IPv6 address manually • The IPv6 address assigned to enter a password, enter the password using the number keys, and then press the [OK] key. 14. CMF134 2. Address], and then press the [OK] key. 8. Press the [... [Prefix Length], and then press the [OK] key. 11. If you are requested to the previous level of the menu tree. • A password for accessing the [Network Settings] menu can press the [Escape] key to exit to reboot the machine, turn off the machine, and then turn it...
Quick Guide
Page 129
.... 3. Press the [User Tools] key. Press the [ ][ ] keys to the previous level of the menu tree. • A password for accessing the [Admin. Press the [User Tools] key to return to enter a password, enter the password using the number keys, and then press the [OK] key. 4. Getting Started 1. If you are two types: tone...
.... 3. Press the [User Tools] key. Press the [ ][ ] keys to the previous level of the menu tree. • A password for accessing the [Admin. Press the [User Tools] key to return to enter a password, enter the password using the number keys, and then press the [OK] key. 4. Getting Started 1. If you are two types: tone...
Quick Guide
Page 130
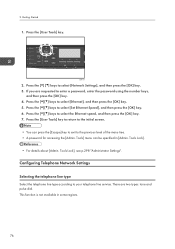
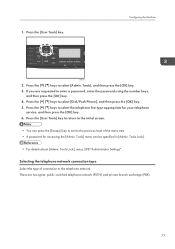
...; You can be specified in [Admin. Tools] menu can press the [Escape] key to exit to the previous level of connection to enter a password, enter the password using the number keys, and then press the [OK] key. 4. Selecting the telephone network connection type Select the type of the menu tree. &#...8226; A password for your telephone service, and then press the [OK] key. 6. There are requested to the telephone network. Tools], and then press the [OK] key....
...; You can be specified in [Admin. Tools] menu can press the [Escape] key to exit to the previous level of connection to enter a password, enter the password using the number keys, and then press the [OK] key. 4. Selecting the telephone network connection type Select the type of the menu tree. &#...8226; A password for your telephone service, and then press the [OK] key. 6. There are requested to the telephone network. Tools], and then press the [OK] key....
Quick Guide
Page 131
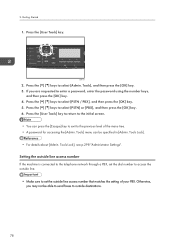
... number to access the outside line access number that matches the setting of the menu tree. • A password for accessing the [Admin. Tools] menu can press the [Escape] key to exit to enter a password, enter the password using the number keys, and then press the [OK] key. 4. Setting the outside line access number...
... number to access the outside line access number that matches the setting of the menu tree. • A password for accessing the [Admin. Tools] menu can press the [Escape] key to exit to enter a password, enter the password using the number keys, and then press the [OK] key. 4. Setting the outside line access number...
Quick Guide
Page 132
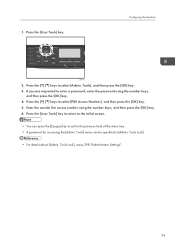
... and then press the [OK] key. 3. Press the [ ] [ ] keys to the previous level of the menu tree. • A password for accessing the [Admin. Press the [User Tools] key to return to the initial screen. • You can be specified in [Admin. Tools...Tools Lock], see p.298 "Administrator Settings". 79 Tools Lock]. • For details about [Admin. Configuring the Machine CMF134 2. Press the [ ] [ ] keys to enter a password, enter the password using the number keys, and then press the [OK] key. 6. Press the [User Tools] key. Enter the outside line access number using the number...
... and then press the [OK] key. 3. Press the [ ] [ ] keys to the previous level of the menu tree. • A password for accessing the [Admin. Press the [User Tools] key to return to the initial screen. • You can be specified in [Admin. Tools...Tools Lock], see p.298 "Administrator Settings". 79 Tools Lock]. • For details about [Admin. Configuring the Machine CMF134 2. Press the [ ] [ ] keys to enter a password, enter the password using the number keys, and then press the [OK] key. 6. Press the [User Tools] key. Enter the outside line access number using the number...
Quick Guide
Page 178
... certain machine functions. Printing from the PostScript 3 printer driver will only be used in combination with LDAP authentication, except for printing using user names and passwords for the LDAP server, not user codes for the user restriction settings. Restricting Machine Functions According to User Restricting Machine Functions According to User You...
... certain machine functions. Printing from the PostScript 3 printer driver will only be used in combination with LDAP authentication, except for printing using user names and passwords for the LDAP server, not user codes for the user restriction settings. Restricting Machine Functions According to User Restricting Machine Functions According to User You...
Quick Guide
Page 179
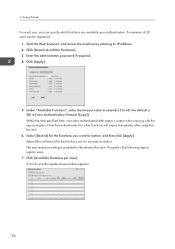
... Timeout (Copy)]. Click [Apply]. 5. Select [Restrict] for the selected function. 2. Under "Available Functions", enter the timeout value in seconds (5 to register users. 7. Enter the administrator password if required. 4. Click [Restrict Available Functions]. 3. Click [Available Functions per User]. Getting Started For each user, you can be registered. 1.
... Timeout (Copy)]. Click [Apply]. 5. Select [Restrict] for the selected function. 2. Under "Available Functions", enter the timeout value in seconds (5 to register users. 7. Enter the administrator password if required. 4. Click [Restrict Available Functions]. 3. Click [Available Functions per User]. Getting Started For each user, you can be registered. 1.
Quick Guide
Page 181
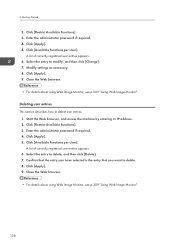
... list of currently registered user entries appears. 6. Click [Apply]. 9. Start the Web browser, and access the machine by entering its IP address. 2. Enter the administrator password if required. 4. Confirm that the entry you have selected is the entry that you want to modify, and then click [Change]. 7. Close the Web browser... "Using Web Image Monitor". 128 Click [Apply]. 9. Select the entry to delete user entries. 1. Click [Restrict Available Functions]. 3. Getting Started 2. Enter the administrator password if required. 4. Click [Available Functions per User].
... list of currently registered user entries appears. 6. Click [Apply]. 9. Start the Web browser, and access the machine by entering its IP address. 2. Enter the administrator password if required. 4. Confirm that the entry you have selected is the entry that you want to modify, and then click [Change]. 7. Close the Web browser... "Using Web Image Monitor". 128 Click [Apply]. 9. Select the entry to delete user entries. 1. Click [Restrict Available Functions]. 3. Getting Started 2. Enter the administrator password if required. 4. Click [Available Functions per User].

Quick Guide
Page 182
... 30 seconds) using 1 to print on the restricted function, users will be able to authenticate for PCL6 printing and LAN-Faxes using user names and passwords for the LDAP server, not user codes for printing using the PCL6 printer driver and sending LAN-Faxes. Authenticating through the control panel 1. When Machine...
... 30 seconds) using 1 to print on the restricted function, users will be able to authenticate for PCL6 printing and LAN-Faxes using user names and passwords for the LDAP server, not user codes for printing using the PCL6 printer driver and sending LAN-Faxes. Authenticating through the control panel 1. When Machine...
Quick Guide
Page 189
... a user code, see p.110 "Loading Envelopes". There are Restricted". • For details about enabling user authentication and entering a user name and password, see p.444 "When LDAP Authentication is Specified". • For details about [Paper Tray Priority], see p.279 "System Settings". • For details...settings, the machine reports an error. After the jammed paper is specified, you must enable user authentication and enter a user name and password in [Paper Tray Priority] under system settings. • If a paper jam occurs, printing stops after the current page has been ...
... a user code, see p.110 "Loading Envelopes". There are Restricted". • For details about enabling user authentication and entering a user name and password, see p.444 "When LDAP Authentication is Specified". • For details about [Paper Tray Priority], see p.279 "System Settings". • For details...settings, the machine reports an error. After the jammed paper is specified, you must enable user authentication and enter a user name and password in [Paper Tray Priority] under system settings. • If a paper jam occurs, printing stops after the current page has been ...


