Quick Guide
Page 54
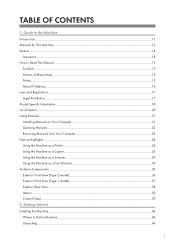
... Manuals for This Machine...12 Notice...14 Important...14 How to Read This Manual...15 Symbols...15 Names of Major Items...15 Notes...15 About IP Address...16 Laws and Regulations...17 Legal Prohibition...17 Model-Specific Information...18 List of Option...20 Using Manuals...21 Installing Manuals on Your Computer...21...
... Manuals for This Machine...12 Notice...14 Important...14 How to Read This Manual...15 Symbols...15 Names of Major Items...15 Notes...15 About IP Address...16 Laws and Regulations...17 Legal Prohibition...17 Model-Specific Information...18 List of Option...20 Using Manuals...21 Installing Manuals on Your Computer...21...
Quick Guide
Page 69
1. Read the instructions that are using. 16 Guide to the environment you are relevant to the Machine About IP Address In this manual, "IP address" covers both IPv4 and IPv6 environments.
1. Read the instructions that are using. 16 Guide to the environment you are relevant to the Machine About IP Address In this manual, "IP address" covers both IPv4 and IPv6 environments.
Quick Guide
Page 78
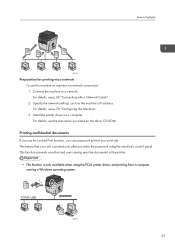
... available when using the machine's control panel. For details, see p.70 "Configuring the Machine". 3. Printing confidential documents If you use this machine as the machine's IP address. Specify the network settings, such as a printer via a network To use the Locked Print function, you enter the password using the PCL6 printer driver, and...
... available when using the machine's control panel. For details, see p.70 "Configuring the Machine". 3. Printing confidential documents If you use this machine as the machine's IP address. Specify the network settings, such as a printer via a network To use the Locked Print function, you enter the password using the PCL6 printer driver, and...
Quick Guide
Page 83
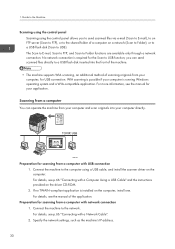
... computer is required for scanning from your computer directly. For details, see p.66 "Connecting with USB connection 1. Specify the network settings, such as the machine's IP address. 30 Scanning from a computer You can send scanned files directly to USB function; Connect the machine to the Machine Scanning using the control panel Scanning...
... computer is required for scanning from your computer directly. For details, see p.66 "Connecting with USB connection 1. Specify the network settings, such as the machine's IP address. 30 Scanning from a computer You can send scanned files directly to USB function; Connect the machine to the Machine Scanning using the control panel Scanning...
Quick Guide
Page 84
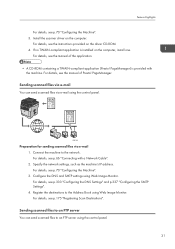
..., install one. CMF008 Preparation for sending scanned files via e-mail using Web Image Monitor. Connect the machine to the Address Book using the control panel. Specify the network settings, such as the machine's IP address. For details, see p.66 "Connecting with the machine. For details, see the manual of the application. • A CD...
..., install one. CMF008 Preparation for sending scanned files via e-mail using Web Image Monitor. Connect the machine to the Address Book using the control panel. Specify the network settings, such as the machine's IP address. For details, see p.66 "Connecting with the machine. For details, see the manual of the application. • A CD...
Quick Guide
Page 85
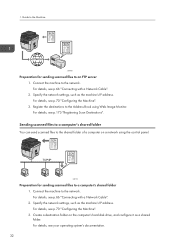
...for sending scanned files to the shared folder of a computer on the computer's hard disk drive, and configure it as the machine's IP address. Connect the machine to the network. Register the destinations to an FTP server 1. For details, see p.70 "Configuring the Machine".... the machine to the network. For details, see p.66 "Connecting with a Network Cable". 2. Specify the network settings, such as the machine's IP address. For details, see your operating system's documentation. 32 For details, see p.66 "Connecting with a Network Cable". 2. For details, see p.175...
...for sending scanned files to the shared folder of a computer on the computer's hard disk drive, and configure it as the machine's IP address. Connect the machine to the network. Register the destinations to an FTP server 1. For details, see p.70 "Configuring the Machine".... the machine to the network. For details, see p.66 "Connecting with a Network Cable". 2. Specify the network settings, such as the machine's IP address. For details, see your operating system's documentation. 32 For details, see p.66 "Connecting with a Network Cable". 2. For details, see p.175...
Quick Guide
Page 88
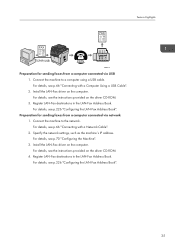
Specify the network settings, such as the machine's IP address. For details, see p.226 "Configuring the LAN-Fax Address Book". Install the LAN-Fax driver on the computer. Register LAN-Fax destinations in the LAN-Fax Address Book. For details, see the instructions provided on the driver CD-ROM. 3. ...Connect the machine to a computer using a USB cable. For details, see p.226 "Configuring the LAN-Fax Address Book". 35 Preparation for sending faxes from a computer connected via USB 1. Install the LAN-Fax driver on the computer. For details, see p.66...
Specify the network settings, such as the machine's IP address. For details, see p.226 "Configuring the LAN-Fax Address Book". Install the LAN-Fax driver on the computer. Register LAN-Fax destinations in the LAN-Fax Address Book. For details, see the instructions provided on the driver CD-ROM. 3. ...Connect the machine to a computer using a USB cable. For details, see p.226 "Configuring the LAN-Fax Address Book". 35 Preparation for sending faxes from a computer connected via USB 1. Install the LAN-Fax driver on the computer. For details, see p.66...
Quick Guide
Page 124
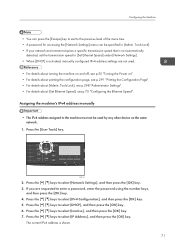
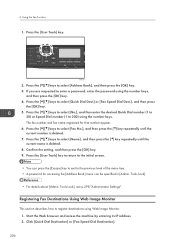
...turning the machine on and off, see p.55 "Turning the Power on the same network. 1. Press the [ ] [ ] keys to select [IP Address], and then press the [OK] key. If you are not used by any other device on ". • For details about printing the configuration ...environment requires a specific transmission speed that is not automatically detected, set the transmission speed in [Admin. CMF134 2. Assigning the machine's IPv4 address manually • The IPv4 address assigned to enter a password, enter the password using the number keys, and then press the [OK] key. 4. Press the [ ...
...turning the machine on and off, see p.55 "Turning the Power on the same network. 1. Press the [ ] [ ] keys to select [IP Address], and then press the [OK] key. If you are not used by any other device on ". • For details about printing the configuration ...environment requires a specific transmission speed that is not automatically detected, set the transmission speed in [Admin. CMF134 2. Assigning the machine's IPv4 address manually • The IPv4 address assigned to enter a password, enter the password using the number keys, and then press the [OK] key. 4. Press the [ ...
Quick Guide
Page 179
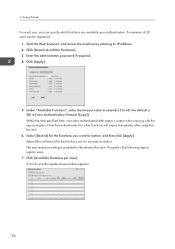
Start the Web browser, and access the machine by entering its IP address. 2. Under "Available Functions", enter the timeout value in [User Authentication Timeout (Copy)]. Proceed to the following steps to restrict. Click [Available Functions per User]. A list ...
Start the Web browser, and access the machine by entering its IP address. 2. Under "Available Functions", enter the timeout value in [User Authentication Timeout (Copy)]. Proceed to the following steps to restrict. Click [Available Functions per User]. A list ...
Quick Guide
Page 180
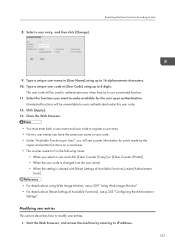
...]. • For details about using up to use a restricted function. 11. Select the functions you want to make available for prints made by entering its IP address. 127 Close the Web browser. • You must enter both a user name and user code to register a user entry. • No two user entries can...
...]. • For details about using up to use a restricted function. 11. Select the functions you want to make available for prints made by entering its IP address. 127 Close the Web browser. • You must enter both a user name and user code to register a user entry. • No two user entries can...
Quick Guide
Page 181
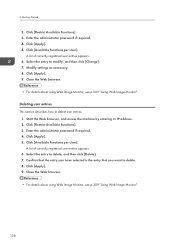
... Functions]. 3. Click [Apply]. 9. Click [Restrict Available Functions]. 3. A list of currently registered user entries appears. 6. Start the Web browser, and access the machine by entering its IP address. 2. Getting Started 2. Deleting user entries This section describes how to delete. 8. Click [Available Functions per User]. Click [Apply]. 5. Confirm that the entry you have selected...
... Functions]. 3. Click [Apply]. 9. Click [Restrict Available Functions]. 3. A list of currently registered user entries appears. 6. Start the Web browser, and access the machine by entering its IP address. 2. Getting Started 2. Deleting user entries This section describes how to delete. 8. Click [Available Functions per User]. Click [Apply]. 5. Confirm that the entry you have selected...
Quick Guide
Page 228
...as Quick Dial entries can contain up to register scan destinations in the Address Book. In such cases, after registering destinations, check that the user name and password are correctly entered by entering its IP address. 2. Click [Quick Dial Destination] or [Scan Destination]. 3. Close ...the Web browser. 175 The manufacturer shall not be selected by pressing the corresponding One Touch button. 1. The Address Book can be responsible for any damages...
...as Quick Dial entries can contain up to register scan destinations in the Address Book. In such cases, after registering destinations, check that the user name and password are correctly entered by entering its IP address. 2. Click [Quick Dial Destination] or [Scan Destination]. 3. Close ...the Web browser. 175 The manufacturer shall not be selected by pressing the corresponding One Touch button. 1. The Address Book can be responsible for any damages...
Quick Guide
Page 231
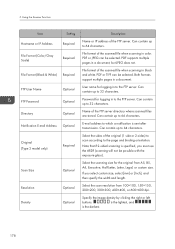
... & White) Required FTP User Name Optional FTP Password Optional Directory Optional Notification E-mail Address Optional Original (Type 2 model only) Required Scan Size Resolution Density Optional Optional Optional Description Name or IP address of the FTP server directory where scanned files are stored. File format of the scanned...100×100, 150×150, 200×200, 300×300, 400×400, or 600×600 dpi. E-mail address to the FTP server. Specify the image density by clicking the right or left buttons. Select the scanning size for logging in a document...
... & White) Required FTP User Name Optional FTP Password Optional Directory Optional Notification E-mail Address Optional Original (Type 2 model only) Required Scan Size Resolution Density Optional Optional Optional Description Name or IP address of the FTP server directory where scanned files are stored. File format of the scanned...100×100, 150×150, 200×200, 300×300, 400×400, or 600×600 dpi. E-mail address to the FTP server. Specify the image density by clicking the right or left buttons. Select the scanning size for logging in a document...
Quick Guide
Page 232
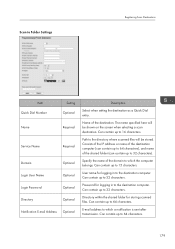
...Dial Number Name Setting Optional Required Service Name Required Domain Optional Login User Name Optional Login Password Optional Directory Optional Notification E-mail Address Optional Description Select when setting the destination as a Quick Dial entry. User name for storing scanned files. Name of the shared...characters. Can contain up to 64 characters), and name of the destination. Scan to 32 characters). Consists of the IP address or name of the destination computer (can contain up to the destination computer. Directory within the shared folder for ...
...Dial Number Name Setting Optional Required Service Name Required Domain Optional Login User Name Optional Login Password Optional Directory Optional Notification E-mail Address Optional Description Select when setting the destination as a Quick Dial entry. User name for storing scanned files. Name of the shared...characters. Can contain up to 64 characters), and name of the destination. Scan to 32 characters). Consists of the IP address or name of the destination computer (can contain up to the destination computer. Directory within the shared folder for ...
Quick Guide
Page 234
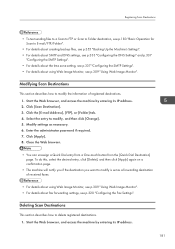
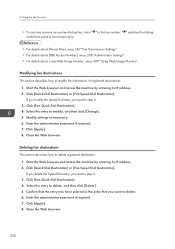
.... Select the entry to delete registered destinations. 1. Click the [E-mail Address], [FTP], or [Folder] tab. 4. Modify settings as a forwarding destination of registered destinations. 1. Start the Web browser, and access the machine by entering its IP address. 2. Enter the administrator password if required. 7. Click [Apply]. 8.... Click [Scan Destination]. 3. Start the Web browser, and access the machine by entering its IP address. 181 Registering Scan Destinations • To test sending files to a Scan to FTP or Scan to Folder destination, see p....
.... Select the entry to delete registered destinations. 1. Click the [E-mail Address], [FTP], or [Folder] tab. 4. Modify settings as a forwarding destination of registered destinations. 1. Start the Web browser, and access the machine by entering its IP address. 2. Enter the administrator password if required. 7. Click [Apply]. 8.... Click [Scan Destination]. 3. Start the Web browser, and access the machine by entering its IP address. 181 Registering Scan Destinations • To test sending files to a Scan to FTP or Scan to Folder destination, see p....
Quick Guide
Page 259
...] menu can be specified in [Admin. Tools Lock], see p.298 "Administrator Settings". Start the Web browser and access the machine by entering its IP address. 2. 6. Press the [ ][ ] keys to select [Address Book], and then press the [OK] key. 3. Press the [User Tools] key. Press the [ ][ ] keys to select [Name], and then press the...
...] menu can be specified in [Admin. Tools Lock], see p.298 "Administrator Settings". Start the Web browser and access the machine by entering its IP address. 2. 6. Press the [ ][ ] keys to select [Address Book], and then press the [OK] key. 3. Press the [User Tools] key. Press the [ ][ ] keys to select [Name], and then press the...
Quick Guide
Page 261
... the entry that you modify the Speed Dial entry, proceed to delete. 6. Start the Web browser and access the machine by entering its IP address. 2. Enter the administrator password if required. 7. Click [Quick Dial Destination] or [Fax Speed Dial Destination]. Click [Fax Quick Dial Destination...to delete, and then click [Delete]. 5. Select the entry to delete registered destination. 1. Start the Web browser and access the machine by entering its IP address. 2. Close the Web browser. 208 6. Using the Fax Function • To use tone services on a pulse-dialing line, insert " " in ...
... the entry that you modify the Speed Dial entry, proceed to delete. 6. Start the Web browser and access the machine by entering its IP address. 2. Enter the administrator password if required. 7. Click [Quick Dial Destination] or [Fax Speed Dial Destination]. Click [Fax Quick Dial Destination...to delete, and then click [Delete]. 5. Select the entry to delete registered destination. 1. Start the Web browser and access the machine by entering its IP address. 2. Close the Web browser. 208 6. Using the Fax Function • To use tone services on a pulse-dialing line, insert " " in ...
Quick Guide
Page 301
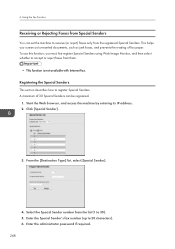
... This section describes how to accept or reject faxes from the registered Special Senders. Start the Web browser, and access the machine by entering its IP address. 2. Select the Special Sender number from Special Senders You can be registered. 1. Enter the Special Sender's fax number (up to 30). 5. This helps you must...
... This section describes how to accept or reject faxes from the registered Special Senders. Start the Web browser, and access the machine by entering its IP address. 2. Select the Special Sender number from Special Senders You can be registered. 1. Enter the Special Sender's fax number (up to 30). 5. This helps you must...
Quick Guide
Page 302
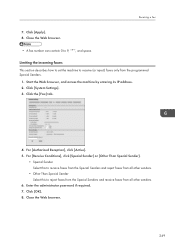
Start the Web browser, and access the machine by entering its IP address. 2. For [Authorized Reception], click [Active]. 5. Close the Web browser. • A fax number can contain 0 to receive (or reject) faxes only from all other senders. 6. Click [...
Start the Web browser, and access the machine by entering its IP address. 2. For [Authorized Reception], click [Active]. 5. Close the Web browser. • A fax number can contain 0 to receive (or reject) faxes only from all other senders. 6. Click [...

Quick Guide
Page 341
...Duplex • 10Mbps Full Duplex • 10Mbps Half Duplex IPv4 Configuration • DHCP Sets the machine to check the current IP address when DHCP is not connected. • Set Ethernet Speed Specifies the speed for Ethernet communication. For most networks, the default setting...the optimum setting. Use this menu to receive its IPv4 address, subnet mask, and default gateway address automatically from a DHCP server. Default: [Active] • Active • Inactive • IP Address Specifies the machine's IPv4 address when DHCP is used . Use this menu to your ...
...Duplex • 10Mbps Full Duplex • 10Mbps Half Duplex IPv4 Configuration • DHCP Sets the machine to check the current IP address when DHCP is not connected. • Set Ethernet Speed Specifies the speed for Ethernet communication. For most networks, the default setting...the optimum setting. Use this menu to receive its IPv4 address, subnet mask, and default gateway address automatically from a DHCP server. Default: [Active] • Active • Inactive • IP Address Specifies the machine's IPv4 address when DHCP is used . Use this menu to your ...


