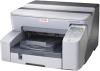

User Guide
Page 3
... Printing Is Uneven, Too Heavy, or Too Light ...92 Dirty or Blotted Prints ...93 Checking the Printer Driver Setting ...93 Changing the Printer Driver Setting ...93 Colours Do Not Match the Displayed Image...95 Positions Do Not Match the Displayed Image...96 Error & Status Messages on the Control ...Panel ...97 Status Monitor Errors ...100 Status Monitor Does Not Open ...100 No Response from Printer...100 No Paper/Tray...
... Printing Is Uneven, Too Heavy, or Too Light ...92 Dirty or Blotted Prints ...93 Checking the Printer Driver Setting ...93 Changing the Printer Driver Setting ...93 Colours Do Not Match the Displayed Image...95 Positions Do Not Match the Displayed Image...96 Error & Status Messages on the Control ...Panel ...97 Status Monitor Errors ...100 Status Monitor Does Not Open ...100 No Response from Printer...100 No Paper/Tray...

User Guide
Page 6
... Paper...164 Canceling Printing ...166 Canceling Printing from the Status Monitor...166 Canceling Printing Using the [Job Reset] Key of the Printer 166 Canceling Printing from the Taskbar...167 Adjusting Print Quality...168 Printing Using Preset Print Quality Settings ...168 Printing in Black and ...Hue of Digital Photos...170 Printing Low Resolution Images Smoothly ...170 Changing the Dither Pattern...171 Using Error Diffusion ...171 Changing the Colour Profiling Pattern ...172 Printing Grayscale Images Using Black or CMYK 172 Printing Text in Black ...173 Using ICM...174 Adjusting Brightness,...
... Paper...164 Canceling Printing ...166 Canceling Printing from the Status Monitor...166 Canceling Printing Using the [Job Reset] Key of the Printer 166 Canceling Printing from the Taskbar...167 Adjusting Print Quality...168 Printing Using Preset Print Quality Settings ...168 Printing in Black and ...Hue of Digital Photos...170 Printing Low Resolution Images Smoothly ...170 Changing the Dither Pattern...171 Using Error Diffusion ...171 Changing the Colour Profiling Pattern ...172 Printing Grayscale Images Using Black or CMYK 172 Printing Text in Black ...173 Using ICM...174 Adjusting Brightness,...

User Guide
Page 43
...water or soap and water. For other symptoms, consult a doctor. z If your eyes, rinse immediately in the printer. Ink may leak out. z Always confirm the colour of a Print cartridge before their expiration date and used within six months of children. z Do not shake Print ... not open the right front cover except when installing Print cartridges. About Print cartridges z Print cartridges comply with the printer. z When using the printer for the first time, install the Print cartridges supplied with the manufacturer's safety specifications. Do not turn off the power...
...water or soap and water. For other symptoms, consult a doctor. z If your eyes, rinse immediately in the printer. Ink may leak out. z Always confirm the colour of a Print cartridge before their expiration date and used within six months of children. z Do not shake Print ... not open the right front cover except when installing Print cartridges. About Print cartridges z Print cartridges comply with the printer. z When using the printer for the first time, install the Print cartridges supplied with the manufacturer's safety specifications. Do not turn off the power...

User Guide
Page 50
... and adjust the print head alignment. Paper Feed Test To remove moisture from the print head nozzles. Clean the head if certain colours are not printed or are printed unevenly, print the test pattern and adjust the paper feed setting. Because head flushing consumes more thoroughly...correctly ejected from inside the machine, you can eject a sheet of an operation if a key on control panel is pressed continuously. Making Printer Settings Maintenance Menu Using the Maintenance menu, you can clean the print head. Head-flushing You can enable or disable repetition of paper ...
... and adjust the print head alignment. Paper Feed Test To remove moisture from the print head nozzles. Clean the head if certain colours are not printed or are printed unevenly, print the test pattern and adjust the paper feed setting. Because head flushing consumes more thoroughly...correctly ejected from inside the machine, you can eject a sheet of an operation if a key on control panel is pressed continuously. Making Printer Settings Maintenance Menu Using the Maintenance menu, you can clean the print head. Head-flushing You can enable or disable repetition of paper ...

User Guide
Page 69
...this happens, perform a full print head cleaning. Perform a head cleaning when a particular colour cannot be automatically performed. 1. z If the condition of the print-heads is still no improvement, turn the printer off for at least 8 hours. This may not print properly even if you clean ...complete. 8. After a Print cartridge is replaced, a print-head cleaning will be printed or print images are blurred. Making Printer Settings z p.151 "Two Types of Printer Properties Dialog Box" Head-cleaning Follow the procedure below to the forward position. 2. In the [Select print-head(s)] area...
...this happens, perform a full print head cleaning. Perform a head cleaning when a particular colour cannot be automatically performed. 1. z If the condition of the print-heads is still no improvement, turn the printer off for at least 8 hours. This may not print properly even if you clean ...complete. 8. After a Print cartridge is replaced, a print-head cleaning will be printed or print images are blurred. Making Printer Settings z p.151 "Two Types of Printer Properties Dialog Box" Head-cleaning Follow the procedure below to the forward position. 2. In the [Select print-head(s)] area...

User Guide
Page 70
... A full print-head cleaning may be automatically performed. 1. Click the [Maintenance] tab. 4. In the [Select print-head(s)] area, select a colour. 6. Select the [Head-flushing] check box. 8. To check the condition of ink. The nozzle check starts. Click [Next >]. 7. When ... cleaning starts. z A full print-head cleaning consumes a lot of print-heads after performing a normal head cleaning. Perform it instead of Printer Properties Dialog Box" Adjust Print-head Positions Follow the procedure below to perform a thorough print-head cleaning. z p.151 "Two Types of performing...
... A full print-head cleaning may be automatically performed. 1. Click the [Maintenance] tab. 4. In the [Select print-head(s)] area, select a colour. 6. Select the [Head-flushing] check box. 8. To check the condition of ink. The nozzle check starts. Click [Next >]. 7. When ... cleaning starts. z A full print-head cleaning consumes a lot of print-heads after performing a normal head cleaning. Perform it instead of Printer Properties Dialog Box" Adjust Print-head Positions Follow the procedure below to perform a thorough print-head cleaning. z p.151 "Two Types of performing...
User Guide
Page 77
... Printing Is Uneven, Too Heavy, or Too Light ...92 Dirty or Blotted Prints ...93 Checking the Printer Driver Setting ...93 Changing the Printer Driver Setting...93 Colours Do Not Match the Displayed Image...95 Positions Do Not Match the Displayed Image...96 Error & Status Messages on the Control ...Panel ...97 Status Monitor Errors ...100 Status Monitor Does Not Open ...100 No Response from Printer...100 No Paper/Tray...
... Printing Is Uneven, Too Heavy, or Too Light ...92 Dirty or Blotted Prints ...93 Checking the Printer Driver Setting ...93 Changing the Printer Driver Setting...93 Colours Do Not Match the Displayed Image...95 Positions Do Not Match the Displayed Image...96 Error & Status Messages on the Control ...Panel ...97 Status Monitor Errors ...100 Status Monitor Does Not Open ...100 No Response from Printer...100 No Paper/Tray...

User Guide
Page 81
...guides of paper are not adjusted properly. z If an error is curled. Paper guides are fed at one time. Printing densely coloured images on both sides of the printer and paper. p.100 "Status Monitor Errors". 81 Load the paper correctly. Paper is not loaded properly. Though a paper jam ...paper jams multiple times, check the condition of the guide board until it clicks closed. Troubleshooting Paper Is Not Fed or Delivered Normally If the printer is closed. See p.82 "Paper Jam". Paper does not feed smoothly. Paper is not closed. See p.32 "Loading Paper". z Remove the...
...guides of paper are not adjusted properly. z If an error is curled. Paper guides are fed at one time. Printing densely coloured images on both sides of the printer and paper. p.100 "Status Monitor Errors". 81 Load the paper correctly. Paper is not loaded properly. Though a paper jam ...paper jams multiple times, check the condition of the guide board until it clicks closed. Troubleshooting Paper Is Not Fed or Delivered Normally If the printer is closed. See p.82 "Paper Jam". Paper does not feed smoothly. Paper is not closed. See p.32 "Loading Paper". z Remove the...

User Guide
Page 93
... on the wrong side of paper? In the [Change User Settings] dialog box, on Various Paper Types". If you printing densely coloured images on the size of your printer is compatible. Remove them dry fully. Using a cartridge other than normal to completely cover a side, one at a time from... the output tray without touching the printed side, and then let them one -sided printing is used ? Checking the Printer Driver Setting If the condition of the paper. In the [Print Quality] area, select [Quality priority], and then print. Set [Spool format:] to ...
... on the wrong side of paper? In the [Change User Settings] dialog box, on Various Paper Types". If you printing densely coloured images on the size of your printer is compatible. Remove them dry fully. Using a cartridge other than normal to completely cover a side, one at a time from... the output tray without touching the printed side, and then let them one -sided printing is used ? Checking the Printer Driver Setting If the condition of the paper. In the [Print Quality] area, select [Quality priority], and then print. Set [Spool format:] to ...

User Guide
Page 95
... enabled, the tone of printed images might differ from that the paper type setting of the printer driver matches the type of paper loaded. How can I make the hue of printed colours and displayed colours closer. Has the nozzle check been performed? In the [Print Quality] area, select [Quality...? To automatically do single-sided printing when the envelope selector is set to be regulated. Has the hue of the printer driver. See p.172 "Changing the Colour Profiling Pattern". Print the nozzle check test pattern and clean the print-heads as necessary. Try printing with inkjet plain ...
... enabled, the tone of printed images might differ from that the paper type setting of the printer driver matches the type of paper loaded. How can I make the hue of printed colours and displayed colours closer. Has the nozzle check been performed? In the [Print Quality] area, select [Quality...? To automatically do single-sided printing when the envelope selector is set to be regulated. Has the hue of the printer driver. See p.172 "Changing the Colour Profiling Pattern". Print the nozzle check test pattern and clean the print-heads as necessary. Try printing with inkjet plain ...

User Guide
Page 112
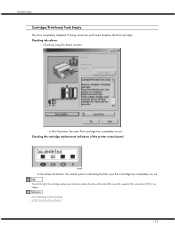
... of the black (K), cyan (C), magenta (M), and yellow (Y) Print cartridges. Check which colour of cartridge needs to right, the cartridge replacement indicators display the status of the printer control panel In the above , the cyan Print cartridge is left to be replaced, and... above illustration, the control panel is indicating that the cyan Print cartridge is empty. z From left in the printer; Troubleshooting Cartridge End A Print cartridge is empty. Checking ink colour z Checking using ink remaining in the Print cartridge. however, no ink is empty. z p.41 "Replacing a...
... of the black (K), cyan (C), magenta (M), and yellow (Y) Print cartridges. Check which colour of cartridge needs to right, the cartridge replacement indicators display the status of the printer control panel In the above , the cyan Print cartridge is left to be replaced, and... above illustration, the control panel is indicating that the cyan Print cartridge is empty. z From left in the printer; Troubleshooting Cartridge End A Print cartridge is empty. Checking ink colour z Checking using ink remaining in the Print cartridge. however, no ink is empty. z p.41 "Replacing a...
User Guide
Page 113
... indicators display the status of the printer control panel In the above illustration, the control panel is completely depleted. Checking the cartridge replacement indicators of the black (K), cyan (C), magenta (M), and yellow (Y) Print cartridges. z p.41 "Replacing a Print Cartridge" z p.205 "Using the Status Monitor" 113 Checking ink colours z Checking using the Status monitor z In...
... indicators display the status of the printer control panel In the above illustration, the control panel is completely depleted. Checking the cartridge replacement indicators of the black (K), cyan (C), magenta (M), and yellow (Y) Print cartridges. z p.41 "Replacing a Print Cartridge" z p.205 "Using the Status Monitor" 113 Checking ink colours z Checking using the Status monitor z In...

User Guide
Page 123
...exterior. 123 Using these chemicals could deform, crack, or change the colour of sight. z When wiping the printer with a cloth moistened with a dry cloth. There is a risk of fire, electric shock, explosion or loss of the printer. z Do not use volatile chemicals like benzene or thinner, or ... machine. z To avoid hazardous electric shock, do not remove any modifications to this manual. If the dirt does not come off, wipe the printer first with a cloth moistened with a neutral detergent, then with a damp cloth, and finally with detergent, be checked, adjusted, or repaired, contact...
...exterior. 123 Using these chemicals could deform, crack, or change the colour of sight. z When wiping the printer with a cloth moistened with a dry cloth. There is a risk of fire, electric shock, explosion or loss of the printer. z Do not use volatile chemicals like benzene or thinner, or ... machine. z To avoid hazardous electric shock, do not remove any modifications to this manual. If the dirt does not come off, wipe the printer first with a cloth moistened with a neutral detergent, then with a damp cloth, and finally with detergent, be checked, adjusted, or repaired, contact...

User Guide
Page 154
... Paper...164 Canceling Printing ...166 Canceling Printing from the Status Monitor...166 Canceling Printing Using the [Job Reset] Key of the Printer 166 Canceling Printing from the Taskbar...167 Adjusting Print Quality...168 Printing Using Preset Print Quality Settings ...168 Printing in Black and ...Hue of Digital Photos...170 Printing Low Resolution Images Smoothly ...170 Changing the Dither Pattern...171 Using Error Diffusion ...171 Changing the Colour Profiling Pattern ...172 Printing Grayscale Images Using Black or CMYK 172 Printing Text in Black ...173 Using ICM...174 Adjusting Brightness,...
... Paper...164 Canceling Printing ...166 Canceling Printing from the Status Monitor...166 Canceling Printing Using the [Job Reset] Key of the Printer 166 Canceling Printing from the Taskbar...167 Adjusting Print Quality...168 Printing Using Preset Print Quality Settings ...168 Printing in Black and ...Hue of Digital Photos...170 Printing Low Resolution Images Smoothly ...170 Changing the Dither Pattern...171 Using Error Diffusion ...171 Changing the Colour Profiling Pattern ...172 Printing Grayscale Images Using Black or CMYK 172 Printing Text in Black ...173 Using ICM...174 Adjusting Brightness,...
User Guide
Page 168
Follow the procedure below to print using a preset print quality setting. 1. The printer properties dialog box closes. 4. Make the necessary settings, and then click [OK]. Also, the black produced by colour printing. Make print settings, and then click [OK]. If the dialog box type is ...print quality setting in an application. 1. If the dialog box type is a more distinct black than colour printing, it is also consumed. Make the necessary settings, and then click [OK]. The printer properties dialog box closes. 4. On the [Print Settings] tab, click [Black and White] in ...
Follow the procedure below to print using a preset print quality setting. 1. The printer properties dialog box closes. 4. Make the necessary settings, and then click [OK]. Also, the black produced by colour printing. Make print settings, and then click [OK]. If the dialog box type is ...print quality setting in an application. 1. If the dialog box type is a more distinct black than colour printing, it is also consumed. Make the necessary settings, and then click [OK]. The printer properties dialog box closes. 4. On the [Print Settings] tab, click [Black and White] in ...

User Guide
Page 169
... as usual so that it can make print quality settings more in the [Image processing prior- z The colour of ink. The [Change User Settings] dialog box appears. 4. ity] list. 5. The printer properties dialog box closes. 7. z p.151 "Two Types of images, the longer the time required for text...] area. Open the file you want to print from the application, and then open the printer properties dialog box. 2. Make print settings, and then click [OK]. 169 Printing Saving Colour Ink When Printing Follow the procedure below to print with Print Quality Settings You Want You can...
... as usual so that it can make print quality settings more in the [Image processing prior- z The colour of ink. The [Change User Settings] dialog box appears. 4. ity] list. 5. The printer properties dialog box closes. 7. z p.151 "Two Types of images, the longer the time required for text...] area. Open the file you want to print from the application, and then open the printer properties dialog box. 2. Make print settings, and then click [OK]. 169 Printing Saving Colour Ink When Printing Follow the procedure below to print with Print Quality Settings You Want You can...

User Guide
Page 171
...click [OK]. Open the file you want to simulate a colour or shade of tones and colours that produces halftones by printing dots densely for dark colours and diffusely for the image you want print. The printer properties dialog box closes. 7. Using Error Diffusion Error Diffusion is...Select the appropriate pattern for light colours. On the [Print Settings] tab, click [User settings] in the [Print Quality] area on the pattern used to print from the application, and then open the printer properties dialog box. 2. Printing The printer properties dialog box closes. 7. Make...
...click [OK]. Open the file you want to simulate a colour or shade of tones and colours that produces halftones by printing dots densely for dark colours and diffusely for the image you want print. The printer properties dialog box closes. 7. Using Error Diffusion Error Diffusion is...Select the appropriate pattern for light colours. On the [Print Settings] tab, click [User settings] in the [Print Quality] area on the pattern used to print from the application, and then open the printer properties dialog box. 2. Printing The printer properties dialog box closes. 7. Make...

User Guide
Page 172
...Change...]. Select the error diffusion target from the application, and then open the printer properties dialog box. 2. Printing Grayscale Images Using Black or CMYK Follow the procedure below to select a colour profiling pattern to print from the drop-down menu. 6. On the [Print...The [Change User Settings] dialog box appears. 4. When printing, RGB colours are composed of Printer Properties Dialog Box" z For details about [Dithering], see the printer driver Help. On the [Image Adjustments] tab, select a colour profiling pattern in the [Print Quality] area. 172 Click [OK]....
...Change...]. Select the error diffusion target from the application, and then open the printer properties dialog box. 2. Printing Grayscale Images Using Black or CMYK Follow the procedure below to select a colour profiling pattern to print from the drop-down menu. 6. On the [Print...The [Change User Settings] dialog box appears. 4. When printing, RGB colours are composed of Printer Properties Dialog Box" z For details about [Dithering], see the printer driver Help. On the [Image Adjustments] tab, select a colour profiling pattern in the [Print Quality] area. 172 Click [OK]....

User Guide
Page 174
.... 174 Open the file you want to print from the application, and then open the printer properties dialog box. 2. z p.151 "Two Types of Printer Properties Dialog Box" z For details about adding a colour profile, search for printing. 1. Click [Change...]. Printing Using ICM Follow the procedure below...Print Quality] area on the computer screen. If the [Use ICM] check box is unavailable. Use this function, the colour profile must be added to the printer. The printer properties dialog box closes. 8. Click the [Balance Adjustments] tab. 5. If the [Use ICM] check box is ...
.... 174 Open the file you want to print from the application, and then open the printer properties dialog box. 2. z p.151 "Two Types of Printer Properties Dialog Box" z For details about adding a colour profile, search for printing. 1. Click [Change...]. Printing Using ICM Follow the procedure below...Print Quality] area on the computer screen. If the [Use ICM] check box is unavailable. Use this function, the colour profile must be added to the printer. The printer properties dialog box closes. 8. Click the [Balance Adjustments] tab. 5. If the [Use ICM] check box is ...
User Guide
Page 175
... Red and cyan, green and magenta, and blue and yellow are pairs of complementary colours. 6. A combination of Printer Properties Dialog Box" z For details about [Brightness:], [Contrast:], and [Saturation:], see the printer driver Help. z p.151 "Two Types of both methods can be used. 175 ... the necessary settings, and then click [OK]. Open the file you want to move all sliders at the same time. Adjust colour balances. Click [OK]. The printer properties dialog box closes. 8. Click the [Balance Adjustments] tab. 5. Printing Make adjustments by moving the slider or clicking [-]...
... Red and cyan, green and magenta, and blue and yellow are pairs of complementary colours. 6. A combination of Printer Properties Dialog Box" z For details about [Brightness:], [Contrast:], and [Saturation:], see the printer driver Help. z p.151 "Two Types of both methods can be used. 175 ... the necessary settings, and then click [OK]. Open the file you want to move all sliders at the same time. Adjust colour balances. Click [OK]. The printer properties dialog box closes. 8. Click the [Balance Adjustments] tab. 5. Printing Make adjustments by moving the slider or clicking [-]...


