User's Guide
Page 9
... jack that has the format US:AAAEQ##TXXXXX. To be advised of the equipment. The REN for repair or warranty information, please contact RICOH CORP. But if advance notice is experienced with this equipment, for this product is part of the product identifier that is necessary. 6.The...explain to the dispatcher the reason for you disconnect the equipment until the problem is resolved. 8.In the event of operation problems (document jam, copy jam, communication error indication), refer to the solving problems section in this manual. 9.Connection to party line service is a REN of devices ...
... jack that has the format US:AAAEQ##TXXXXX. To be advised of the equipment. The REN for repair or warranty information, please contact RICOH CORP. But if advance notice is experienced with this equipment, for this product is part of the product identifier that is necessary. 6.The...explain to the dispatcher the reason for you disconnect the equipment until the problem is resolved. 8.In the event of operation problems (document jam, copy jam, communication error indication), refer to the solving problems section in this manual. 9.Connection to party line service is a REN of devices ...
User's Guide
Page 16
... Optional Tray 2 9.6 In the Fuser Area or Around the Toner Cartridge 9.7 In the Paper Exit Area 9.9 In the Multipurpose Tray 9.10 Tips for Avoiding Paper Jams 9.11 Clearing LCD Error Messages 9.12 Solving Other Problems 9.16 Paper Feeding Problems 9.16 Printing Problems 9.17 Printing Quality Problems 9.19 Copying Problems 9.24 Scanning...
... Optional Tray 2 9.6 In the Fuser Area or Around the Toner Cartridge 9.7 In the Paper Exit Area 9.9 In the Multipurpose Tray 9.10 Tips for Avoiding Paper Jams 9.11 Clearing LCD Error Messages 9.12 Solving Other Problems 9.16 Paper Feeding Problems 9.16 Printing Problems 9.17 Printing Quality Problems 9.19 Copying Problems 9.24 Scanning...
User's Guide
Page 33
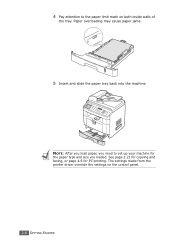
Paper overloading may cause paper jams. 5 Insert and slide the paper tray back into the machine. NOTE: After you load paper, you need to the paper limit mark on the control panel. 2.8 GETTING STARTED See page 2.21 for copying and faxing, or page 4.6 for the paper type and size you loaded. The settings made from the printer driver override the settings on both inside walls of the tray. 4 Pay attention to set up your machine for PC-printing.
Paper overloading may cause paper jams. 5 Insert and slide the paper tray back into the machine. NOTE: After you load paper, you need to the paper limit mark on the control panel. 2.8 GETTING STARTED See page 2.21 for copying and faxing, or page 4.6 for the paper type and size you loaded. The settings made from the printer driver override the settings on both inside walls of the tray. 4 Pay attention to set up your machine for PC-printing.

User's Guide
Page 35
3 Squeeze the width guide, as shown and slide it to warp. • If you do not adjust the paper width guide, it lightly touches the side of paper until it may cause paper jams. 2.10 GETTING STARTED NOTES: • Do not push the paper width guide far enough to cause the materials to the stack of the stack.
3 Squeeze the width guide, as shown and slide it to warp. • If you do not adjust the paper width guide, it lightly touches the side of paper until it may cause paper jams. 2.10 GETTING STARTED NOTES: • Do not push the paper width guide far enough to cause the materials to the stack of the stack.

User's Guide
Page 79
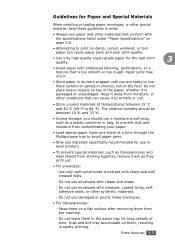
When you choose print materials, consider the following: • Desired outcome: The paper you experience excessive jamming, load one sheet at a time through the Multipurpose tray. 3.2 PAPER HANDLING NOTE: Using print materials that does not conform to the specifications listed on page C.9 ...
When you choose print materials, consider the following: • Desired outcome: The paper you experience excessive jamming, load one sheet at a time through the Multipurpose tray. 3.2 PAPER HANDLING NOTE: Using print materials that does not conform to the specifications listed on page C.9 ...
User's Guide
Page 80
... with the specifications listed under "Paper Specifications" on page C.6. • Attempting to print on damp, curled, wrinkled, or torn paper can cause paper jams and poor print quality. • Use only high quality copier grade paper for the best print quality. 3 • Avoid paper with embossed lettering, ... a texture that can cause it to wrinkle or curl. • Store unused materials at a time through the Multipurpose tray to avoid paper jams. • Only use materials specifically recommended for long periods of the paper, whether it is too smooth or too rough. Paper...
... with the specifications listed under "Paper Specifications" on page C.6. • Attempting to print on damp, curled, wrinkled, or torn paper can cause paper jams and poor print quality. • Use only high quality copier grade paper for the best print quality. 3 • Avoid paper with embossed lettering, ... a texture that can cause it to wrinkle or curl. • Store unused materials at a time through the Multipurpose tray to avoid paper jams. • Only use materials specifically recommended for long periods of the paper, whether it is too smooth or too rough. Paper...

User's Guide
Page 81
... Load the print material you use Carbonless paper and Tracing paper. Exposed areas can cause labels to peel off during printing, which can cause paper jams. Exposed adhesive can purchase an optional paper tray (Tray 2) and attach it below the standard tray to load an additional 250 sheets of them through...
... Load the print material you use Carbonless paper and Tracing paper. Exposed areas can cause labels to peel off during printing, which can cause paper jams. Exposed adhesive can purchase an optional paper tray (Tray 2) and attach it below the standard tray to load an additional 250 sheets of them through...
User's Guide
Page 84
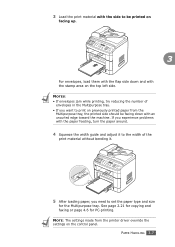
See page 2.21 for copying and faxing or page 4.6 for the Multipurpose tray. PAPER HANDLING 3.7 NOTES: • If envelopes jam while printing, try reducing the number of the print material without bending it. 5 After loading paper, you want to print on previously printed paper from ...
See page 2.21 for copying and faxing or page 4.6 for the Multipurpose tray. PAPER HANDLING 3.7 NOTES: • If envelopes jam while printing, try reducing the number of the print material without bending it. 5 After loading paper, you want to print on previously printed paper from ...

User's Guide
Page 86
.... Tips on Using the Multipurpose Tray • Load only one size of print material at a time in the Multipurpose tray. • To prevent paper jams, do not add paper when there is still paper in the center of the print material without bending it to the width of the tray.... • Always load only the print materials specified in the Specifications on page C.6 to avoid paper jams and print quality problems. • Flatten any curl on postcards, envelopes, and labels before loading them into the Multipurpose tray first and be placed in...
.... Tips on Using the Multipurpose Tray • Load only one size of print material at a time in the Multipurpose tray. • To prevent paper jams, do not add paper when there is still paper in the center of the print material without bending it to the width of the tray.... • Always load only the print materials specified in the Specifications on page C.6 to avoid paper jams and print quality problems. • Flatten any curl on postcards, envelopes, and labels before loading them into the Multipurpose tray first and be placed in...

User's Guide
Page 87
... door is printing. The tray should be used for most print jobs. 3.10 PAPER HANDLING Printing to the rear output slot. • To avoid paper jams, do not open the rear door. Selecting an Output Location The machine has two output locations: the rear output slot (face up) and the front...
... door is printing. The tray should be used for most print jobs. 3.10 PAPER HANDLING Printing to the rear output slot. • To avoid paper jams, do not open the rear door. Selecting an Output Location The machine has two output locations: the rear output slot (face up) and the front...
User's Guide
Page 183
... numbers are printed will be deleted. You can set up to print out automatically don't print out when there is no paper loaded or a paper jam has occurred. NOTE: The lists you have set as junk fax numbers. 7.36 FAXING System Data List This list shows the status of operation(s). See...
... numbers are printed will be deleted. You can set up to print out automatically don't print out when there is no paper loaded or a paper jam has occurred. NOTE: The lists you have set as junk fax numbers. 7.36 FAXING System Data List This list shows the status of operation(s). See...

User's Guide
Page 204
9 TROUBLESHOOTING This chapter gives helpful information for what to do if you encounter an error. This chapter includes: • Clearing Document Jams • Clearing Paper Jams • Clearing LCD Error Messages • Solving Other Problems
9 TROUBLESHOOTING This chapter gives helpful information for what to do if you encounter an error. This chapter includes: • Clearing Document Jams • Clearing Paper Jams • Clearing LCD Error Messages • Solving Other Problems

User's Guide
Page 205
Clearing Document Jams When a document jams while passing through the ADF (Automatic Document Feeder), "Document Jam" appears on the right end of the ADF. 9.2 TROUBLESHOOTING Pull the document gently to the left and out of the ADF roller toward the ADF ( 1 ) and remove the roller from the slot ( 2 ). Input Misfeed 1 Remove any remaining page(s) from the ADF. 2 Open the ADF cover. 3 Rotate the bushing on the display.
Clearing Document Jams When a document jams while passing through the ADF (Automatic Document Feeder), "Document Jam" appears on the right end of the ADF. 9.2 TROUBLESHOOTING Pull the document gently to the left and out of the ADF roller toward the ADF ( 1 ) and remove the roller from the slot ( 2 ). Input Misfeed 1 Remove any remaining page(s) from the ADF. 2 Open the ADF cover. 3 Rotate the bushing on the display.

User's Guide
Page 206
... knob to remove the misfed documents from the document output tray. 9 TROUBLESHOOTING 9.3 Exit Misfeed 1 Remove any , back into the right slot ( 1 ). NOTE: To prevent document jams, use the document glass for thick, thin, or mixed paper-type documents. Rotate the bushing on the right end of the ADF roller into the...
... knob to remove the misfed documents from the document output tray. 9 TROUBLESHOOTING 9.3 Exit Misfeed 1 Remove any , back into the right slot ( 1 ). NOTE: To prevent document jams, use the document glass for thick, thin, or mixed paper-type documents. Rotate the bushing on the right end of the ADF roller into the...
User's Guide
Page 208
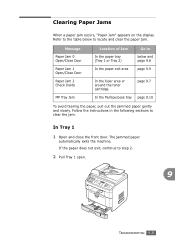
If the paper does not exit, continue to below to clear the jam. Message Paper Jam 0 Open/Close Door Paper Jam 1 Open/Close Door Paper Jam 2 Check Inside MP Tray Jam Location of Jam In the paper tray (Tray 1 or Tray 2) In the paper exit area Go to step 2. 2 Pull Tray 1... 9.5 Follow the instructions in the following sections to locate and clear the paper jam. In Tray 1 1 Open and close the front door. Clearing Paper Jams When a paper jam occurs, "Paper Jam" appears on the display. The jammed paper automatically exits the machine. Refer to the table below and page 9.6 page...
If the paper does not exit, continue to below to clear the jam. Message Paper Jam 0 Open/Close Door Paper Jam 1 Open/Close Door Paper Jam 2 Check Inside MP Tray Jam Location of Jam In the paper tray (Tray 1 or Tray 2) In the paper exit area Go to step 2. 2 Pull Tray 1... 9.5 Follow the instructions in the following sections to locate and clear the paper jam. In Tray 1 1 Open and close the front door. Clearing Paper Jams When a paper jam occurs, "Paper Jam" appears on the display. The jammed paper automatically exits the machine. Refer to the table below and page 9.6 page...
User's Guide
Page 209
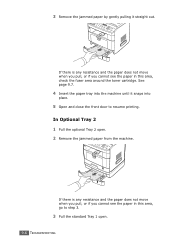
... not move when you pull, or if you cannot see the paper in this area, check the fuser area around the toner cartridge. 3 Remove the jammed paper by gently pulling it snaps into place. 5 Open and close the front door to step 3. 3 Pull the standard Tray 1 open . 2 Remove the...
... not move when you pull, or if you cannot see the paper in this area, check the fuser area around the toner cartridge. 3 Remove the jammed paper by gently pulling it snaps into place. 5 Open and close the front door to step 3. 3 Pull the standard Tray 1 open . 2 Remove the...

User's Guide
Page 211
2 Remove the jammed paper by gently pulling it straight out. 3 Replace the toner cartridge and close the front door. Printing automatically resumes. 9.8 TROUBLESHOOTING
2 Remove the jammed paper by gently pulling it straight out. 3 Replace the toner cartridge and close the front door. Printing automatically resumes. 9.8 TROUBLESHOOTING

User's Guide
Page 212
In the Paper Exit Area 1 Open and close the front door. The jammed paper automatically exits the machine. If the paper does not exit, continue to step 6. 3 If there is any resistance and the paper does not move when you pull, or if you cannot see the paper in the front output tray, open the rear door. 9 TROUBLESHOOTING 9.9 Skip to step 2. 2 Gently pull the paper out of the front output tray.
In the Paper Exit Area 1 Open and close the front door. The jammed paper automatically exits the machine. If the paper does not exit, continue to step 6. 3 If there is any resistance and the paper does not move when you pull, or if you cannot see the paper in the front output tray, open the rear door. 9 TROUBLESHOOTING 9.9 Skip to step 2. 2 Gently pull the paper out of the front output tray.

User's Guide
Page 213
This may be a lack of the machine. If the paper is not feeding properly, pull the paper out of paper or improper paper loading. In the Multipurpose Tray "MP Tray Jam" appears on the display when you try to resume printing. 4 Remove the jammed paper by gently pulling it straight out. 5 Close the rear door. 6 Open and close the front door. 9.10 TROUBLESHOOTING To resume printing, open and close the front door to print using the Multipurpose tray and the machine does not detect paper.
This may be a lack of the machine. If the paper is not feeding properly, pull the paper out of paper or improper paper loading. In the Multipurpose Tray "MP Tray Jam" appears on the display when you try to resume printing. 4 Remove the jammed paper by gently pulling it straight out. 5 Close the rear door. 6 Open and close the front door. 9.10 TROUBLESHOOTING To resume printing, open and close the front door to print using the Multipurpose tray and the machine does not detect paper.

User's Guide
Page 214
... your machine is below . - Tips for Avoiding Paper Jams By selecting the correct paper types, most paper jams can be avoided. See page 4.5. 9 TROUBLESHOOTING 9.11 When a paper jam occurs, follow the steps outlined in "Clearing Paper Jams" on page 9.5. • Follow the procedures in the... Multipurpose tray. • If paper jams occur frequently when you print on...
... your machine is below . - Tips for Avoiding Paper Jams By selecting the correct paper types, most paper jams can be avoided. See page 4.5. 9 TROUBLESHOOTING 9.11 When a paper jam occurs, follow the steps outlined in "Clearing Paper Jams" on page 9.5. • Follow the procedures in the... Multipurpose tray. • If paper jams occur frequently when you print on...


