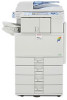
Ricoh Aficio MP C2551 Support Question
Ricoh Aficio MP C2551 Support Question
Find answers below for this question about Ricoh Aficio MP C2551.Need a Ricoh Aficio MP C2551 manual? We have 1 online manual for this item!
Question posted by janp on March 28th, 2012
Paper Jams
Almost every day, at least once a day, our Aficio has a paper jam from the first paper tray. The paper jams as it is drawn into the door panel on the right side of the machine - it never gets to the point of being printed. Is there someting I can do to keep this from happening or does it need an adjustment of some kind?
Current Answers
Answer #1: Posted by freginold on March 28th, 2012 7:02 PM
freginold

Member since:
December 20th, 2011 Points: 23,253,885

Member since:
December 20th, 2011 Points: 23,253,885
There are many different things that could be causing your paper jams. It could be a dirty or worn out feed roller, a dirty registration sensor, or the paper guides in the tray might not be flush against the paper stack. It could also be a bad clutch or motor somewhere in the transport section of the copier.
Related Ricoh Aficio MP C2551 Manual Pages
Quick Use Guide - Page 3
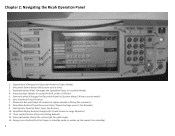
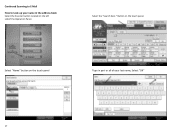
Numerical Key pad (Input of number of copies needed / Dialing Fax numbers) 8. Start button (Used to Copier Mode) 2. Copy button (Changes the Operation Panel to Start Copy, Fax & Scan) 10. Printer button (Access to Facsimile Mode) 4. Clear/Stop button (Stops the current Job / Clears the Page count / Fax Number) 9. ...
Quick Use Guide - Page 5
Continued Making a Copy:
Paper Size (default is Auto) Select "Paper Size" if different than Auto Select
You can also determine if the machine needs paper by checking the icons above the Paper size buttons
2 sided to 2 sided copies
1 sided to 2 sided copies
5
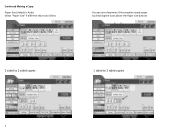
Quick Use Guide - Page 8
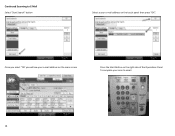
Select "Manual Entry" on Touch Panel to Fax Mode.
Chapter 4: Sending a Fax
Select the Facsimile button to switch to enter a fax number. Type your fax number including 9 to get an outside line, select "OK" at the top . (You can use the Touch panel or the Numerical keyboard)
Your number will be displayed. Press the "green" Start button Your Fax will then be Sent.
8
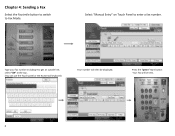
Quick Use Guide - Page 12
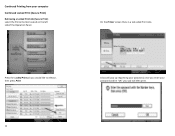
... "OK" your computer
Continued Locked Print (Secure Print)
Retrieving a Locked Print Job (Secure Print) select the Printer button located on the left sideof the Operation Panel. Continued Printing from your job will then print.
Quick Use Guide - Page 14
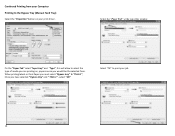
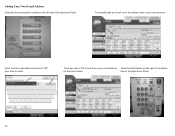
... print driver. Continued Printing from your Computer Printing to the Bypass Tray (Manual Feed Tray)
Select the "Properties" button on , paper source you would like the selected from.
Select the "Paper Tab" at the top of the window
On the "Paper Tab" select "Input tray" and "Type", this will allow to select the type of media...
Quick Use Guide - Page 15
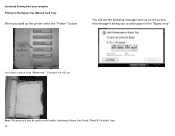
... you to print Lables, letterhead, Heavy Card Stock (Think) & Printable Tabs
15 Note: This process is also be used to place paper in the "Bypass tray"
Once paper is asking you walk up the printer select the "Printer" button
You will see the following message come up on the screen, this message is...
Quick Use Guide - Page 16
Select the letter that corresponds with your last name, next use the arrow key to find your name
Select your scan to E‐mail
Select the Scanner button located on the right side of the Operations Panel To complete your name from the list
Press the "Start" Button on the left sideof the Operation Panel.
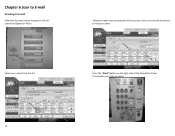
Chapter 6 Scan to E‐mail
Scanning to email.
16
Quick Use Guide - Page 17
Button on the left sideof the Operation Panel. Continued Scanning to E‐Mail
How to Look up your last name, Select "OK"
17
Select "Name" button on the touch panel
Type in part or all of your name in the address book
Select the Scanner button located on the touch panel.
Select the "Search Dest."
Quick Use Guide - Page 18
Continued Scanning to email.
18 Once you select "OK' you will see your scan to E‐Mail
Select "Start Search" button
Select a your e‐mail address on the right side of the Operations Panel To complete your e‐mail address on the main screen
Press the Start Button on the touch panel then press "OK".
Quick Use Guide - Page 19
... the address book, select manual entry
Enter the full e‐mail address and press "OK" your e‐mail address Press the Start Button on the right To complete
on the left sideof the Operation Panel.
Once you select "OK' you will see your scan to email.
Similar Questions


Where Are The Waste Toner Bottles On The Rico Aficio Mp C2551
free manual for rico aficio mp c2551
free manual for rico aficio mp c2551
(Posted by phillipnava56 10 years ago)

How To Get Individual Print Count Aficio Mp C4500
(Posted by Potlenjo 10 years ago)

I Have A Paper Jam In My Ricoh Afficio Mp171. The Paper Tore And I Have Only
been able to remove a portion of it. When I take the top paper tray out I can see that there is more...
been able to remove a portion of it. When I take the top paper tray out I can see that there is more...
(Posted by warkworthva 11 years ago)
Paper Jam In My Ricoh Afficio Mp171.
I have a paper jam in my Ricoh Afficio MP171. The paper tore and I have only been able to remove a p...
I have a paper jam in my Ricoh Afficio MP171. The paper tore and I have only been able to remove a p...
(Posted by warkworthva 11 years ago)