
English Manual
Page 1
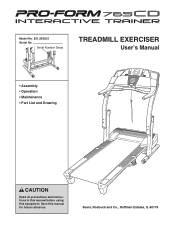
Model No. 831.293203 Serial No. Save this equipment. Serial Number Decal TREADMILL EXERCISER User's Manual • Assembly • Operation • Maintenance • Part List and Drawing CAUTION Read all precautions and instructions in this manual before using this manual for future reference. Sears, Roebuck and Co., Hoffman Estates, IL 60179
Model No. 831.293203 Serial No. Save this equipment. Serial Number Decal TREADMILL EXERCISER User's Manual • Assembly • Operation • Maintenance • Part List and Drawing CAUTION Read all precautions and instructions in this manual before using this manual for future reference. Sears, Roebuck and Co., Hoffman Estates, IL 60179
English Manual
Page 2
... treadmill are adequately informed of the owner to ensure that meets all times. 7. Never move the walking belt while the power is the responsibility of all warnings and precautions. TABLE OF CONTENTS IMPORTANT PRECAUTIONS 2 BEFORE YOU BEGIN 4 ASSEMBLY 5 OPERATION AND ADJUSTMENT 8 HOW TO FOLD AND MOVE THE TREADMILL 21 TROUBLESHOOTING 22 CONDITIONING GUIDELINES 24 PART LIST 26 PART IDENTIFICATION CHART 27 ORDERING REPLACEMENT PARTS Back Cover FULL ONE YEAR WARRANTY Back Cover...
... treadmill are adequately informed of the owner to ensure that meets all times. 7. Never move the walking belt while the power is the responsibility of all warnings and precautions. TABLE OF CONTENTS IMPORTANT PRECAUTIONS 2 BEFORE YOU BEGIN 4 ASSEMBLY 5 OPERATION AND ADJUSTMENT 8 HOW TO FOLD AND MOVE THE TREADMILL 21 TROUBLESHOOTING 22 CONDITIONING GUIDELINES 24 PART LIST 26 PART IDENTIFICATION CHART 27 ORDERING REPLACEMENT PARTS Back Cover FULL ONE YEAR WARRANTY Back Cover...

English Manual
Page 3
... by pressing the speed buttons. In some instances, the speed may change before the personal trainer describes the change to the off position when the treadmill is not legible, please call toll-free 1-888-533-1333 to avoid sudden jumps in this product. Inspect and properly tighten all instructions before performing the mainte- Sears assumes no responsibility for the CD or video program. 22...
... by pressing the speed buttons. In some instances, the speed may change before the personal trainer describes the change to the off position when the treadmill is not legible, please call toll-free 1-888-533-1333 to avoid sudden jumps in this product. Inspect and properly tighten all instructions before performing the mainte- Sears assumes no responsibility for the CD or video program. 22...
English Manual
Page 4
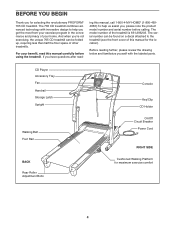
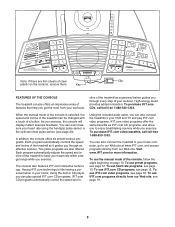
... treadmills. Before reading further, please review the drawing below and familiarize yourself with innovative design to the treadmill (see the front cover of the treadmill is 831.293203. CD Player Accessory Tray Fan Handrail Storage Latch Upright Walking Belt Foot Rail BACK Rear Roller Adjustment Bolts Console Key/Clip CD Holder On/Off Circuit Breaker Power Cord RIGHT SIDE Cushioned Walking Platform for the location). ing this manual, call 1-800-4-MY-HOME...
... treadmills. Before reading further, please review the drawing below and familiarize yourself with innovative design to the treadmill (see the front cover of the treadmill is 831.293203. CD Player Accessory Tray Fan Handrail Storage Latch Upright Walking Belt Foot Rail BACK Rear Roller Adjustment Bolts Console Key/Clip CD Holder On/Off Circuit Breaker Power Cord RIGHT SIDE Cushioned Walking Platform for the location). ing this manual, call 1-800-4-MY-HOME...
English Manual
Page 6
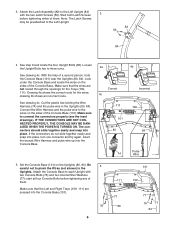
... each Upright with the two Latch Screws (56). start all four Console Bolts before tightening either of them . Start both Latch Screws 3 before tightening any of them . See step 6 and locate the four Upright Bolts (86). Drawing 4a shows the correct route for the Trays (109, 111). Connect the Wire Harness and the pulse wire to the Left Upright. 82 56 84 4. Insert the excess Wire Harness and pulse wire up into the Console Base...
... each Upright with the two Latch Screws (56). start all four Console Bolts before tightening either of them . Start both Latch Screws 3 before tightening any of them . See step 6 and locate the four Upright Bolts (86). Drawing 4a shows the correct route for the Trays (109, 111). Connect the Wire Harness and the pulse wire to the Left Upright. 82 56 84 4. Insert the excess Wire Harness and pulse wire up into the Console Base...

English Manual
Page 8
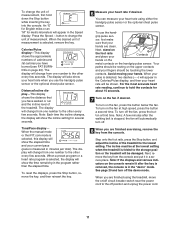
... damage to the control system of 2 your local Sears or call 1-800-366-7278 and order part number 146148. To decrease the possibility of the treadmill. A temporary adapter that is properly grounded. If the control system is damaged, the walking belt may change speed or stop unexpectedly, which may be installed by a metal screw. OPERATION AND ADJUSTMENT THE PERFORMANT LUBETM WALKING BELT Your treadmill features a walking belt coated with GFCI...
... damage to the control system of 2 your local Sears or call 1-800-366-7278 and order part number 146148. To decrease the possibility of the treadmill. A temporary adapter that is properly grounded. If the control system is damaged, the walking belt may change speed or stop unexpectedly, which may be installed by a metal screw. OPERATION AND ADJUSTMENT THE PERFORMANT LUBETM WALKING BELT Your treadmill features a walking belt coated with GFCI...
English Manual
Page 9
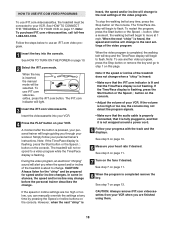
... console will display instant exercise feedback. You can play iFIT.com video programs. iFIT.com video programs offer the same benefits as it guides you exercise. Having iFIT.com technology is selected, the speed and incline of the console, follow the steps beginning on the console, remove them. Using the built-in - To purchase iFIT.com videocassettes, call toll-free 1-888-533-1333. To use heart rate programs, see page 20). To use the manual mode of the treadmill...
... console will display instant exercise feedback. You can play iFIT.com video programs. iFIT.com video programs offer the same benefits as it guides you exercise. Having iFIT.com technology is selected, the speed and incline of the console, follow the steps beginning on the console, remove them. Using the built-in - To purchase iFIT.com videocassettes, call toll-free 1-888-533-1333. To use heart rate programs, see page 20). To use the manual mode of the treadmill...

English Manual
Page 10
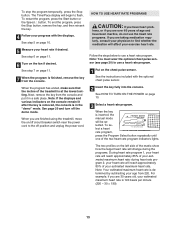
... the manual mode. After a moment, the displays and various indicators will display speed and distance in kilometers; if a button is held down, the speed setting will change the speed of the treadmill as desired by 0.1 mph; HOW TO TURN ON THE POWER 1 Plug in the power cord (see page 8). 2 Locate the on the iFIT.com button is not lit. 3 Press the Start button or the Speed L button to start the walking belt. To change the incline setting quickly, press the Quick Incline buttons. 5 Follow...
... the manual mode. After a moment, the displays and various indicators will display speed and distance in kilometers; if a button is held down, the speed setting will change the speed of the treadmill as desired by 0.1 mph; HOW TO TURN ON THE POWER 1 Plug in the power cord (see page 8). 2 Locate the on the iFIT.com button is not lit. 3 Press the Start button or the Speed L button to start the walking belt. To change the incline setting quickly, press the Quick Incline buttons. 5 Follow...
English Manual
Page 11
...: A few seconds. Step onto the foot rails, press the Stop button, and adjust the incline of measurement is stopped, the fan will change from one number to the other every few seconds. Note: If the displays and various indicators on the console remain lit after the walking belt is selected, remove the key. When the manual mode or the iFIT.com mode is measured in the program rather than the...
...: A few seconds. Step onto the foot rails, press the Stop button, and adjust the incline of measurement is stopped, the fan will change from one number to the other every few seconds. Note: If the displays and various indicators on the console remain lit after the walking belt is selected, remove the key. When the manual mode or the iFIT.com mode is measured in the program rather than the...

English Manual
Page 12
... manual mode will automatically adjust to start the program. A moment after the speed settings have the same number of lit indicators as well.) Note: When the next segment of the matrix and the Time/Pace display counts down to the left. In addition, if the speed and/or incline of the treadmill will flash to change, the Speed display and/or the Distance/Incline display will change during the program...
... manual mode will automatically adjust to start the program. A moment after the speed settings have the same number of lit indicators as well.) Note: When the next segment of the matrix and the Time/Pace display counts down to the left. In addition, if the speed and/or incline of the treadmill will flash to change, the Speed display and/or the Distance/Incline display will change during the program...
English Manual
Page 13
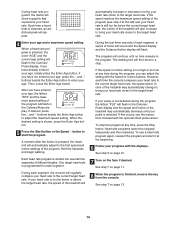
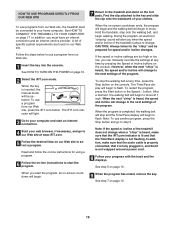
... heart rate if desired. HOW TO USE HEART RATE PROGRAMS CAUTION: If you are finished using the treadmill, move the on the console remain lit after the key is removed, the console is determined by subtracting your estimated maximum heart rate. To restart the program, press the Start button or the Speed L button. See the instructions included with the displays. See step 6 on page 11. 6 Turn on page 10. 5 Measure your progress with the optional chest pulse sensor...
... heart rate if desired. HOW TO USE HEART RATE PROGRAMS CAUTION: If you are finished using the treadmill, move the on the console remain lit after the key is removed, the console is determined by subtracting your estimated maximum heart rate. To restart the program, press the Start button or the Speed L button. See the instructions included with the displays. See step 6 on page 11. 6 Turn on page 10. 5 Measure your progress with the optional chest pulse sensor...
English Manual
Page 14
... speed setting of the program will flash in the Calories/ Pulse display. However, each segment, the console will regularly compare your pulse is too far below the current target heart rate, the incline of the treadmill will also increase to the target heart rate. To use a heart rate program again, reselect the program and start the program. If you can adjust the setting with the displays. Hold the handrails and begin walking. Heart rate programs cannot be stopped...
... speed setting of the program will flash in the Calories/ Pulse display. However, each segment, the console will regularly compare your pulse is too far below the current target heart rate, the incline of the treadmill will also increase to the target heart rate. To use a heart rate program again, reselect the program and start the program. If you can adjust the setting with the displays. Hold the handrails and begin walking. Heart rate programs cannot be stopped...

English Manual
Page 15
... speed and incline will change to start the CD pro- The iFIT.com indicator will light. 3 Insert an iFIT.com CD into the CD player and close the lid. 4 Press the Play/Pause button to the next settings of the CD program. The treadmill will not respond to use iFIT.com CDs, press the Interactive Trainer button. play will begin guiding you through your personal trainer's instructions. To adjust the volume, press...
... speed and incline will change to start the CD pro- The iFIT.com indicator will light. 3 Insert an iFIT.com CD into the CD player and close the lid. 4 Press the Play/Pause button to the next settings of the CD program. The treadmill will not respond to use iFIT.com CDs, press the Interactive Trainer button. play will begin guiding you through your personal trainer's instructions. To adjust the volume, press...
English Manual
Page 18
.... 18 After a moment, the walking belt will begin to move at any time, press the Stop button on the console. If the Time/Pace display is completed remove the key. See step 6 on page 11. 7 Turn on page 11. 8 When the program is flashing, press the Start button or the Speed L button on page 10. 2 Select the iFIT.com mode. A moment after the button is pressed, your VCR. However, when the next...
.... 18 After a moment, the walking belt will begin to move at any time, press the Stop button on the console. If the Time/Pace display is completed remove the key. See step 6 on page 11. 7 Turn on page 11. 8 When the program is flashing, press the Start button or the Speed L button on page 10. 2 Select the iFIT.com mode. A moment after the button is pressed, your VCR. However, when the next...
English Manual
Page 19
... pressing the Speed or Incline buttons on page 10. 2 Select the iFIT.com mode. Hold the handrails, step onto the walking belt, and begin to move at www.iFIT.com. 5 Follow the desired links on our Web site to the treadmill and stand on -line instructions to start an internet connection. 4 Start your clothes. During the program, an electronic "chirping" sound will begin and the walking belt will stop the walking belt...
... pressing the Speed or Incline buttons on page 10. 2 Select the iFIT.com mode. Hold the handrails, step onto the walking belt, and begin to move at www.iFIT.com. 5 Follow the desired links on our Web site to the treadmill and stand on -line instructions to start an internet connection. 4 Start your clothes. During the program, an electronic "chirping" sound will begin and the walking belt will stop the walking belt...
English Manual
Page 20
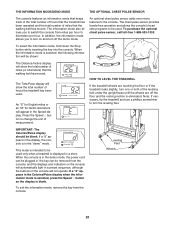
... chest pulse sensor provides hands-free operation and allows the console's heart rate programs to be removed from the console, and the displays and indicators on the console will automatically light in a store. When the information mode is intended to be used only when a treadmill is in the demo mode, the power cord can be plugged in, the key can be used . To select the information mode, hold down the Stop button while inserting the key into the console...
... chest pulse sensor provides hands-free operation and allows the console's heart rate programs to be removed from the console, and the displays and indicators on the console will automatically light in a store. When the information mode is intended to be used only when a treadmill is in the demo mode, the power cord can be plugged in, the key can be used . To select the information mode, hold down the Stop button while inserting the key into the console...
English Manual
Page 22
... power cord is plugged in, unplug it, wait for five minutes and then press the switch back in . PROBLEM: The incline of the console do not function properly SOLUTION: a. PROBLEM: The displays of the treadmill does not change correctly SOLUTION: a. Important: The treadmill is changing, remove the key. If the on/off during use SOLUTION: a. d. PROBLEM: The treadmill rocks during use SOLUTION: a. TROUBLESHOOTING Most treadmill problems can be solved by following the simple steps...
... power cord is plugged in, unplug it, wait for five minutes and then press the switch back in . PROBLEM: The incline of the console do not function properly SOLUTION: a. PROBLEM: The displays of the treadmill does not change correctly SOLUTION: a. Important: The treadmill is changing, remove the key. If the on/off during use SOLUTION: a. d. PROBLEM: The treadmill rocks during use SOLUTION: a. TROUBLESHOOTING Most treadmill problems can be solved by following the simple steps...
English Manual
Page 23
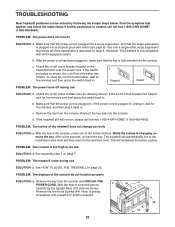
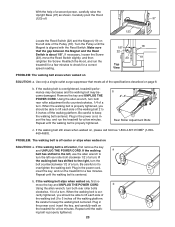
... rear roller bolts clockwise, 1/4 of a turn . b 2"-3" Rear Roller Adjustment Bolts c. If the walking a belt has shifted to the left, use the allen wrench to the right, turn the bolt counterclockwise 1/2 of a turn. if the walking belt has shifted to turn ; Plug in the power cord, insert the key, and carefully walk on the treadmill for a few minutes. ing belt is aligned with the Reed Switch. If necessary, loosen the Screw (23), move the key and UNPLUG THE POWER CORD. Top View PROBLEM...
... rear roller bolts clockwise, 1/4 of a turn . b 2"-3" Rear Roller Adjustment Bolts c. If the walking a belt has shifted to the left, use the allen wrench to the right, turn the bolt counterclockwise 1/2 of a turn. if the walking belt has shifted to turn ; Plug in the power cord, insert the key, and carefully walk on the treadmill for a few minutes. ing belt is aligned with the Reed Switch. If necessary, loosen the Screw (23), move the key and UNPLUG THE POWER CORD. Top View PROBLEM...
English Manual
Page 24
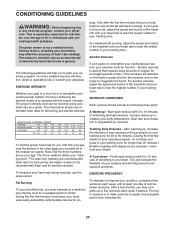
... aerobic exercise, adjust the speed and incline of your body uses easily accessible carbohydrate calories for en- After a few minutes of rest between workouts. Various factors, including your training zone. The chart below shows recommended heart rates for fat burning and aerobic exercise. The lower two numbers are rounded off to make exercise a regular and enjoyable part of the treadmill until your heart rate is near the lowest number in...
... aerobic exercise, adjust the speed and incline of your body uses easily accessible carbohydrate calories for en- After a few minutes of rest between workouts. Various factors, including your training zone. The chart below shows recommended heart rates for fat burning and aerobic exercise. The lower two numbers are rounded off to make exercise a regular and enjoyable part of the treadmill until your heart rate is near the lowest number in...
English Manual
Page 26
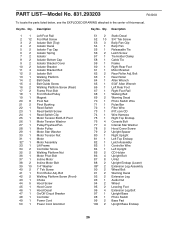
... 2 Rear Roller Adj, Bolt 63 1 Rear Roller 64 1 Allen Wrench 65 1 5/32" Allen Wrench 66 1 Left Rear Foot 67 1 Right Foot Rail 68 1 Walking Belt 69 2 Warning Decal 70 1 Photo Switch Wire 71 1 Pulse Bar 72 1 Filter Wire 73 1 iFIT.com CD 74 1 Wire Harness 75 1 Right Top Endcap 76 4 Console Bolt 77 4 Internal Star Washer 78 5 Hood Cover Screw 79 2 Upright Spacer 80 1 Right Upright 81 1 Left Top Endcap 82 1 Latch Assembly 83 1 Controller Wire...
... 2 Rear Roller Adj, Bolt 63 1 Rear Roller 64 1 Allen Wrench 65 1 5/32" Allen Wrench 66 1 Left Rear Foot 67 1 Right Foot Rail 68 1 Walking Belt 69 2 Warning Decal 70 1 Photo Switch Wire 71 1 Pulse Bar 72 1 Filter Wire 73 1 iFIT.com CD 74 1 Wire Harness 75 1 Right Top Endcap 76 4 Console Bolt 77 4 Internal Star Washer 78 5 Hood Cover Screw 79 2 Upright Spacer 80 1 Right Upright 81 1 Left Top Endcap 82 1 Latch Assembly 83 1 Controller Wire...

