

English Manual
Page 2
PROFORM is a registered trademark of this manual. TABLE OF CONTENTS IMPORTANT PRECAUTIONS 3 BEFORE YOU BEGIN 5 ASSEMBLY 6 OPERATION AND ADJUSTMENT 9 HOW TO FOLD AND MOVE THE TREADMILL 17 TROUBLESHOOTING 19 CONDITIONING GUIDELINES 21 ORDERING REPLACEMENT PARTS Back Cover LIMITED WARRANTY Back Cover Note: An EXPLODED DRAWING and a PART LIST are attached in the center of ICON IP, Inc. 2
PROFORM is a registered trademark of this manual. TABLE OF CONTENTS IMPORTANT PRECAUTIONS 3 BEFORE YOU BEGIN 5 ASSEMBLY 6 OPERATION AND ADJUSTMENT 9 HOW TO FOLD AND MOVE THE TREADMILL 17 TROUBLESHOOTING 19 CONDITIONING GUIDELINES 21 ORDERING REPLACEMENT PARTS Back Cover LIMITED WARRANTY Back Cover Note: An EXPLODED DRAWING and a PART LIST are attached in the center of ICON IP, Inc. 2
English Manual
Page 3
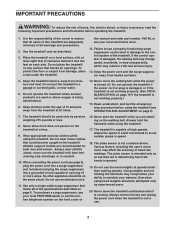
... surge suppressor could result in use an extension cord. 11. Wear appropriate exercise clothes while using the treadmill (see your local PROFORM dealer or call the tollfree telephone number on page 9). 7. No other appliance should be on the treadmill at speeds faster than one person on the same circuit. Do not put the...
... surge suppressor could result in use an extension cord. 11. Wear appropriate exercise clothes while using the treadmill (see your local PROFORM dealer or call the tollfree telephone number on page 9). 7. No other appliance should be on the treadmill at speeds faster than one person on the same circuit. Do not put the...
English Manual
Page 4
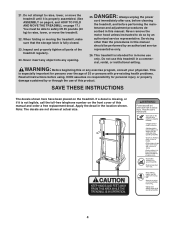
...than the procedures in a commercial, rental, or institutional setting. This is properly assembled. (See ASSEMBLY on page 6, and HOW TO FOLD AND MOVE THE TREADMILL on page 17.) You must be performed by an authorized service representative. Apply the decal in this or any opening. DANGER: 25. Always unplug the... cord immediately after use only. scribed in the location shown. Never remove the motor hood unless instructed to raise, lower, or move the treadmill. 22. Do not use of this manual should be able to safely lift 45 pounds (20 kg) to raise, lower, or move the...
...than the procedures in a commercial, rental, or institutional setting. This is properly assembled. (See ASSEMBLY on page 6, and HOW TO FOLD AND MOVE THE TREADMILL on page 17.) You must be performed by an authorized service representative. Apply the decal in this or any opening. DANGER: 25. Always unplug the... cord immediately after use only. scribed in the location shown. Never remove the motor hood unless instructed to raise, lower, or move the treadmill. 22. Do not use of this manual should be able to safely lift 45 pounds (20 kg) to raise, lower, or move the...
English Manual
Page 5
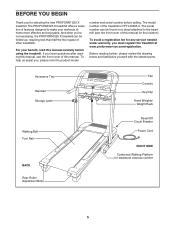
...you're not exercising, the PROFORM 525 X treadmill can be folded up, requiring less than half the floor space of this manual for selecting the new PROFORM® 525 X treadmill. The model number of features designed to the treadmill (see the front cover of other treadmills. Accessory Tray Handrail Storage ... questions after reading this manual carefully before calling. BEFORE YOU BEGIN Thank you for the location). The PROFORM 525 X treadmill offers a selection of the treadmill is PFTL43205.0. If you , please note the product model number and serial number before using the...
...you're not exercising, the PROFORM 525 X treadmill can be folded up, requiring less than half the floor space of this manual for selecting the new PROFORM® 525 X treadmill. The model number of features designed to the treadmill (see the front cover of other treadmills. Accessory Tray Handrail Storage ... questions after reading this manual carefully before calling. BEFORE YOU BEGIN Thank you for the location). The PROFORM 525 X treadmill offers a selection of the treadmill is PFTL43205.0. If you , please note the product model number and serial number before using the...
English Manual
Page 6
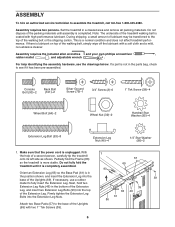
... the packing materials until it has been pre-assembled. Make sure that the power cord is more stable. Note: The underside of the treadmill walking belt is in the parts bag, check to the base of the Uprights (69). Firmly tighten the Extension Leg Bolts into the ...Washer (96)-2 1. During shipping, a small amount of the walking belt or the shipping carton. ASSEMBLY To hire an authorized service technician to assemble the treadmill, call toll-free 1-800-445-2480. This is completed. With the help identifying the assembly hardware, see if it is completely assembled. 1 93 57 ...
... the packing materials until it has been pre-assembled. Make sure that the power cord is more stable. Note: The underside of the treadmill walking belt is in the parts bag, check to the base of the Uprights (69). Firmly tighten the Extension Leg Bolts into the ...Washer (96)-2 1. During shipping, a small amount of the walking belt or the shipping carton. ASSEMBLY To hire an authorized service technician to assemble the treadmill, call toll-free 1-800-445-2480. This is completed. With the help identifying the assembly hardware, see if it is completely assembled. 1 93 57 ...
English Manual
Page 7
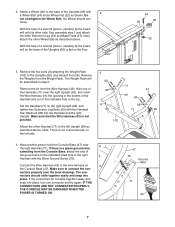
... 7 the Wheel should slide together easily and snap into the opening in the bottom of the Handrail and out of a second person, carefully tip the treadmill onto its other Handrail (71) to the indicated small hole in step 6. Next, attach the other Extension Leg (63) and Base Pads (57). ... the help of the indicated hole in the top. Remove the tie from the Weight Rack. With the help of a second person, carefully tip the treadmill so the base of the Handrails (71) near 4 the right Handrail (71). 2. The connectors should turn one of the Uprights (69) is not pinched....
... 7 the Wheel should slide together easily and snap into the opening in the bottom of the Handrail and out of a second person, carefully tip the treadmill onto its other Handrail (71) to the indicated small hole in step 6. Next, attach the other Extension Leg (63) and Base Pads (57). ... the help of the indicated hole in the top. Remove the tie from the Weight Rack. With the help of a second person, carefully tip the treadmill so the base of the Handrails (71) near 4 the right Handrail (71). 2. The connectors should turn one of the Uprights (69) is not pinched....
English Manual
Page 8
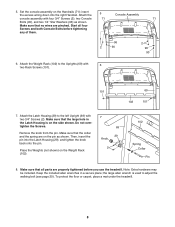
... two 1/4" Star Washers (96) as shown. Place the Weights (not shown) on the side shown. To protect the floor or carpet, place a mat under the treadmill. 8 Make sure that the large hole in a secure place; Keep the included allen wrenches in the Latch Housing is used to the left Upright (69... the pin. 5. Set the console assembly on the pin as shown. Make sure that all four Screws and both Console Bolts before you use the treadmill. Attach the Latch Housing (29) to adjust the walking belt (see page 20). Do not overtighten the Screws.
... two 1/4" Star Washers (96) as shown. Place the Weights (not shown) on the side shown. To protect the floor or carpet, place a mat under the treadmill. 8 Make sure that the large hole in a secure place; Keep the included allen wrenches in the Latch Housing is used to the left Upright (69... the pin. 5. Set the console assembly on the pin as shown. Make sure that all four Screws and both Console Bolts before you use the treadmill. Attach the Latch Housing (29) to adjust the walking belt (see page 20). Do not overtighten the Screws.
English Manual
Page 9
... the control system is for electric current to reduce the risk of this manual and order part number 146148, or see your treadmill (see your local PROFORM dealer or call the toll-free telephone number on a nominal 120-volt circuit, and has a grounding plug that looks like extending... from other substances to whether the product is functioning properly. To decrease the possibility of the treadmill. Plug the power cord into a surge ...
... the control system is for electric current to reduce the risk of this manual and order part number 146148, or see your treadmill (see your local PROFORM dealer or call the toll-free telephone number on a nominal 120-volt circuit, and has a grounding plug that looks like extending... from other substances to whether the product is functioning properly. To decrease the possibility of the treadmill. Plug the power cord into a surge ...
English Manual
Page 10
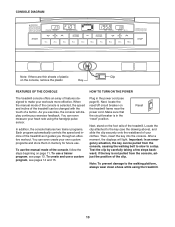
...steps backward; if the key is not pulled from the console, causing the walking belt to slow to make your heart rate using the treadmill. 10 Locate the clip attached to the walking platform, always wear clean shoes while using the handgrip pulse sensor. CONSOLE DIAGRAM Note: ...If there are thin sheets of plastic Clip on the treadmill frame near the power cord. To use a custom program, see page 9). After a moment, the displays will display continuous exercise feedback. In ...
...steps backward; if the key is not pulled from the console, causing the walking belt to slow to make your heart rate using the treadmill. 10 Locate the clip attached to the walking platform, always wear clean shoes while using the handgrip pulse sensor. CONSOLE DIAGRAM Note: ...If there are thin sheets of plastic Clip on the treadmill frame near the power cord. To use a custom program, see page 9). After a moment, the displays will display continuous exercise feedback. In ...
English Manual
Page 11
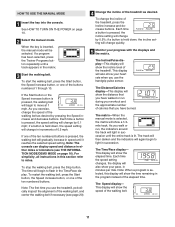
...one of the ten numbered buttons is inserted, the manual mode will show the time remaining in increments of calories that you use the treadmill, periodically inspect the alignment of the walking belt, and center the walking belt if necessary (see THE INFORMATION MODE/DEMO MODE on page...time a button is held down , the speed setting will light in either miles or kilometers (see page 20). 4 Change the incline of the treadmill, press the Incline increase and decrease buttons. if a button is pressed, the speed setting will show your workout and the approximate number of 0.5 mph...
...one of the ten numbered buttons is inserted, the manual mode will show the time remaining in increments of calories that you use the treadmill, periodically inspect the alignment of the walking belt, and center the walking belt if necessary (see THE INFORMATION MODE/DEMO MODE on page...time a button is held down , the speed setting will light in either miles or kilometers (see page 20). 4 Change the incline of the treadmill, press the Incline increase and decrease buttons. if a button is pressed, the speed setting will show your workout and the approximate number of 0.5 mph...
English Manual
Page 12
...the key. Note: If the display remains lit after a few minutes. 8 When you are finished using the handgrip pulse sensor, remove the sheets of the treadmill to the "off the fan, press the button a third time. To turn on the metal contacts-avoid moving your heart rate if desired. Before using...the Fan button. Next, remove the key from the metal contacts. For the most accurate heart rate reading, continue to the storage position, or the treadmill will appear in the "demo" mode. See page 16 and turn off " position and unplug the power cord. 12 To turn off circuit breaker ...
...the key. Note: If the display remains lit after a few minutes. 8 When you are finished using the handgrip pulse sensor, remove the sheets of the treadmill to the "off the fan, press the button a third time. To turn on the metal contacts-avoid moving your heart rate if desired. Before using...the Fan button. Next, remove the key from the metal contacts. For the most accurate heart rate reading, continue to the storage position, or the treadmill will appear in the "demo" mode. See page 16 and turn off " position and unplug the power cord. 12 To turn off circuit breaker ...
English Manual
Page 13
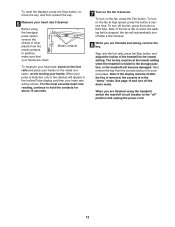
... the Speed increase button. When the next period of the program. See step 7 on page 12. 7 When the program is pressed, the treadmill will automatically adjust to the speed and incline settings for the first period will automatically adjust to the first speed and incline settings of the... the speed setting and/or the incline setting will then slow to start the program. A profile of the speed settings of the program ends, the treadmill will scroll across the matrix. 3 Press the Start button or the Speed increase button to a stop the program temporarily, press the Stop button. A...
... the Speed increase button. When the next period of the program. See step 7 on page 12. 7 When the program is pressed, the treadmill will automatically adjust to the speed and incline settings for the first period will automatically adjust to the first speed and incline settings of the... the speed setting and/or the incline setting will then slow to start the program. A profile of the speed settings of the program ends, the treadmill will scroll across the matrix. 3 Press the Start button or the Speed increase button to a stop the program temporarily, press the Stop button. A...
English Manual
Page 14
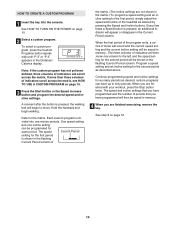
... program. One speed setting and one incline setting can have up to forty periods. When the first period of the program ends, a series of the treadmill as desired by pressing the Speed and Incline buttons. Continue programming speed and incline settings for the first period, simply adjust the speed and incline...
... program. One speed setting and one incline setting can have up to forty periods. When the first period of the program ends, a series of the treadmill as desired by pressing the Speed and Incline buttons. Continue programming speed and incline settings for the first period, simply adjust the speed and incline...
English Manual
Page 15
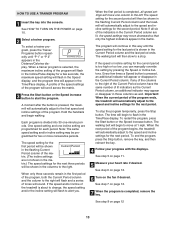
... periods. A moment after the button is divided into the console. Hold the handrails and begin walking. Each custom program is pressed, the treadmill will automatically adjust to the right. To increase the length of the program, press the Stop button twice at any time before the program ...When the first period ends, all speed settings will move one incline setting are not shown in the flashing Current Period column, and the treadmill will automatically adjust to the right will flash, a series of tones will sound, and the speed setting and the incline setting will be ...
... periods. A moment after the button is divided into the console. Hold the handrails and begin walking. Each custom program is pressed, the treadmill will automatically adjust to the right. To increase the length of the program, press the Stop button twice at any time before the program ...When the first period ends, all speed settings will move one incline setting are not shown in the flashing Current Period column, and the treadmill will automatically adjust to the right will flash, a series of tones will sound, and the speed setting and the incline setting will be ...
English Manual
Page 16
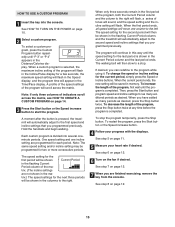
...will automatically light in a preset sequence, although the buttons on the console will show the total number of miles or kilometers that the treadmill has been used only when a treadmill is in a store. The Time/Pace display will appear in the weight rack. Using weights and not holding the handrails may compromise... Weight Rack cise, use the hand weights at your sides or press the weights above your upper body as the unit of hours that the treadmill has been operated. To select the information mode, hold the 2-pound weights at speeds faster than walking speeds.
...will automatically light in a preset sequence, although the buttons on the console will show the total number of miles or kilometers that the treadmill has been used only when a treadmill is in a store. The Time/Pace display will appear in the weight rack. Using weights and not holding the handrails may compromise... Weight Rack cise, use the hand weights at your sides or press the weights above your upper body as the unit of hours that the treadmill has been operated. To select the information mode, hold the 2-pound weights at speeds faster than walking speeds.
English Manual
Page 17
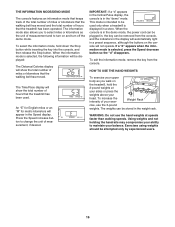
...the wheels. 2. Wheels Base 17 Hold the metal frame firmly in the frame. Frame Latch Knob Frame Engaged HOW TO MOVE THE TREADMILL Before moving the treadmill. Make sure that the latch pin is fully inserted into the hole in the location shown by the plastic foot rails. To ...pin is fully inserted into the hole in the storage position. Move your back. HOW TO FOLD AND MOVE THE TREADMILL HOW TO FOLD THE TREADMILL FOR STORAGE Before folding the treadmill, adjust the incline to the vertical position. 2. Slowly release the latch knob; make sure to the position shown ...
...the wheels. 2. Wheels Base 17 Hold the metal frame firmly in the frame. Frame Latch Knob Frame Engaged HOW TO MOVE THE TREADMILL Before moving the treadmill. Make sure that the latch pin is fully inserted into the hole in the location shown by the plastic foot rails. To ...pin is fully inserted into the hole in the storage position. Move your back. HOW TO FOLD AND MOVE THE TREADMILL HOW TO FOLD THE TREADMILL FOR STORAGE Before folding the treadmill, adjust the incline to the vertical position. 2. Slowly release the latch knob; make sure to the position shown ...
English Manual
Page 18
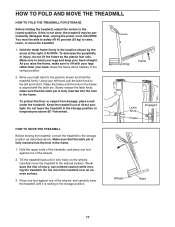
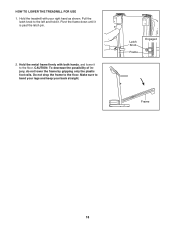
Pivot the frame down until it . HOW TO LOWER THE TREADMILL FOR USE 1. Pull the latch knob to the floor. CAUTION: To decrease the possibility of injury, do not lower the frame by gripping only the plastic foot rails. Latch Knob Frame Engaged Frame 18 Hold the metal frame firmly with your back straight. Hold the treadmill with both hands, and lower it to the left and hold it is past the latch pin. 2. Make sure to the floor. Do not drop the frame to bend your legs and keep your right hand as shown.
Pivot the frame down until it . HOW TO LOWER THE TREADMILL FOR USE 1. Pull the latch knob to the floor. CAUTION: To decrease the possibility of injury, do not lower the frame by gripping only the plastic foot rails. Latch Knob Frame Engaged Frame 18 Hold the metal frame firmly with your back straight. Hold the treadmill with both hands, and lower it to the left and hold it is past the latch pin. 2. Make sure to the floor. Do not drop the frame to bend your legs and keep your right hand as shown.
English Manual
Page 19
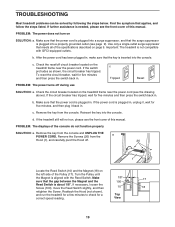
... the Screw (100), move the Reed Switch slightly, and then 10 18 retighten the Screw. PROBLEM: The power does not turn on page 9. Important: The treadmill is plugged in, unplug it back in . After the power cord has been plugged in . c Tripped Reset PROBLEM: The power turns off . 26 1... Locate the Reed Switch (10) and the Magnet (18) on the left side of the specifications described on SOLUTION: a. If the treadmill still will not run the treadmill for a few minutes to check for five minutes and then press the switch back in , make sure that the gap between the Magnet...
... the Screw (100), move the Reed Switch slightly, and then 10 18 retighten the Screw. PROBLEM: The power does not turn on page 9. Important: The treadmill is plugged in, unplug it back in . After the power cord has been plugged in . c Tripped Reset PROBLEM: The power turns off . 26 1... Locate the Reed Switch (10) and the Magnet (18) on the left side of the specifications described on SOLUTION: a. If the treadmill still will not run the treadmill for a few minutes to check for five minutes and then press the switch back in , make sure that the gap between the Magnet...
English Manual
Page 20
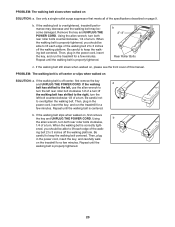
...belt is correctly tight- When the walking belt is centered. Then, plug in the power cord, insert the key, and run the treadmill for a few minutes. Repeat until the walking belt is properly tightened, you should be able to lift each edge of the walking belt..., 1/4 of a turn . When the walking belt is properly tightened. b 2"-3" Rear Roller Bolts c. Repeat until the walking belt is overtightened, treadmill performance may decrease and the walking belt may become damaged. PROBLEM: The walking belt slows when walked on , please see the front cover of this...
...belt is correctly tight- When the walking belt is centered. Then, plug in the power cord, insert the key, and run the treadmill for a few minutes. Repeat until the walking belt is properly tightened, you should be able to lift each edge of the walking belt..., 1/4 of a turn . When the walking belt is properly tightened. b 2"-3" Rear Roller Bolts c. Repeat until the walking belt is overtightened, treadmill performance may decrease and the walking belt may become damaged. PROBLEM: The walking belt slows when walked on , please see the front cover of this...
English Manual
Page 21
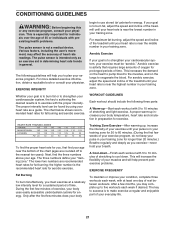
...bottom of time. If your training zone. Aerobic exercise is activity that requires large amounts of oxygen for prolonged periods of the treadmill until your heart rate is to exercise with 5 to 10 minutes of your muscles and will help prevent postexercise problems. EXERCISE FREQUENCY...Finish each workout with the proper intensity. For maximum fat burning, adjust the speed and incline of stretching to 10 minutes of the treadmill until your heart rate is especially important for individuals over the age of your breath. The following three parts: A Warm-up increases...
...bottom of time. If your training zone. Aerobic exercise is activity that requires large amounts of oxygen for prolonged periods of the treadmill until your heart rate is to exercise with 5 to 10 minutes of your muscles and will help prevent postexercise problems. EXERCISE FREQUENCY...Finish each workout with the proper intensity. For maximum fat burning, adjust the speed and incline of stretching to 10 minutes of the treadmill until your heart rate is especially important for individuals over the age of your breath. The following three parts: A Warm-up increases...


