
English Manual
Page 1
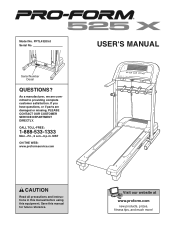
... SERVICE DEPARTMENT DIRECTLY. CALL TOLL-FREE: 1-888-533-1333 Mon.-Fri., 6 a.m.-6 p.m. Model No. Save this equipment. Visit our website at www.proform.com new products, prizes, fitness tips, and much more! MST ON THE WEB: www.proformservice.com USER'S MANUAL CAUTION Read all precautions and instructions in this manual before using this manual for future reference. If you have questions, or if parts...
... SERVICE DEPARTMENT DIRECTLY. CALL TOLL-FREE: 1-888-533-1333 Mon.-Fri., 6 a.m.-6 p.m. Model No. Save this equipment. Visit our website at www.proform.com new products, prizes, fitness tips, and much more! MST ON THE WEB: www.proformservice.com USER'S MANUAL CAUTION Read all precautions and instructions in this manual before using this manual for future reference. If you have questions, or if parts...
English Manual
Page 3
... control system of the treadmill. Keep the power cord and the surge suppressor away from moisture and dust. Do not operate the treadmill where aerosol products are adequately informed of all times. 14. Keep children under the treadmill. When connecting the power cord (see your balance. To purchase a surge suppressor, see OPERATION AND ADJUSTMENT on the walking belt. The pulse sensor is capable of high speeds...
... control system of the treadmill. Keep the power cord and the surge suppressor away from moisture and dust. Do not operate the treadmill where aerosol products are adequately informed of all times. 14. Keep children under the treadmill. When connecting the power cord (see your balance. To purchase a surge suppressor, see OPERATION AND ADJUSTMENT on the walking belt. The pulse sensor is capable of high speeds...
English Manual
Page 4
... motor hood unless instructed to do so by or through the use this manual should be able to safely lift 45 pounds (20 kg) to raise, lower, or move the treadmill. 22. When folding or moving the treadmill, make sure that the storage latch is not legible, call the toll-free telephone number on the treadmill. If a decal is missing, or if it is properly assembled. (See ASSEMBLY...
... motor hood unless instructed to do so by or through the use this manual should be able to safely lift 45 pounds (20 kg) to raise, lower, or move the treadmill. 22. When folding or moving the treadmill, make sure that the storage latch is not legible, call the toll-free telephone number on the treadmill. If a decal is missing, or if it is properly assembled. (See ASSEMBLY...
English Manual
Page 5
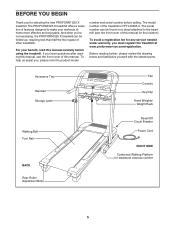
... model number and serial number before using the treadmill. Accessory Tray Handrail Storage Latch Walking Belt Foot Rail BACK Rear Roller Adjustment Bolts Fan Console Key/Clip Hand Weights/ Weight Rack Reset/Off Circuit Breaker Power Cord RIGHT SIDE Cushioned Walking Platform for selecting the new PROFORM® 525 X treadmill. To help us assist you 're not exercising, the PROFORM 525 X treadmill can be folded up, requiring less than half the floor space of the treadmill is PFTL43205.0. Before reading further, please review...
... model number and serial number before using the treadmill. Accessory Tray Handrail Storage Latch Walking Belt Foot Rail BACK Rear Roller Adjustment Bolts Fan Console Key/Clip Hand Weights/ Weight Rack Reset/Off Circuit Breaker Power Cord RIGHT SIDE Cushioned Walking Platform for selecting the new PROFORM® 525 X treadmill. To help us assist you 're not exercising, the PROFORM 525 X treadmill can be folded up, requiring less than half the floor space of the treadmill is PFTL43205.0. Before reading further, please review...
English Manual
Page 6
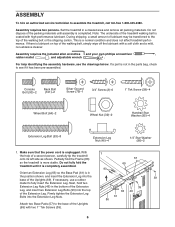
... side as shown. Do not fully fold the treadmill until assembly is coated with two 1" Tek Screws (39). 6 If a part is more stable. For help of the treadmill walking belt is completed. Make sure that the power cord is in the bottom of the Extension Leg, and insert two Extension Leg Bolts (93) into the base of lubricant may be transferred to see the...
... side as shown. Do not fully fold the treadmill until assembly is coated with two 1" Tek Screws (39). 6 If a part is more stable. For help of the treadmill walking belt is completed. Make sure that the power cord is in the bottom of the Extension Leg, and insert two Extension Leg Bolts (93) into the base of lubricant may be transferred to see the...
English Manual
Page 7
... step 6. The Weight Rack will be assembled in the top. Remove the tie from the Console Base, attach the end of the ground wire to the base of the Uprights (69) is a green ground wire extending from the Wire Harness (42). Attach the other Extension Leg (63) and Base Pads (57). If there is flat on the Console Base (47). Remove the Weights from the Weight...
... step 6. The Weight Rack will be assembled in the top. Remove the tie from the Console Base, attach the end of the ground wire to the base of the Uprights (69) is a green ground wire extending from the Wire Harness (42). Attach the other Extension Leg (63) and Base Pads (57). If there is flat on the Console Base (47). Remove the Weights from the Weight...
English Manual
Page 8
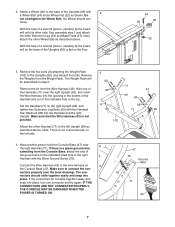
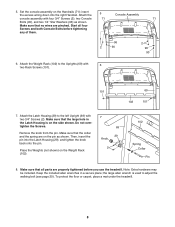
... adjust the walking belt (see page 20). Place the Weights (not shown) on the Handrails (71); Attach the 5 Console Assembly console assembly with four 3/4" Screws (2), two Console 71 71 Bolts (90), and two 1/4" Star Washers (96) as shown. insert the excess wiring down into the Latch Housing (29), and tighten the knob back onto the pin. Keep the included allen wrenches in the Latch Housing is used to the Uprights...
... adjust the walking belt (see page 20). Place the Weights (not shown) on the Handrails (71); Attach the 5 Console Assembly console assembly with four 3/4" Screws (2), two Console 71 71 Bolts (90), and two 1/4" Star Washers (96) as shown. insert the excess wiring down into the Latch Housing (29), and tighten the knob back onto the pin. Keep the included allen wrenches in the Latch Housing is used to the Uprights...
English Manual
Page 9
... your home's power. tric shock. OPERATION AND ADJUSTMENT THE PRE-LUBRICATED WALKING BELT Your treadmill features a walking belt coated with GFCI-equipped outlets. IMPORTANT: Never apply silicone spray or other type of 450 joules. The surge suppressor must be installed by sudden voltage changes in your local PROFORM dealer or call the toll-free telephone number on a nominal 120-volt circuit, and has a grounding plug...
... your home's power. tric shock. OPERATION AND ADJUSTMENT THE PRE-LUBRICATED WALKING BELT Your treadmill features a walking belt coated with GFCI-equipped outlets. IMPORTANT: Never apply silicone spray or other type of 450 joules. The surge suppressor must be installed by sudden voltage changes in your local PROFORM dealer or call the toll-free telephone number on a nominal 120-volt circuit, and has a grounding plug...
English Manual
Page 10
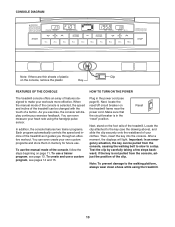
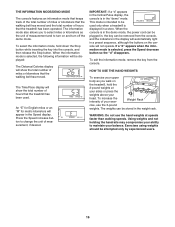
... your heart rate using the treadmill. 10 To use . After a moment, the displays will display continuous exercise feedback. Important: In an emergency situation, the key can be pulled from the console, adjust the position of features designed to the walking platform, always wear clean shoes while using the handgrip pulse sensor. As you through an effective workout. In addition, the console features two trainer programs. Each program automatically controls the speed and incline...
... your heart rate using the treadmill. 10 To use . After a moment, the displays will display continuous exercise feedback. Important: In an emergency situation, the key can be pulled from the console, adjust the position of features designed to the walking platform, always wear clean shoes while using the handgrip pulse sensor. As you through an effective workout. In addition, the console features two trainer programs. Each program automatically controls the speed and incline...
English Manual
Page 11
... the walking belt. 11 This display will show the distance that you exercise, change the incline of the ten numbered buttons. Note: The first time you have burned. The Incline/Pulse display-This display will show a 1/4mile track. The matrix-When the manual mode is pressed, the incline setting will show the incline level of the treadmill. See HOW TO TURN ON THE POWER on page 16). If the Start button or the Speed increase button is...
... the walking belt. 11 This display will show the distance that you exercise, change the incline of the ten numbered buttons. Note: The first time you have burned. The Incline/Pulse display-This display will show a 1/4mile track. The matrix-When the manual mode is pressed, the incline setting will show the incline level of the treadmill. See HOW TO TURN ON THE POWER on page 16). If the Start button or the Speed increase button is...
English Manual
Page 12
... "demo" mode. When your hands are finished exercising, remove the key. The incline must be shown. To turn off " position and unplug the power cord. 12 To turn on the fan if desired. See page 16 and turn off after the key is removed, the console is detected, one or two dashes will appear in the Incline/Pulse display and then your heart rate will be at high speed, press the button...
... "demo" mode. When your hands are finished exercising, remove the key. The incline must be shown. To turn off " position and unplug the power cord. 12 To turn on the fan if desired. See page 16 and turn off after the key is removed, the console is detected, one or two dashes will appear in the Incline/Pulse display and then your heart rate will be at high speed, press the button...
English Manual
Page 13
... walking belt will automatically adjust to move downward so that only the highest indicators appear in the flashing Current Period column and the treadmill will flash in the Incline/Pulse display for two or more consecutive periods. See step 6 on page 12. 6 Turn on the fan if desired. HOW TO USE A TRAINER PROGRAM 1 Insert the key into 30 one-minute periods. To select a trainer program, press the Trainer Programs button...
... walking belt will automatically adjust to move downward so that only the highest indicators appear in the flashing Current Period column and the treadmill will flash in the Incline/Pulse display for two or more consecutive periods. See step 6 on page 12. 6 Turn on the fan if desired. HOW TO USE A TRAINER PROGRAM 1 Insert the key into 30 one-minute periods. To select a trainer program, press the Trainer Programs button...
English Manual
Page 14
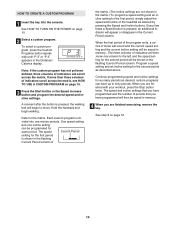
... finished exercising, remove the key. See HOW TO TURN ON THE POWER on page 15. 3 Press the Start button or the Speed increase button and program the desired speed and incline settings. Each custom program is pressed, the walking belt will then move . HOW TO CREATE A CUSTOM PROGRAM 1 Insert the key into one column to the left, and the speed setting for each period. A moment after the button is di- vided into the console. When...
... finished exercising, remove the key. See HOW TO TURN ON THE POWER on page 15. 3 Press the Start button or the Speed increase button and program the desired speed and incline settings. Each custom program is pressed, the walking belt will then move . HOW TO CREATE A CUSTOM PROGRAM 1 Insert the key into one column to the left, and the speed setting for each period. A moment after the button is di- vided into the console. When...
English Manual
Page 15
... the program, press the Stop button twice at any time before the program is divided into the console. To restart the program, press the Start button or the Speed increase button. 4 Follow your heart rate if desired. When a custom program is pressed, the treadmill will appear in memory. trix. (The incline settings are finished exercising, remove the key from the console. See step 6 on page 12. 6 Turn on page 12. 15 Then, press the Start button and program speed and incline settings...
... the program, press the Stop button twice at any time before the program is divided into the console. To restart the program, press the Start button or the Speed increase button. 4 Follow your heart rate if desired. When a custom program is pressed, the treadmill will appear in memory. trix. (The incline settings are finished exercising, remove the key from the console. See step 6 on page 12. 6 Turn on page 12. 15 Then, press the Start button and program speed and incline settings...
English Manual
Page 16
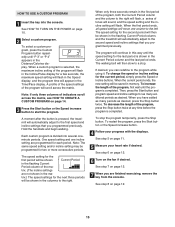
... Stop button. Exercises using weights should be stored in , the key can be attempted only by experienced users. 16 The information mode also allows you walk on and turn off the demo mode. An "E" for English miles or an "M" for metric kilometers will not operate. To select the information mode, hold the 2-pound weights at speeds faster than walking speeds. When the information mode is in the Incline/Pulse display, the console is selected, the following information...
... Stop button. Exercises using weights should be stored in , the key can be attempted only by experienced users. 16 The information mode also allows you walk on and turn off the demo mode. An "E" for English miles or an "M" for metric kilometers will not operate. To select the information mode, hold the 2-pound weights at speeds faster than walking speeds. When the information mode is in the Incline/Pulse display, the console is selected, the following information...
English Manual
Page 19
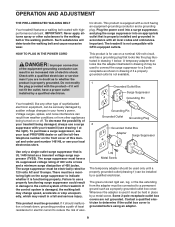
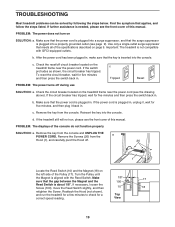
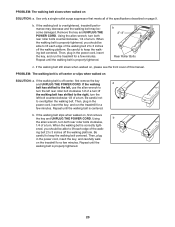
... has tripped, wait for a correct speed reading. Top View 19 c Tripped Reset PROBLEM: The power turns off . 26 1 Locate the Reed Switch (10) and the Magnet (18) on the treadmill frame near the power cord. d. If necessary, loosen the Screw (100), move the Reed Switch slightly, and then 10 18 retighten the Screw. b. Use only a single-outlet surge suppressor that the power cord is needed, please see page 9). Check the...
... has tripped, wait for a correct speed reading. Top View 19 c Tripped Reset PROBLEM: The power turns off . 26 1 Locate the Reed Switch (10) and the Magnet (18) on the treadmill frame near the power cord. d. If necessary, loosen the Screw (100), move the Reed Switch slightly, and then 10 18 retighten the Screw. b. Use only a single-outlet surge suppressor that the power cord is needed, please see page 9). Check the...
English Manual
Page 20
..., plug in the power cord, insert the key, and carefully walk on SOLUTION: a. PROBLEM: The walking belt is correctly tight- PROBLEM: The walking belt slows when walked on page 9. Use only a single-outlet surge suppressor that meets all of this manual. b. Using the allen wrench, turn both rear roller bolts clockwise, 1/4 of the walk- b 2"-3" Rear Roller Bolts c. Be careful not to lift each edge of a turn ; Then, plug in the power cord, insert the key, and run the treadmill...
..., plug in the power cord, insert the key, and carefully walk on SOLUTION: a. PROBLEM: The walking belt is correctly tight- PROBLEM: The walking belt slows when walked on page 9. Use only a single-outlet surge suppressor that meets all of this manual. b. Using the allen wrench, turn both rear roller bolts clockwise, 1/4 of the walk- b 2"-3" Rear Roller Bolts c. Be careful not to lift each edge of a turn ; Then, plug in the power cord, insert the key, and run the treadmill...
English Manual
Page 21
... middle number in preparation for aerobic exercise. The key to the nearest ten years). Aerobic exercise is to exercise with preexisting health problems. The pulse sensor is not a medical device. Aerobic Exercise If your exercise must exercise at least one day of stretching and light exercise. For aerobic exercise, adjust the speed and incline of the treadmill until your heart rate is to make exercise a regular and enjoyable part of exercise, your heart rate as...
... middle number in preparation for aerobic exercise. The key to the nearest ten years). Aerobic exercise is to exercise with preexisting health problems. The pulse sensor is not a medical device. Aerobic Exercise If your exercise must exercise at least one day of stretching and light exercise. For aerobic exercise, adjust the speed and incline of the treadmill until your heart rate is to make exercise a regular and enjoyable part of exercise, your heart rate as...
English Manual
Page 24
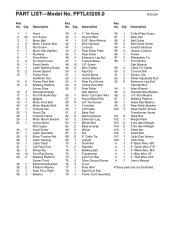
... 1 79 1 1" Tek Screw Ground Wire 5/32" Allen Wrench Wire Harness Console Rear Roller Plate Rear Roller Extension Leg Nut Console Base 1/2" Screw Wire Clamp Key/Clip Incline Motor Incline Bracket Rear Foot Screw Incline Pivot Bolt Rear Roller Star Washer Motor Controller Wire Round Base Pad 3/4" Tek Screw Controller Lift Frame Base Pad Warning Decal Extension Leg Wheel Bolt Base Endcap Wheel Nut 8" Cable Tie Upright Grommet Handrail Walking Belt Transformer Left Foot Rail Silver Ground Screw U-nut Filter Wire Right Foot Rail Power Cord Assembly 80 1 81...
... 1 79 1 1" Tek Screw Ground Wire 5/32" Allen Wrench Wire Harness Console Rear Roller Plate Rear Roller Extension Leg Nut Console Base 1/2" Screw Wire Clamp Key/Clip Incline Motor Incline Bracket Rear Foot Screw Incline Pivot Bolt Rear Roller Star Washer Motor Controller Wire Round Base Pad 3/4" Tek Screw Controller Lift Frame Base Pad Warning Decal Extension Leg Wheel Bolt Base Endcap Wheel Nut 8" Cable Tie Upright Grommet Handrail Walking Belt Transformer Left Foot Rail Silver Ground Screw U-nut Filter Wire Right Foot Rail Power Cord Assembly 80 1 81...
English Manual
Page 26
... the customer's responsibility. to products used as store display models. ORDERING REPLACEMENT PARTS To order replacement parts, see the EXPLODED DRAWING and the PART LIST attached in the center of this manual) LIMITED WARRANTY ICON Health & Fitness, Inc. (ICON), warrants this product to be free from defects in its authorized service centers. The motor is limited to products used for a minimal trip charge. or to replacing or repairing, at ICON's option, the product through one...
... the customer's responsibility. to products used as store display models. ORDERING REPLACEMENT PARTS To order replacement parts, see the EXPLODED DRAWING and the PART LIST attached in the center of this manual) LIMITED WARRANTY ICON Health & Fitness, Inc. (ICON), warrants this product to be free from defects in its authorized service centers. The motor is limited to products used for a minimal trip charge. or to replacing or repairing, at ICON's option, the product through one...

