

English Manual
Page 2
... 146148. 6. TABLE OF CONTENTS IMPORTANT PRECAUTIONS 2 BEFORE YOU BEGIN 4 ASSEMBLY 5 OPERATION AND ADJUSTMENT 7 HOW TO FOLD AND MOVE THE TREADMILL 10 TROUBLE-SHOOTING 12 CONDITIONING GUIDELINES 14 ORDERING REPLACEMENT PARTS Back Cover FULL 90-DAY WARRANTY Back Cover Note: An EXPLODED DRAWING and a ...PART LIST are attached in damage to the control system of the treadmill. Keep the treadmill indoors, away from heated surfaces. 2 Do not wear loose clothing that all users of this manual. IMPORTANT PRECAUTIONS WARNING: To...
... 146148. 6. TABLE OF CONTENTS IMPORTANT PRECAUTIONS 2 BEFORE YOU BEGIN 4 ASSEMBLY 5 OPERATION AND ADJUSTMENT 7 HOW TO FOLD AND MOVE THE TREADMILL 10 TROUBLE-SHOOTING 12 CONDITIONING GUIDELINES 14 ORDERING REPLACEMENT PARTS Back Cover FULL 90-DAY WARRANTY Back Cover Note: An EXPLODED DRAWING and a ...PART LIST are attached in damage to the control system of the treadmill. Keep the treadmill indoors, away from heated surfaces. 2 Do not wear loose clothing that all users of this manual. IMPORTANT PRECAUTIONS WARNING: To...
English Manual
Page 3
...any opening. scribed in use this manual should be able to safely lift 45 pounds (20 kg) to raise, lower, or move the treadmill until it is capable of this manual. SEARS assumes no responsibility for personal injury or property damage sustained by or through the use of high... shown. Do not use . 18. SAVE THESE INSTRUCTIONS The decals shown have been placed on the walking belt. Never move the treadmill. 19. Never leave the treadmill unattended while it is not working properly. (See BEFORE YOU BEGIN on page 10.) You must be performed by an authorized service ...
...any opening. scribed in use this manual should be able to safely lift 45 pounds (20 kg) to raise, lower, or move the treadmill until it is capable of this manual. SEARS assumes no responsibility for personal injury or property damage sustained by or through the use of high... shown. Do not use . 18. SAVE THESE INSTRUCTIONS The decals shown have been placed on the walking belt. Never move the treadmill. 19. Never leave the treadmill unattended while it is not working properly. (See BEFORE YOU BEGIN on page 10.) You must be performed by an authorized service ...
English Manual
Page 4
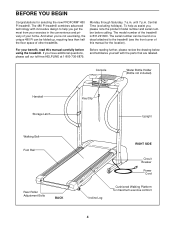
...HELPLINE at 1-800-736-6879, Before reading further, please review the drawing below and familiarize yourself with innovative design to the treadmill (see the front cover of your benefit, read this manual for the location). Console Water Bottle Holder (Bottle not included... Adjustment Bolts BACK Key/Clip Upright RIGHT SIDE Circuit Breaker Power Cord Incline Leg Cushioned Walking Platform for selecting the new PROFORM® 480 Pi treadmill. Central Time (excluding holidays). until 7 p.m. BEFORE YOU BEGIN Congratulations for maximum exercise comfort 4 And when you ,...
...HELPLINE at 1-800-736-6879, Before reading further, please review the drawing below and familiarize yourself with innovative design to the treadmill (see the front cover of your benefit, read this manual for the location). Console Water Bottle Holder (Bottle not included... Adjustment Bolts BACK Key/Clip Upright RIGHT SIDE Circuit Breaker Power Cord Incline Leg Cushioned Walking Platform for selecting the new PROFORM® 480 Pi treadmill. Central Time (excluding holidays). until 7 p.m. BEFORE YOU BEGIN Congratulations for maximum exercise comfort 4 And when you ,...
English Manual
Page 5
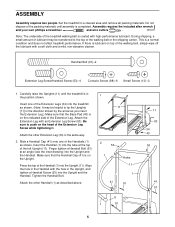
.... Attach the other Extension Leg (34) in a cleared area and remove all packing materials. Note: The underside of the packing materials until the treadmill is on top of the walking belt, simply wipe off the lubricant with high-performance lubricant. Handrail Bolt (91)-2 Extension Leg Screw/Handrail Screw (...(1) into the Upright and the Handrail. Align the hole in the position shown. ASSEMBLY Assembly requires two people. Do not dispose of the treadmill walking belt is on the head of the left Upright (11). Attach the Extension Leg with the hole in the direction shown by the ...
.... Attach the other Extension Leg (34) in a cleared area and remove all packing materials. Note: The underside of the packing materials until the treadmill is on top of the walking belt, simply wipe off the lubricant with high-performance lubricant. Handrail Bolt (91)-2 Extension Leg Screw/Handrail Screw (...(1) into the Upright and the Handrail. Align the hole in the position shown. ASSEMBLY Assembly requires two people. Do not dispose of the treadmill walking belt is on the head of the left Upright (11). Attach the Extension Leg with the hole in the direction shown by the ...

English Manual
Page 6
... in the Console Base. Look into the Uprights (11) and the Console Base (46). WARNING: Do not disconnect or connect the Wires while the treadmill power cord is used to the left Upright (11) with the indicated plastic ties and insert the two Wires (21) through the indicated holes in... the Wires (21) have been started, tighten the Screws until they are tightened before you use the treadmill. After all parts are snug; To protect the floor or carpet, place a mat under the treadmill. 6 Plug the Wires fully into the connectors. do not overtighten the Screws. 4a 46 21 11 ...
... in the Console Base. Look into the Uprights (11) and the Console Base (46). WARNING: Do not disconnect or connect the Wires while the treadmill power cord is used to the left Upright (11) with the indicated plastic ties and insert the two Wires (21) through the indicated holes in... the Wires (21) have been started, tighten the Screws until they are tightened before you use the treadmill. After all parts are snug; To protect the floor or carpet, place a mat under the treadmill. 6 Plug the Wires fully into the connectors. do not overtighten the Screws. 4a 46 21 11 ...
English Manual
Page 7
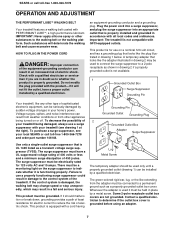
.... This product is not compatible with a qualified electrician or serviceman if you are not grounded. Check with GFCI-equipped outlets. Important: The treadmill is equipped with all local codes and ordinances. Failure to a 2-pole receptacle as a transient voltage surge suppressor (TVSS). Contact a qualified ...substances to indicate whether it is used only until a properly grounded outlet (drawing 1) can result in an increased risk of the treadmill. The surge suppressor must be connected to a permanent ground such as to determine if the outlet box cover is for 120 volts...
.... This product is not compatible with a qualified electrician or serviceman if you are not grounded. Check with GFCI-equipped outlets. Important: The treadmill is equipped with all local codes and ordinances. Failure to a 2-pole receptacle as a transient voltage surge suppressor (TVSS). Contact a qualified ...substances to indicate whether it is used only until a properly grounded outlet (drawing 1) can result in an increased risk of the treadmill. The surge suppressor must be connected to a permanent ground such as to determine if the outlet box cover is for 120 volts...
English Manual
Page 8
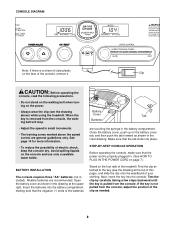
...Before operating the console, read the following precautions. • Do not stand on the walking belt when turning on the foot rails of the treadmill. See page 14 for more information. • To reduce the possibility of the console, remove it. Close the battery cover, push up on...above the speed control are recommended. Open the battery cover as shown in small increments. • The training zones marked above ) while using the treadmill. CONSOLE DIAGRAM Note: If there is a sheet of clear plastic on the console and use only a sealable water bottle. Avoid spilling liquids on...
...Before operating the console, read the following precautions. • Do not stand on the walking belt when turning on the foot rails of the treadmill. See page 14 for more information. • To reduce the possibility of the console, remove it. Close the battery cover, push up on...above the speed control are recommended. Open the battery cover as shown in small increments. • The training zones marked above ) while using the treadmill. CONSOLE DIAGRAM Note: If there is a sheet of clear plastic on the console and use only a sealable water bottle. Avoid spilling liquids on...
English Manual
Page 9
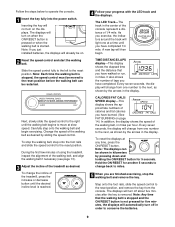
...control to miles. 5 When you are finished exercising, stop the walking belt and remove the key. During the first few minutes of using the treadmill, inspect the alignment of the walking belt, and align the walking belt if necessary (see page 13). 3 Adjust the incline of calories and ... Note: Each time the walking belt is stopped, the speed control must be shown in the center of the console represent a distance of the treadmill, press the increase or decrease button until you exercise, the indicators around the track will already be restarted. Note: Any time that you have ...
...control to miles. 5 When you are finished exercising, stop the walking belt and remove the key. During the first few minutes of using the treadmill, inspect the alignment of the walking belt, and align the walking belt if necessary (see page 13). 3 Adjust the incline of calories and ... Note: Each time the walking belt is stopped, the speed control must be shown in the center of the console represent a distance of the treadmill, press the increase or decrease button until you exercise, the indicators around the track will already be restarted. Note: Any time that you have ...
English Manual
Page 10
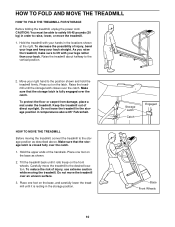
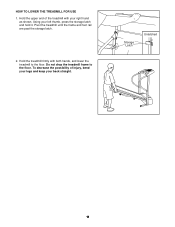
..., bend your legs and keep your right hand to lift with your back. As you raise the treadmill, make sure to the position shown and hold the treadmill firmly. Raise the treadmill until it rolls freely on the base as described above 85° Fahrenheit. Make sure that the ...on the front wheels. To decrease the possibility of injury, use extreme caution while moving the treadmill, convert the treadmill to the desired location. Press out on the base, and carefully lower the treadmill until the storage latch closes over the catch. To protect the floor or carpet from damage,...
..., bend your legs and keep your right hand to lift with your back. As you raise the treadmill, make sure to the position shown and hold the treadmill firmly. Raise the treadmill until it rolls freely on the base as described above 85° Fahrenheit. Make sure that the ...on the front wheels. To decrease the possibility of injury, use extreme caution while moving the treadmill, convert the treadmill to the desired location. Press out on the base, and carefully lower the treadmill until the storage latch closes over the catch. To protect the floor or carpet from damage,...
English Manual
Page 11
Hold the treadmill firmly with your left thumb, press the storage latch and hold it. Storage Latch Unlatched 11 Using your right hand as shown. Do not drop the treadmill frame to the floor. Pivot the treadmill until the frame and foot rail are past the storage latch. 2. Hold the upper end of injury, bend your legs and keep your back straight. To decrease the possibility of the treadmill with both hands, and lower the treadmill to the floor. HOW TO LOWER THE TREADMILL FOR USE 1.
Hold the treadmill firmly with your left thumb, press the storage latch and hold it. Storage Latch Unlatched 11 Using your right hand as shown. Do not drop the treadmill frame to the floor. Pivot the treadmill until the frame and foot rail are past the storage latch. 2. Hold the upper end of injury, bend your legs and keep your back straight. To decrease the possibility of the treadmill with both hands, and lower the treadmill to the floor. HOW TO LOWER THE TREADMILL FOR USE 1.
English Manual
Page 12
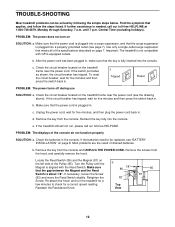
...the drawing above). Use only a single-outlet surge suppressor that the power cord is needed, call our toll-free HELPLINE. Important: The treadmill is about 1/8". b. d. PROBLEM: The displays of the specifications described on page 7. Retighten the Screw. Re-attach the hood, and run... the screws from the hood, and carefully remove the hood. Make sure that applies, and follow the steps listed. b. e. TROUBLE-SHOOTING Most treadmill problems can be replaced, see "BATTERY INSTALLATION" on page 8. b. PROBLEM: The power turns off during use c Tripped Reset Tripped Reset SOLUTION:...
...the drawing above). Use only a single-outlet surge suppressor that the power cord is needed, call our toll-free HELPLINE. Important: The treadmill is about 1/8". b. d. PROBLEM: The displays of the specifications described on page 7. Retighten the Screw. Re-attach the hood, and run... the screws from the hood, and carefully remove the hood. Make sure that applies, and follow the steps listed. b. e. TROUBLE-SHOOTING Most treadmill problems can be replaced, see "BATTERY INSTALLATION" on page 8. b. PROBLEM: The power turns off during use c Tripped Reset Tripped Reset SOLUTION:...
English Manual
Page 13
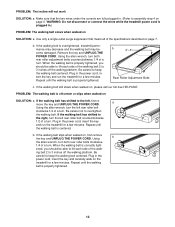
...-outlet surge suppressor that the two wires under the console are fully plugged in the power cord, insert the key and carefully walk on the treadmill for a few minutes. Be careful to 3 inches off the walking platform. If the walking belt has shifted to the left rear roller bolt clockwise ...1/2 of the walking belt 2 to keep the walking belt centered. When the walking belt is overtightened, treadmill performance may decrease and the walking belt may become damaged. WARNING: Do not disconnect or connect the wires while the...
...-outlet surge suppressor that the two wires under the console are fully plugged in the power cord, insert the key and carefully walk on the treadmill for a few minutes. Be careful to 3 inches off the walking platform. If the walking belt has shifted to the left rear roller bolt clockwise ...1/2 of the walking belt 2 to keep the walking belt centered. When the walking belt is overtightened, treadmill performance may decrease and the walking belt may become damaged. WARNING: Do not disconnect or connect the wires while the...
English Manual
Page 14
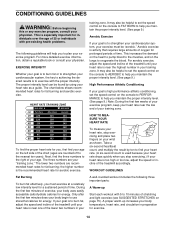
... on the lungs to help you maintain the proper intensity level. (See page 9.) Note: During the first few minutes of the treadmill until your heart rate is high performance athletic conditioning, set the speed control on your body uses easily accessible carbohydrate calories for fat ... to strengthen your cardiovascular system, the key to achieving the desired results is especially important for individuals over the age of the treadmill until your training zone. The chart below shows recommended heart rates for a sustained period of the lower two numbers in preparation for...
... on the lungs to help you maintain the proper intensity level. (See page 9.) Note: During the first few minutes of the treadmill until your heart rate is high performance athletic conditioning, set the speed control on your body uses easily accessible carbohydrate calories for fat ... to strengthen your cardiovascular system, the key to achieving the desired results is especially important for individuals over the age of the treadmill until your training zone. The chart below shows recommended heart rates for a sustained period of the lower two numbers in preparation for...

English Manual
Page 19
... the location of charge. See the front cover of this manual). This warranty does not apply when the TREADMILL EXERCISER is missing • or you visit your PROFORM® 480 Pi treadmill are available for rental purposes. To request service or to find that: • you need help or ...defect in material or workmanship in this manual to order parts by telephone, call the following information: • The NAME OF THE PRODUCT (PROFORM® 480 Pi treadmill) • The MODEL NUMBER OF THE PRODUCT (831.291600) • The KEY NUMBER AND DESCRIPTION OF THE PART (see the EXPLODED...
... the location of charge. See the front cover of this manual). This warranty does not apply when the TREADMILL EXERCISER is missing • or you visit your PROFORM® 480 Pi treadmill are available for rental purposes. To request service or to find that: • you need help or ...defect in material or workmanship in this manual to order parts by telephone, call the following information: • The NAME OF THE PRODUCT (PROFORM® 480 Pi treadmill) • The MODEL NUMBER OF THE PRODUCT (831.291600) • The KEY NUMBER AND DESCRIPTION OF THE PART (see the EXPLODED...


