
Uk Manual
Page 1
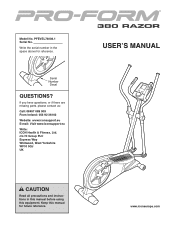
c/o HI Group PLC Express Way Whitwood, West Yorkshire WF10 5QJ UK CAUTION Read all precautions and instructions in the space above for future reference. Model No. Serial Number Decal QUESTIONS? If you have questions, or if there are missing parts, please contact us: Call: 08457 089 009 From Ireland: 053 92 36102 Website: www.iconsupport.eu E-mail: Visit www.iconsupport.eu Write: ICON Health & Fitness, Ltd. Write the serial number in this manual before using this manual for reference. Keep this equipment. USERʼS MANUAL www.iconeurope.com PFEVEL74008.1 Serial No.
c/o HI Group PLC Express Way Whitwood, West Yorkshire WF10 5QJ UK CAUTION Read all precautions and instructions in the space above for future reference. Model No. Serial Number Decal QUESTIONS? If you have questions, or if there are missing parts, please contact us: Call: 08457 089 009 From Ireland: 053 92 36102 Website: www.iconsupport.eu E-mail: Visit www.iconsupport.eu Write: ICON Health & Fitness, Ltd. Write the serial number in this manual before using this manual for reference. Keep this equipment. USERʼS MANUAL www.iconeurope.com PFEVEL74008.1 Serial No.
Uk Manual
Page 2
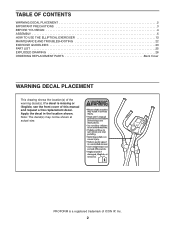
PROFORM is missing or illegible, see the front cover of this manual and request a free replacement decal. Note: The decal(s) may not be shown at actual size. If a decal is a registered trademark of the warning decal(s). Apply ...the decal in the location shown. TABLE OF CONTENTS WARNING DECAL PLACEMENT 2 IMPORTANT PRECAUTIONS 3 BEFORE YOU BEGIN 4 ASSEMBLY 5 HOW TO USE THE ELLIPTICAL EXERCISER...
PROFORM is missing or illegible, see the front cover of this manual and request a free replacement decal. Note: The decal(s) may not be shown at actual size. If a decal is a registered trademark of the warning decal(s). Apply ...the decal in the location shown. TABLE OF CONTENTS WARNING DECAL PLACEMENT 2 IMPORTANT PRECAUTIONS 3 BEFORE YOU BEGIN 4 ASSEMBLY 5 HOW TO USE THE ELLIPTICAL EXERCISER...

Uk Manual
Page 3
...IMPORTANT PRECAUTIONS WARNING: To reduce the risk of serious injury, read all important precautions and instructions in this manual and all times. 8. do not arch your elliptical exerciser and 2 ft. (0.6 m) on a level surface, with pre-existing health problems. 2. The ...sensor is intended only as described in this manual. 3 Make sure that all users of the elliptical exerciser are adequately informed of your back. 11. Before beginning any worn parts immediately. 6. Keep your elliptical exerciser indoors, away from your elliptical exerciser at least 3 ft. (1 m)...
...IMPORTANT PRECAUTIONS WARNING: To reduce the risk of serious injury, read all important precautions and instructions in this manual and all times. 8. do not arch your elliptical exerciser and 2 ft. (0.6 m) on a level surface, with pre-existing health problems. 2. The ...sensor is intended only as described in this manual. 3 Make sure that all users of the elliptical exerciser are adequately informed of your back. 11. Before beginning any worn parts immediately. 6. Keep your elliptical exerciser indoors, away from your elliptical exerciser at least 3 ft. (1 m)...
Uk Manual
Page 4
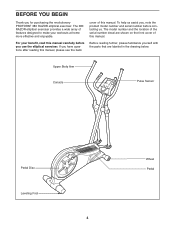
.... The model number and the location of this manual carefully before contacting us. The 380 RAZOR elliptical exerciser provides a wide array of this manual. To help us assist you, note the product model number and serial number before you for purchasing the revolutionary PROFORM® 380 RAZOR elliptical exerciser. Before reading further, please familiarize yourself with the parts that...
.... The model number and the location of this manual carefully before contacting us. The 380 RAZOR elliptical exerciser provides a wide array of this manual. To help us assist you, note the product model number and serial number before you for purchasing the revolutionary PROFORM® 380 RAZOR elliptical exerciser. Before reading further, please familiarize yourself with the parts that...

Uk Manual
Page 5
... been preassembled. The number in parentheses below to the included tool(s), assembly requires a Phillips screwdriver wrench , and a rubber mallet . , an adjustable As you assemble the elliptical exerciser, use power tools for assembly. Note: If a part is not in a cleared area and remove the packing materials. The number following the parentheses is... part, from the PART LIST near the end of the packing materials until assembly is the quantity needed for assembly. Do not dispose of this manual.
... been preassembled. The number in parentheses below to the included tool(s), assembly requires a Phillips screwdriver wrench , and a rubber mallet . , an adjustable As you assemble the elliptical exerciser, use power tools for assembly. Note: If a part is not in a cleared area and remove the packing materials. The number following the parentheses is... part, from the PART LIST near the end of the packing materials until assembly is the quantity needed for assembly. Do not dispose of this manual.

Uk Manual
Page 8
... the cover of the Upright. Tip: Avoid pinching the wires. plug the other electronic components. Pull a console pulse wire outward from each side of this manual. Attach the Console (4) to the Wire Harness (86). IMPORTANT: If the Console has been exposed to cold temperatures, allow it to warm to orient the...
... the cover of the Upright. Tip: Avoid pinching the wires. plug the other electronic components. Pull a console pulse wire outward from each side of this manual. Attach the Console (4) to the Wire Harness (86). IMPORTANT: If the Console has been exposed to cold temperatures, allow it to warm to orient the...
Uk Manual
Page 14
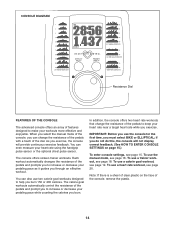
...heart rate workouts that change the resistance of the pedals with a touch of the pedals and prompt you to help you must select BIKE or ELLIPTICAL; To use a calorie goal workout, see page 16. CONSOLE DIAGRAM Resistance Dial FEATURES OF THE CONSOLE The advanced console offers an array of ..., see page 15. Each workout automatically changes the resistance of features designed to make your workouts more effective and enjoyable. if you use the manual mode, see page 19. You can even measure your heart rate near a target heart rate while you exercise. To use the console for ...
...heart rate workouts that change the resistance of the pedals with a touch of the pedals and prompt you to help you must select BIKE or ELLIPTICAL; To use a calorie goal workout, see page 16. CONSOLE DIAGRAM Resistance Dial FEATURES OF THE CONSOLE The advanced console offers an array of ..., see page 15. Each workout automatically changes the resistance of features designed to make your workouts more effective and enjoyable. if you use the manual mode, see page 19. You can even measure your heart rate near a target heart rate while you exercise. To use the console for ...
Uk Manual
Page 16
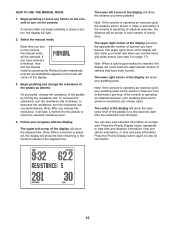
...pace will take a moment for a few seconds each time the resistance level changes. The lower right corner of the elapsed time. HOW TO USE THE MANUAL MODE 1. You can also view selected information at a larger size. Press the Priority Display button repeatedly to turn on page 17). Note: When a workout..., your heart rate when you change the resistance, it will be selected. Note: When a calorie goal workout is operating an elliptical exerciser, the distance will be shown in the workout instead of the display will be shown in miles or kilometers. Follow your pedaling ...
...pace will take a moment for a few seconds each time the resistance level changes. The lower right corner of the elapsed time. HOW TO USE THE MANUAL MODE 1. You can also view selected information at a larger size. Press the Priority Display button repeatedly to turn on page 17). Note: When a workout..., your heart rate when you change the resistance, it will be selected. Note: When a calorie goal workout is operating an elliptical exerciser, the distance will be shown in the workout instead of the display will be shown in miles or kilometers. Follow your pedaling ...
Uk Manual
Page 18
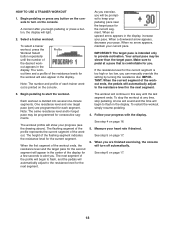
... at any button on page 17. 6. The height of the resistance levels for the current segment. See step 4 on page 17. 18 When you can manually override the setting by turning the resistance dial. out appears in the display. Note: The number and profile of the workout. When an upward arrow...
... at any button on page 17. 6. The height of the resistance levels for the current segment. See step 4 on page 17. 18 When you can manually override the setting by turning the resistance dial. out appears in the display. Note: The number and profile of the workout. When an upward arrow...

Uk Manual
Page 19
... desired. When an upward arrow appears in the display. The height of the workout ends, the resistance level and the target pace for you can manually override the setting by turning the resistance dial. Measure your progress with the display. To restart the workout, simply resume pedaling. 4. See step 4 on page...
... desired. When an upward arrow appears in the display. The height of the workout ends, the resistance level and the target pace for you can manually override the setting by turning the resistance dial. Measure your progress with the display. To restart the workout, simply resume pedaling. 4. See step 4 on page...
Uk Manual
Page 21
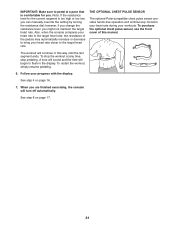
... any time, stop pedaling. To stop the workout at a pace that is comfortable for the current segment is too high or too low, you can manually override the setting by turning the resistance dial; See step 4 on page 17. 21 however, if you change the resistance level, you are finished exercising...
... any time, stop pedaling. To stop the workout at a pace that is comfortable for the current segment is too high or too low, you can manually override the setting by turning the resistance dial; See step 4 on page 17. 21 however, if you change the resistance level, you are finished exercising...
Uk Manual
Page 25
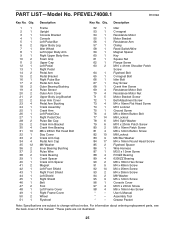
... Screw 96 1 Console Cover 97 4 M3.5 x 20mm Screw 98 4 M6 x 16mm Hex Screw * - For information about ordering replacement parts, see the back cover of this manual. *These parts are subject to change without notice. Assembly Tool * - PART LIST-Model No. Qty. Userʼ...
... Screw 96 1 Console Cover 97 4 M3.5 x 20mm Screw 98 4 M6 x 16mm Hex Screw * - For information about ordering replacement parts, see the back cover of this manual. *These parts are subject to change without notice. Assembly Tool * - PART LIST-Model No. Qty. Userʼ...

Uk Manual
Page 28
To help us assist you, be prepared to provide the following information when contacting us: • the model number and serial number of the product (see the front cover of this manual) • the name of the product (see the front cover of this manual) • the key number and description of the replacement part(s) (see the front cover of this manual. ORDERING REPLACEMENT PARTS To order replacement parts, please see the PART LIST and the EXPLODED DRAWING near the end of this manual) Part No. 286205 R1009A Printed in China © 2009 ICON IP, Inc.
To help us assist you, be prepared to provide the following information when contacting us: • the model number and serial number of the product (see the front cover of this manual) • the name of the product (see the front cover of this manual) • the key number and description of the replacement part(s) (see the front cover of this manual. ORDERING REPLACEMENT PARTS To order replacement parts, please see the PART LIST and the EXPLODED DRAWING near the end of this manual) Part No. 286205 R1009A Printed in China © 2009 ICON IP, Inc.


