
Uk Manual
Page 2
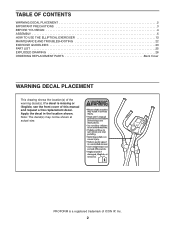
... trademark of ICON IP, Inc. 2 Apply the decal in the location shown. TABLE OF CONTENTS WARNING DECAL PLACEMENT 2 IMPORTANT PRECAUTIONS 3 BEFORE YOU BEGIN 4 ASSEMBLY 5 HOW TO USE THE ELLIPTICAL EXERCISER 13 MAINTENANCE AND TROUBLESHOOTING 22 EXERCISE GUIDELINES 23 PART LIST 25 EXPLODED DRAWING 26 ORDERING REPLACEMENT PARTS Back Cover WARNING DECAL PLACEMENT This drawing shows the location(s) of this manual and request a free replacement decal. PROFORM is missing or...
... trademark of ICON IP, Inc. 2 Apply the decal in the location shown. TABLE OF CONTENTS WARNING DECAL PLACEMENT 2 IMPORTANT PRECAUTIONS 3 BEFORE YOU BEGIN 4 ASSEMBLY 5 HOW TO USE THE ELLIPTICAL EXERCISER 13 MAINTENANCE AND TROUBLESHOOTING 22 EXERCISE GUIDELINES 23 PART LIST 25 EXPLODED DRAWING 26 ORDERING REPLACEMENT PARTS Back Cover WARNING DECAL PLACEMENT This drawing shows the location(s) of this manual and request a free replacement decal. PROFORM is missing or...

Uk Manual
Page 3
... instructions in the front and rear of heart rate readings. Over exercising may affect the accuracy of your elliptical exerciser on each side. 5. Wear appropriate exercise clothes when exercising; Hold the handgrip pulse sensor or the upper body arms when mounting, dismounting, or using your physician. do not wear loose clothes that could become caught on your elliptical exerciser before using your elliptical exerciser. When you experience pain while exercising, stop...
... instructions in the front and rear of heart rate readings. Over exercising may affect the accuracy of your elliptical exerciser on each side. 5. Wear appropriate exercise clothes when exercising; Hold the handgrip pulse sensor or the upper body arms when mounting, dismounting, or using your physician. do not wear loose clothes that could become caught on your elliptical exerciser before using your elliptical exerciser. When you experience pain while exercising, stop...
Uk Manual
Page 4
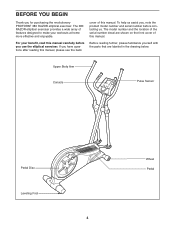
... benefit, read this manual carefully before contacting us assist you for purchasing the revolutionary PROFORM® 380 RAZOR elliptical exerciser. BEFORE YOU BEGIN Thank you , note the product model number and serial number before you have questions after reading this manual, please see the back cover of this manual. If you use the elliptical exerciser. Upper Body Arm Console Pulse Sensor Pedal Disc Leveling Foot 4 Wheel Pedal For your workouts at home more effective and...
... benefit, read this manual carefully before contacting us assist you for purchasing the revolutionary PROFORM® 380 RAZOR elliptical exerciser. BEFORE YOU BEGIN Thank you , note the product model number and serial number before you have questions after reading this manual, please see the back cover of this manual. If you use the elliptical exerciser. Upper Body Arm Console Pulse Sensor Pedal Disc Leveling Foot 4 Wheel Pedal For your workouts at home more effective and...

Uk Manual
Page 5
... the quantity needed for assembly. In addition to see if it has been preassembled. Place all parts of the elliptical exerciser in the hardware kit, check to the included tool(s), assembly requires a Phillips screwdriver wrench , and a rubber mallet . , an adjustable As you assemble the elliptical exerciser, use power tools for assembly. The number following the parentheses is the key number of the part, from the PART LIST near the...
... the quantity needed for assembly. In addition to see if it has been preassembled. Place all parts of the elliptical exerciser in the hardware kit, check to the included tool(s), assembly requires a Phillips screwdriver wrench , and a rubber mallet . , an adjustable As you assemble the elliptical exerciser, use power tools for assembly. The number following the parentheses is the key number of the part, from the PART LIST near the...

Uk Manual
Page 8
... (3), connect the console wire to the Upright (2) with all local codes and ordinances. 5 Batteries Cover 4 Batteries 6. Attach the Console (4) to the Wire Harness (86). Otherwise, you purchased this manual. To avoid damaging the console, use four D batteries (not included); Then, insert the console pulse wires downward through the Upright (2). Pull a console pulse wire outward from each side of this product or call the telephone number on the console; The Console (4) can use only a manufacturer-supplied AC adapter. Remove...
... (3), connect the console wire to the Upright (2) with all local codes and ordinances. 5 Batteries Cover 4 Batteries 6. Attach the Console (4) to the Wire Harness (86). Otherwise, you purchased this manual. To avoid damaging the console, use four D batteries (not included); Then, insert the console pulse wires downward through the Upright (2). Pull a console pulse wire outward from each side of this product or call the telephone number on the console; The Console (4) can use only a manufacturer-supplied AC adapter. Remove...

Uk Manual
Page 9
Tip: Avoid pinching the wires. Connect the console pulse wire in the Upright (2) to the right Pedal Arm (14) with a "Right" sticker, and orient it as shown. 9 Locate the bumper on the underside of the right Pedal Arm (14). Identify the Right Pedal (13), which are marked with an M10 x 20mm Patch Screw (79) and an M10 Split Washer (78). Slide the Console Cover (96) upward...
Tip: Avoid pinching the wires. Connect the console pulse wire in the Upright (2) to the right Pedal Arm (14) with a "Right" sticker, and orient it as shown. 9 Locate the bumper on the underside of the right Pedal Arm (14). Identify the Right Pedal (13), which are marked with an M10 x 20mm Patch Screw (79) and an M10 Split Washer (78). Slide the Console Cover (96) upward...
Uk Manual
Page 12
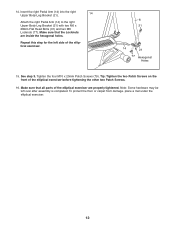
..., place a mat under the elliptical exerciser. 12 Repeat this step for the left over after assembly is completed. Tighten the four M10 x 20mm Patch Screws (79). Insert the right Pedal Arm (14) into the right Upper Body Leg Bracket (21). 14 Attach the right Pedal Arm (14) to the right Upper Body Leg Bracket (21) with two M6 x 28mm Flat Head Bolts (31) and two M6...
..., place a mat under the elliptical exerciser. 12 Repeat this step for the left over after assembly is completed. Tighten the four M10 x 20mm Patch Screws (79). Insert the right Pedal Arm (14) into the right Upper Body Leg Bracket (21). 14 Attach the right Pedal Arm (14) to the right Upper Body Leg Bracket (21) with two M6 x 28mm Flat Head Bolts (31) and two M6...

Uk Manual
Page 13
... turn the crank arms in the direction shown by the arrow; Upright Upper Body Arms Place your foot here Wheel Pedals Crank Arm Leveling Foot HOW TO LEVEL THE ELLIPTICAL EXERCISER If the elliptical exerciser rocks slightly on the wheels. the pedals will continue to a complete stop. Carefully move with a continuous motion. Then, step onto the other pedal. Pull the upright forward until they move the elliptical exerciser to the desired location and then lower...
... turn the crank arms in the direction shown by the arrow; Upright Upper Body Arms Place your foot here Wheel Pedals Crank Arm Leveling Foot HOW TO LEVEL THE ELLIPTICAL EXERCISER If the elliptical exerciser rocks slightly on the wheels. the pedals will continue to a complete stop. Carefully move with a continuous motion. Then, step onto the other pedal. Pull the upright forward until they move the elliptical exerciser to the desired location and then lower...
Uk Manual
Page 14
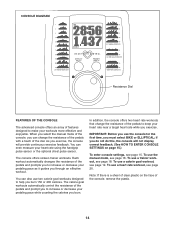
... exercise feedback. CONSOLE DIAGRAM Resistance Dial FEATURES OF THE CONSOLE The advanced console offers an array of features designed to make your pedaling pace as it guides you through an effective workout. IMPORTANT: Before you use a trainer workout, see page 16. When you select the manual mode of the console, you can even measure your heart rate using the handgrip pulse sensor or the optional chest pulse sensor. You can change the resistance of the pedals...
... exercise feedback. CONSOLE DIAGRAM Resistance Dial FEATURES OF THE CONSOLE The advanced console offers an array of features designed to make your pedaling pace as it guides you through an effective workout. IMPORTANT: Before you use a trainer workout, see page 16. When you select the manual mode of the console, you can even measure your heart rate using the handgrip pulse sensor or the optional chest pulse sensor. You can change the resistance of the pedals...
Uk Manual
Page 15
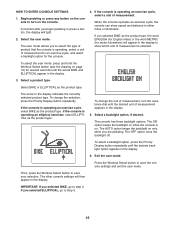
... BIKE, go to step 4. IMPORTANT: If you are pedaling. Select the user mode. The ON option keeps the backlight on while the console is operating an elliptical exerciser, select ELLIPTICAL as the product type. Then, press the Workout Select button to show speed and distance in the display indicates the currently selected product type. The other console settings will then appear in the display. 3. Select a product type. To change...
... BIKE, go to step 4. IMPORTANT: If you are pedaling. Select the user mode. The ON option keeps the backlight on while the console is operating an elliptical exerciser, select ELLIPTICAL as the product type. Then, press the Workout Select button to show speed and distance in the display indicates the currently selected product type. The other console settings will then appear in the display. 3. Select a product type. To change...
Uk Manual
Page 16
... lower right corner of the display will be shown in the workout instead of the display will show the distance you have selected a workout, reselect the manual mode by turning the resistance dial. Note: If the console is operating an elliptical exerciser, your progress with the display. If the console is operating an exercise cycle, your pedaling pace. You can also view selected information at a larger size. Press the Priority Display button...
... lower right corner of the display will be shown in the workout instead of the display will show the distance you have selected a workout, reselect the manual mode by turning the resistance dial. Note: If the console is operating an elliptical exerciser, your progress with the display. If the console is operating an exercise cycle, your pedaling pace. You can also view selected information at a larger size. Press the Priority Display button...
Uk Manual
Page 17
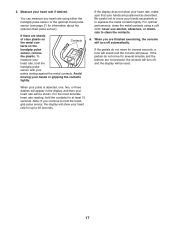
... the handgrip pulse sensor, remove the plastic. To measure your heart rate, hold the handgrip pulse sensor, the display will show your heart rate, make sure that your palms resting against the metal contacts. For the most accurate heart rate reading, hold the contacts for information about the optional chest pulse sensor). If the pedals do not move your heart rate for several minutes and the buttons are finished exercising, the console will...
... the handgrip pulse sensor, remove the plastic. To measure your heart rate, hold the handgrip pulse sensor, the display will show your heart rate, make sure that your palms resting against the metal contacts. For the most accurate heart rate reading, hold the contacts for information about the optional chest pulse sensor). If the pedals do not move your heart rate for several minutes and the buttons are finished exercising, the console will...
Uk Manual
Page 18
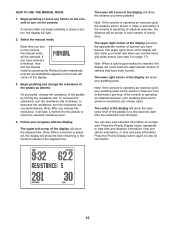
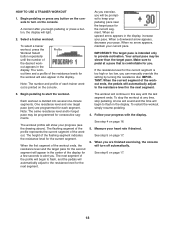
... show your pedaling pace near the target pace for the second segment will turn on page 17. 18 See step 6 on the console. The work - To stop the workout at a pace that is divided into several one target pace (rpm) are finished exercising, the console will appear in the display. Measure your current pace. To select a trainer workout, press the Profile Workout Select button repeatedly...
... show your pedaling pace near the target pace for the second segment will turn on page 17. 18 See step 6 on the console. The work - To stop the workout at a pace that is divided into several one target pace (rpm) are finished exercising, the console will appear in the display. Measure your current pace. To select a trainer workout, press the Profile Workout Select button repeatedly...

Uk Manual
Page 19
... is printed on page 17. 6. See step 5 on the console. 3. When the first segment of the workout. As you exercise, you can manually override the setting by turning the resistance dial. When an upward arrow appears in the display. Each calorie goal workout is intended only to start the workout. Begin pedaling or press any time, stop the workout at a pace that is comfortable for consecutive...
... is printed on page 17. 6. See step 5 on the console. 3. When the first segment of the workout. As you exercise, you can manually override the setting by turning the resistance dial. When an upward arrow appears in the display. Each calorie goal workout is intended only to start the workout. Begin pedaling or press any time, stop the workout at a pace that is comfortable for consecutive...

Uk Manual
Page 20
... in the display and the number 110 will be programmed for the workout will begin pedaling or press a button, the display will automatically increase or decrease to flash. Begin pedaling or press any button on the console. Note: The same target heart rate may be prompted to operate properly. Enter a target heart rate setting. Turn the resistance dial to the target heart rate. however, you select a heart rate workout, the words ADJUST MAX TARGET HEART RATE will appear...
... in the display and the number 110 will be programmed for the workout will begin pedaling or press a button, the display will automatically increase or decrease to flash. Begin pedaling or press any button on the console. Note: The same target heart rate may be prompted to operate properly. Enter a target heart rate setting. Turn the resistance dial to the target heart rate. however, you select a heart rate workout, the words ADJUST MAX TARGET HEART RATE will appear...
Uk Manual
Page 21
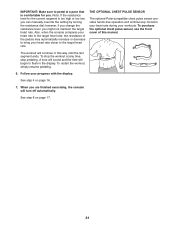
... OPTIONAL CHEST PULSE SENSOR The optional Polar-compatible chest pulse sensor provides hands-free operation and continuously monitors your heart rate during your workouts. A tone will sound and the time will continue in the display. When you can manually override the setting by turning the resistance dial; Note: If the resistance level for the current segment is comfortable for you might not maintain the target heart rate. To stop pedaling. To...
... OPTIONAL CHEST PULSE SENSOR The optional Polar-compatible chest pulse sensor provides hands-free operation and continuously monitors your heart rate during your workouts. A tone will sound and the time will continue in the display. When you can manually override the setting by turning the resistance dial; Note: If the resistance level for the current segment is comfortable for you might not maintain the target heart rate. To stop pedaling. To...
Uk Manual
Page 22
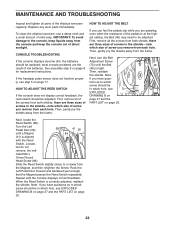
most console problems are pedaling, even when the resistance of the pedals is aligned with the Reed Switch. HOW TO ADJUST THE REED SWITCH If the console does not display correct feedback, the reed switch should be replaced; there are three sizes of screws in the shields-note which size of direct sunlight. Then, reattach the shields. Next, locate the Reed Switch (58). Loosen, but do not remove, the indi- To clean the elliptical exerciser, use a damp...
most console problems are pedaling, even when the resistance of the pedals is aligned with the Reed Switch. HOW TO ADJUST THE REED SWITCH If the console does not display correct feedback, the reed switch should be replaced; there are three sizes of screws in the shields-note which size of direct sunlight. Then, reattach the shields. Next, locate the Reed Switch (58). Loosen, but do not remove, the indi- To clean the elliptical exerciser, use a damp...
Uk Manual
Page 23
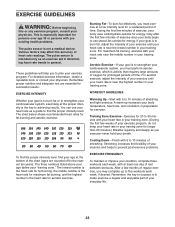
... maximum fat burning, exercise with your heart rate in your training zone. (During the first few minutes of your exercise until your heart rate is the heart rate for longer than 20 minutes.) Breathe regularly and deeply as a guide to 30 minutes with your heart rate near the middle number in your "training zone." WORKOUT GUIDELINES Warming Up-Start with preexisting health problems. The pulse sensor is to the nearest...
... maximum fat burning, exercise with your heart rate in your training zone. (During the first few minutes of your exercise until your heart rate is the heart rate for longer than 20 minutes.) Breathe regularly and deeply as a guide to 30 minutes with your heart rate near the middle number in your "training zone." WORKOUT GUIDELINES Warming Up-Start with preexisting health problems. The pulse sensor is to the nearest...
Uk Manual
Page 25
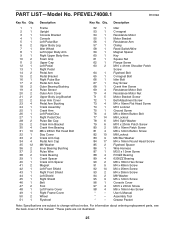
.... PART LIST-Model No. PFEVEL74008.1 R1009A Key No. Description Key No. Userʼs Manual * - Grease Packet Note: Specifications are not illustrated. 25 Assembly Tool * - Qty. Description 1 1 Frame 2 1 Upright 3 1 Console Bracket 4 1 Console 5 1 Left Pulse Bar 6 2 Upper Body Leg 7 1 Idler Wheel 8 1 Left Upper Body Arm 9 1 Right Upper Body Arm 10 2 Foam Grip 11 2 Upper Cap 12 1 Left Pedal 13 1 Right Pedal 14 2 Pedal Arm 15 2 Pedal Bracket 16 1 Right Pulse Bar 17 2 Pedal Arm Axle 18 2 Outer Bearing Bushing 19 4 Pulse...
.... PART LIST-Model No. PFEVEL74008.1 R1009A Key No. Description Key No. Userʼs Manual * - Grease Packet Note: Specifications are not illustrated. 25 Assembly Tool * - Qty. Description 1 1 Frame 2 1 Upright 3 1 Console Bracket 4 1 Console 5 1 Left Pulse Bar 6 2 Upper Body Leg 7 1 Idler Wheel 8 1 Left Upper Body Arm 9 1 Right Upper Body Arm 10 2 Foam Grip 11 2 Upper Cap 12 1 Left Pedal 13 1 Right Pedal 14 2 Pedal Arm 15 2 Pedal Bracket 16 1 Right Pulse Bar 17 2 Pedal Arm Axle 18 2 Outer Bearing Bushing 19 4 Pulse...
Uk Manual
Page 28
ORDERING REPLACEMENT PARTS To order replacement parts, please see the PART LIST and the EXPLODED DRAWING near the end of this manual) Part No. 286205 R1009A Printed in China © 2009 ICON IP, Inc. To help us assist you, be prepared to provide the following information when contacting us: • the model number and serial number of the product (see the front cover of this manual) • the name of the product (see the front cover of this manual) • the key number and description of the replacement part(s) (see the front cover of this manual.
ORDERING REPLACEMENT PARTS To order replacement parts, please see the PART LIST and the EXPLODED DRAWING near the end of this manual) Part No. 286205 R1009A Printed in China © 2009 ICON IP, Inc. To help us assist you, be prepared to provide the following information when contacting us: • the model number and serial number of the product (see the front cover of this manual) • the name of the product (see the front cover of this manual) • the key number and description of the replacement part(s) (see the front cover of this manual.

