
English Manual
Page 1
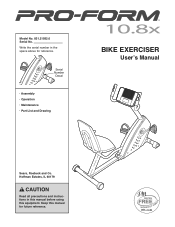
Write the serial number in this manual before using this manual for reference. Serial Number Decal • Assembly • Operation • Maintenance • Part List and Drawing BIKE EXERCISER Userʼs Manual Sears, Roebuck and Co. Keep this equipment. Model No. 831.21932.0 Serial No. Hoffman Estates, IL 60179 CAUTION Read all precautions and instructions in the space above for future reference.
Write the serial number in this manual before using this manual for reference. Serial Number Decal • Assembly • Operation • Maintenance • Part List and Drawing BIKE EXERCISER Userʼs Manual Sears, Roebuck and Co. Keep this equipment. Model No. 831.21932.0 Serial No. Hoffman Estates, IL 60179 CAUTION Read all precautions and instructions in the space above for future reference.
English Manual
Page 2
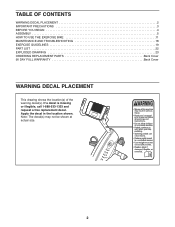
Apply the decal in the location shown. TABLE OF CONTENTS WARNING DECAL PLACEMENT 2 IMPORTANT PRECAUTIONS 3 BEFORE YOU BEGIN 4 ASSEMBLY 5 HOW TO USE THE EXERCISE BIKE 11 MAINTENANCE AND TROUBLESHOOTING 18 EXERCISE GUIDELINES 19 PART LIST 22 EXPLODED DRAWING 23 ORDERING REPLACEMENT PARTS Back Cover 90 DAY FULL WARRANTY Back Cover WARNING DECAL PLACEMENT This drawing shows the location(s) of the warning decal(s). If a decal is missing or illegible, call 1-888-533-1333 and request a free replacement decal. Note: The decal(s) may not be shown at actual size. 2
Apply the decal in the location shown. TABLE OF CONTENTS WARNING DECAL PLACEMENT 2 IMPORTANT PRECAUTIONS 3 BEFORE YOU BEGIN 4 ASSEMBLY 5 HOW TO USE THE EXERCISE BIKE 11 MAINTENANCE AND TROUBLESHOOTING 18 EXERCISE GUIDELINES 19 PART LIST 22 EXPLODED DRAWING 23 ORDERING REPLACEMENT PARTS Back Cover 90 DAY FULL WARRANTY Back Cover WARNING DECAL PLACEMENT This drawing shows the location(s) of the warning decal(s). If a decal is missing or illegible, call 1-888-533-1333 and request a free replacement decal. Note: The decal(s) may not be shown at actual size. 2
English Manual
Page 3
... sustained by persons weighing more than 250 lbs. (113 kg). 11. Do not use the exercise bike in a garage or covered patio, or near water. 12. Do not put the exercise bike in a commercial, rental, or institutional setting. 10. the pedals will continue to ensure that could become caught on a level surface with pre-existing...
... sustained by persons weighing more than 250 lbs. (113 kg). 11. Do not use the exercise bike in a garage or covered patio, or near water. 12. Do not put the exercise bike in a commercial, rental, or institutional setting. 10. the pedals will continue to ensure that could become caught on a level surface with pre-existing...
English Manual
Page 4
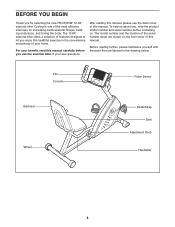
The 10.8X exercise bike offers a selection of features designed to let you have questions after reading this manual, please see the back cover of this healthful exercise in the convenience and privacy of the serial number decal are labeled in the drawing below. If you ...Before reading further, please familiarize yourself with the parts that are shown on the front cover of the most effective exercises for selecting the new PROFORM® 10.8X exercise bike. Cycling is one of this manual carefully before you , note the product model number and serial number before contacting...
The 10.8X exercise bike offers a selection of features designed to let you have questions after reading this manual, please see the back cover of this healthful exercise in the convenience and privacy of the serial number decal are labeled in the drawing below. If you ...Before reading further, please familiarize yourself with the parts that are shown on the front cover of the most effective exercises for selecting the new PROFORM® 10.8X exercise bike. Cycling is one of this manual carefully before you , note the product model number and serial number before contacting...
English Manual
Page 5
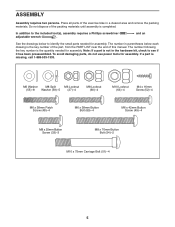
...)-4 M6 x 42mm Button Screw (49)-4 M8 x 25mm Button Screw (33)-3 M8 x 70mm Button Bolt (54)-2 M10 x 75mm Carriage Bolt (51)-4 5 Do not dispose of the exercise bike in the hardware kit, check to see if it has been preassembled.
...)-4 M6 x 42mm Button Screw (49)-4 M8 x 25mm Button Screw (33)-3 M8 x 70mm Button Bolt (54)-2 M10 x 75mm Carriage Bolt (51)-4 5 Do not dispose of the exercise bike in the hardware kit, check to see if it has been preassembled.
English Manual
Page 10
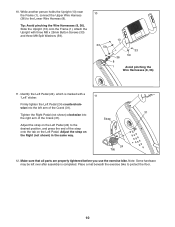
... another person holds the Upright (13) near the Frame (1), connect the Upper Wire Harness (36) to protect the floor. 10 Place a mat beneath the exercise bike to the Lower Wire Harness (8). Note: Some hardware may be left arm of the Crank (31). 31 Tighten the Right Pedal (not shown) ...the end of the Crank (31). Slide the Upright (13) onto the Frame (1). Make sure that all parts are properly tightened before you use the exercise bike. Attach the Upright with a "Left" sticker. 11 Firmly tighten the Left Pedal (24) counterclockwise into the left over after assembly is marked with ...
... another person holds the Upright (13) near the Frame (1), connect the Upper Wire Harness (36) to protect the floor. 10 Place a mat beneath the exercise bike to the Lower Wire Harness (8). Note: Some hardware may be left arm of the Crank (31). 31 Tighten the Right Pedal (not shown) ...the end of the Crank (31). Slide the Upright (13) onto the Frame (1). Make sure that all parts are properly tightened before you use the exercise bike. Attach the Upright with a "Left" sticker. 11 Firmly tighten the Left Pedal (24) counterclockwise into the left over after assembly is marked with ...
English Manual
Page 11
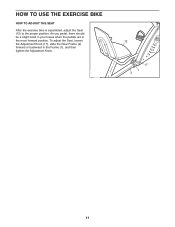
As you pedal, there should be a slight bend in your knees when the pedals are in the Frame (1), and then tighten the Adjustment Knob. 12 17 1 2 11 To adjust the Seat, loosen the Adjustment Knob (17), slide the Rear Frame (2) forward or backward in the most forward position. HOW TO USE THE EXERCISE BIKE HOW TO ADJUST THE SEAT After the exercise bike is assembled, adjust the Seat (12) to the proper position.
As you pedal, there should be a slight bend in your knees when the pedals are in the Frame (1), and then tighten the Adjustment Knob. 12 17 1 2 11 To adjust the Seat, loosen the Adjustment Knob (17), slide the Rear Frame (2) forward or backward in the most forward position. HOW TO USE THE EXERCISE BIKE HOW TO ADJUST THE SEAT After the exercise bike is assembled, adjust the Seat (12) to the proper position.

English Manual
Page 12
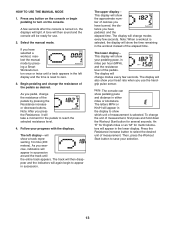
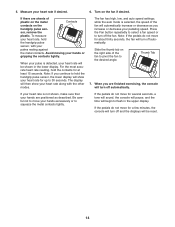
... plastic. To use the manual mode, see page 13. Note: If there is a sheet of plastic on the face of the pedals and prompt you exercise. You can change the resistance of features designed to keep your heart rate using the handgrip pulse sensor. To use a smart workout, see page 16... the pedals with the touch of a button. When you use a heart rate workout, see page 15. To use the manual mode of the console, you exercise, the console will provide continuous...
... plastic. To use the manual mode, see page 13. Note: If there is a sheet of plastic on the face of the pedals and prompt you exercise. You can change the resistance of features designed to keep your heart rate using the handgrip pulse sensor. To use a smart workout, see page 16... the pedals with the touch of a button. When you use a heart rate workout, see page 15. To use the manual mode of the console, you exercise, the console will provide continuous...
English Manual
Page 13
... time remaining in miles per hour (MPH), and the resistance level of the pedals as desired. Press the Resistance increase button to zero. 3. If you exercise, indicators will appear in either miles or kilometers. The upper display- An "E" for English miles or an "M" for use the handgrip pulse sensor. Then, press...
... time remaining in miles per hour (MPH), and the resistance level of the pedals as desired. Press the Resistance increase button to zero. 3. If you exercise, indicators will appear in either miles or kilometers. The upper display- An "E" for English miles or an "M" for use the handgrip pulse sensor. Then, press...
English Manual
Page 14
... palms resting against the metal contacts. Avoid moving your heart rate if desired. 6. When you continue to turn off the fan. 5. If there are finished exercising, the console will automatically increase or decrease as described.
... palms resting against the metal contacts. Avoid moving your heart rate if desired. 6. When you continue to turn off the fan. 5. If there are finished exercising, the console will automatically increase or decrease as described.
English Manual
Page 15
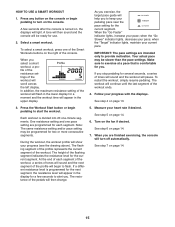
... be programmed for the next segment, the resistance level will light. Follow your current pace. Press the Workout Start button or begin pedaling to exercise at a pace that is programmed for two or more consecutive segments. If a different resistance level is comfortable for use. 2. See step ... represents the current segment of the resistance set- Measure your pace; To select a smart workout, press one pace setting are finished exercising, the console will appear in the lower display for the current segment. If you are programmed for several seconds, a series of ...
... be programmed for the next segment, the resistance level will light. Follow your current pace. Press the Workout Start button or begin pedaling to exercise at a pace that is programmed for two or more consecutive segments. If a different resistance level is comfortable for use. 2. See step ... represents the current segment of the resistance set- Measure your pace; To select a smart workout, press one pace setting are finished exercising, the console will appear in the lower display for the current segment. If you are programmed for several seconds, a series of ...
English Manual
Page 16
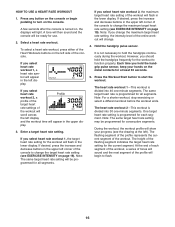
...heart rate Profile workout 2, a profile of the target heart rate settings of the console to change the maximum target heart rate setting (see EXERCISE INTENSITY on page 19). Enter a target heart rate setting. Note: The same target heart rate setting will scroll across the left corner ..., you hold the handgrips continuously during the workout. Press the Workout Start button to hold the handgrip pulse sensor, keep your progress (see EXERCISE INTENSITY on , the displays will change. 4. Note: The same target heart rate setting may be ready for the workout will flash in ...
...heart rate Profile workout 2, a profile of the target heart rate settings of the console to change the maximum target heart rate setting (see EXERCISE INTENSITY on page 19). Enter a target heart rate setting. Note: The same target heart rate setting will scroll across the left corner ..., you hold the handgrips continuously during the workout. Press the Workout Start button to hold the handgrip pulse sensor, keep your progress (see EXERCISE INTENSITY on , the displays will change. 4. Note: The same target heart rate setting may be ready for the workout will flash in ...

English Manual
Page 17
... turn off automatically. See step 7 on page 14. If you stop pedaling for you. 8. Make sure to provide motivation. When you are intended only to exercise at a pace that is too far below or above the target heart rate setting, the resistance of the pedals may be slower than the target... or decrease to bring your heart rate closer to the target heart rate setting for the current segment, if desired, with the displays. As you exercise, the target pace guide will help you to the target heart rate setting. Both heart rate workouts-As you pedal, the console will regularly compare...
... turn off automatically. See step 7 on page 14. If you stop pedaling for you. 8. Make sure to provide motivation. When you are intended only to exercise at a pace that is too far below or above the target heart rate setting, the resistance of the pedals may be slower than the target... or decrease to bring your heart rate closer to the target heart rate setting for the current segment, if desired, with the displays. As you exercise, the target pace guide will help you to the target heart rate setting. Both heart rate workouts-As you pedal, the console will regularly compare...
English Manual
Page 18
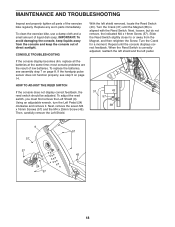
... Screw. To adjust the reed switch, you must first remove the Left Shield (9). Replace any worn parts immediately. To clean the exercise bike, use a damp cloth and a small amount of the exercise bike regularly. Turn the Crank (31) until the console displays correct feedback. Turn the Crank for a moment. Next, remove the seven M4...
... Screw. To adjust the reed switch, you must first remove the Left Shield (9). Replace any worn parts immediately. To clean the exercise bike, use a damp cloth and a small amount of the exercise bike regularly. Turn the Crank (31) until the console displays correct feedback. Turn the Crank for a moment. Next, remove the seven M4...
English Manual
Page 19
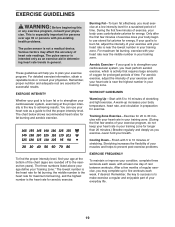
...your heart rate is to five workouts each week, with 5 to plan your exercise program. After a few minutes of stretching and light exercise. These guidelines will help you to 10 minutes of exercise does your training zone. You can use stored fat calories for maximum fat burning,..."training zone." Remember, proper nutrition and adequate rest are rounded off to 10 minutes of regular exercise, you exercise-never hold your training zone. Only after the first few months of stretching. Aerobic Exercise-If your goal is near the middle number in general. The lowest number...
...your heart rate is to five workouts each week, with 5 to plan your exercise program. After a few minutes of stretching and light exercise. These guidelines will help you to 10 minutes of exercise does your training zone. You can use stored fat calories for maximum fat burning,..."training zone." Remember, proper nutrition and adequate rest are rounded off to 10 minutes of regular exercise, you exercise-never hold your training zone. Only after the first few months of stretching. Aerobic Exercise-If your goal is near the middle number in general. The lowest number...
English Manual
Page 24
... (U.S.A. only) www.sears.com To purchase a protection agreement (U.S.A.) or maintenance agreement (Canada) on -line for rental purposes. This warranty does not apply when the bike exerciser is used commercially or for the location of purchase, call 1-800-4-MY-HOME® (1-800-469-4663) to do-it-yourself. Your Home For repair..., LLC ® Marca Registrada / TM Marca de Fábrica / SM Marca de Servicio de Sears Brands, LLC 90 DAY FULL WARRANTY If this Sears bike exerciser fails due to a defect in material or workmanship within 90 days of the date of your home or ours!
... (U.S.A. only) www.sears.com To purchase a protection agreement (U.S.A.) or maintenance agreement (Canada) on -line for rental purposes. This warranty does not apply when the bike exerciser is used commercially or for the location of purchase, call 1-800-4-MY-HOME® (1-800-469-4663) to do-it-yourself. Your Home For repair..., LLC ® Marca Registrada / TM Marca de Fábrica / SM Marca de Servicio de Sears Brands, LLC 90 DAY FULL WARRANTY If this Sears bike exerciser fails due to a defect in material or workmanship within 90 days of the date of your home or ours!


