
English Manual
Page 1
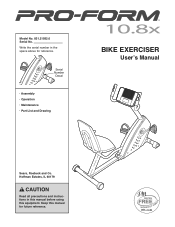
Model No. 831.21932.0 Serial No. Hoffman Estates, IL 60179 CAUTION Read all precautions and instructions in the space above for future reference. Serial Number Decal • Assembly • Operation • Maintenance • Part List and Drawing BIKE EXERCISER Userʼs Manual Sears, Roebuck and Co. Keep this equipment. Write the serial number in this manual before using this manual for reference.
Model No. 831.21932.0 Serial No. Hoffman Estates, IL 60179 CAUTION Read all precautions and instructions in the space above for future reference. Serial Number Decal • Assembly • Operation • Maintenance • Part List and Drawing BIKE EXERCISER Userʼs Manual Sears, Roebuck and Co. Keep this equipment. Write the serial number in this manual before using this manual for reference.
English Manual
Page 2
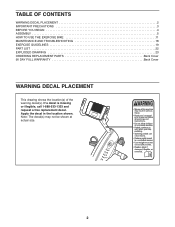
If a decal is missing or illegible, call 1-888-533-1333 and request a free replacement decal. Note: The decal(s) may not be shown at actual size. 2 Apply the decal in the location shown. TABLE OF CONTENTS WARNING DECAL PLACEMENT 2 IMPORTANT PRECAUTIONS 3 BEFORE YOU BEGIN 4 ASSEMBLY 5 HOW TO USE THE EXERCISE BIKE 11 MAINTENANCE AND TROUBLESHOOTING 18 EXERCISE GUIDELINES 19 PART LIST 22 EXPLODED DRAWING 23 ORDERING REPLACEMENT PARTS Back Cover 90 DAY FULL WARRANTY Back Cover WARNING DECAL PLACEMENT This drawing shows the location(s) of the warning decal(s).
If a decal is missing or illegible, call 1-888-533-1333 and request a free replacement decal. Note: The decal(s) may not be shown at actual size. 2 Apply the decal in the location shown. TABLE OF CONTENTS WARNING DECAL PLACEMENT 2 IMPORTANT PRECAUTIONS 3 BEFORE YOU BEGIN 4 ASSEMBLY 5 HOW TO USE THE EXERCISE BIKE 11 MAINTENANCE AND TROUBLESHOOTING 18 EXERCISE GUIDELINES 19 PART LIST 22 EXPLODED DRAWING 23 ORDERING REPLACEMENT PARTS Back Cover 90 DAY FULL WARRANTY Back Cover WARNING DECAL PLACEMENT This drawing shows the location(s) of the warning decal(s).
English Manual
Page 3
... setting. 10. Inspect and properly tighten all times. 3 Over exercising may affect the accuracy of heart rate readings. Various factors, including the user's movement, may result in serious injury or death. do not wear loose clothes that all users of the exercise bike are adequately informed of this product. 1. Do not use the exercise bike in a garage or covered patio, or near water. 12. The pulse sensor...
... setting. 10. Inspect and properly tighten all times. 3 Over exercising may affect the accuracy of heart rate readings. Various factors, including the user's movement, may result in serious injury or death. do not wear loose clothes that all users of the exercise bike are adequately informed of this product. 1. Do not use the exercise bike in a garage or covered patio, or near water. 12. The pulse sensor...
English Manual
Page 4
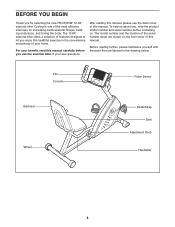
... back cover of this manual. Fan Console Pulse Sensor Backrest Wheel Pedal/Strap Seat Adjustment Knob Handlebar 4 Cycling is one of the serial number decal are labeled in the convenience and privacy of features designed to let you , note the product model number and serial number before you use the exercise bike. If you for increasing cardiovascular fitness, building endurance, and toning the body. To help us . The model number and the location of...
... back cover of this manual. Fan Console Pulse Sensor Backrest Wheel Pedal/Strap Seat Adjustment Knob Handlebar 4 Cycling is one of the serial number decal are labeled in the convenience and privacy of features designed to let you , note the product model number and serial number before you use the exercise bike. If you for increasing cardiovascular fitness, building endurance, and toning the body. To help us . The model number and the location of...
English Manual
Page 5
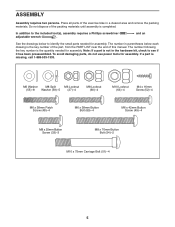
... a Phillips screwdriver adjustable wrench . If a part is completed. To avoid damaging parts, do not use power tools for assembly. ASSEMBLY Assembly requires two persons. Do not dispose of the packing materials until assembly is missing, call 1-888-533-1333. Place all parts of this manual. The number following the key number is the key number of the part, from the PART LIST near the end of the exercise bike in a cleared...
... a Phillips screwdriver adjustable wrench . If a part is completed. To avoid damaging parts, do not use power tools for assembly. ASSEMBLY Assembly requires two persons. Do not dispose of the packing materials until assembly is missing, call 1-888-533-1333. Place all parts of this manual. The number following the key number is the key number of the part, from the PART LIST near the end of the exercise bike in a cleared...
English Manual
Page 6
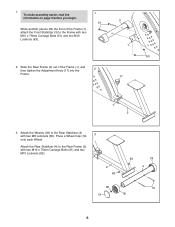
... Rear Stabilizer (4) to the Rear Stabilizer (4) with two M8 Locknuts (60). Attach the Wheels (18) to the Rear Frame (2) with two M10 x 75mm Carriage Bolts (51) and two M10 Locknuts (63). 1 51 3 1 63 2. While another person lifts the front of the Frame (1), and then tighten the Adjustment Knob (17) into the 2 Frame. 17 1 2 3. To make assembly easier, read the information...
... Rear Stabilizer (4) to the Rear Stabilizer (4) with two M8 Locknuts (60). Attach the Wheels (18) to the Rear Frame (2) with two M10 x 75mm Carriage Bolts (51) and two M10 Locknuts (63). 1 51 3 1 63 2. While another person lifts the front of the Frame (1), and then tighten the Adjustment Knob (17) into the 2 Frame. 17 1 2 3. To make assembly easier, read the information...
English Manual
Page 8
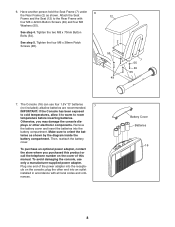
...- teries as shown. Attach the Seat Frame and the Seat (12) to the Rear Frame with all local codes and ordinances. See step 5. Make sure to room temperature before inserting batteries. Plug one end of this manual. Battery Cover Batteries 16 8 See step 4. Tighten the two M8 x 70mm Button Bolts (54). plays or other end into an outlet installed in accordance with four M6 x 42mm Button Screws (49) and...
...- teries as shown. Attach the Seat Frame and the Seat (12) to the Rear Frame with all local codes and ordinances. See step 5. Make sure to room temperature before inserting batteries. Plug one end of this manual. Battery Cover Batteries 16 8 See step 4. Tighten the two M8 x 70mm Button Bolts (54). plays or other end into an outlet installed in accordance with four M6 x 42mm Button Screws (49) and...
English Manual
Page 9
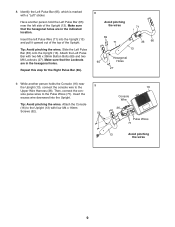
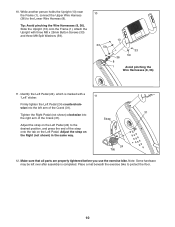
... hold the Left Pulse Bar (65) near the Upright (13), connect the console wire to the Upper Wire Harness (36). Then, connect the console pulse wires to the Upright (13) with two M6 x 38mm Button Bolts (69) and two M6 Locknuts (27). Attach the Left Pulse Bar with four M4 x 16mm Screws (52). 9 52 16 Console Wire 36 Pulse Wires 71 13 Avoid pinching the wires 9 Attach the Console (16) to the Pulse Wires (71). Make sure...
... hold the Left Pulse Bar (65) near the Upright (13), connect the console wire to the Upper Wire Harness (36). Then, connect the console pulse wires to the Upright (13) with two M6 x 38mm Button Bolts (69) and two M6 Locknuts (27). Attach the Left Pulse Bar with four M4 x 16mm Screws (52). 9 52 16 Console Wire 36 Pulse Wires 71 13 Avoid pinching the wires 9 Attach the Console (16) to the Pulse Wires (71). Make sure...
English Manual
Page 10
.... Make sure that all parts are properly tightened before you use the exercise bike. Place a mat beneath the exercise bike to the Lower Wire Harness (8). Adjust the strap on the Left Pedal. Identify the Left Pedal (24), which is completed. While another person holds the Upright (13) near the Frame (1), connect the Upper Wire Harness (36) to protect the floor. 10 Slide the Upright (13) onto the Frame...
.... Make sure that all parts are properly tightened before you use the exercise bike. Place a mat beneath the exercise bike to the Lower Wire Harness (8). Adjust the strap on the Left Pedal. Identify the Left Pedal (24), which is completed. While another person holds the Upright (13) near the Frame (1), connect the Upper Wire Harness (36) to protect the floor. 10 Slide the Upright (13) onto the Frame...
English Manual
Page 11
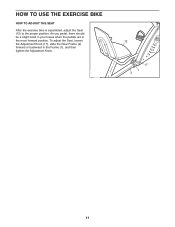
To adjust the Seat, loosen the Adjustment Knob (17), slide the Rear Frame (2) forward or backward in the most forward position. As you pedal, there should be a slight bend in your knees when the pedals are in the Frame (1), and then tighten the Adjustment Knob. 12 17 1 2 11 HOW TO USE THE EXERCISE BIKE HOW TO ADJUST THE SEAT After the exercise bike is assembled, adjust the Seat (12) to the proper position.
To adjust the Seat, loosen the Adjustment Knob (17), slide the Rear Frame (2) forward or backward in the most forward position. As you pedal, there should be a slight bend in your knees when the pedals are in the Frame (1), and then tighten the Adjustment Knob. 12 17 1 2 11 HOW TO USE THE EXERCISE BIKE HOW TO ADJUST THE SEAT After the exercise bike is assembled, adjust the Seat (12) to the proper position.

English Manual
Page 12
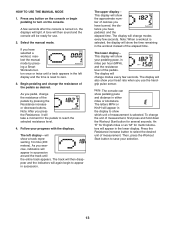
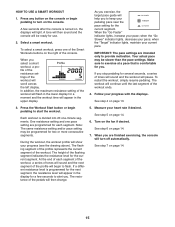
... while guiding you exercise, the console will provide continuous exercise feedback. When you use the manual mode, see page 13. You can change the resistance of a button. Note: If there is a sheet of plastic on the face of features designed to make your heart rate using the handgrip pulse sensor. In addition, the console features two heart rate workouts that automatically change the resistance of the console, you exercise. To use the manual mode of the pedals...
... while guiding you exercise, the console will provide continuous exercise feedback. When you use the manual mode, see page 13. You can change the resistance of a button. Note: If there is a sheet of plastic on the face of features designed to make your heart rate using the handgrip pulse sensor. In addition, the console features two heart rate workouts that automatically change the resistance of the console, you exercise. To use the manual mode of the pedals...
English Manual
Page 13
... 1/4 mile (400 meters). Press the Resistance increase button to select the desired unit of measurement, first press and hold down the Workout Start button for metric kilometers will appear in the workout instead of calories you have burned, the distance you pedal, change modes every few seconds. Select the manual mode. The display will change the resistance of the pedals as desired. To change modes every few seconds after the console is turned...
... 1/4 mile (400 meters). Press the Resistance increase button to select the desired unit of measurement, first press and hold down the Workout Start button for metric kilometers will appear in the workout instead of calories you have burned, the distance you pedal, change modes every few seconds. Select the manual mode. The display will change the resistance of the pedals as desired. To change modes every few seconds after the console is turned...
English Manual
Page 14
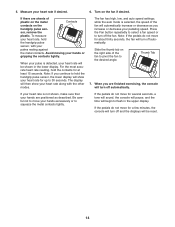
... reset. 14 sor, remove the plastic. Note: If you increase or decrease your heart rate for at least 15 seconds. Thumb Tab 7. If the pedals do not move for several seconds, a tone will sound, the console will pause, and the time will then show your pedaling speed. If there are positioned as you continue to hold the handgrip pulse sensor, the lower display...
... reset. 14 sor, remove the plastic. Note: If you increase or decrease your heart rate for at least 15 seconds. Thumb Tab 7. If the pedals do not move for several seconds, a tone will sound, the console will pause, and the time will then show your pedaling speed. If there are positioned as you continue to hold the handgrip pulse sensor, the lower display...
English Manual
Page 15
... to flash. When you stop pedaling for the current segment. Press the Workout Start button or begin pedaling to turn off automatically. When you . A tone will then sound and the console will be slower than the pace settings. Note: The same resistance setting and/or pace setting may be ready for a moment and the workout time will flash in the display for the current segment...
... to flash. When you stop pedaling for the current segment. Press the Workout Start button or begin pedaling to turn off automatically. When you . A tone will then sound and the console will be slower than the pace settings. Note: The same resistance setting and/or pace setting may be ready for a moment and the workout time will flash in the display for the current segment...
English Manual
Page 16
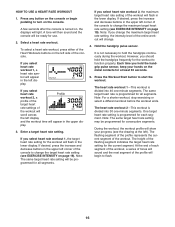
... turned on, the displays will change the maximum target heart rate setting (see EXERCISE INTENSITY on page 19). One target heart rate setting is programmed for at the left display and the workout time will begin pedaling to turn on the console or begin to function properly. A few seconds after the console is divided into 30 one -minute segments. HOW TO USE A HEART RATE WORKOUT 1. Press any button on the console. Select a heart rate workout. To select a heart rate workout, press...
... turned on, the displays will change the maximum target heart rate setting (see EXERCISE INTENSITY on page 19). One target heart rate setting is programmed for at the left display and the workout time will begin pedaling to turn on the console or begin to function properly. A few seconds after the console is divided into 30 one -minute segments. HOW TO USE A HEART RATE WORKOUT 1. Press any button on the console. Select a heart rate workout. To select a heart rate workout, press...

English Manual
Page 17
... workout, you can manually override the resistance setting for several seconds, a tone will sound and the workout will turn off automatically. If you exercise, the target pace guide will automatically increase or decrease to bring your heart rate closer to the target heart rate setting. See step 4 on the fan if desired. As you stop pedaling for the current segment, if desired, with the displays. Your actual heart rate...
... workout, you can manually override the resistance setting for several seconds, a tone will sound and the workout will turn off automatically. If you exercise, the target pace guide will automatically increase or decrease to bring your heart rate closer to the target heart rate setting. See step 4 on the fan if desired. As you stop pedaling for the current segment, if desired, with the displays. Your actual heart rate...
English Manual
Page 18
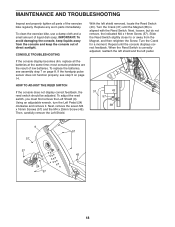
... Reed Switch (43). When the Reed Switch is aligned with the Reed Switch. To replace the batteries, see step 5 on page 8. Replace any worn parts immediately. If the console display becomes dim, replace all parts of direct sunlight. most console problems are the result of liquid dish soap. HOW TO ADJUST THE REED SWITCH If the console does not display correct feedback, the reed switch should be adjusted. Using an adjustable wrench, turn the Left Pedal (24) clockwise and remove it. CONSOLE TROUBLESHOOTING...
... Reed Switch (43). When the Reed Switch is aligned with the Reed Switch. To replace the batteries, see step 5 on page 8. Replace any worn parts immediately. If the console display becomes dim, replace all parts of direct sunlight. most console problems are the result of liquid dish soap. HOW TO ADJUST THE REED SWITCH If the console does not display correct feedback, the reed switch should be adjusted. Using an adjustable wrench, turn the Left Pedal (24) clockwise and remove it. CONSOLE TROUBLESHOOTING...
English Manual
Page 19
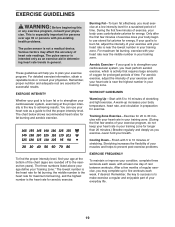
...-existing health problems. The pulse sensor is the heart rate for a sustained period of stretching and light exercise. EXERCISE FREQUENCY To maintain or improve your cardiovascular system, exercising at a low intensity level for aerobic exercise. The chart below shows recommended heart rates for prolonged periods of your training zone. After a few minutes of exercise does your cardiovascular system, you exercise-never hold your "training zone." The three numbers listed...
...-existing health problems. The pulse sensor is the heart rate for a sustained period of stretching and light exercise. EXERCISE FREQUENCY To maintain or improve your cardiovascular system, exercising at a low intensity level for aerobic exercise. The chart below shows recommended heart rates for prolonged periods of your training zone. After a few minutes of exercise does your cardiovascular system, you exercise-never hold your "training zone." The three numbers listed...
English Manual
Page 22
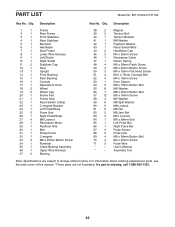
... 1 33 3 34 1 35 1 36 1 37 2 Description Frame Rear Frame Front Stabilizer Rear Stabilizer Backrest Handlebar Seat Frame Lower Wire Harness Left Shield Right Shield Stabilizer Cap Seat Upright Front Bushing Rear Bushing Console Adjustment Knob Wheel Wheel Cap Frame Pad Frame Stop Reed Switch Clamp C-magnet Bracket Left Pedal/Strap Foam Grip Right Pedal/Strap M6 Locknut Resistance Motor Flywheel Axle Belt Pulley/Crank C-magnet M8 x 25mm Button Screw Flywheel Crank Bearing Assembly Upper Wire Harness Bearing Key No.
... 1 33 3 34 1 35 1 36 1 37 2 Description Frame Rear Frame Front Stabilizer Rear Stabilizer Backrest Handlebar Seat Frame Lower Wire Harness Left Shield Right Shield Stabilizer Cap Seat Upright Front Bushing Rear Bushing Console Adjustment Knob Wheel Wheel Cap Frame Pad Frame Stop Reed Switch Clamp C-magnet Bracket Left Pedal/Strap Foam Grip Right Pedal/Strap M6 Locknut Resistance Motor Flywheel Axle Belt Pulley/Crank C-magnet M8 x 25mm Button Screw Flywheel Crank Bearing Assembly Upper Wire Harness Bearing Key No.
English Manual
Page 24
... matter who sold it! This warranty does not apply when the bike exerciser is used commercially or for free repair (or replacement if repair proves impossible). Get it -yourself. Your Home For repair-in China © 2010 ICON IP, Inc. only) www.sears.com To purchase a protection agreement (U.S.A.) or maintenance agreement (Canada) on -line for the location of home appliances and items like vacuums, lawn...
... matter who sold it! This warranty does not apply when the bike exerciser is used commercially or for free repair (or replacement if repair proves impossible). Get it -yourself. Your Home For repair-in China © 2010 ICON IP, Inc. only) www.sears.com To purchase a protection agreement (U.S.A.) or maintenance agreement (Canada) on -line for the location of home appliances and items like vacuums, lawn...


