Owner's Manual
Page 2
...After you have finished reading the instructions, keep this manual 11 - Data subject to use this document in this manual 11 - Resetting the microprocessor 12 Basic operation Checking part names and functions 13 Remote control 14 Use and care of the map 32 Switching screens ...source list 25 - Contents Thank you for buying this manual 11 Notes on internal memory 12 - Important The screens shown in this Pioneer product. Introduction Manual overview 11 - Switching screens using the hardware buttons 23 Supported AV source 24 Displaying the AV operation screen 24 -...
...After you have finished reading the instructions, keep this manual 11 - Data subject to use this document in this manual 11 - Resetting the microprocessor 12 Basic operation Checking part names and functions 13 Remote control 14 Use and care of the map 32 Switching screens ...source list 25 - Contents Thank you for buying this manual 11 Notes on internal memory 12 - Important The screens shown in this Pioneer product. Introduction Manual overview 11 - Switching screens using the hardware buttons 23 Supported AV source 24 Displaying the AV operation screen 24 -...

Owner's Manual
Page 12
...Some of the system. ! p Do not perform this product. eration of the settings and recorded con- If there appears to be reset. 6100NEX 5100NEX Data subject to erasure 1 The information is connected to this operation when a device is erased by disconnecting the yellow lead from the battery... (or removing the battery itself). p Some of the settings and recorded contents will not be reset under the following conditions: !...
...Some of the system. ! p Do not perform this product. eration of the settings and recorded con- If there appears to be reset. 6100NEX 5100NEX Data subject to erasure 1 The information is connected to this operation when a device is erased by disconnecting the yellow lead from the battery... (or removing the battery itself). p Some of the settings and recorded contents will not be reset under the following conditions: !...
Owner's Manual
Page 13
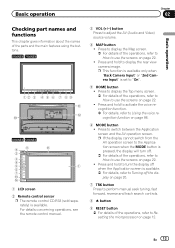
...names and functions This chapter gives information about the names of the parts and the main features using the buttons. 8100NEX 7100NEX 12 3 4 5 6 7 8 9 b c a 6100NEX 5100NEX 9 8 b 2 3 4 5 1 6 7 d e 1 LCD screen 2 Remote control sensor p The remote control CD-R33 (sold separately) is available. = For details, ...on page 20. 7 TRK button Press to perform manual seek tuning, fast forward, reverse and track search controls. 8 h button 9 RESET button = For details of the operations, refer to Using the voice recognition function on page 22. ! For details concerning operations, see ...
...names and functions This chapter gives information about the names of the parts and the main features using the buttons. 8100NEX 7100NEX 12 3 4 5 6 7 8 9 b c a 6100NEX 5100NEX 9 8 b 2 3 4 5 1 6 7 d e 1 LCD screen 2 Remote control sensor p The remote control CD-R33 (sold separately) is available. = For details, ...on page 20. 7 TRK button Press to perform manual seek tuning, fast forward, reverse and track search controls. 8 h button 9 RESET button = For details of the operations, refer to Using the voice recognition function on page 22. ! For details concerning operations, see ...

Owner's Manual
Page 63
Displays the shortcuts. 6 Touch [Reset All Settings]. A confirmation message appears. 7 Touch [OK]. p The route is planned based on page 73. Car: - Private roads and resident-only roads are used only ... following key. Information on the route. date on the selected vehicle type. p If you will be using on each option of vehicle you touch [Factory Reset] on the Map screen. 3 Touch to their factory defaults. Maneuver restrictions and directional constraints are...
Displays the shortcuts. 6 Touch [Reset All Settings]. A confirmation message appears. 7 Touch [OK]. p The route is planned based on page 73. Car: - Private roads and resident-only roads are used only ... following key. Information on the route. date on the selected vehicle type. p If you will be using on each option of vehicle you touch [Factory Reset] on the Map screen. 3 Touch to their factory defaults. Maneuver restrictions and directional constraints are...
Owner's Manual
Page 137
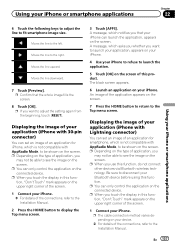
.... p When you use this product. A message, which is not compatible with AppRadio Mode, to be able to adjust the setting again from the beginning, touch [RESET]. p When you want to see the image on the connected device. Moves the line upward. Displaying the image of your application (iPhone with 30-pin...
.... p When you use this product. A message, which is not compatible with AppRadio Mode, to be able to adjust the setting again from the beginning, touch [RESET]. p When you want to see the image on the connected device. Moves the line upward. Displaying the image of your application (iPhone with 30-pin...
Owner's Manual
Page 170
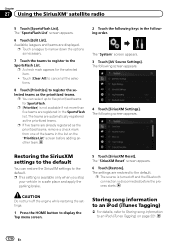
... List]. p [Prioritize] is not available if not more than five teams are restored to the default. The following screen appears. The "SiriusXM Reset" screen appears. 6 Touch [Restore]. The settings are registered in the list on page 221. 170 En CAUTION Do not turn off and the...p This setting is disconnected before adding another team. 2 Touch the following keys in a safe place and apply the parking brake. 5 Touch [SiriusXM Reset]. p The source is turned off the engine while restoring the settings. 1 Press the HOME button to an iPod (iTunes Tagging) on the "Prioritize...
... List]. p [Prioritize] is not available if not more than five teams are restored to the default. The following screen appears. The "SiriusXM Reset" screen appears. 6 Touch [Restore]. The settings are registered in the list on page 221. 170 En CAUTION Do not turn off and the...p This setting is disconnected before adding another team. 2 Touch the following keys in a safe place and apply the parking brake. 5 Touch [SiriusXM Reset]. p The source is turned off the engine while restoring the settings. 1 Press the HOME button to an iPod (iTunes Tagging) on the "Prioritize...
Owner's Manual
Page 184
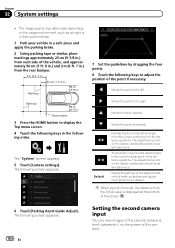
... also move . The following order. Moves the point to the right. Moves the point upward. The adjustment points on the screen of the distance guideline. Resets the settings of the distance guideline. The "System" screen appears. 5 Touch [Camera settings]. Shortens the line from the initial value is displayed at both ends...
... also move . The following order. Moves the point to the right. Moves the point upward. The adjustment points on the screen of the distance guideline. Resets the settings of the distance guideline. The "System" screen appears. 5 Touch [Camera settings]. Shortens the line from the initial value is displayed at both ends...
Owner's Manual
Page 191
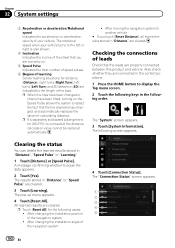
... appears. 7 Touch [Firmware Update]. p When the firmware update starts, the source is turned off and the Bluetooth connection is available for AVIC8100NEX and AVIC-7100NEX. 1 Download the firmware update files. 2 Connect a blank (formatted) SD memory card or USB storage device to your computer, and then locate...use its sensor memory based on page 25. 4 Press the HOME button to proceed and start the recovery sequence. p This product will reset automatically after the firmware update is completed if the update is successful. System settings Chapter 32 p Use the USB port1 to display the ...
... appears. 7 Touch [Firmware Update]. p When the firmware update starts, the source is turned off and the Bluetooth connection is available for AVIC8100NEX and AVIC-7100NEX. 1 Download the firmware update files. 2 Connect a blank (formatted) SD memory card or USB storage device to your computer, and then locate...use its sensor memory based on page 25. 4 Press the HOME button to proceed and start the recovery sequence. p This product will reset automatically after the firmware update is completed if the update is successful. System settings Chapter 32 p Use the USB port1 to display the ...
Owner's Manual
Page 192
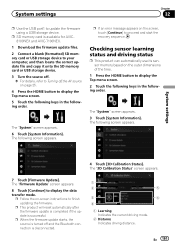
... If you are currently on the Speed Pulse allows the system to detect the fact that you touch [Reset Distance], all learned results stored in the following order. p Touch [Reset All] for calculating distance. A message confirming whether to display the Top menu screen. 2 Touch the ...1 Press the HOME button to erase the data appears. 2 Touch [Yes]. Also check whether they are cleared. The pop-up menu appears. 4 Touch [Reset All]. The results stored in "Distance", "Speed Pulse" or "Learning". 1 Touch [Distance] or [Speed Pulse]. p If a separately sold speed pulse generator...
... If you are currently on the Speed Pulse allows the system to detect the fact that you touch [Reset Distance], all learned results stored in the following order. p Touch [Reset All] for calculating distance. A message confirming whether to display the Top menu screen. 2 Touch the ...1 Press the HOME button to erase the data appears. 2 Touch [Yes]. Also check whether they are cleared. The pop-up menu appears. 4 Touch [Reset All]. The results stored in "Distance", "Speed Pulse" or "Learning". 1 Touch [Distance] or [Speed Pulse]. p If a separately sold speed pulse generator...
Owner's Manual
Page 226
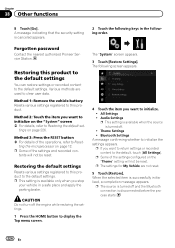
Forgotten password Contact the nearest authorized Pioneer Service Station. Method 3: Press the RESET button = For details of the operations, refer to the default settings. tents will not be reset. p This setting is turned off. ! Audio Settings p This setting is available when the source is ...Do not turn off and the Bluetooth connection is successfully initialized, a completion message appears. tings on the "Theme" setting will not be reset. Chapter 38 Other functions 8 Touch [Go]. p Some of the settings and recorded con- All Settings ! Restoring this product. A ...
Forgotten password Contact the nearest authorized Pioneer Service Station. Method 3: Press the RESET button = For details of the operations, refer to the default settings. tents will not be reset. p This setting is turned off. ! Audio Settings p This setting is available when the source is ...Do not turn off and the Bluetooth connection is successfully initialized, a completion message appears. tings on the "Theme" setting will not be reset. Chapter 38 Other functions 8 Touch [Go]. p Some of the settings and recorded con- All Settings ! Restoring this product. A ...
Owner's Manual
Page 230
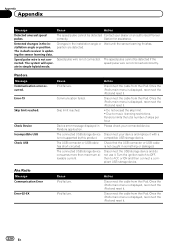
...detected if the nected. ate in -dash receiver is displayed, reconnect the iPod and reset it . Disconnect the cable from the iPod. Disconnect the cable from the iPod....the iPod's main menu is displayed, reconnect the iPod and reset it . Do not exceed the skip limit. ! Pandora application. Once the iPod's ...main menu is displayed, reconnect the iPod and reset it . The in simple hybrid mode. Speed pulse wire is not ...displayed, reconnect the iPod and reset it with a is not con- The connected USB storage device Disconnect your dealer ...
...detected if the nected. ate in -dash receiver is displayed, reconnect the iPod and reset it . Disconnect the cable from the iPod. Disconnect the cable from the iPod....the iPod's main menu is displayed, reconnect the iPod and reset it . Do not exceed the skip limit. ! Pandora application. Once the iPod's ...main menu is displayed, reconnect the iPod and reset it . The in simple hybrid mode. Speed pulse wire is not ...displayed, reconnect the iPod and reset it with a is not con- The connected USB storage device Disconnect your dealer ...
Owner's Manual
Page 232
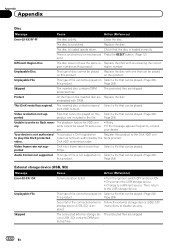
.... Page 259) Security for the connected external Follow the external storage device (USB, SD) storage device (USB, SD) is an electrical or mechanical Press the RESET button. (Page 12) error. abled. There is en- region number. Retry. tents cannot be played. Audio Format not supported This type of file cannot be...
.... Page 259) Security for the connected external Follow the external storage device (USB, SD) storage device (USB, SD) is an electrical or mechanical Press the RESET button. (Page 12) error. abled. There is en- region number. Retry. tents cannot be played. Audio Format not supported This type of file cannot be...
Owner's Manual
Page 233
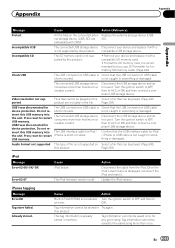
... was disconnected for formatting SD memory cards. (Page 243) Check USB The USB connector or USB cable is displayed, reconnect the iPod and reset it . Do not reinsert this USB memory into the unit. Cause Action Built-in something or damaged. Tag information can be stored in ...memory. Remove your device and replace it with DRM. USB2 was disconnected for iPod / iPhone is old. Press reset to restart USB memory. Do not reinsert this USB memory into the unit. The iPod firmware version is short-circuited. this Select a file ...
... was disconnected for formatting SD memory cards. (Page 243) Check USB The USB connector or USB cable is displayed, reconnect the iPod and reset it . Do not reinsert this USB memory into the unit. Cause Action Built-in something or damaged. Tag information can be stored in ...memory. Remove your device and replace it with DRM. USB2 was disconnected for iPod / iPhone is old. Press reset to restart USB memory. Do not reinsert this USB memory into the unit. The iPod firmware version is short-circuited. this Select a file ...
Owner's Manual
Page 235
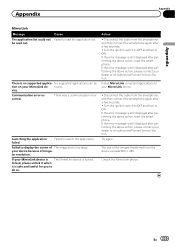
... a communication error. Failed to display the screen of The image size is locked. If your dealer or an authorized Pioneer Service Station. If the error message is still displayed after performing the above action, please contact your MirrorLink device is ... above action, please contact your MirrorLink device. ! locked, please unlock it when it is still displayed after performing the above action, reset the smartphone. Disconnect the cable from the device exceeds 800 × 480. Communication error occurred. Launching the application failed. Failed to ...
... a communication error. Failed to display the screen of The image size is locked. If your dealer or an authorized Pioneer Service Station. If the error message is still displayed after performing the above action, please contact your MirrorLink device is ... above action, please contact your MirrorLink device. ! locked, please unlock it when it is still displayed after performing the above action, reset the smartphone. Disconnect the cable from the device exceeds 800 × 480. Communication error occurred. Launching the application failed. Failed to ...
Installation Manual
Page 34
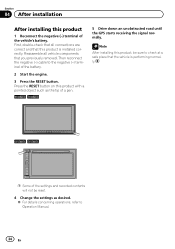
Reassemble all connections are correct and that this product, be reset. 4 Change the settings as the tip of the settings and recorded contents will not be sure to check at a safe place that you previously removed. ... Manual. 34 En Then reconnect the negative (-) cable to the negative (-) terminal of the vehicle's battery. Note After installing this product is performing normally. 6100NEX 5100NEX p Some of a pen. 8100NEX 7100NEX 5 Drive down an unobstructed road until the GPS starts receiving the signal normally. First, double-check that all vehicle components...
Reassemble all connections are correct and that this product, be reset. 4 Change the settings as the tip of the settings and recorded contents will not be sure to check at a safe place that you previously removed. ... Manual. 34 En Then reconnect the negative (-) cable to the negative (-) terminal of the vehicle's battery. Note After installing this product is performing normally. 6100NEX 5100NEX p Some of a pen. 8100NEX 7100NEX 5 Drive down an unobstructed road until the GPS starts receiving the signal normally. First, double-check that all vehicle components...


