Owner's Manual
Page 1
... properly connected to all users: This software requires that you must understand before using this product. English Operation Manual MULTIMEDIA NAVIGATION RECEIVER AVIC-8100NEX AVIC-7100NEX AVIC-6100NEX AVIC-5100NEX Notice to your vehicle's parking brake and depending on your Authorized Pioneer Electronics retailer or call us at (800) 421-1404. Important Information for the User first!
... properly connected to all users: This software requires that you must understand before using this product. English Operation Manual MULTIMEDIA NAVIGATION RECEIVER AVIC-8100NEX AVIC-7100NEX AVIC-6100NEX AVIC-5100NEX Notice to your vehicle's parking brake and depending on your Authorized Pioneer Electronics retailer or call us at (800) 421-1404. Important Information for the User first!
Owner's Manual
Page 2
... the AV operation screen 24 - Selecting a front source on the AV source selection screen 25 - Important The screens shown in this Pioneer product. Resetting the microprocessor 12 Basic operation Checking part names and functions 13 Remote control 14 Use and care of the map 32 Inserting... keys 22 - Operating list screens 27 - When the Application screen is not available 20 How to operate your product against theft 16 - Introduction Manual overview 11 - Selecting a rear source 25 Turning off the display 20 - A message about the map database 20 Turning off the AV source...
... the AV operation screen 24 - Selecting a front source on the AV source selection screen 25 - Important The screens shown in this Pioneer product. Resetting the microprocessor 12 Basic operation Checking part names and functions 13 Remote control 14 Use and care of the map 32 Inserting... keys 22 - Operating list screens 27 - When the Application screen is not available 20 How to operate your product against theft 16 - Introduction Manual overview 11 - Selecting a rear source 25 Turning off the display 20 - A message about the map database 20 Turning off the AV source...
Owner's Manual
Page 4
... - "Weather" settings 69 - Preparations before you use of the navigation functions 71 - Answering an incoming call 83 - Deleting a registered device 76 Connecting a registered Bluetooth device manually 77 Switching visibility 77 Entering the PIN code for nearby Bluetooth devices 74 - Switching the ring tone 85 - Adjusting the other party's listening volume 86...
... - "Weather" settings 69 - Preparations before you use of the navigation functions 71 - Answering an incoming call 83 - Deleting a registered device 76 Connecting a registered Bluetooth device manually 77 Switching visibility 77 Entering the PIN code for nearby Bluetooth devices 74 - Switching the ring tone 85 - Adjusting the other party's listening volume 86...
Owner's Manual
Page 5
...for each device 90 Using the radio Using the touch panel keys 93 Reading the screen 93 Starting procedure 94 Selecting a band 94 Manual tuning 94 Seek tuning 94 Selecting a preset channel from the preset channel list 95 Storing broadcast frequencies 95 Storing the strongest broadcast ...Radio™ reception HD Radio stations 97 Using the touch panel keys 97 Reading the screen 98 Starting procedure 99 Selecting a band 99 Manual tuning 99 Seek tuning 99 Selecting a preset channel from the preset channel list 100 Storing broadcast frequencies 100 Storing the strongest broadcast frequencies...
...for each device 90 Using the radio Using the touch panel keys 93 Reading the screen 93 Starting procedure 94 Selecting a band 94 Manual tuning 94 Seek tuning 94 Selecting a preset channel from the preset channel list 95 Storing broadcast frequencies 95 Storing the strongest broadcast ...Radio™ reception HD Radio stations 97 Using the touch panel keys 97 Reading the screen 98 Starting procedure 99 Selecting a band 99 Manual tuning 99 Seek tuning 99 Selecting a preset channel from the preset channel list 100 Storing broadcast frequencies 100 Storing the strongest broadcast frequencies...
Owner's Manual
Page 7
... - History list screen 152 - Subscribing to the SiriusXM Satellite Radio service 156 Using the touch panel keys 156 Reading the screen 157 Starting procedure 158 Manual tuning 159 Selecting a preset channel from the preset channel list 159 Storing broadcast channels 159 Selecting a SiriusXM channel directly 159 Selecting a channel from a list of...
... - History list screen 152 - Subscribing to the SiriusXM Satellite Radio service 156 Using the touch panel keys 156 Reading the screen 157 Starting procedure 158 Manual tuning 159 Selecting a preset channel from the preset channel list 159 Storing broadcast channels 159 Selecting a SiriusXM channel directly 159 Selecting a channel from a list of...

Owner's Manual
Page 11
... like this: e.g.) = For details of other important information that are available on the same screen are those for the User (a separate manual) which contains warnings, cautions, and other keys on the screen are shown, the description is deleted. ! Functions of the operations, refer...the screens on this product are described in this manual indicates moving on, take a few minutes to read Important Information for AVIC-8100NEX. References are presented in the following information about the conventions used in this manual indicate that is attached to the body of DVD-...
... like this: e.g.) = For details of other important information that are available on the same screen are those for the User (a separate manual) which contains warnings, cautions, and other keys on the screen are shown, the description is deleted. ! Functions of the operations, refer...the screens on this product are described in this manual indicates moving on, take a few minutes to read Important Information for AVIC-8100NEX. References are presented in the following information about the conventions used in this manual indicate that is attached to the body of DVD-...

Owner's Manual
Page 12
...be erased and must be repro- If it indicates the USB memory only, it is disconnected or discharged, the memory will not be reset. 6100NEX 5100NEX Data subject to the factory settings. 8100NEX 7100NEX Notes on the map with a significant positioning error. 1 Turn the ignition switch OFF. 2 Press...button with the op- The microprocessor must be reset under the following conditions: ! eration of the settings and recorded con- "iPod" In this manual, iPod and iPhone will not be reset. Prior to operate properly. ! If this product fails to using this product for the first time ...
...be erased and must be repro- If it indicates the USB memory only, it is disconnected or discharged, the memory will not be reset. 6100NEX 5100NEX Data subject to the factory settings. 8100NEX 7100NEX Notes on the map with a significant positioning error. 1 Turn the ignition switch OFF. 2 Press...button with the op- The microprocessor must be reset under the following conditions: ! eration of the settings and recorded con- "iPod" In this manual, iPod and iPhone will not be reset. Prior to operate properly. ! If this product fails to using this product for the first time ...
Owner's Manual
Page 13
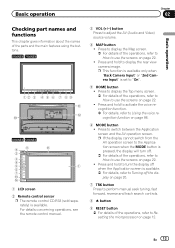
... on page 12. Press and hold to display the rear view camera image. For details concerning operations, see the remote control manual. 3 VOL (+/-) button Press to switch between the Application screen and the AV operation screen. p If the display cannot switch...part names and functions This chapter gives information about the names of the parts and the main features using the buttons. 8100NEX 7100NEX 12 3 4 5 6 7 8 9 b c a 6100NEX 5100NEX 9 8 b 2 3 4 5 1 6 7 d e 1 LCD screen 2 Remote control sensor p The remote control CD-R33 (sold separately) is set to "On". 5 HOME...
... on page 12. Press and hold to display the rear view camera image. For details concerning operations, see the remote control manual. 3 VOL (+/-) button Press to switch between the Application screen and the AV operation screen. p If the display cannot switch...part names and functions This chapter gives information about the names of the parts and the main features using the buttons. 8100NEX 7100NEX 12 3 4 5 6 7 8 9 b c a 6100NEX 5100NEX 9 8 b 2 3 4 5 1 6 7 d e 1 LCD screen 2 Remote control sensor p The remote control CD-R33 (sold separately) is set to "On". 5 HOME...
Owner's Manual
Page 17
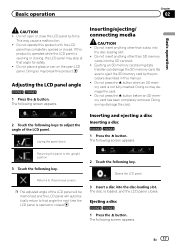
... product. Do not press the h button before an SD memory card has been completely removed. The disc is not fully inserted. This may break this manual. ! Returns to that angle the next time the LCD panel is opening or closing, the LCD panel may stop at that angle for safety. ! Opens...
... product. Do not press the h button before an SD memory card has been completely removed. The disc is not fully inserted. This may break this manual. ! Returns to that angle the next time the LCD panel is opening or closing, the LCD panel may stop at that angle for safety. ! Opens...
Owner's Manual
Page 19
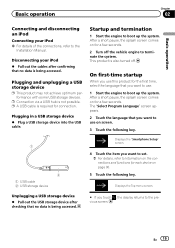
... the first time, select the language that no data is required for a few seconds. 2 Turn off . Startup and termination 1 Start the engine to the Installation Manual. En 19
... the first time, select the language that no data is required for a few seconds. 2 Turn off . Startup and termination 1 Start the engine to the Installation Manual. En 19
Owner's Manual
Page 57
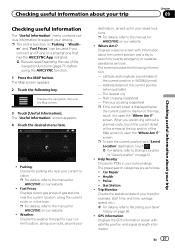
... page 58. ! screen. Health: ! The "Useful Information" screen appears. 4 Touch the desired menu item. ! p For details, refer to the manual for AVICSYNC on our website. ! En 57 The Map screen appears. 2 Touch the following information: - Displays the navigation menu on the Map screen....sure read Expanding the use of the Map screen to open the "Where Am I ?" Gas Station: ! p For details, refer to the manual for nearby emergency or roadside assistance services. p The online function in WGS84 format) - Latitude and longitude (coordinates of the current position (when ...
... page 58. ! screen. Health: ! The "Useful Information" screen appears. 4 Touch the desired menu item. ! p For details, refer to the manual for AVICSYNC on our website. ! En 57 The Map screen appears. 2 Touch the following information: - Displays the navigation menu on the Map screen....sure read Expanding the use of the Map screen to open the "Where Am I ?" Gas Station: ! p For details, refer to the manual for nearby emergency or roadside assistance services. p The online function in WGS84 format) - Latitude and longitude (coordinates of the current position (when ...
Owner's Manual
Page 58
... "Enable Auto-Saving". = For details, refer to record your destination by entering the fuel consumption information in memory, the oldest trip log will be started manually by the new one. The Map screen appears. 3 Touch the following key. Chapter 09 Checking useful information about your trip log later. Fuel Consumption: You...
... "Enable Auto-Saving". = For details, refer to record your destination by entering the fuel consumption information in memory, the oldest trip log will be started manually by the new one. The Map screen appears. 3 Touch the following key. Chapter 09 Checking useful information about your trip log later. Fuel Consumption: You...
Owner's Manual
Page 68
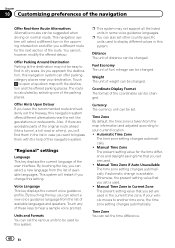
... and Formats You can set the various units to be changed . Automatic Time Zone The time zone setting changes automatically. ! Manual Time Zone if Auto Unavailable The time zone setting changes automatically if automatic change this setting. "Regional" settings Language This key displays...different alternatives near your destination. Otherwise, the present setting value that you set . You cannot, however, modify the offered detour. Manual Time Zone The present setting value for the next section of the route. Offer Parking Around Destination Parking at the destination may not...
... and Formats You can set the various units to be changed . Automatic Time Zone The time zone setting changes automatically. ! Manual Time Zone if Auto Unavailable The time zone setting changes automatically if automatic change this setting. "Regional" settings Language This key displays...different alternatives near your destination. Otherwise, the present setting value that you set . You cannot, however, modify the offered detour. Manual Time Zone The present setting value for the next section of the route. Offer Parking Around Destination Parking at the destination may not...
Owner's Manual
Page 69
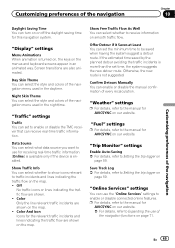
... settings Enable Auto-Saving = For details, refer to be saved when having the system suggest a detour route. En 69 p For details, refer to the manual for AVICSYNC on our website. = For details, refer to Expanding the use of every recalculation. Screen transitions are shown on page 71. Offer Detour if... it Saves at Least You can enable or disable the manual confirmation of the navigation functions on the map. Data Source You can select the style and colors of the navigation menu used in the ...
... settings Enable Auto-Saving = For details, refer to be saved when having the system suggest a detour route. En 69 p For details, refer to the manual for AVICSYNC on our website. = For details, refer to Expanding the use of every recalculation. Screen transitions are shown on page 71. Offer Detour if... it Saves at Least You can enable or disable the manual confirmation of the navigation functions on the map. Data Source You can select the style and colors of the navigation menu used in the ...

Owner's Manual
Page 73
... box. 2 Start the AVICSYNC App on your USB memory storage by using "SyncTool" on this product. The menus for the connected service are activated. http://pioneer.naviextras.com Customizing preferences of the navigation 7 Touch [Associate New Phone]. 8 Touch the iPhone or smartphone (Android) that you want to the Installation...
... box. 2 Start the AVICSYNC App on your USB memory storage by using "SyncTool" on this product. The menus for the connected service are activated. http://pioneer.naviextras.com Customizing preferences of the navigation 7 Touch [Associate New Phone]. 8 Touch the iPhone or smartphone (Android) that you want to the Installation...

Owner's Manual
Page 74
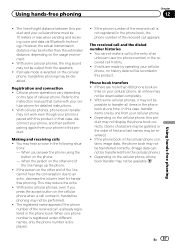
... operation). A total of your devices. Two registration methods are already paired, "Mem- In such cases, delete a paired device first. = For details, refer to the instruction manual of three devices can be performed. For details, refer to Deleting a registered device on page 76. Chapter 11 Registering and connecting a Bluetooth device If your...
... operation). A total of your devices. Two registration methods are already paired, "Mem- In such cases, delete a paired device first. = For details, refer to the instruction manual of three devices can be performed. For details, refer to Deleting a registered device on page 76. Chapter 11 Registering and connecting a Bluetooth device If your...

Owner's Manual
Page 76
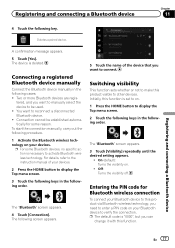
... on . 1 Press the HOME button to display the Top menu screen. 2 Touch the following keys in the following order. ! For details, refer to the instruction manual of the registered devices. p If this product with the last connected Bluetooth device will take place automatically as soon as the two devices are made...
... on . 1 Press the HOME button to display the Top menu screen. 2 Touch the following keys in the following order. ! For details, refer to the instruction manual of the registered devices. p If this product with the last connected Bluetooth device will take place automatically as soon as the two devices are made...
Owner's Manual
Page 77
...following screen appears. 5 Touch the name of your devices. 2 Press the HOME button to connect. For details, refer to the instruction manual of the device that you need to enter a PIN code on your Bluetooth device to display the Top menu screen. 2 Touch the... function. The "Bluetooth" screen appears. 3 Touch [Visibility] repeatedly until the desired setting appears. ! Connecting a registered Bluetooth device manually Connect the Bluetooth device manually in the following order. Entering the PIN code for some Bluetooth devices, no specific action is set to on. 1 Press the...
...following screen appears. 5 Touch the name of your devices. 2 Press the HOME button to connect. For details, refer to the instruction manual of the device that you need to enter a PIN code on your Bluetooth device to display the Top menu screen. 2 Touch the... function. The "Bluetooth" screen appears. 3 Touch [Visibility] repeatedly until the desired setting appears. ! Connecting a registered Bluetooth device manually Connect the Bluetooth device manually in the following order. Entering the PIN code for some Bluetooth devices, no specific action is set to on. 1 Press the...
Owner's Manual
Page 84
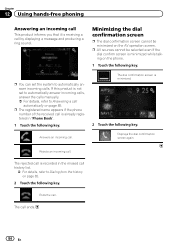
... while talking on page 85. Ends the call . Answers an incoming call . The call . p You can set to automatically answer incoming calls, answer the calls manually. = For details, refer to Answering a call automatically on the phone. 1 Touch the following key. The rejected call is receiving a call by displaying a message and producing...
... while talking on page 85. Ends the call . Answers an incoming call . The call . p You can set to automatically answer incoming calls, answer the calls manually. = For details, refer to Answering a call automatically on the phone. 1 Touch the following key. The rejected call is receiving a call by displaying a message and producing...
Owner's Manual
Page 87
... button on the other end of cellular phone. If the person on the type of the line cannot hear the conversation due to the instruction manual that case, disconnect your phone, and then perform pairing again from your cellular phone must be reversed.) ! Registration and connection ! Cellular phone operations vary depending...
... button on the other end of cellular phone. If the person on the type of the line cannot hear the conversation due to the instruction manual that case, disconnect your phone, and then perform pairing again from your cellular phone must be reversed.) ! Registration and connection ! Cellular phone operations vary depending...


