Owner's Manual
Page 1
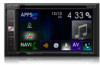
... your vehicle's parking brake and depending on your Authorized Pioneer Electronics retailer or call us at (800) 421-1404. For more information, please contact your vehicle, additional installation may be required. Important Information for the User first! Operation Manual MULTIMEDIA NAVIGATION RECEIVER AVIC-8100NEX AVIC-7100NEX AVIC-6100NEX AVIC-5100NEX Notice to all users: This software requires that...
... your vehicle's parking brake and depending on your Authorized Pioneer Electronics retailer or call us at (800) 421-1404. For more information, please contact your vehicle, additional installation may be required. Important Information for the User first! Operation Manual MULTIMEDIA NAVIGATION RECEIVER AVIC-8100NEX AVIC-7100NEX AVIC-6100NEX AVIC-5100NEX Notice to all users: This software requires that...
Owner's Manual
Page 2
...23 Supported AV source 24 Displaying the AV operation screen 24 - Using the common touch panel keys 26 - Conventions used in this manual 11 Notes on the AV source selection screen 25 - Removing the detachable faceplate 16 - Inserting and ejecting a disc 17 - ... shown in a safe place for future reference. Installing the battery 15 - Connecting and disconnecting an iPod 19 - Switching screens using the touch panel keys 22 - After you will know how to use this Pioneer product. Introduction Manual overview 11 - When the Application screen is available...
...23 Supported AV source 24 Displaying the AV operation screen 24 - Using the common touch panel keys 26 - Conventions used in this manual 11 Notes on the AV source selection screen 25 - Removing the detachable faceplate 16 - Inserting and ejecting a disc 17 - ... shown in a safe place for future reference. Installing the battery 15 - Connecting and disconnecting an iPod 19 - Switching screens using the touch panel keys 22 - After you will know how to use this Pioneer product. Introduction Manual overview 11 - When the Application screen is available...

Owner's Manual
Page 12
... Prior to using this product fails to operate properly. ! If this product for the first time after installation. ! eration of the settings and recorded con- tents will not be reset. p Some of the... settings and recorded con- 1 tents will not be reset. 6100NEX 5100NEX Data subject to erasure 1 The information is erased by disconnecting the yellow lead from the battery ... will not be repro- If it indicates the USB memory only, it is connected to this manual, iPod and iPhone will be reset under the following conditions: ! p Do not perform this ...
... Prior to using this product fails to operate properly. ! If this product for the first time after installation. ! eration of the settings and recorded con- tents will not be reset. p Some of the... settings and recorded con- 1 tents will not be reset. 6100NEX 5100NEX Data subject to erasure 1 The information is erased by disconnecting the yellow lead from the battery ... will not be repro- If it indicates the USB memory only, it is connected to this manual, iPod and iPhone will be reset under the following conditions: ! p Do not perform this ...
Owner's Manual
Page 19
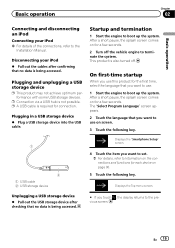
... connections and functions for each device on screen. 3 Touch the following key. p Connection via a USB hub is also turned off the vehicle engine to the Installation Manual. Startup and termination 1 Start the engine to use on page 90. 5 Touch the following key. 1 2 1 USB cable 2 USB storage device Displays the "Smartphone Setup" screen...
... connections and functions for each device on screen. 3 Touch the following key. p Connection via a USB hub is also turned off the vehicle engine to the Installation Manual. Startup and termination 1 Start the engine to use on page 90. 5 Touch the following key. 1 2 1 USB cable 2 USB storage device Displays the "Smartphone Setup" screen...

Owner's Manual
Page 73
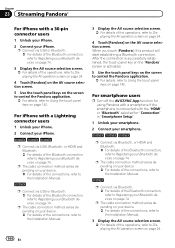
...]. 13 Touch the service that you want to the Installation Manual. 4 Press the MAP button. To update the content, download the update on your navigation system by using the computer to "HOW TO UPDATE?" http://pioneer.naviextras.com Customizing preferences of the navigation Chapter 10 Preparations... (Android). Then, transfer the data from App Store or Google Play and install the app to your product. En 73 Once the association is established, your iPhone or smartphone (Android) is installed. The menus for the connected service are activated. p For details, access ...
...]. 13 Touch the service that you want to the Installation Manual. 4 Press the MAP button. To update the content, download the update on your navigation system by using the computer to "HOW TO UPDATE?" http://pioneer.naviextras.com Customizing preferences of the navigation Chapter 10 Preparations... (Android). Then, transfer the data from App Store or Google Play and install the app to your product. En 73 Once the association is established, your iPhone or smartphone (Android) is installed. The menus for the connected service are activated. p For details, access ...
Owner's Manual
Page 88
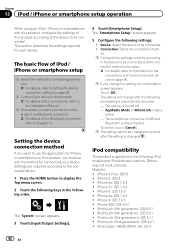
... on the connections and functions for each device on page 88. 2 Connect your device to this product. = For details of the connections, refer to the Installation Manual. 3 If necessary, connect your device. The basic flow of iPod / iPhone or smartphone setup 1 Select the method for connecting your device to this product via...
... on the connections and functions for each device on page 88. 2 Connect your device to this product. = For details of the connections, refer to the Installation Manual. 3 If necessary, connect your device. The basic flow of iPod / iPhone or smartphone setup 1 Select the method for connecting your device to this product via...
Owner's Manual
Page 122
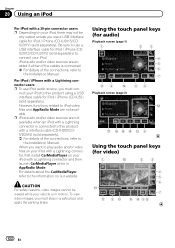
...your iPod with a 30-pin connector users p Depending on our website. When you must con- To view video images, you want to the Installation Manual. Chapter 20 Using an iPod For iPod with a Lightning connector and then launch CarMediaPlayer while in AppRadio Mode. p iPod audio and/or video.... = For details of the cables is in a safe place and apply the parking brake. For details about the CarMediaPlayer, refer to the Installation Manual. CAUTION For safety reasons, video images cannot be viewed while your iPod, there may not be any output unless you must stop in motion....
...your iPod with a 30-pin connector users p Depending on our website. When you must con- To view video images, you want to the Installation Manual. Chapter 20 Using an iPod For iPod with a Lightning connector and then launch CarMediaPlayer while in AppRadio Mode. p iPod audio and/or video.... = For details of the cables is in a safe place and apply the parking brake. For details about the CarMediaPlayer, refer to the Installation Manual. CAUTION For safety reasons, video images cannot be viewed while your iPod, there may not be any output unless you must stop in motion....
Owner's Manual
Page 134
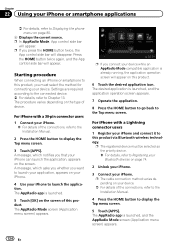
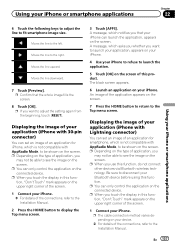
... your iPhone. = For details of this product, you want to launch your application, appears on the screen of the connections, refer to the Installation Manual. 2 Press the HOME button to display the Top menu screen. 3 Touch [APPS]. Press the HOME button twice again, and the App control...must be selected as the priority device. = For details, refer to Registering your Bluetooth devices on the type of the connections, refer to the Installation Manual. 4 Press the HOME button to display the Top menu screen. 5 Touch [APPS]. p The cable connection method varies depending on this product via...
... your iPhone. = For details of this product, you want to launch your application, appears on the screen of the connections, refer to the Installation Manual. 2 Press the HOME button to display the Top menu screen. 3 Touch [APPS]. Press the HOME button twice again, and the App control...must be selected as the priority device. = For details, refer to Registering your Bluetooth devices on the type of the connections, refer to the Installation Manual. 4 Press the HOME button to display the Top menu screen. 5 Touch [APPS]. p The cable connection method varies depending on this product via...
Owner's Manual
Page 135
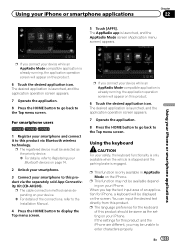
... the AppRadio Mode screen (Application menu screen) appears. The AppRadio app is engaged. p The language preference for the keyboard of the connections, refer to the Installation Manual. 4 Press the HOME button to this product. p This function is launched, and the application operation screen appears. 7 Operate the application. 8 Press the HOME button to...
... the AppRadio Mode screen (Application menu screen) appears. The AppRadio app is engaged. p The language preference for the keyboard of the connections, refer to the Installation Manual. 4 Press the HOME button to this product. p This function is launched, and the application operation screen appears. 7 Operate the application. 8 Press the HOME button to...
Owner's Manual
Page 137
... you that the whole image fills the screen. 8 Touch [OK]. A message, which asks you whether you may not be able to the Installation Manual. The black screen appears. 6 Launch an application on your iPhone. p Depending on the type of the connections, refer to see the image ... p When you touch the display in this function, "Don't Touch" mark appears on the upper right corner of the connections, refer to the Installation Manual. 2 Press the HOME button to disconnect your iPhone. = For details of the screen. 1 Connect your Bluetooth device before using this product. En...
... you that the whole image fills the screen. 8 Touch [OK]. A message, which asks you whether you may not be able to the Installation Manual. The black screen appears. 6 Launch an application on your iPhone. p Depending on the type of the connections, refer to see the image ... p When you touch the display in this function, "Don't Touch" mark appears on the upper right corner of the connections, refer to the Installation Manual. 2 Press the HOME button to disconnect your iPhone. = For details of the screen. 1 Connect your Bluetooth device before using this product. En...

Owner's Manual
Page 138
... for smartphone, which is not compatible with finger gestures such as tapping, dragging, scrolling or flicking on the screen of the connections, refer to the Installation Manual. 2 Press the HOME button to display the Top menu screen. 3 Touch [APPS]. p You can control applications for a smartphone. In Android Auto, you use Android Auto...
... for smartphone, which is not compatible with finger gestures such as tapping, dragging, scrolling or flicking on the screen of the connections, refer to the Installation Manual. 2 Press the HOME button to display the Top menu screen. 3 Touch [APPS]. p You can control applications for a smartphone. In Android Auto, you use Android Auto...
Owner's Manual
Page 139
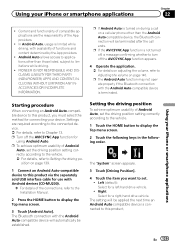
... RESPONSIBLE AND DISCLAIMS LIABILITY FOR THIRD PARTY (NON-PIONEER) APPS AND CONTENT, INCLUDING WITHOUT LIMITATION ANY INACCURACIES OR INCOMPLETE INFORMATION. Setting the driving position To achieve optimum usability of functions and content ... applications other than those listed, subject to display the Top menu screen. 3 Touch [Android Auto]. p To achieve optimum usability of the connections, refer to the Installation Manual. 2 Press the HOME button to limitations while driving. ! The "System" screen appears. 3 Touch [Driving Position]. 4 Touch the item you must select the method ...
... RESPONSIBLE AND DISCLAIMS LIABILITY FOR THIRD PARTY (NON-PIONEER) APPS AND CONTENT, INCLUDING WITHOUT LIMITATION ANY INACCURACIES OR INCOMPLETE INFORMATION. Setting the driving position To achieve optimum usability of functions and content ... applications other than those listed, subject to display the Top menu screen. 3 Touch [Android Auto]. p To achieve optimum usability of the connections, refer to the Installation Manual. 2 Press the HOME button to limitations while driving. ! The "System" screen appears. 3 Touch [Driving Position]. 4 Touch the item you must select the method ...
Owner's Manual
Page 140
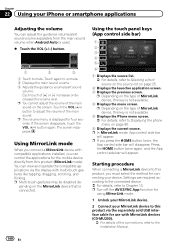
...(+/-) button again. You can view and operate the compatible applications via the separately sold USB interface cable for use with compatible applications installed, you must select the method for four seconds. Settings are required according to the connected device. = For details, refer to ...sound volume when Android Auto is not available. 4 Displays the menu screen. Starting procedure When connecting a MirrorLink device to the Installation Manual. 140 En p Depending on the MirrorLink device that is displayed for connecting your device. Touch again to Chapter 13. Each touch...
...(+/-) button again. You can view and operate the compatible applications via the separately sold USB interface cable for use with compatible applications installed, you must select the method for four seconds. Settings are required according to the connected device. = For details, refer to ...sound volume when Android Auto is not available. 4 Displays the menu screen. Starting procedure When connecting a MirrorLink device to the Installation Manual. 140 En p Depending on the MirrorLink device that is displayed for connecting your device. Touch again to Chapter 13. Each touch...
Owner's Manual
Page 144
...Bluetooth devices on page 74. p The cable connection method varies depending on your device. = For details of the connections, refer to the Installation Manual. 5100NEX p Connect via USB or Bluetooth. = For details of the Bluetooth connection, refer to Using the touch panel keys on page 74. ...AV source selection screen. p The cable connection method varies depending on your device. = For details of the connections, refer to the Installation Manual. 5100NEX p Connect via USB or Bluetooth. = For details of the Bluetooth connection, refer to Registering your device. = For details of the connections...
...Bluetooth devices on page 74. p The cable connection method varies depending on your device. = For details of the connections, refer to the Installation Manual. 5100NEX p Connect via USB or Bluetooth. = For details of the Bluetooth connection, refer to Using the touch panel keys on page 74. ...AV source selection screen. p The cable connection method varies depending on your device. = For details of the connections, refer to the Installation Manual. 5100NEX p Connect via USB or Bluetooth. = For details of the Bluetooth connection, refer to Registering your device. = For details of the connections...
Owner's Manual
Page 148
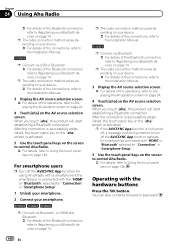
... page 74. 148 En p The cable connection method varies depending on your device. = For details of the connections, refer to the Installation Manual. 5100NEX p Connect via USB or Bluetooth. = For details of the Bluetooth connection, refer to Registering your device. = For details of the connections,... refer to the Installation Manual. 5100NEX p Connect via Bluetooth. = For details of the operations, refer to Using the touch panel keys on page 74. Chapter 24 Using Aha...
... page 74. 148 En p The cable connection method varies depending on your device. = For details of the connections, refer to the Installation Manual. 5100NEX p Connect via USB or Bluetooth. = For details of the Bluetooth connection, refer to Registering your device. = For details of the connections,... refer to the Installation Manual. 5100NEX p Connect via Bluetooth. = For details of the operations, refer to Using the touch panel keys on page 74. Chapter 24 Using Aha...

Owner's Manual
Page 172
... the Phone menu screen. 1 Current time and date Starting procedure 1 Display the AV source selection screen. = For details of the connection method, refer to the Installation Manual. Reading the screen 1 Using the touch panel keys 1 23 4 5 6 7 1 Displays the source list. = For details, refer to Selecting a front source on the source list on...
... the Phone menu screen. 1 Current time and date Starting procedure 1 Display the AV source selection screen. = For details of the connection method, refer to the Installation Manual. Reading the screen 1 Using the touch panel keys 1 23 4 5 6 7 1 Displays the source list. = For details, refer to Selecting a front source on the source list on...

Owner's Manual
Page 173
.... = For details, refer to Setting the time and date on page 221. 3 Displays the Setting menu screen. 4 Recalls equalizer curves. = For details, refer to the Installation Manual. CAUTION For safety reasons, video images cannot be viewed while your vehicle is required for an AUX source. The following order.
.... = For details, refer to Setting the time and date on page 221. 3 Displays the Setting menu screen. 4 Recalls equalizer curves. = For details, refer to the Installation Manual. CAUTION For safety reasons, video images cannot be viewed while your vehicle is required for an AUX source. The following order.
Owner's Manual
Page 175
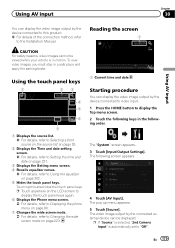
... in the following screen appears. 4 Touch [AV Input]. The video image output by the device connected to video input. 1 Press the HOME button to the Installation Manual. En 175 p If "Source" is selected, "2nd Camera Input" is in motion. Using AV input Chapter 30 Using AV input You can be viewed while...
... in the following screen appears. 4 Touch [AV Input]. The video image output by the device connected to video input. 1 Press the HOME button to the Installation Manual. En 175 p If "Source" is selected, "2nd Camera Input" is in motion. Using AV input Chapter 30 Using AV input You can be viewed while...
Owner's Manual
Page 205
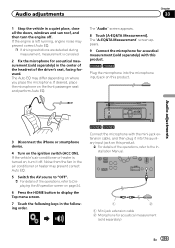
...) in the center of the headrest of the operations, refer to display the Top menu screen. 7 Touch the following order. 6100NEX 5100NEX Connect the microphone with this product. = For details of the driver's seat, facing forward. Audio adjustments Chapter 33 1 Stop the vehicle...the doors, windows and sun roof, and then turn it into the microphone input jack on page 24. 6 Press the HOME button to the Installation Manual. 1 2 1 Mini-jack extension cable 2 Microphone for acoustical measurement (sold separately) En 205 p If driving restrictions are detected during measurement,...
...) in the center of the headrest of the operations, refer to display the Top menu screen. 7 Touch the following order. 6100NEX 5100NEX Connect the microphone with this product. = For details of the driver's seat, facing forward. Audio adjustments Chapter 33 1 Stop the vehicle...the doors, windows and sun roof, and then turn it into the microphone input jack on page 24. 6 Press the HOME button to the Installation Manual. 1 2 1 Mini-jack extension cable 2 Microphone for acoustical measurement (sold separately) En 205 p If driving restrictions are detected during measurement,...
Installation Manual
Page 5
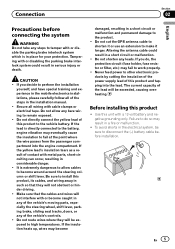
... Do not cut the GPS antenna cable to shorten it longer. If you decide to remain exposed. ! Connection Section 02 English Precautions before installation. Do not allow cables to high temperatures. The current capacity of the vehicle's controls. ! Tampering with or become caught in a fire ... Do not shorten any of the lead will be exceeded, causing overheating. Use this product, its cables, and wiring away in the installation manual. ! Failure to make it or use an extension to do , the protection circuit (fuse holder, fuse resistor or filter, etc...
... Do not cut the GPS antenna cable to shorten it longer. If you decide to remain exposed. ! Connection Section 02 English Precautions before installation. Do not allow cables to high temperatures. The current capacity of the vehicle's controls. ! Tampering with or become caught in a fire ... Do not shorten any of the lead will be exceeded, causing overheating. Use this product, its cables, and wiring away in the installation manual. ! Failure to make it or use an extension to do , the protection circuit (fuse holder, fuse resistor or filter, etc...

