Owner's Manual
Page 2
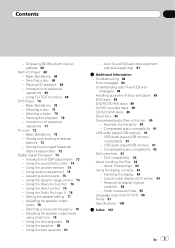
... demo mode 14 Operating this manual 9 After-sales service for Pioneer products 9 Visit our website 10 Features 10 - Selecting a source 16 - Playing DivX® VOD content 23 - Playable discs 9 ! Parking brake interlock 7 - DVD video disc region numbers 9 About this unit What's What 15 - About WMA 11 - About the SAT RADIO READY mark 12 To protect the LCD screen 12 For viewing LCD comfortably 13 - Changing the picture adjustment 13 What the marks on DVDs indicate 13 - Operating...
... demo mode 14 Operating this manual 9 After-sales service for Pioneer products 9 Visit our website 10 Features 10 - Selecting a source 16 - Playing DivX® VOD content 23 - Playable discs 9 ! Parking brake interlock 7 - DVD video disc region numbers 9 About this unit What's What 15 - About WMA 11 - About the SAT RADIO READY mark 12 To protect the LCD screen 12 For viewing LCD comfortably 13 - Changing the picture adjustment 13 What the marks on DVDs indicate 13 - Operating...
Owner's Manual
Page 3
... Setting up the DVD player 37 - Setting the audio language 38 - Changing languages for a song/video 30 - Switching the sound muting/ attenuation 42 - Correcting distorted sound 43 - Introduction of DVD setup adjustments 37 - Selecting audio output 28 - Browsing for CAUTION 42 - Displaying text information on USB portable audio player/ USB memory 32 - Basic Operations 32 - Selecting files from album list of currently playing artist 31 - Boosting the bass 36 - Introduction of advanced operations 27 - Setting the DivX subtitle file 40 - Displaying your iPod...
... Setting up the DVD player 37 - Setting the audio language 38 - Changing languages for a song/video 30 - Switching the sound muting/ attenuation 42 - Correcting distorted sound 43 - Introduction of DVD setup adjustments 37 - Selecting audio output 28 - Browsing for CAUTION 42 - Displaying text information on USB portable audio player/ USB memory 32 - Basic Operations 32 - Selecting files from album list of currently playing artist 31 - Boosting the bass 36 - Introduction of advanced operations 27 - Setting the DivX subtitle file 40 - Displaying your iPod...
Owner's Manual
Page 4
... adjustments 44 - Setting up for rear view camera (back up camera) 46 - Connecting to a registered cellular phone 64 - Adjusting the response positions of advanced operations 63 - Storing and recalling broadcast stations 55 - Using the Game Alert function 57 - Displaying the Radio ID 58 - Disconnecting a Bluetooth audio player 60 - Making a phone call by entering phone number 67 - Connecting a cellular phone 63 - Changing the picture adjustment 44 - Switching the iPod charge setting 47 - Using the PGM button 49 Available accessories XM tuner 51 - Selecting a SIRIUS...
... adjustments 44 - Setting up for rear view camera (back up camera) 46 - Connecting to a registered cellular phone 64 - Adjusting the response positions of advanced operations 63 - Storing and recalling broadcast stations 55 - Using the Game Alert function 57 - Displaying the Radio ID 58 - Disconnecting a Bluetooth audio player 60 - Making a phone call by entering phone number 67 - Connecting a cellular phone 63 - Changing the picture adjustment 44 - Switching the iPod charge setting 47 - Using the PGM button 49 Available accessories XM tuner 51 - Selecting a SIRIUS...
Owner's Manual
Page 5
... - Using the equalizer 80 - Pausing CD playback 69 - Introduction of advanced operations 69 - Setting the speaker setting 77 - About iPod settings 93 Using the display correctly 93 - Handling the display 94 - Selecting a disc 69 - Example of DSP adjustments 73 - Liquid crystal display (LCD) screen 94 - Small fluorescent tube 95 Language code chart for DVD 96 Terms 97 Specifications 100 Index 102 En 5 Adjusting source levels 75 - Using the down-mix function 76 - DivX compatibility 93...
... - Using the equalizer 80 - Pausing CD playback 69 - Introduction of advanced operations 69 - Setting the speaker setting 77 - About iPod settings 93 Using the display correctly 93 - Handling the display 94 - Selecting a disc 69 - Example of DSP adjustments 73 - Liquid crystal display (LCD) screen 94 - Small fluorescent tube 95 Language code chart for DVD 96 Terms 97 Specifications 100 Index 102 En 5 Adjusting source levels 75 - Using the down-mix function 76 - DivX compatibility 93...
Owner's Manual
Page 6
... to watch a DVD, Video CD or TV while driving, the warning Viewing of front seat video source while driving is being driven. NECTOR IS DESIGNED TO DETECT PARKED STATUS AND MUST BE CONNECTED TO THE POWER SUPPLY SIDE OF THE PARKING BRAKE SWITCH. fore operating your vehicle...manual fully and carefully be used while the vehicle is strictly prohibited. Do not attempt to install or service your display and retain them for operating procedures and safety information. 3 Pay close attention to all warnings in this manual and follow all of these instructions regarding your display...
... to watch a DVD, Video CD or TV while driving, the warning Viewing of front seat video source while driving is being driven. NECTOR IS DESIGNED TO DETECT PARKED STATUS AND MUST BE CONNECTED TO THE POWER SUPPLY SIDE OF THE PARKING BRAKE SWITCH. fore operating your vehicle...manual fully and carefully be used while the vehicle is strictly prohibited. Do not attempt to install or service your display and retain them for operating procedures and safety information. 3 Pay close attention to all warnings in this manual and follow all of these instructions regarding your display...
Owner's Manual
Page 16
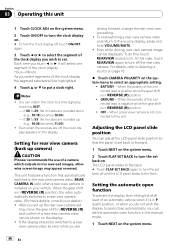
...by default. The source names are displayed and selectable ones are highlighted. % When using the button, press SRC repeatedly to the DVD player, load a disc in DVD player ! iPod ! Bluetooth telephone ! DVD player/multi-DVD player ! AUX 1 ! AV input ! External unit 1 ! SIRIUS - When AUX (auxiliary input) is connected. - Section 03 Operating this unit. % When using the touch panel keys, touch the source icon and then touch the desired source name. To switch to select a desired source. Radio ! EXT 2 - Rear view camera ! OFF - When no disc or magazine in...
...by default. The source names are displayed and selectable ones are highlighted. % When using the button, press SRC repeatedly to the DVD player, load a disc in DVD player ! iPod ! Bluetooth telephone ! DVD player/multi-DVD player ! AUX 1 ! AV input ! External unit 1 ! SIRIUS - When AUX (auxiliary input) is connected. - Section 03 Operating this unit. % When using the touch panel keys, touch the source icon and then touch the desired source name. To switch to select a desired source. Radio ! EXT 2 - Rear view camera ! OFF - When no disc or magazine in...
Owner's Manual
Page 17
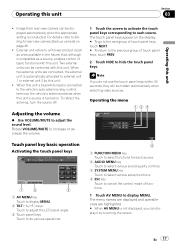
... touch panel keys, touch PREV. 2 Touch HIDE to display MENU. To retract the antenna, turn the source off. 1 Touch the screen to activate the touch panel keys corresponding to each source. 2 AUDIO MENU key Touch to select various sound quality controls. 3 SYSTEM MENU key Touch to select various setup functions. 4 ESC key Touch to cancel the control mode of functions. 1 Touch AV MENU to hide the touch panel keys. Image from rear view camera can display it by this unit ! For details, refer to Setting for rear view camera...
... touch panel keys, touch PREV. 2 Touch HIDE to display MENU. To retract the antenna, turn the source off. 1 Touch the screen to activate the touch panel keys corresponding to each source. 2 AUDIO MENU key Touch to select various sound quality controls. 3 SYSTEM MENU key Touch to select various setup functions. 4 ESC key Touch to cancel the control mode of functions. 1 Touch AV MENU to hide the touch panel keys. Image from rear view camera can display it by this unit ! For details, refer to Setting for rear view camera...

Owner's Manual
Page 30
... output the video to the ordinary display. 30 En For details, refer to the iPod's manuals. 1 Touch Video. # To return to OFF. Change the video setting on the iPod. ALBUMS (albums) ! To do this unit is designed to be turned on the iPod are not compatible with video capabilities is turned off . ! Connect directly the dock connector cable to Error messages on page 93. ! If an error message or icon such as possible to play...
... output the video to the ordinary display. 30 En For details, refer to the iPod's manuals. 1 Touch Video. # To return to OFF. Change the video setting on the iPod. ALBUMS (albums) ! To do this unit is designed to be turned on the iPod are not compatible with video capabilities is turned off . ! Connect directly the dock connector cable to Error messages on page 93. ! If an error message or icon such as possible to play...

Owner's Manual
Page 39
... setting) ! When using a regular display, select either LETTER BOX or PAN SCAN. The picture is not recorded in an unnatural picture. ! When playing discs that the angle icon appears on the DVD setup menu. 2 Touch PARENTAL. 3 Touch 0 to 9 to REAR MONITOR OUTPUT. ! When you can set a parental lock level and then play a disc featuring parental lock, code number input indications may result in the disc. Setting the code number and level You need to have registered a code number for the display connected to input...
... setting) ! When using a regular display, select either LETTER BOX or PAN SCAN. The picture is not recorded in an unnatural picture. ! When playing discs that the angle icon appears on the DVD setup menu. 2 Touch PARENTAL. 3 Touch 0 to 9 to REAR MONITOR OUTPUT. ! When you can set a parental lock level and then play a disc featuring parental lock, code number input indications may result in the disc. Setting the code number and level You need to have registered a code number for the display connected to input...

Owner's Manual
Page 45
... the screen. 4 Touch ESC to be possible. 3 Touch c or d to select the desired background display. Operating this unit Section 03 Operating this page.) Setting the AV input You can enjoy AV (AV input) as EXT source. ! BRIGHTNESS - Adjust the black intensity ! Adjust the contrast ! Adjust the brightness of color (red is increased or decreased. 4 Touch ESC to audio source such as AV source. ! Switch the picture adjustment modes # You cannot adjust the picture adjustment for rear view camera when CAMERA POLARITY is emphasized) ! ground video image while you touch...
... the screen. 4 Touch ESC to be possible. 3 Touch c or d to select the desired background display. Operating this unit Section 03 Operating this page.) Setting the AV input You can enjoy AV (AV input) as EXT source. ! BRIGHTNESS - Adjust the black intensity ! Adjust the contrast ! Adjust the brightness of color (red is increased or decreased. 4 Touch ESC to audio source such as AV source. ! Switch the picture adjustment modes # You cannot adjust the picture adjustment for rear view camera when CAMERA POLARITY is emphasized) ! ground video image while you touch...
Owner's Manual
Page 46
... clock display appears on the display. OFF - After you set up the rear view camera set . Setting for rear view camera (back up . (e.g., 10:36 becomes 11:00.) ! Notes ! You can adjust the LCD panel slide position so that automatically switches to 59, the minutes are rounded up camera) CAUTION Pioneer recommends the use of a camera which outputs mirror reversed images, otherwise screen image may appear reversed. Section 03 Operating this unit 1 Touch CLOCK ADJ on the system menu. 2 Touch ON/OFF to turn the clock display...
... clock display appears on the display. OFF - After you set up the rear view camera set . Setting for rear view camera (back up . (e.g., 10:36 becomes 11:00.) ! Notes ! You can adjust the LCD panel slide position so that automatically switches to 59, the minutes are rounded up camera) CAUTION Pioneer recommends the use of a camera which outputs mirror reversed images, otherwise screen image may appear reversed. Section 03 Operating this unit 1 Touch CLOCK ADJ on the system menu. 2 Touch ON/OFF to turn the clock display...

Owner's Manual
Page 48
...-BUS-RCA interconnector (AUX 2) When connecting auxiliary device using a mini plug cable iPod and portable audio/video player can be connected to this unit to What's What on page 41. For more details, refer to auxiliary device featuring RCA output. Setting the AUX title The title displayed for the AUX source can be changed. ! Section 03 Operating this unit via 3.5 mm plug (4 pole) cable (e.g., CD-V150M), you can enjoy the video contents of the iPod. ! The 16-point touch panel adjustment screen appears. # To...
...-BUS-RCA interconnector (AUX 2) When connecting auxiliary device using a mini plug cable iPod and portable audio/video player can be connected to this unit to What's What on page 41. For more details, refer to auxiliary device featuring RCA output. Setting the AUX title The title displayed for the AUX source can be changed. ! Section 03 Operating this unit via 3.5 mm plug (4 pole) cable (e.g., CD-V150M), you can enjoy the video contents of the iPod. ! The 16-point touch panel adjustment screen appears. # To...
Owner's Manual
Page 63
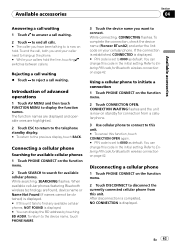
... to the device name, touch PHONE NAME. 3 Touch the device name you want to connect. The function names are displayed and operable ones are found, device name or Name Not Found (if names cannot be obtained) is displayed. # If this unit. Introduction of advanced operations 1 Touch AV MENU and then touch FUNCTION MENU to Entering PIN code for connection from a cellular phone. 3 Use cellular phone to connect to this unit. # To cancel this function, touch CONNECTION OPEN again. # PIN code is set to...
... to the device name, touch PHONE NAME. 3 Touch the device name you want to connect. The function names are displayed and operable ones are found, device name or Name Not Found (if names cannot be obtained) is displayed. # If this unit. Introduction of advanced operations 1 Touch AV MENU and then touch FUNCTION MENU to Entering PIN code for connection from a cellular phone. 3 Use cellular phone to connect to this unit. # To cancel this function, touch CONNECTION OPEN again. # PIN code is set to...

Owner's Manual
Page 73
... displayed and operable ones are connected to this unit, be stored in the order shown, you have saved using a test tone 6 Selecting a cross-over frequency 7 Adjusting the speaker output levels 8 Adjusting 3-band parametric equalizer 1 Touch AV MENU and then touch DSP MENU to display the DSP function names. Digital Signal Processor Introduction of DSP adjustments You can create a finely-tuned sound field effortlessly. 1 Setting the speaker setting 2 Using the position selector 3 Auto TA and EQ (auto-time...
... displayed and operable ones are connected to this unit, be stored in the order shown, you have saved using a test tone 6 Selecting a cross-over frequency 7 Adjusting the speaker output levels 8 Adjusting 3-band parametric equalizer 1 Touch AV MENU and then touch DSP MENU to display the DSP function names. Digital Signal Processor Introduction of DSP adjustments You can create a finely-tuned sound field effortlessly. 1 Setting the speaker setting 2 Using the position selector 3 Auto TA and EQ (auto-time...
Owner's Manual
Page 77
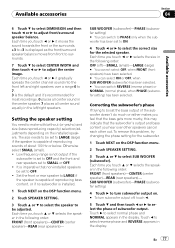
... output if the subwoofer is set to OFF and the front and rear speakers set to ON. 4 Touch c or d to adjust the center image. SUB WOOFER (subwoofer)-PHASE (subwoofer setting) # You can switch REVERSE (reverse phase) or NORMAL (normal phase), when PHASE (subwoofer setting) has been selected. En 77 Each time you touch c or d it 's recommended for most recordings. 0 places all center sound in the center speaker. 7 places all center sound equally in the display...
... output if the subwoofer is set to OFF and the front and rear speakers set to ON. 4 Touch c or d to adjust the center image. SUB WOOFER (subwoofer)-PHASE (subwoofer setting) # You can switch REVERSE (reverse phase) or NORMAL (normal phase), when PHASE (subwoofer setting) has been selected. En 77 Each time you touch c or d it 's recommended for most recordings. 0 places all center sound in the center speaker. 7 places all center sound equally in the display...

Owner's Manual
Page 82
... headrest of the car interior acoustic characteristics. ! Using another microphone may differ depending on the power amp before carrying out auto TA and EQ. When front speaker is as quiet as below: - When this unit is connected to use this unit is turned on, turn the source on if this already exists, the setting will be set to be replaced. Auto TA and EQ changes the audio settings as possible...
... headrest of the car interior acoustic characteristics. ! Using another microphone may differ depending on the power amp before carrying out auto TA and EQ. When front speaker is as quiet as below: - When this unit is connected to use this unit is turned on, turn the source on if this already exists, the setting will be set to be replaced. Auto TA and EQ changes the audio settings as possible...

Owner's Manual
Page 88
... error messages When correct measurement of correcting the problem. Message Cause Action Error. Please check FL SP., Error. Correct the input level setting of a speaker. ! After checking, try again. The surrounding noise level is not possible using the auto TA and EQ, an error message may appear on the display. Please check center SP., Error. Stop your car in metal objects). Set the microphone correctly. 88 En Update the iPod...
... error messages When correct measurement of correcting the problem. Message Cause Action Error. Please check FL SP., Error. Correct the input level setting of a speaker. ! After checking, try again. The surrounding noise level is not possible using the auto TA and EQ, an error message may appear on the display. Please check center SP., Error. Stop your car in metal objects). Set the microphone correctly. 88 En Update the iPod...
Other Manual
Page 1
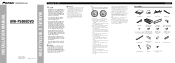
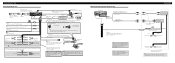
... the driver may fail to ground. - Parts supplied ENGLISH This product Tuner box Power cord Antenna cable USB cable Mounting sleeve (pre-installed) Trim ring (pre-installed) Side bracket (small) (2 pcs.) (pre-installed) Screw (2 mm × 3 mm) (4 pcs.) (pre-installed) Flush surface screw (5 mm × 6 mm) (6 pcs.) (2 are not used. - Where such regulations apply, they are color-coded. Cover any cables. - Refer all wiring with a glass antenna, connect it to authorized Pioneer service...
... the driver may fail to ground. - Parts supplied ENGLISH This product Tuner box Power cord Antenna cable USB cable Mounting sleeve (pre-installed) Trim ring (pre-installed) Side bracket (small) (2 pcs.) (pre-installed) Screw (2 mm × 3 mm) (4 pcs.) (pre-installed) Flush surface screw (5 mm × 6 mm) (6 pcs.) (2 are not used. - Where such regulations apply, they are color-coded. Cover any cables. - Refer all wiring with a glass antenna, connect it to authorized Pioneer service...
Other Manual
Page 2
... remote control (blue/white). Connecting the Units Connecting the power cord Wired remote input Hard-wired remote control adaptor can be connected (sold separately). 1.5 m (4 ft. 11 in.) Gray USB cable (supplied) Connect to separately sold USB device. 20 cm (7-7/8 in .) Tuner box (supplied) IP-BUS input IP-BUS cable (Blue) Multi-CD player (sold separately) Yellow/black Antenna cable If you use an equipment with Mute function, wire this lead to the Audio Mute lead on the vehicle model. Do not connect anything to the speaker leads and system remote control (blue/white...
... remote control (blue/white). Connecting the Units Connecting the power cord Wired remote input Hard-wired remote control adaptor can be connected (sold separately). 1.5 m (4 ft. 11 in.) Gray USB cable (supplied) Connect to separately sold USB device. 20 cm (7-7/8 in .) Tuner box (supplied) IP-BUS input IP-BUS cable (Blue) Multi-CD player (sold separately) Yellow/black Antenna cable If you use an equipment with Mute function, wire this lead to the Audio Mute lead on the vehicle model. Do not connect anything to the speaker leads and system remote control (blue/white...
Other Manual
Page 3
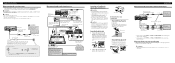
... When connecting the external video component and the display Rear monitor output (REAR MONITOR OUTPUT) 20 cm (7-7/8 in.) This product To video input Display with RCA input jacks (sold separately) Video input (VIDEO INPUT) 25 cm (9-7/8 in.) Audio input (AUDIO INPUT) RCA cables (sold separately) To video output External video component (sold separately) To video output Violet/white Fuse resistor Of the two lead wires connected to the back lamp, connect the one video component with this unit. CAUTION • The screen image may result in a traffic accident. Rear view camera 20...
... When connecting the external video component and the display Rear monitor output (REAR MONITOR OUTPUT) 20 cm (7-7/8 in.) This product To video input Display with RCA input jacks (sold separately) Video input (VIDEO INPUT) 25 cm (9-7/8 in.) Audio input (AUDIO INPUT) RCA cables (sold separately) To video output External video component (sold separately) To video output Violet/white Fuse resistor Of the two lead wires connected to the back lamp, connect the one video component with this unit. CAUTION • The screen image may result in a traffic accident. Rear view camera 20...


