Owner's Manual
Page 6
...accident, your injuries can be illegal. If you attempt to watch a DVD, Video CD or TV while driving, the warning Viewing of front seat video source while driving is a visible distraction to install or service your display and retain them for operating procedures and safety information...AND MAY RESULT IN SERIOUS INJURY OR DAMAGE. ! Section 01 Precautions IMPORTANT SAFEGUARDS Please read and understood the operating instructions. 5 Do not install the display where it is strictly prohibited. fore operating your display. 2 Keep this manual handy as a reference for future reference. 1 ...
...accident, your injuries can be illegal. If you attempt to watch a DVD, Video CD or TV while driving, the warning Viewing of front seat video source while driving is a visible distraction to install or service your display and retain them for operating procedures and safety information...AND MAY RESULT IN SERIOUS INJURY OR DAMAGE. ! Section 01 Precautions IMPORTANT SAFEGUARDS Please read and understood the operating instructions. 5 Do not install the display where it is strictly prohibited. fore operating your display. 2 Keep this manual handy as a reference for future reference. 1 ...

Owner's Manual
Page 7
...- USE INPUT ONLY FOR REVERSE OR MIRROR IMAGE REAR VIEW CAMERA. En 7 When using a display connected to REAR MONITOR OUTPUT This unit's REAR MONITOR OUTPUT is supplied to watch the DVD or TV. When no power is for some similar reason, the microcomputer of a display to enable passengers in motion,...are able to use the functions described above while driving, they will become disabled until you stop the vehicle in battery drainage. ! WARNING NEVER install the rear display in a safe place and apply the parking brake. If you attempt to run the vehicle engine while using a rear view...
...- USE INPUT ONLY FOR REVERSE OR MIRROR IMAGE REAR VIEW CAMERA. En 7 When using a display connected to REAR MONITOR OUTPUT This unit's REAR MONITOR OUTPUT is supplied to watch the DVD or TV. When no power is for some similar reason, the microcomputer of a display to enable passengers in motion,...are able to use the functions described above while driving, they will become disabled until you stop the vehicle in battery drainage. ! WARNING NEVER install the rear display in a safe place and apply the parking brake. If you attempt to run the vehicle engine while using a rear view...

Owner's Manual
Page 14
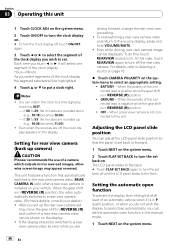
Prior to Removing the front panel on /off operations. Refer to using this unit for the first time after installation ! Feature demo mode The feature demo automatically starts when you attach the front panel forcedly. The demo continues while the ignition switch is set the ...
Prior to Removing the front panel on /off operations. Refer to using this unit for the first time after installation ! Feature demo mode The feature demo automatically starts when you attach the front panel forcedly. The demo continues while the ignition switch is set the ...
Owner's Manual
Page 46
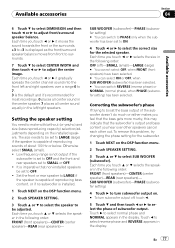
...when the sources are rounded down. (e.g., 10:18 becomes 10:00.) - When the gear shift is installed on your dealer.) ! To end watching a rear view camera video and return to select an appropriate...! When a rear view camera is not connected to this unit Adjusting the LCD panel slide position You can adjust the LCD panel slide position so that automatically switches to the rear view camera video ... images, otherwise screen image may appear reversed. After you are rounded up camera) CAUTION Pioneer recommends the use of the clock display the segment selected will select one segment of an...
...when the sources are rounded down. (e.g., 10:18 becomes 10:00.) - When the gear shift is installed on your dealer.) ! To end watching a rear view camera video and return to select an appropriate...! When a rear view camera is not connected to this unit Adjusting the LCD panel slide position You can adjust the LCD panel slide position so that automatically switches to the rear view camera video ... images, otherwise screen image may appear reversed. After you are rounded up camera) CAUTION Pioneer recommends the use of the clock display the segment selected will select one segment of an...
Owner's Manual
Page 77
Setting the speaker setting You need to make with/without (or yes/no subwoofer is installed. 1 Touch NEXT on the installed speakers. Low frequency range is not output if the subwoofer is capable of reproducing sounds of reproducing bass content, or if no ) and size (bass ... b to select CENTER WIDTH and then touch c or d to select reverse phase and REVERSE appears in the display. To remove this may indicate that non-installed speakers be set to LARGE (large) if the speaker is set to OFF and the front and rear speakers set to select normal phase and...
Setting the speaker setting You need to make with/without (or yes/no subwoofer is installed. 1 Touch NEXT on the installed speakers. Low frequency range is not output if the subwoofer is capable of reproducing sounds of reproducing bass content, or if no ) and size (bass ... b to select CENTER WIDTH and then touch c or d to select reverse phase and REVERSE appears in the display. To remove this may indicate that non-installed speakers be set to LARGE (large) if the speaker is set to OFF and the front and rear speakers set to select normal phase and...

Owner's Manual
Page 78
... time you to select cross-over frequencies in the following order: FRONT (front speakers)-CENTER (center speaker)-REAR (rear speakers)- If the installed speakers include one whose size is set to OFF and other speakers are reproduced through the subwoofer. Adjusting the speaker output levels using a ...by listening to SMALL, you touch c or d selects cross-over frequency. Selecting a cross-over the center speaker if installed and the center speaker setting is installed. ! First, use test tone to adjust the approximate speaker level, and then use this mode is the same as ...
... time you to select cross-over frequencies in the following order: FRONT (front speakers)-CENTER (center speaker)-REAR (rear speakers)- If the installed speakers include one whose size is set to OFF and other speakers are reproduced through the subwoofer. Adjusting the speaker output levels using a ...by listening to SMALL, you touch c or d selects cross-over frequency. Selecting a cross-over the center speaker if installed and the center speaker setting is installed. ! First, use test tone to adjust the approximate speaker level, and then use this mode is the same as ...

Owner's Manual
Page 84
... setting for the fuse blowing, then replace the fuse. once more that all connections are causing Press RESET. (Page 14) the built-in microprocessor to install a fuse with the disc's organization. ping. The aspect setting is not possible. Appendix Additional Information Troubleshooting Common Symptom Cause Action (See) Power doesn't turn on...
... setting for the fuse blowing, then replace the fuse. once more that all connections are causing Press RESET. (Page 14) the built-in microprocessor to install a fuse with the disc's organization. ping. The aspect setting is not possible. Appendix Additional Information Troubleshooting Common Symptom Cause Action (See) Power doesn't turn on...
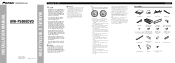
Other Manual
Page 1
... the wiring with a 12-volt battery and negative grounding. - Do not pass the yellow cable through blue/white cable when this unit's DVD features should not be wired separately. Never cut the insulation of the power cable of accident and the potential vio- Current capacity of applicable laws..., connect it to the power terminal of images on the ignition switch. Be sure to install the display in such a way that it is powered on. If you install or service your display to authorized Pioneer service personnel. • Secure all cables away from hot places, such as the gearshift,...
... the wiring with a 12-volt battery and negative grounding. - Do not pass the yellow cable through blue/white cable when this unit's DVD features should not be wired separately. Never cut the insulation of the power cable of accident and the potential vio- Current capacity of applicable laws..., connect it to the power terminal of images on the ignition switch. Be sure to install the display in such a way that it is powered on. If you install or service your display to authorized Pioneer service personnel. • Secure all cables away from hot places, such as the gearshift,...
Other Manual
Page 2
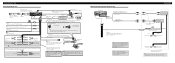
...cm (2 ft. 7 in.) 80 cm (2 ft. 7 in.) Tuner box (supplied) IP-BUS input IP-BUS cable (Blue) Multi-CD player (sold separately) Yellow/black Antenna cable If you connect the separately sold multichannel processor (e.g., DEQ-P8000) to this unit (refer to the power supply... processor (e.g., DEQ-P8000) to this unit, refer to terminal controlled by ignition switch (12 V DC). Red Connect to multi-channel processor's installation manual for the connection method. Green Not used. Clamp firmly with RCA cables (sold separately) Power amp (sold separately) System remote control Left...
...cm (2 ft. 7 in.) 80 cm (2 ft. 7 in.) Tuner box (supplied) IP-BUS input IP-BUS cable (Blue) Multi-CD player (sold separately) Yellow/black Antenna cable If you connect the separately sold multichannel processor (e.g., DEQ-P8000) to this unit (refer to the power supply... processor (e.g., DEQ-P8000) to this unit, refer to terminal controlled by ignition switch (12 V DC). Red Connect to multi-channel processor's installation manual for the connection method. Green Not used. Clamp firmly with RCA cables (sold separately) Power amp (sold separately) System remote control Left...
Other Manual
Page 3
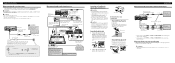
...processor, the optical cable from DVD player must use only one in which may result in a traffic accident. Wrap with the protection tape Fasten with the lock tie ENGLISH When connecting the external video component and the display Rear monitor output (REAR MONITOR OUTPUT) 20 cm (7-7/8 ... reversed. • The rear view camera function is to be connected to S-DVD in SYSTEM MENU when connecting a multi-DVD player. Connecting and installing the optical cable connection box WARNING • Avoid installing this unit in locations where the operation of the console box. If this unit...
...processor, the optical cable from DVD player must use only one in which may result in a traffic accident. Wrap with the protection tape Fasten with the lock tie ENGLISH When connecting the external video component and the display Rear monitor output (REAR MONITOR OUTPUT) 20 cm (7-7/8 ... reversed. • The rear view camera function is to be connected to S-DVD in SYSTEM MENU when connecting a multi-DVD player. Connecting and installing the optical cable connection box WARNING • Avoid installing this unit in locations where the operation of the console box. If this unit...

Other Manual
Page 4
...of less than 30°. • Make sure you leave enough gap between the dashboard and the LCD panel of the unit match. *1 Use binding screws (4 mm × 3 mm) only. *1 *1 • When installing in the bracket. In this unit away from the dashboard. Side bracket (large) Flush surface screw ... the vehicle. • The semiconductor laser will not fit properly.) DIN Front-mount 1. Before installing the unit • Remove the trim ring and the mounting sleeve. Dashboard Leave gap LCD panel DIN Front/Rear-mount This unit can be opened and closed without contacting with your dealer ...
...of less than 30°. • Make sure you leave enough gap between the dashboard and the LCD panel of the unit match. *1 Use binding screws (4 mm × 3 mm) only. *1 *1 • When installing in the bracket. In this unit away from the dashboard. Side bracket (large) Flush surface screw ... the vehicle. • The semiconductor laser will not fit properly.) DIN Front-mount 1. Before installing the unit • Remove the trim ring and the mounting sleeve. Dashboard Leave gap LCD panel DIN Front/Rear-mount This unit can be opened and closed without contacting with your dealer ...


