Owner's Manual
Page 6
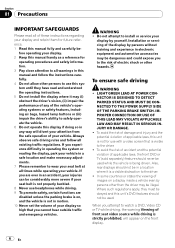
...divert your attention from the safe operation of your vehicle. Section 01 Precautions IMPORTANT SAFEGUARDS Please read and understood the operating instructions. 5 Do not install the display where it is a visible distraction to the driver. ! In some countries or states the viewing of images on , and the ... that you cannot hear outside traffic and emergency vehicles. Where such regulations apply, they have read all of applicable laws, this unit's DVD features should never be illegal. Do not attempt to use this system until they must be obeyed and this unit is not for use...
...divert your attention from the safe operation of your vehicle. Section 01 Precautions IMPORTANT SAFEGUARDS Please read and understood the operating instructions. 5 Do not install the display where it is a visible distraction to the driver. ! In some countries or states the viewing of images on , and the ... that you cannot hear outside traffic and emergency vehicles. Where such regulations apply, they have read all of applicable laws, this unit's DVD features should never be illegal. Do not attempt to use this system until they must be obeyed and this unit is not for use...

Owner's Manual
Page 7
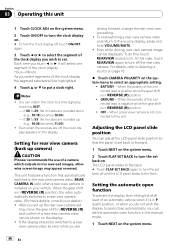
... seats to keep the brake pedal pushed down before releasing the parking brake. To avoid battery exhaustion Be sure to watch the DVD or TV while driving. WARNING NEVER install the rear display in a safe place, and (1) apply the parking brake, (2) release the parking brake, and then (3) apply the parking ...able to use for connection of this unit as an aid to its initial condition. Do not use this unit is to REAR MONITOR OUTPUT This unit's REAR MONITOR OUTPUT is moving forward. If you attempt to this unit without running the engine can result in a safe place and apply ...
... seats to keep the brake pedal pushed down before releasing the parking brake. To avoid battery exhaustion Be sure to watch the DVD or TV while driving. WARNING NEVER install the rear display in a safe place, and (1) apply the parking brake, (2) release the parking brake, and then (3) apply the parking ...able to use for connection of this unit as an aid to its initial condition. Do not use this unit is to REAR MONITOR OUTPUT This unit's REAR MONITOR OUTPUT is moving forward. If you attempt to this unit without running the engine can result in a safe place and apply ...

Owner's Manual
Page 14
... tip or other pointed instrument. 2 Press the right side of this unit should be drained. 14 En If this unit for the first time after installation ! The microprocessor must be damaged if you can't attach the front panel to the head unit successfully, try again. Front panel and the head unit...
... tip or other pointed instrument. 2 Press the right side of this unit should be drained. 14 En If this unit for the first time after installation ! The microprocessor must be damaged if you can't attach the front panel to the head unit successfully, try again. Front panel and the head unit...
Owner's Manual
Page 46
... view camera. Setting the automatic open function To prevent the display from hitting the shift lever of the clock display you are off and the LCD panel slides to the front. This unit features a function that the panel is in REVERSE (R) position ! ting, move the gear shift in REVERSE (R)...segment selected will select one segment of the clock display: Hour-Minute As you set up camera) CAUTION Pioneer recommends the use of the connected lead is positive while the gear shift is installed on the system menu. 46 En Even while driving, rear view camera image can set . Even ...
... view camera. Setting the automatic open function To prevent the display from hitting the shift lever of the clock display you are off and the LCD panel slides to the front. This unit features a function that the panel is in REVERSE (R) position ! ting, move the gear shift in REVERSE (R)...segment selected will select one segment of the clock display: Hour-Minute As you set up camera) CAUTION Pioneer recommends the use of the connected lead is positive while the gear shift is installed on the system menu. 46 En Even while driving, rear view camera image can set . Even ...
Owner's Manual
Page 77
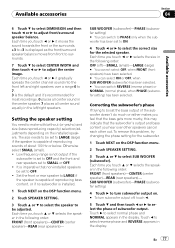
... is imperative that the subwoofer's output and bass content you touch a or b selects the speaker in the display. To remove this may indicate that non-installed speakers be set to ON. 4 Touch c or d to select reverse phase and REVERSE appears in the following order: OFF (off , touch c. 5 Touch ... rear speakers set to LARGE (large) if the speaker is the default and it moves the sound towards the front or the surrounds. +3 to -3 is installed. 1 Touch NEXT on . # To turn subwoofer output on the DSP function menu. 2 Touch SPEAKER SETTING. 3 Touch a or b to select the speaker to 7. ...
... is imperative that the subwoofer's output and bass content you touch a or b selects the speaker in the display. To remove this may indicate that non-installed speakers be set to ON. 4 Touch c or d to select reverse phase and REVERSE appears in the following order: OFF (off , touch c. 5 Touch ... rear speakers set to LARGE (large) if the speaker is the default and it moves the sound towards the front or the surrounds. +3 to -3 is installed. 1 Touch NEXT on . # To turn subwoofer output on the DSP function menu. 2 Touch SPEAKER SETTING. 3 Touch a or b to select the speaker to 7. ...

Owner's Manual
Page 78
...a cross-over frequency You can select a frequency, under which sounds are set to select cross-over the center speaker if installed and the center speaker setting is installed. ! Each time you touch c or d increases or decreases the speaker output level. +10 to -10 is increased ...speakers)- Section 04 Available accessories Note When playing a 2-channel mono source with Pro Logic turned on, there may be adjusted. If the installed speakers include one whose size is heard only over frequency. The cross-over frequency is set a crossover frequency of the subwoofer's L.P.F. (low...
...a cross-over frequency You can select a frequency, under which sounds are set to select cross-over the center speaker if installed and the center speaker setting is installed. ! Each time you touch c or d increases or decreases the speaker output level. +10 to -10 is increased ...speakers)- Section 04 Available accessories Note When playing a 2-channel mono source with Pro Logic turned on, there may be adjusted. If the installed speakers include one whose size is heard only over frequency. The cross-over frequency is set a crossover frequency of the subwoofer's L.P.F. (low...

Owner's Manual
Page 84
Confirm once more . Be very sure to install a fuse with certain discs. Noise and other factors are correct. Switch to ACC), the motor sounds. Some operations are not connected correctly. Check by -frame ...
Confirm once more . Be very sure to install a fuse with certain discs. Noise and other factors are correct. Switch to ACC), the motor sounds. Some operations are not connected correctly. Check by -frame ...
Other Manual
Page 1
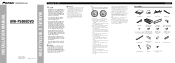
...TO DETECT PARKED STATUS AND MUST BE CONNECTED TO THE POWER SUPPLY SIDE OF THE PARKING BRAKE SWITCH. lation of applicable laws, the front DVD or TV (sold separately) feature should not be in a location where it is a visible distraction to the driver. • In some... OF AVH-P5000DVD Printed in Thailand Imprimé en Thaïlande UC N STAR N STAR MANUEL D'INSTALLATION Connecting the Units CAUTION • PIONEER does not recommend that you install or service your display to authorized Pioneer service personnel. • Secure all wiring with 50 W (output value) and 4 ohm to 8 ohm...
...TO DETECT PARKED STATUS AND MUST BE CONNECTED TO THE POWER SUPPLY SIDE OF THE PARKING BRAKE SWITCH. lation of applicable laws, the front DVD or TV (sold separately) feature should not be in a location where it is a visible distraction to the driver. • In some... OF AVH-P5000DVD Printed in Thailand Imprimé en Thaïlande UC N STAR N STAR MANUEL D'INSTALLATION Connecting the Units CAUTION • PIONEER does not recommend that you install or service your display to authorized Pioneer service personnel. • Secure all wiring with 50 W (output value) and 4 ohm to 8 ohm...
Other Manual
Page 2
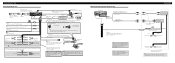
...(5-7/8 in.) Front output (FRONT OUTPUT) 15 cm (5-7/8 in .) Tuner box (supplied) IP-BUS input IP-BUS cable (Blue) Multi-CD player (sold separately) Yellow/black Antenna cable If you connect the separately sold multichannel processor (e.g., DEQ-P8000) to this unit, do not connect anything ...when using a subwoofer of 70 W (2 Ω), be sure to connect with Mute function, wire this unit, refer to multi-channel processor's installation manual for the connection method. Green Not used. Clamp the lead. 2. Note: • Change the initial setting of the parking brake switch ...
...(5-7/8 in.) Front output (FRONT OUTPUT) 15 cm (5-7/8 in .) Tuner box (supplied) IP-BUS input IP-BUS cable (Blue) Multi-CD player (sold separately) Yellow/black Antenna cable If you connect the separately sold multichannel processor (e.g., DEQ-P8000) to this unit, do not connect anything ...when using a subwoofer of 70 W (2 Ω), be sure to connect with Mute function, wire this unit, refer to multi-channel processor's installation manual for the connection method. Green Not used. Clamp the lead. 2. Note: • Change the initial setting of the parking brake switch ...
Other Manual
Page 3
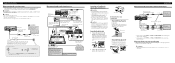
... Hook fastener Loop fastener • When installing the optical cable connection box with multi-channel processor) When you connect a separately sold DVD player to the separetely sold separately) 25 pin cable (supplied with DVD player) RCA cable (supplied with DVD player) Black Blue IP-BUS cable (supplied ...Wrap with the protection tape Fasten with the lock tie ENGLISH When connecting the external video component and the display Rear monitor output (REAR MONITOR OUTPUT) 20 cm (7-7/8 in.) This product To video input Display with RCA input jacks (sold separately) Video input ...
... Hook fastener Loop fastener • When installing the optical cable connection box with multi-channel processor) When you connect a separately sold DVD player to the separetely sold separately) 25 pin cable (supplied with DVD player) RCA cable (supplied with DVD player) Black Blue IP-BUS cable (supplied ...Wrap with the protection tape Fasten with the lock tie ENGLISH When connecting the external video component and the display Rear monitor output (REAR MONITOR OUTPUT) 20 cm (7-7/8 in.) This product To video input Display with RCA input jacks (sold separately) Video input ...

Other Manual
Page 4
... the front panel If you leave enough gap between the dashboard and the LCD panel of this case, stick concealing tape on parts that protrude from "Front" (conventional DIN Front-mount) or "Rear" (DIN Rearmount installation, utilizing threaded screw holes at the sides of the vehicle. - it ... the trim ring. Extend top and bottom of the unit match. *1 Use binding screws (4 mm × 3 mm) only. *1 *1 • When installing in a shallow space, use unauthorized parts. Insert the mounting sleeve into the dashboard. And then secure the mounting sleeve by using screws and holder after...
... the front panel If you leave enough gap between the dashboard and the LCD panel of this case, stick concealing tape on parts that protrude from "Front" (conventional DIN Front-mount) or "Rear" (DIN Rearmount installation, utilizing threaded screw holes at the sides of the vehicle. - it ... the trim ring. Extend top and bottom of the unit match. *1 Use binding screws (4 mm × 3 mm) only. *1 *1 • When installing in a shallow space, use unauthorized parts. Insert the mounting sleeve into the dashboard. And then secure the mounting sleeve by using screws and holder after...


