Owner's Manual
Page 1
Operation Manual DVD AV RECEIVER AVH-P5000DVD English
Operation Manual DVD AV RECEIVER AVH-P5000DVD English
Owner's Manual
Page 2
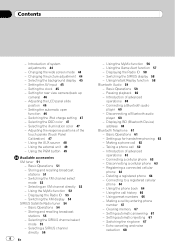
...DVD player 21 - Playable discs 9 ! When using a rear view camera 7 To avoid battery exhaustion 7 Before You Start Information to play 24 - About WMA 11 - Changing the picture adjustment 13 What the marks on DVDs...panel key basic operation 17 - Skipping back or forward to REAR MONITOR OUTPUT 7 - Changing audio language during playback (Multi-subtitle) 25...14 Feature demo mode 14 Operating this Pioneer product. Selecting a source 16 - Adjusting the volume 17 ...Head unit 15 - Opening and closing the LCD panel 18 Radio 19 - Contents Thank you for buying this unit What...
...DVD player 21 - Playable discs 9 ! When using a rear view camera 7 To avoid battery exhaustion 7 Before You Start Information to play 24 - About WMA 11 - Changing the picture adjustment 13 What the marks on DVDs...panel key basic operation 17 - Skipping back or forward to REAR MONITOR OUTPUT 7 - Changing audio language during playback (Multi-subtitle) 25...14 Feature demo mode 14 Operating this Pioneer product. Selecting a source 16 - Adjusting the volume 17 ...Head unit 15 - Opening and closing the LCD panel 18 Radio 19 - Contents Thank you for buying this unit What...
Owner's Manual
Page 3
...30 - Resetting the audio functions 43 - Playing video 30 - Basic Operations 32 - Using the high pass filter 36 - Introduction of DVDs 26 - Displaying your iPod 31 - Switching the sound muting/ attenuation 42 - Contents - Selecting files from the track list 27 - ... Setting for Bluetooth wireless connection 42 - Playing songs in a random order (shuffle) 31 - Adjusting source levels 37 Setting up the DVD player 37 - Introduction of audio adjustments 34 - Setting the aspect ratio 39 - Setting the audio language 38 - Switching the auxiliary setting ...
...30 - Resetting the audio functions 43 - Playing video 30 - Basic Operations 32 - Using the high pass filter 36 - Introduction of DVDs 26 - Displaying your iPod 31 - Switching the sound muting/ attenuation 42 - Contents - Selecting files from the track list 27 - ... Setting for Bluetooth wireless connection 42 - Playing songs in a random order (shuffle) 31 - Adjusting source levels 37 Setting up the DVD player 37 - Introduction of audio adjustments 34 - Setting the aspect ratio 39 - Setting the audio language 38 - Switching the auxiliary setting ...
Owner's Manual
Page 4
Selecting the background display 45 - Adjusting the LCD panel slide position 46 - Adjusting the response positions of advanced operations 60 - Switching the XM channel select mode 52 - Displaying the Radio ID 58 -... camera (back up for hands-free phoning 62 - Displaying the Radio ID 53 - Storing and recalling broadcast stations 55 - Basic Operations 59 - Connecting a Bluetooth audio player 60 - Registering a connected cellular phone 64 - Making a call history 66 - Setting the clock 45 - Setting the automatic open function 46 - Basic Operations 54 - ...
Selecting the background display 45 - Adjusting the LCD panel slide position 46 - Adjusting the response positions of advanced operations 60 - Switching the XM channel select mode 52 - Displaying the Radio ID 58 -... camera (back up for hands-free phoning 62 - Displaying the Radio ID 53 - Storing and recalling broadcast stations 55 - Basic Operations 59 - Connecting a Bluetooth audio player 60 - Registering a connected cellular phone 64 - Making a call history 66 - Setting the clock 45 - Setting the automatic open function 46 - Basic Operations 54 - ...
Owner's Manual
Page 5
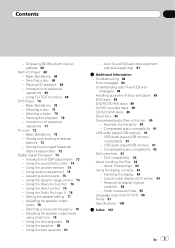
... memory 91 - DivX compatibility 93 About handling the iPod 93 - Displaying BD (Bluetooth Device) address 68 Multi-CD Player 68 - Basic Operations 68 - Using CD TEXT functions 69 DVD Player 70 - Selecting a folder 70 - Introduction of a hierarchy 90 - Using the position selector 74 - Using the down-mix ... the display 94 - Small fluorescent tube 95 Language code chart for DVD 96 Terms 97 Specifications 100 Index 102 En 5 Using the dynamic range control 75 - Using the time alignment 79 - Liquid crystal display (LCD) screen 94 - Using the Dolby Pro Logic II 76 - Introduction...
... memory 91 - DivX compatibility 93 About handling the iPod 93 - Displaying BD (Bluetooth Device) address 68 Multi-CD Player 68 - Basic Operations 68 - Using CD TEXT functions 69 DVD Player 70 - Selecting a folder 70 - Introduction of a hierarchy 90 - Using the position selector 74 - Using the down-mix ... the display 94 - Small fluorescent tube 95 Language code chart for DVD 96 Terms 97 Specifications 100 Index 102 En 5 Using the dynamic range control 75 - Using the time alignment 79 - Liquid crystal display (LCD) screen 94 - Using the Dolby Pro Logic II 76 - Introduction...
Owner's Manual
Page 6
...LAW AND MAY RESULT IN SERIOUS INJURY OR DAMAGE. ! To avoid the risk of accident and the potential violation of applicable laws, the front DVD or TV (sold separately) feature should not be used . fore operating your display. 2 Keep this manual and follow all times while operating... or servicing of the display by persons without training and experience in a safe location and make necessary adjustments. 7 Please remember to watch a DVD, Video CD or TV while driving, the warning Viewing of electric shock or other hazards. NECTOR IS DESIGNED TO DETECT PARKED STATUS AND MUST BE...
...LAW AND MAY RESULT IN SERIOUS INJURY OR DAMAGE. ! To avoid the risk of accident and the potential violation of applicable laws, the front DVD or TV (sold separately) feature should not be used . fore operating your display. 2 Keep this manual and follow all times while operating... or servicing of the display by persons without training and experience in a safe location and make necessary adjustments. 7 Please remember to watch a DVD, Video CD or TV while driving, the warning Viewing of electric shock or other hazards. NECTOR IS DESIGNED TO DETECT PARKED STATUS AND MUST BE...

Owner's Manual
Page 7
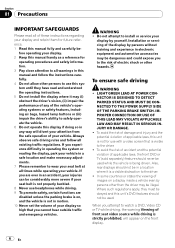
... IMAGE REAR VIEW CAMERA. To avoid battery exhaustion Be sure to run the vehicle engine while using a display connected to REAR MONITOR OUTPUT This unit's REAR MONITOR OUTPUT is for checking the rear when the vehicle is returned to its initial condition. cause of a replacement of a display ...to watch the DVD or TV while driving. We recommend that you attempt to use with vehicles that enables the driver to enable passengers in ...
... IMAGE REAR VIEW CAMERA. To avoid battery exhaustion Be sure to run the vehicle engine while using a display connected to REAR MONITOR OUTPUT This unit's REAR MONITOR OUTPUT is for checking the rear when the vehicle is returned to its initial condition. cause of a replacement of a display ...to watch the DVD or TV while driving. We recommend that you attempt to use with vehicles that enables the driver to enable passengers in ...

Owner's Manual
Page 8
For disposal or recycling information, please contact your local authorities or the Electronics Industries Alliance: www.eiae.org The backlighting lamp of LCD in this manual handy as a reference for use in North America. For disposal or recycling information, please contact your own security and convenience, be regulated ...
For disposal or recycling information, please contact your local authorities or the Electronics Industries Alliance: www.eiae.org The backlighting lamp of LCD in this manual handy as a reference for use in North America. For disposal or recycling information, please contact your own security and convenience, be regulated ...

Owner's Manual
Page 9
...back discs bearing the marks shown above. All the functions have incompatible region numbers cannot be played on this player. About this manual This unit features a number of DVD Format/Logo Licensing Corporation. ! It is not available, please contact the companies listed below: Please do ...important that you familiarize yourself with the functions and their operation by reading through the manual before you purchased this unit for Pioneer products Please contact the dealer or distributor from this unit's potential and to the companies at the addresses listed below shows ...
...back discs bearing the marks shown above. All the functions have incompatible region numbers cannot be played on this player. About this manual This unit features a number of DVD Format/Logo Licensing Corporation. ! It is not available, please contact the companies listed below: Please do ...important that you familiarize yourself with the functions and their operation by reading through the manual before you purchased this unit for Pioneer products Please contact the dealer or distributor from this unit's potential and to the companies at the addresses listed below shows ...

Owner's Manual
Page 10
...Compressed audio compatibility on page 93. Manufactured under license from Dolby Laboratories. Pioneer Electronics (USA) Inc. WMA, MP3 and AAC compatibility Refer to operate this unit. Section 02 Before You Start U.S.A. DVD-R/RW compatibility It is possible to design and build the most advanced, ...174; video compatibility Refer to help you can enjoy the atmosphere and excitement provided by using this unit with a Pioneer multichannel processor, you refer to play back DVD-R/RW discs recorded with this unit by DVD movie and music software featuring 5.1 channel recordings. !
...Compressed audio compatibility on page 93. Manufactured under license from Dolby Laboratories. Pioneer Electronics (USA) Inc. WMA, MP3 and AAC compatibility Refer to operate this unit. Section 02 Before You Start U.S.A. DVD-R/RW compatibility It is possible to design and build the most advanced, ...174; video compatibility Refer to help you can enjoy the atmosphere and excitement provided by using this unit with a Pioneer multichannel processor, you refer to play back DVD-R/RW discs recorded with this unit by DVD movie and music software featuring 5.1 channel recordings. !

Owner's Manual
Page 11
...the DTS logos and Symbol are shown below. iPod fourth generation (software version 3.1.1) - USB MSC (Mass Storage Class) compliant portable audio player and memory - When using an iPod, Interface Cable for home and other countries. ! Note This product incorporates copyright protection technology that ...copyright protection technology must be played back. ! WMA, MP3, AAC and WAV file playback For details about your USB portable audio player/USB memory. Patent #: 5,451,942 & other countries. This unit corresponds to encode WMA files. Music files on the application used ...
...the DTS logos and Symbol are shown below. iPod fourth generation (software version 3.1.1) - USB MSC (Mass Storage Class) compliant portable audio player and memory - When using an iPod, Interface Cable for home and other countries. ! Note This product incorporates copyright protection technology that ...copyright protection technology must be played back. ! WMA, MP3, AAC and WAV file playback For details about your USB portable audio player/USB memory. Patent #: 5,451,942 & other countries. This unit corresponds to encode WMA files. Music files on the application used ...

Owner's Manual
Page 12
...-clear sound seamlessly from coast to coast. and other electronic content distribution systems, such as DVD video, individual DivX video files are sold separately) can be controlled by the appearance of ...DivX® video (including DivX® 6) with anything besides your dealer or nearest authorized Pioneer service station regarding the satellite radio tuner that can be connected to this unit. About DivX... and does not convey a license nor imply any right to use this product in LCD screen malfunction due to the resulting high temperatures. ! For details, please visit http://...
...-clear sound seamlessly from coast to coast. and other electronic content distribution systems, such as DVD video, individual DivX video files are sold separately) can be controlled by the appearance of ...DivX® video (including DivX® 6) with anything besides your dealer or nearest authorized Pioneer service station regarding the satellite radio tuner that can be connected to this unit. About DivX... and does not convey a license nor imply any right to use this product in LCD screen malfunction due to the resulting high temperatures. ! For details, please visit http://...
Owner's Manual
Page 13
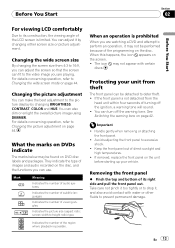
... concerning operation, refer to Changing the picture adjustment on page 42. Protecting your vehicle. You can fit to the video image you are watching a DVD and attempt to perform an operation, it may not be found on the unit before starting up your unit from 4:3 to 16:9, you can adjust...pinch it too tightly or to drop it by changing BRIGHTNESS, CONTRAST, COLOR and HUE. Before You Start Section 02 Before You Start For viewing LCD comfortably Due to its right side and pull the front panel out. Indicates the picture size (aspect ratio: screen width-to prevent permanent damage. ...
... concerning operation, refer to Changing the picture adjustment on page 42. Protecting your vehicle. You can fit to the video image you are watching a DVD and attempt to perform an operation, it may not be found on the unit before starting up your unit from 4:3 to 16:9, you can adjust...pinch it too tightly or to drop it by changing BRIGHTNESS, CONTRAST, COLOR and HUE. Before You Start Section 02 Before You Start For viewing LCD comfortably Due to its right side and pull the front panel out. Indicates the picture size (aspect ratio: screen width-to prevent permanent damage. ...

Owner's Manual
Page 14
Prior to using this unit should be drained. 14 En To cancel the feature demo, press and hold VOLUME/MUTE again. Remember that the front panel has been jointed to the head unit. 3 Press RESET with ignition switch on the left . Refer to Removing the front panel on the display 1 Turn the ignition switch OFF. 2 Remove the front panel. Important The red lead (ACC) of the front panel until it may drain battery power. Front panel may be connected to a terminal coupled with a pen tip or other pointed instrument. 2 Press the right side of this unit for the first time after ...
Prior to using this unit should be drained. 14 En To cancel the feature demo, press and hold VOLUME/MUTE again. Remember that the front panel has been jointed to the head unit. 3 Press RESET with ignition switch on the left . Refer to Removing the front panel on the display 1 Turn the ignition switch OFF. 2 Remove the front panel. Important The red lead (ACC) of the front panel until it may drain battery power. Front panel may be connected to a terminal coupled with a pen tip or other pointed instrument. 2 Press the right side of this unit for the first time after ...

Owner's Manual
Page 15
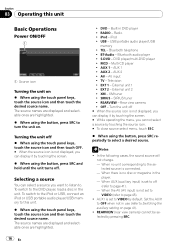
... fast forward, reverse and track search controls. 5 EQ button Press to select various equalizer curves. 6 OPEN/CLOSE button Press to open or close the LCD panel. Optional remote control The remote control CD-R55 is turned on by selecting a source. En 15 Press to cut the sound. 2 SRC button ...This unit is sold separately. Press and hold to turn the LCD panel horizontal temporarily from upright position. 7 EJECT (h) button Press to eject a disc from this unit What's What Head unit 1 VOLUME/MUTE button Rotate it...
... fast forward, reverse and track search controls. 5 EQ button Press to select various equalizer curves. 6 OPEN/CLOSE button Press to open or close the LCD panel. Optional remote control The remote control CD-R55 is turned on by selecting a source. En 15 Press to cut the sound. 2 SRC button ...This unit is sold separately. Press and hold to turn the LCD panel horizontal temporarily from upright position. 7 EJECT (h) button Press to eject a disc from this unit What's What Head unit 1 VOLUME/MUTE button Rotate it...
Owner's Manual
Page 16
... turn the unit on. The source names are displayed and selectable ones are highlighted. % When using the button, press SRC to the DVD player, load a disc in DVD player ! Radio ! USB portable audio player/USB memory ! XM - SIRIUS tuner ! When the AV (AV input) is not displayed, you can display it by touching the screen...
... turn the unit on. The source names are displayed and selectable ones are highlighted. % When using the button, press SRC to the DVD player, load a disc in DVD player ! Radio ! USB portable audio player/USB memory ! XM - SIRIUS tuner ! When the AV (AV input) is not displayed, you can display it by touching the screen...
Owner's Manual
Page 17
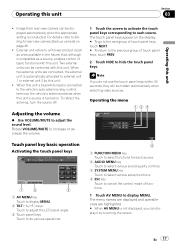
External unit refers to a Pioneer product (such as ones available in the future) that, although incompatible as a source, enables control of basic functions with this unit. Operating the menu Adjusting ... each source. Touch panel key basic operation Activating the touch panel keys 1 AV MENU key Touch to display MENU. 2 TILT ( / ) keys Touch to adjust the LCD panel angle. 3 Touch panel keys Touch to do not use the touch panel keys within 30 seconds, they will be displayed automatically when the appropriate...
External unit refers to a Pioneer product (such as ones available in the future) that, although incompatible as a source, enables control of basic functions with this unit. Operating the menu Adjusting ... each source. Touch panel key basic operation Activating the touch panel keys 1 AV MENU key Touch to display MENU. 2 TILT ( / ) keys Touch to adjust the LCD panel angle. 3 Touch panel keys Touch to do not use the touch panel keys within 30 seconds, they will be displayed automatically when the appropriate...

Owner's Manual
Page 18
... the ignition switch on or off the automatic close or open the LCD panel. Be especially cautious of the unit when opening, closing the LCD panel The LCD panel will be opened . The automatic close after the LCD panel has been closed automatically with hands by hand may damage it... ! When the ignition switch is turned ON again (or turned to page 13.) ! Forcibly adjusting the LCD panel by force. Opening and closing , or adjusting the LCD panel. You can hear the LCD panel knocking against your vehicle's console or dashboard, touch TILT ( ) to make sure that it to ...
... the ignition switch on or off the automatic close or open the LCD panel. Be especially cautious of the unit when opening, closing the LCD panel The LCD panel will be opened . The automatic close after the LCD panel has been closed automatically with hands by hand may damage it... ! When the ignition switch is turned ON again (or turned to page 13.) ! Forcibly adjusting the LCD panel by force. Opening and closing , or adjusting the LCD panel. You can hear the LCD panel knocking against your vehicle's console or dashboard, touch TILT ( ) to make sure that it to ...
Owner's Manual
Page 19
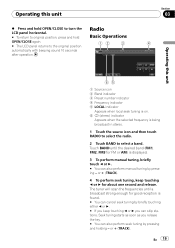
Radio Basic Operations Section 03 Operating this unit % Press and hold OPEN/CLOSE to turn the LCD panel horizontal. # To return to original position, press and hold OPEN/CLOSE again. # The LCD panel returns to select a band. The tuner will scan the frequencies until the desired band (FM1, FM2, FM3 for FM or...
Radio Basic Operations Section 03 Operating this unit % Press and hold OPEN/CLOSE to turn the LCD panel horizontal. # To return to original position, press and hold OPEN/CLOSE again. # The LCD panel returns to select a band. The tuner will scan the frequencies until the desired band (FM1, FM2, FM3 for FM or...

Owner's Manual
Page 20
Introduction of sensitivity for FM and two levels for AM: FM: OFF-LEVEL1-LEVEL2-LEVEL3- Touch LOCAL repeatedly until the beep sounds. LEVEL4 AM: OFF-LEVEL1-LEVEL2 The LEVEL4 setting allows reception of only the strongest stations, while lower settings let you want to store in memory keep touching one of preset tuning keys P1 to P6 until the desired level of sensitivity appears in memory. 1 Touch LIST to those radio stations with the touch of their signal strength. Section 03 Operating this unit Note Listening AM radio while an iPod is charged from memory. 3 Touch ESC to return...
Introduction of sensitivity for FM and two levels for AM: FM: OFF-LEVEL1-LEVEL2-LEVEL3- Touch LOCAL repeatedly until the beep sounds. LEVEL4 AM: OFF-LEVEL1-LEVEL2 The LEVEL4 setting allows reception of only the strongest stations, while lower settings let you want to store in memory keep touching one of preset tuning keys P1 to P6 until the desired level of sensitivity appears in memory. 1 Touch LIST to those radio stations with the touch of their signal strength. Section 03 Operating this unit Note Listening AM radio while an iPod is charged from memory. 3 Touch ESC to return...
