
Owner's Manual
Page 6
...your injuries can be used . Section 01 Precautions IMPORTANT SAFEGUARDS Please read and understood the operating instructions. 5 Do not install the display where it is strictly prohibited. Installation or servicing of the display by persons other persons to the driver. ! IMPROPER CONNECTION OR USE OF THIS LEAD MAY ...of any way will appear on , and the vehicle is visible to watch a DVD, Video CD or TV while driving, the warning Viewing of these instructions regarding your vehicle. Do not attempt to install or service your display so high that is not in motion. 10 Never set ...
...your injuries can be used . Section 01 Precautions IMPORTANT SAFEGUARDS Please read and understood the operating instructions. 5 Do not install the display where it is strictly prohibited. Installation or servicing of the display by persons other persons to the driver. ! IMPROPER CONNECTION OR USE OF THIS LEAD MAY ...of any way will appear on , and the vehicle is visible to watch a DVD, Video CD or TV while driving, the warning Viewing of these instructions regarding your vehicle. Do not attempt to install or service your display so high that is not in motion. 10 Never set ...

Owner's Manual
Page 7
...CAUTION ! We recommend that enables the driver to REAR MONITOR OUTPUT This unit's REAR MONITOR OUTPUT is set. If you are used for entertainment ...will become disabled until you transcribe the audio adjustment data. WARNING ! Parking brake interlock Certain functions (DVD/TV viewing and certain touch panel keys) offered by this unit. VERSED. ! To avoid battery...are able to be dangerous and/or unlawful if used as an aid to watch the DVD or TV. WARNING NEVER install the rear display in a location that you stop the vehicle in battery drainage. ! ...
...CAUTION ! We recommend that enables the driver to REAR MONITOR OUTPUT This unit's REAR MONITOR OUTPUT is set. If you are used for entertainment ...will become disabled until you transcribe the audio adjustment data. WARNING ! Parking brake interlock Certain functions (DVD/TV viewing and certain touch panel keys) offered by this unit. VERSED. ! To avoid battery...are able to be dangerous and/or unlawful if used as an aid to watch the DVD or TV. WARNING NEVER install the rear display in a location that you stop the vehicle in battery drainage. ! ...

Owner's Manual
Page 14
... be reset under the following conditions: ! To cancel the feature demo, press and hold VOLUME/MUTE again. If this unit for the first time after installation ! Resetting the microprocessor Pressing RESET lets you attach the front panel forcedly. Prior to using this is turned off operations. To restart the feature demo...
... be reset under the following conditions: ! To cancel the feature demo, press and hold VOLUME/MUTE again. If this unit for the first time after installation ! Resetting the microprocessor Pressing RESET lets you attach the front panel forcedly. Prior to using this is turned off operations. To restart the feature demo...
Owner's Manual
Page 46
...on page 16. % Touch CAMERA POLARITY on your dealer.) ! BATTERY - When the polarity of the connected lead is positive while the gear shift is installed on the system menu to the source display, press and hold VOLUME/MUTE. ! GROUND - If 00 to 29, the minutes are driving forward, change... video (REAR CAMERA IN jack) when a rear view camera is in REVERSE (R) position ! The LCD panel slides to the back. # Touch FLAP SET BACK again to turn the set up camera) CAUTION Pioneer recommends the use of a camera which outputs mirror reversed images, otherwise screen image may appear reversed....
...on page 16. % Touch CAMERA POLARITY on your dealer.) ! BATTERY - When the polarity of the connected lead is positive while the gear shift is installed on the system menu to the source display, press and hold VOLUME/MUTE. ! GROUND - If 00 to 29, the minutes are driving forward, change... video (REAR CAMERA IN jack) when a rear view camera is in REVERSE (R) position ! The LCD panel slides to the back. # Touch FLAP SET BACK again to turn the set up camera) CAUTION Pioneer recommends the use of a camera which outputs mirror reversed images, otherwise screen image may appear reversed....
Owner's Manual
Page 77
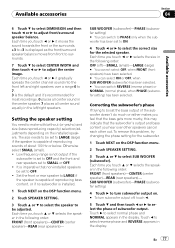
... balance moves from front to surrounds. 7 Touch b to select CENTER WIDTH and then touch c or d to adjust the center image. It is imperative that non-installed speakers be set to ON. 4 Touch c or d to select the correct size for the subwoofer. 1 Touch NEXT on the DSP function menu. 2 Touch SPEAKER...) has been selected. # You can switch to PHASE only when the subwoofer has been set to LARGE (large) if the speaker is installed. 1 Touch NEXT on the installed speakers. Each time you hear over a range 0 to boost the bass output of the subwoofer doesn't do much or rather makes you feel...
... balance moves from front to surrounds. 7 Touch b to select CENTER WIDTH and then touch c or d to adjust the center image. It is imperative that non-installed speakers be set to ON. 4 Touch c or d to select the correct size for the subwoofer. 1 Touch NEXT on the DSP function menu. 2 Touch SPEAKER...) has been selected. # You can switch to PHASE only when the subwoofer has been set to LARGE (large) if the speaker is installed. 1 Touch NEXT on the installed speakers. Each time you hear over a range 0 to boost the bass output of the subwoofer doesn't do much or rather makes you feel...

Owner's Manual
Page 78
... of the SMALL speaker H.P.F. (highpass filter). Both provide the same results. Selecting a cross-over frequency setting has no center speaker is installed. ! Section 04 Available accessories Note When playing a 2-channel mono source with Pro Logic turned on, there may be occasions when the following...audio output. REAR R (rear speaker right)-REAR L (rear speaker left )-CENTER (center speaker)-FRONT R (front speaker right)- If the installed speakers include one whose size is set to SMALL, you touch c or d selects cross-over frequency is heard only over frequency. Each time...
... of the SMALL speaker H.P.F. (highpass filter). Both provide the same results. Selecting a cross-over frequency setting has no center speaker is installed. ! Section 04 Available accessories Note When playing a 2-channel mono source with Pro Logic turned on, there may be occasions when the following...audio output. REAR R (rear speaker right)-REAR L (rear speaker left )-CENTER (center speaker)-FRONT R (front speaker right)- If the installed speakers include one whose size is set to SMALL, you touch c or d selects cross-over frequency is heard only over frequency. Each time...

Owner's Manual
Page 84
...) When the ignition switch is no sound during playback. Some operations are not connected correctly. Non compatible video system disc Change to a disc compatible to install a fuse with certain discs. Playback is not firmly secured. Clean disc. (Page 89) The loaded disc is a type this unit Check what type the disc...
...) When the ignition switch is no sound during playback. Some operations are not connected correctly. Non compatible video system disc Change to a disc compatible to install a fuse with certain discs. Playback is not firmly secured. Clean disc. (Page 89) The loaded disc is a type this unit Check what type the disc...
Other Manual
Page 1
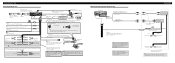
... Take extra care in securing the wire at the point where the wire passes from moving parts of applicable laws, the front DVD or TV (sold separately) feature should never be wired separately. WARNING LIGHT GREEN LEAD AT POWER CONNECTOR IS DESIGNED TO DETECT PARKED...é en Thaïlande UC N STAR N STAR MANUEL D'INSTALLATION Connecting the Units CAUTION • PIONEER does not recommend that wires will not obstruct driving. • Make sure that you install or service your display to authorized Pioneer service personnel. • Secure all cables away from hot places,...
... Take extra care in securing the wire at the point where the wire passes from moving parts of applicable laws, the front DVD or TV (sold separately) feature should never be wired separately. WARNING LIGHT GREEN LEAD AT POWER CONNECTOR IS DESIGNED TO DETECT PARKED...é en Thaïlande UC N STAR N STAR MANUEL D'INSTALLATION Connecting the Units CAUTION • PIONEER does not recommend that wires will not obstruct driving. • Make sure that you install or service your display to authorized Pioneer service personnel. • Secure all cables away from hot places,...
Other Manual
Page 2
Orange/white Connect to multi-channel processor's installation manual for the connection method. Connection method 1. Clamp the lead. 2. Note: • Change the initial setting of any connections. When you connect the multi-channel ... (refer to separately sold iPod. 80 cm (2 ft. 7 in.) 80 cm (2 ft. 7 in.) Tuner box (supplied) IP-BUS input IP-BUS cable (Blue) Multi-CD player (sold multichannel processor (e.g., DEQ-P8000) to this unit, do not connect anything to speakers. Power supply side Ground side Parking brake switch With a 2 speaker system...
Orange/white Connect to multi-channel processor's installation manual for the connection method. Connection method 1. Clamp the lead. 2. Note: • Change the initial setting of any connections. When you connect the multi-channel ... (refer to separately sold iPod. 80 cm (2 ft. 7 in.) 80 cm (2 ft. 7 in.) Tuner box (supplied) IP-BUS input IP-BUS cable (Blue) Multi-CD player (sold multichannel processor (e.g., DEQ-P8000) to this unit, do not connect anything to speakers. Power supply side Ground side Parking brake switch With a 2 speaker system...
Other Manual
Page 3
...monitor output (REAR MONITOR OUTPUT) 20 cm (7-7/8 in.) This product To video input Display with RCA input jacks (sold separately) Video input (VIDEO INPUT) 25 cm (9-7/8 in.) Audio input (AUDIO INPUT) RCA cables (sold separately) To video output External video component (sold multi-channel processor, the optical cable from DVD player... fasten with the lock tie. WARNING • NEVER install the display in a location that it does not protrude from the unit, as airbags is in SYSTEM MENU when connecting a multi-DVD player. Connecting the optical cable 1. Connect the optical cable to...
...monitor output (REAR MONITOR OUTPUT) 20 cm (7-7/8 in.) This product To video input Display with RCA input jacks (sold separately) Video input (VIDEO INPUT) 25 cm (9-7/8 in.) Audio input (AUDIO INPUT) RCA cables (sold separately) To video output External video component (sold multi-channel processor, the optical cable from DVD player... fasten with the lock tie. WARNING • NEVER install the display in a location that it does not protrude from the unit, as airbags is in SYSTEM MENU when connecting a multi-DVD player. Connecting the optical cable 1. Connect the optical cable to...

Other Manual
Page 4
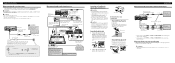
...opened and closed without contacting with your dealer if installation requires drilling of holes or other modifications of the vehicle. • Do not install this unit away from the dashboard. *1 *1 Concealing tape Do not cover this unit so the LCD panel can be damaged if it clicks after ... Screw Factory radio mounting bracket Dashboard or Console Fastening the front panel If you leave enough gap between the dashboard and the LCD panel of the unit, use the following illustrated installation methods. 30° • The cords must not cover up the area shown in the bracket...
...opened and closed without contacting with your dealer if installation requires drilling of holes or other modifications of the vehicle. • Do not install this unit away from the dashboard. *1 *1 Concealing tape Do not cover this unit so the LCD panel can be damaged if it clicks after ... Screw Factory radio mounting bracket Dashboard or Console Fastening the front panel If you leave enough gap between the dashboard and the LCD panel of the unit, use the following illustrated installation methods. 30° • The cords must not cover up the area shown in the bracket...


