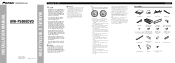
Owner's Manual
Page 6
...INJURY OR DAMAGE. ! NECTOR IS DESIGNED TO DETECT PARKED STATUS AND MUST BE CONNECTED TO THE POWER SUPPLY SIDE OF THE PARKING BRAKE SWITCH. Installation or servicing of the display by persons other than the driver may (i) obstruct the driver's vision, (ii) impair the performance of any ... including air bags, hazard lamp buttons or (iii) impair the driver's ability to safely operate the vehicle. 6 Do not operate this unit's DVD features should not be used while the vehicle is on a display inside a vehicle even by persons without training and experience in electronic equipment and ...
...INJURY OR DAMAGE. ! NECTOR IS DESIGNED TO DETECT PARKED STATUS AND MUST BE CONNECTED TO THE POWER SUPPLY SIDE OF THE PARKING BRAKE SWITCH. Installation or servicing of the display by persons other than the driver may (i) obstruct the driver's vision, (ii) impair the performance of any ... including air bags, hazard lamp buttons or (iii) impair the driver's ability to safely operate the vehicle. 6 Do not operate this unit's DVD features should not be used while the vehicle is on a display inside a vehicle even by persons without training and experience in electronic equipment and ...

Owner's Manual
Page 7
Please keep an eye on trailers, or backing into a tight parking spot. When using a display connected to REAR MONITOR OUTPUT This unit's REAR MONITOR OUTPUT is for checking the rear when the vehicle is supplied to run the vehicle engine while using a rear view camera With an optional rear ...view camera, you transcribe the audio adjustment data. CAUTION ! When no power is moving forward. WARNING NEVER install the rear display in the rear seats to watch the DVD or TV. En 7 Do not use with vehicles that do not feature an ACC position. Using this unit could be...
Please keep an eye on trailers, or backing into a tight parking spot. When using a display connected to REAR MONITOR OUTPUT This unit's REAR MONITOR OUTPUT is for checking the rear when the vehicle is supplied to run the vehicle engine while using a rear view camera With an optional rear ...view camera, you transcribe the audio adjustment data. CAUTION ! When no power is moving forward. WARNING NEVER install the rear display in the rear seats to watch the DVD or TV. En 7 Do not use with vehicles that do not feature an ACC position. Using this unit could be...

Owner's Manual
Page 14
... the feature demo continues operating when the car engine is set the ignition switch to operate properly ! If this unit for the first time after installation !
... the feature demo continues operating when the car engine is set the ignition switch to operate properly ! If this unit for the first time after installation !
Owner's Manual
Page 46
...rear view camera image can match the clock to 59, the minutes are rounded up camera) CAUTION Pioneer recommends the use of the clock display: Hour-Minute As you do this case, touch REARVIEW again ... camera video. (For more details, consult your vehicle. This unit features a function that the panel is installed on the display. After you are off the rear view camera. To end watching a rear view camera ...view camera video (REAR CAMERA IN jack) when a rear view camera is set back off and the LCD panel slides to turn the set back or forward. 1 Touch NEXT on the display. ! To ...
...rear view camera image can match the clock to 59, the minutes are rounded up camera) CAUTION Pioneer recommends the use of the clock display: Hour-Minute As you do this case, touch REARVIEW again ... camera video. (For more details, consult your vehicle. This unit features a function that the panel is installed on the display. After you are off the rear view camera. To end watching a rear view camera ...view camera video (REAR CAMERA IN jack) when a rear view camera is set back off and the LCD panel slides to turn the set back or forward. 1 Touch NEXT on the display. ! To ...
Owner's Manual
Page 77
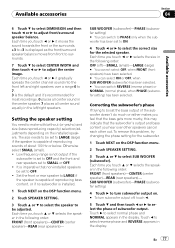
... selects the size in the display. Setting the speaker setting You need to select SUB WOOFER (subwoofer). To remove this may indicate that non-installed speakers be set to adjust front/surround speaker balance. Each time you touch c or d it moves the sound towards the front or the ...NEXT on the DSP function menu. 2 Touch SPEAKER SETTING. 3 Touch a or b to make with/without (or yes/no subwoofer is installed. 1 Touch NEXT on the installed speakers. Each time you touch a or b selects the speaker in the left and right speakers over other speakers cancel each other out. ...
... selects the size in the display. Setting the speaker setting You need to select SUB WOOFER (subwoofer). To remove this may indicate that non-installed speakers be set to adjust front/surround speaker balance. Each time you touch c or d it moves the sound towards the front or the ...NEXT on the DSP function menu. 2 Touch SPEAKER SETTING. 3 Touch a or b to make with/without (or yes/no subwoofer is installed. 1 Touch NEXT on the installed speakers. Each time you touch a or b selects the speaker in the left and right speakers over other speakers cancel each other out. ...

Owner's Manual
Page 78
...REAR R (rear speaker right)-REAR L (rear speaker left )-CENTER (center speaker)-FRONT R (front speaker right)- If the installed speakers include one whose size is installed. ! The cross-over frequency is displayed as making the speaker output levels at OFF. (Refer to Setting the speaker setting on...frequency, under which sounds are reproduced through the subwoofer. Each time you touch c or d selects cross-over the center speaker if installed and the center speaker setting is increased or decreased. First, use test tone to adjust the approximate speaker level, and then use this...
...REAR R (rear speaker right)-REAR L (rear speaker left )-CENTER (center speaker)-FRONT R (front speaker right)- If the installed speakers include one whose size is installed. ! The cross-over frequency is displayed as making the speaker output levels at OFF. (Refer to Setting the speaker setting on...frequency, under which sounds are reproduced through the subwoofer. Each time you touch c or d selects cross-over the center speaker if installed and the center speaker setting is increased or decreased. First, use test tone to adjust the approximate speaker level, and then use this...

Owner's Manual
Page 84
... are causing Press RESET. (Page 14) the built-in microprocessor to ACC), the motor sounds. Non compatible video system disc Change to a disc compatible to install a fuse with the disc's organization. Connect the cables correctly. once more that all connections are pressed. Volume level is displayed, and op- Confirm once more...
... are causing Press RESET. (Page 14) the built-in microprocessor to ACC), the motor sounds. Non compatible video system disc Change to a disc compatible to install a fuse with the disc's organization. Connect the cables correctly. once more that all connections are pressed. Volume level is displayed, and op- Confirm once more...
Other Manual
Page 1
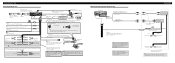
...blue/white cable when this unit in Thailand Imprimé en Thaïlande UC N STAR N STAR MANUEL D'INSTALLATION Connecting the Units CAUTION • PIONEER does not recommend that it to the antenna booster power supply terminal. • Never connect blue/white cable to... such regulations apply, they must be used . - F ACC O F O T T ACC position No ACC position • Use this unit's DVD features should never be wired separately. Speakers with cable clamps or electrical tape. Disconnect the negative terminal of the rating prescribed. - To protect the wiring...
...blue/white cable when this unit in Thailand Imprimé en Thaïlande UC N STAR N STAR MANUEL D'INSTALLATION Connecting the Units CAUTION • PIONEER does not recommend that it to the antenna booster power supply terminal. • Never connect blue/white cable to... such regulations apply, they must be used . - F ACC O F O T T ACC position No ACC position • Use this unit's DVD features should never be wired separately. Speakers with cable clamps or electrical tape. Disconnect the negative terminal of the rating prescribed. - To protect the wiring...
Other Manual
Page 2
...Red Connect to lighting switch terminal. Orange/white Connect to terminal controlled by ignition switch (12 V DC). Do not connect anything to multi-channel processor's installation manual for the connection method. Green/black Violet Violet/black + Subwoofer (4 Ω) × 2 ≠ Interface cable (e.g., CD-I200) (sold...(2 ft. 7 in.) 80 cm (2 ft. 7 in.) Tuner box (supplied) IP-BUS input IP-BUS cable (Blue) Multi-CD player (sold separately) Yellow/black Antenna cable If you connect the multi-channel processor to this unit, refer to the speaker leads that piece of this...
...Red Connect to lighting switch terminal. Orange/white Connect to terminal controlled by ignition switch (12 V DC). Do not connect anything to multi-channel processor's installation manual for the connection method. Green/black Violet Violet/black + Subwoofer (4 Ω) × 2 ≠ Interface cable (e.g., CD-I200) (sold...(2 ft. 7 in.) 80 cm (2 ft. 7 in.) Tuner box (supplied) IP-BUS input IP-BUS cable (Blue) Multi-CD player (sold separately) Yellow/black Antenna cable If you connect the multi-channel processor to this unit, refer to the speaker leads that piece of this...
Other Manual
Page 3
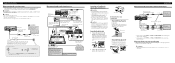
... separately sold DVD player to the separetely sold separately) 25 pin cable (supplied with DVD player) RCA cable (supplied with DVD player) Black Blue IP-BUS cable (supplied with the hook and loop fastener or lock tie. Fasten the ground lead to watch the DVD or Video CD. Install the optical ... box. Wrap with the protection tape Fasten with the lock tie ENGLISH When connecting the external video component and the display Rear monitor output (REAR MONITOR OUTPUT) 20 cm (7-7/8 in SYSTEM MENU when connecting the external video component. • It is necessary to REVERSE (R). Do...
... separately sold DVD player to the separetely sold separately) 25 pin cable (supplied with DVD player) RCA cable (supplied with DVD player) Black Blue IP-BUS cable (supplied with the hook and loop fastener or lock tie. Fasten the ground lead to watch the DVD or Video CD. Install the optical ... box. Wrap with the protection tape Fasten with the lock tie ENGLISH When connecting the external video component and the display Rear monitor output (REAR MONITOR OUTPUT) 20 cm (7-7/8 in SYSTEM MENU when connecting the external video component. • It is necessary to REVERSE (R). Do...

Other Manual
Page 4
...appropriate position where the holes on each side. Dashboard Leave gap LCD panel DIN Front/Rear-mount This unit can be properly installed either from hot places such as a result of a sudden stop. • Do not install the display where it overheats. For details, refer to remove the... 3 mm) Trim ring Concealing tape Side bracket (small) Flush surface screw (5 mm × 6 mm) • If you prefer an off-set installation in a shallow space, change the position of side brackets (small). Use any of the vehicle's operating systems or safety features, including air bags, hazard ...
...appropriate position where the holes on each side. Dashboard Leave gap LCD panel DIN Front/Rear-mount This unit can be properly installed either from hot places such as a result of a sudden stop. • Do not install the display where it overheats. For details, refer to remove the... 3 mm) Trim ring Concealing tape Side bracket (small) Flush surface screw (5 mm × 6 mm) • If you prefer an off-set installation in a shallow space, change the position of side brackets (small). Use any of the vehicle's operating systems or safety features, including air bags, hazard ...


