Installation Manual
Page 5
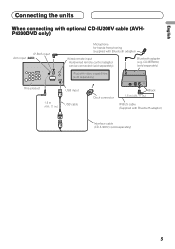
English Connecting the units When connecting with optional CD-IU200V cable (AVHP4200DVD only) IP-BUS input AUX input (AUX) Microphone for hands-free phoning (supplied with Bluetooth adapter) Interface cable (CD-IU200V) (sold separately). CD-BTB200) (sold separately) iPod with video capabilities (sold separately) This product USB input 1.5 m (4 ft. 11 in.) USB cable Dock connector Black 1.5 m (4 ft. 11 in.) IP-BUS cable (Supplied with Bluetooth adapter) Wired remote input Hard-wired remote control adaptor can be connected (sold separately) 5 Bluetooth adapter (e.g.
English Connecting the units When connecting with optional CD-IU200V cable (AVHP4200DVD only) IP-BUS input AUX input (AUX) Microphone for hands-free phoning (supplied with Bluetooth adapter) Interface cable (CD-IU200V) (sold separately). CD-BTB200) (sold separately) iPod with video capabilities (sold separately) This product USB input 1.5 m (4 ft. 11 in.) USB cable Dock connector Black 1.5 m (4 ft. 11 in.) IP-BUS cable (Supplied with Bluetooth adapter) Wired remote input Hard-wired remote control adaptor can be connected (sold separately) 5 Bluetooth adapter (e.g.
Installation Manual
Page 6
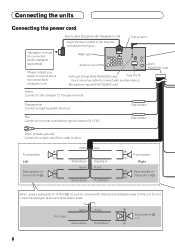
... Navigation unit can be sure to connect with Navigation unit) Insert the 26 pin cable in the direction indicated in the figure. RGB input This product Antenna input AUX jack (3.5 ø) (AVH-P4200DVD only) Fuse (10 A) Use a mini plug cable to the constant 12 V supply terminal. Orange/white Connect to Green and Green/black leads...
... Navigation unit can be sure to connect with Navigation unit) Insert the 26 pin cable in the direction indicated in the figure. RGB input This product Antenna input AUX jack (3.5 ø) (AVH-P4200DVD only) Fuse (10 A) Use a mini plug cable to the constant 12 V supply terminal. Orange/white Connect to Green and Green/black leads...
Owner's Manual
Page 10
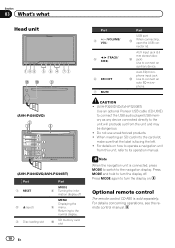
...VOLUME/ VOL) 5 c/d (TRACK/ SEEK) 6 SRC/OFF 7 MUTE Part USB port b When connecting, open the USB con- AUX input jack (3.5 mm stereo/video c jack) Use to connect an auto EQ microphone. Press MODE again to turn the display on how...Pioneer USB cable (CD-U50E) to connect the USB audio player/USB memory as any device connected directly to the unit will protrude out from this unit, refer to the normal display. Do not use unauthorized products. ! Returning to its operation manual. Section 03 What's what Head unit da 3 (AVH-P4200DVD) 2 1 3 4 5 7 6 c8ad9b (AVH-P3200DVD/AVH...
...VOLUME/ VOL) 5 c/d (TRACK/ SEEK) 6 SRC/OFF 7 MUTE Part USB port b When connecting, open the USB con- AUX input jack (3.5 mm stereo/video c jack) Use to connect an auto EQ microphone. Press MODE again to turn the display on how...Pioneer USB cable (CD-U50E) to connect the USB audio player/USB memory as any device connected directly to the unit will protrude out from this unit, refer to the normal display. Do not use unauthorized products. ! Returning to its operation manual. Section 03 What's what Head unit da 3 (AVH-P4200DVD) 2 1 3 4 5 7 6 c8ad9b (AVH-P3200DVD/AVH...

Owner's Manual
Page 11
...SD - AUX - AUX ! Bluetooth telephone/audio (Function of up , the image from the rear view camera can be available in DVD player ! Notes ! Although incompatible as a source, the basic functions of AVH-P4200DVD/AVH-P3200DVD) !...future. EXT1 - USB/iPod is displayed when no device is connected. - Switching to a Pioneer product, such as follows: - Refer to this unit. Turning the unit off using the ... Radio When the source icon is skipped. Radio/HD Radio - USB/iPod - AV input ! When two external units are connected, the external units are automatically allocated to Setting ...
...SD - AUX - AUX ! Bluetooth telephone/audio (Function of up , the image from the rear view camera can be available in DVD player ! Notes ! Although incompatible as a source, the basic functions of AVH-P4200DVD/AVH-P3200DVD) !...future. EXT1 - USB/iPod is displayed when no device is connected. - Switching to a Pioneer product, such as follows: - Refer to this unit. Turning the unit off using the ... Radio When the source icon is skipped. Radio/HD Radio - USB/iPod - AV input ! When two external units are connected, the external units are automatically allocated to Setting ...
Owner's Manual
Page 62
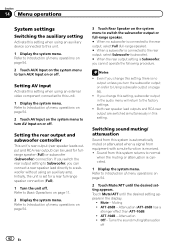
... -20dB - Section 14 Menu operations System settings Switching the auxiliary setting Activate this setting when using an auxiliary device connected to turn AUX Input on or off. Refer to this unit. 1 Display the system menu. Both rear speaker lead outputs and RCA rear output are ... # When a subwoofer is connected to the factory settings. ! Notes ! Attenuation ! Refer to Introduction of menu operations on page 54. 2 Touch AUX Input on the system menu to this unit. 1 Display the system menu. Touch Mute/ATT until the desired setting appears. ATT -10dB - Sound from equipment...
... -20dB - Section 14 Menu operations System settings Switching the auxiliary setting Activate this setting when using an auxiliary device connected to turn AUX Input on or off. Refer to this unit. 1 Display the system menu. Both rear speaker lead outputs and RCA rear output are ... # When a subwoofer is connected to the factory settings. ! Notes ! Attenuation ! Refer to Introduction of menu operations on page 54. 2 Touch AUX Input on the system menu to this unit. 1 Display the system menu. Touch Mute/ATT until the desired setting appears. ATT -10dB - Sound from equipment...
Owner's Manual
Page 69
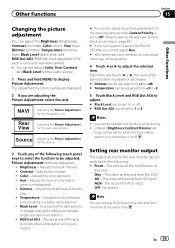
...- Temperature - Adjusts the color tempera- Emphasizes the dark portions of the dis- Front - The video and sound from AV input AUX- The source for the rear view camera. En 69 Adjusts the color saturation ! Adjusts the brightness of images making the difference ...adjusted from +3 to -3. 5 Touch Black Level and RGB Dot ADJ to adjust. # Black Level can be set - Adjusting the Picture Adjustment for AUX input Off- Source Adjusting the Picture Adjustment for each source and rear view camera. ! Picture Adjustment items are adjusting the Picture Adjustment, select the unit. ...
...- Temperature - Adjusts the color tempera- Emphasizes the dark portions of the dis- Front - The video and sound from AV input AUX- The source for the rear view camera. En 69 Adjusts the color saturation ! Adjusts the brightness of images making the difference ...adjusted from +3 to -3. 5 Touch Black Level and RGB Dot ADJ to adjust. # Black Level can be set - Adjusting the Picture Adjustment for AUX input Off- Source Adjusting the Picture Adjustment for each source and rear view camera. ! Picture Adjustment items are adjusting the Picture Adjustment, select the unit. ...
Owner's Manual
Page 71
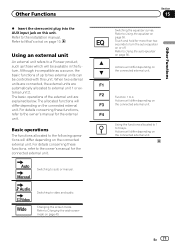
...Audio Video Switching to the owner's manual for the connected external unit. Other Functions % Insert the stereo mini plug into the AUX input jack on the connected external unit. For details concerning these functions, refer to the installation manual. F4 Using the functions allocated to... auto-equalizer on F3 the connected external unit. Touch and hold for the external unit. Basic operations The functions allocated to a Pioneer product, such as a source, the basic functions of the external unit are automatically allocated to Using the equalizer on the connected...
...Audio Video Switching to the owner's manual for the connected external unit. Other Functions % Insert the stereo mini plug into the AUX input jack on the connected external unit. For details concerning these functions, refer to the installation manual. F4 Using the functions allocated to... auto-equalizer on F3 the connected external unit. Touch and hold for the external unit. Basic operations The functions allocated to a Pioneer product, such as a source, the basic functions of the external unit are automatically allocated to Using the equalizer on the connected...


