Installation Manual
Page 2
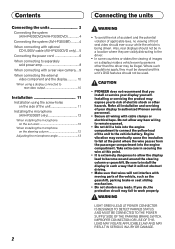
...sure that you install or service your display to authorized Pioneer service personnel. • Secure all wiring with cable clamps or electrical tape. Installing or servicing ...AVH-P4200DVD/AVH-P3200DVD 4 Connecting the system (AVH-P3200BT) ......... 4 When connecting with optional CD-IU200V cable (AVH-P4200DVD only) ... 5 Connecting the power cord 6 When connecting to separately sold power amp 8 When connecting with a rear view camera.... 9 When connecting the external video component and the display 10 When using a display connected to rear video output 10 Installation 11 Installation...
...sure that you install or service your display to authorized Pioneer service personnel. • Secure all wiring with cable clamps or electrical tape. Installing or servicing ...AVH-P4200DVD/AVH-P3200DVD 4 Connecting the system (AVH-P3200BT) ......... 4 When connecting with optional CD-IU200V cable (AVH-P4200DVD only) ... 5 Connecting the power cord 6 When connecting to separately sold power amp 8 When connecting with a rear view camera.... 9 When connecting the external video component and the display 10 When using a display connected to rear video output 10 Installation 11 Installation...
Installation Manual
Page 3
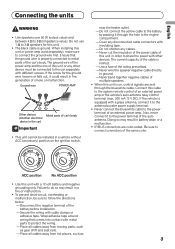
...all cables away from moving parts, such as 3 Cover any cables. - Never cut the insulation of the power cable of the battery before installation. - Disconnect the negative terminal of this unit is properly connected to protect the wiring. - Wrap adhesive tape around wiring that the ground wire...negative grounding only. The current capacity of car's body (Another electronic device in the car) Important • This unit cannot be installed in a fire or malfunction. • To prevent short-circuit, overheating or malfunction, be connected to connect the ground wire first.
...all cables away from moving parts, such as 3 Cover any cables. - Never cut the insulation of the power cable of the battery before installation. - Disconnect the negative terminal of this unit is properly connected to protect the wiring. - Wrap adhesive tape around wiring that the ground wire...negative grounding only. The current capacity of car's body (Another electronic device in the car) Important • This unit cannot be installed in a fire or malfunction. • To prevent short-circuit, overheating or malfunction, be connected to connect the ground wire first.
Installation Manual
Page 10
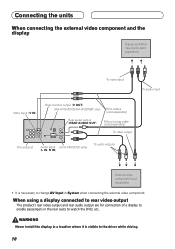
WARNING Never install the display in a location where it is necessary to change AV Input in the rear seats to watch the DVD, etc. When using a display connected ... video component and the display Display with RCA input jacks (sold separately) To video input To audio input Video input (V IN) Rear monitor output (V OUT) (AVH-P4200DVD/AVH-P3200BT only) RCA cables (sold separately) Rear audio output (REAR AUDIO OUT) Mini pin plug cable (sold separately) To video output This product Audio input...
WARNING Never install the display in a location where it is necessary to change AV Input in the rear seats to watch the DVD, etc. When using a display connected ... video component and the display Display with RCA input jacks (sold separately) To video input To audio input Video input (V IN) Rear monitor output (V OUT) (AVH-P4200DVD/AVH-P3200BT only) RCA cables (sold separately) Rear audio output (REAR AUDIO OUT) Mini pin plug cable (sold separately) To video output This product Audio input...
Installation Manual
Page 11
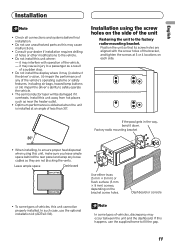
... air bags, hazard lamp buttons or (iii) impair the driver's ability to safely operate the vehicle. • The semiconductor laser will be properly installed. Position the unit so that its screw holes are aligned with operation of the bracket, and tighten the screws at an angle of any loose... cables so they are not blocking the vents. If this happens, use the supplied frame to the vehicle. • Do not install this unit where: - it may (i) obstruct the driver's vision, (ii) impair the performance of less than 30°. it down. Dashboard or console ...
... air bags, hazard lamp buttons or (iii) impair the driver's ability to safely operate the vehicle. • The semiconductor laser will be properly installed. Position the unit so that its screw holes are aligned with operation of the bracket, and tighten the screws at an angle of any loose... cables so they are not blocking the vents. If this happens, use the supplied frame to the vehicle. • Do not install this unit where: - it may (i) obstruct the driver's vision, (ii) impair the performance of less than 30°. it down. Dashboard or console ...

Installation Manual
Page 12
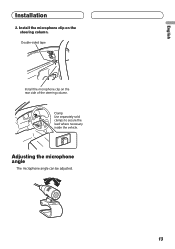
Installation Installing the microphone (AVH-P3200BT only) Installation notes Install the microphone in such a way that will not obstruct driving. Microphone Microphone clip Microphone base Fit the microphone lead into the groove. • Microphone can be installed without using microphone clip. Microphone Microphone clip... dangerous to allow the microphone lead to secure the lead where necessary inside the vehicle. When installing the microphone on the microphone clip. Install the microphone on the sun visor 1. To detach the microphone base from the microphone clip. In...
Installation Installing the microphone (AVH-P3200BT only) Installation notes Install the microphone in such a way that will not obstruct driving. Microphone Microphone clip Microphone base Fit the microphone lead into the groove. • Microphone can be installed without using microphone clip. Microphone Microphone clip... dangerous to allow the microphone lead to secure the lead where necessary inside the vehicle. When installing the microphone on the microphone clip. Install the microphone on the sun visor 1. To detach the microphone base from the microphone clip. In...
Installation Manual
Page 13
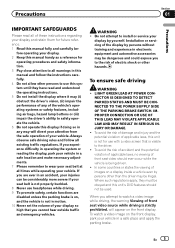
Double-sided tape Install the microphone clip on the steering column. Clamp Use separately sold clamps to secure the lead where necessary inside the vehicle. English Installation 2. Install the microphone clip on the rear side of the steering column. Adjusting the microphone angle The microphone angle can be adjusted. 13
Double-sided tape Install the microphone clip on the steering column. Clamp Use separately sold clamps to secure the lead where necessary inside the vehicle. English Installation 2. Install the microphone clip on the rear side of the steering column. Adjusting the microphone angle The microphone angle can be adjusted. 13
Owner's Manual
Page 5
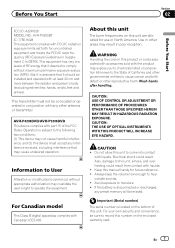
... safety information. 3 Pay close attention to all warnings in this manual and follow all times while operating your vehicle. WARNING ! Installation or servicing of the display by persons without training and experience in any of the vehicle's operating systems or safety features, including air...! LIGHT GREEN LEAD AT POWER CON- Precautions Section 01 Precautions IMPORTANT SAFEGUARDS Please read and understood the operating instructions. 5 Do not install the display where it may be illegal. Do not attempt to safely operate the vehicle. 6 Do not operate this manual fully and...
... safety information. 3 Pay close attention to all warnings in this manual and follow all times while operating your vehicle. WARNING ! Installation or servicing of the display by persons without training and experience in any of the vehicle's operating systems or safety features, including air...! LIGHT GREEN LEAD AT POWER CON- Precautions Section 01 Precautions IMPORTANT SAFEGUARDS Please read and understood the operating instructions. 5 Do not install the display where it may be illegal. Do not attempt to safely operate the vehicle. 6 Do not operate this manual fully and...
Owner's Manual
Page 6
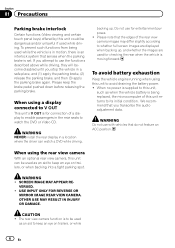
... driving, they will become disabled until you transcribe the audio adjustment data. backing up , and whether the images are used for entertainment purposes. ! WARNING NEVER install the rear display in motion, there is an interlock system that the edges of the rear view camera images may differ slightly according to whether...
... driving, they will become disabled until you transcribe the audio adjustment data. backing up , and whether the images are used for entertainment purposes. ! WARNING NEVER install the rear display in motion, there is an interlock system that the edges of the rear view camera images may differ slightly according to whether...
Owner's Manual
Page 7
... that may cause undesired operation. Information to comply without appropriate authorization may result in conjunction with any preset memory will be installed and operated with liquids. ! Do not allow this product or cords associated with accessories sold with part 15 of RF ...any other reproductive harm. Wash hands after handling.. CAUTION: THE USE OF OPTICAL INSTRUMENTS WITH THIS PRODUCT WILL INCREASE EYE HAZARD. AVH-P4200DVD/AVH-P3200DVD This device complies with the product may not cause harmful interference, and (2) this number on this unit to record this ...
... that may cause undesired operation. Information to comply without appropriate authorization may result in conjunction with any preset memory will be installed and operated with liquids. ! Do not allow this product or cords associated with accessories sold with part 15 of RF ...any other reproductive harm. Wash hands after handling.. CAUTION: THE USE OF OPTICAL INSTRUMENTS WITH THIS PRODUCT WILL INCREASE EYE HAZARD. AVH-P4200DVD/AVH-P3200DVD This device complies with the product may not cause harmful interference, and (2) this number on this unit to record this ...
Owner's Manual
Page 9
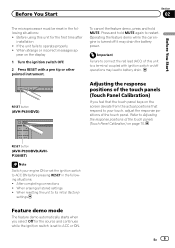
...feature demo automatically starts when you feel that the touch panel keys on page 70. After completing connections ! En 9 RESET button (AVH-P4200DVD) To cancel the feature demo, press and hold MUTE again to battery drain. Important Failure to connect the red lead (ACC) of...power. When erasing all stored settings ! RESET button (AVH-P3200DVD/AVHP3200BT) Note Switch your touch, adjust the response positions of the touch panels (Touch Panel Calibration) If you select Off for the first time after installation ! Adjusting the response positions of the touch panel. ...
...feature demo automatically starts when you feel that the touch panel keys on page 70. After completing connections ! En 9 RESET button (AVH-P4200DVD) To cancel the feature demo, press and hold MUTE again to battery drain. Important Failure to connect the red lead (ACC) of...power. When erasing all stored settings ! RESET button (AVH-P3200DVD/AVHP3200BT) Note Switch your touch, adjust the response positions of the touch panels (Touch Panel Calibration) If you select Off for the first time after installation ! Adjusting the response positions of the touch panel. ...
Owner's Manual
Page 64
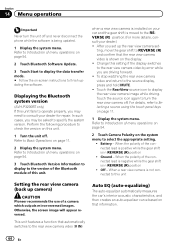
... display. ! Refer to specify the system version. When the polarity of a camera which outputs mirror-reversed images. Displaying the Bluetooth system version (AVH-P3200BT only) If this unit. 1 Turn the unit off . Refer to Introduction of menu operations on page 54. 3 Touch Bluetooth Version Information... the software is in REVERSE (R) position ! when a rear view camera is installed on that automatically switches to Basic Operations on the system menu to operate properly, you set up camera) CAUTION Pioneer recommends the use of the connected lead is negative while the gear shift is ...
... display. ! Refer to specify the system version. When the polarity of a camera which outputs mirror-reversed images. Displaying the Bluetooth system version (AVH-P3200BT only) If this unit. 1 Turn the unit off . Refer to Introduction of menu operations on page 54. 3 Touch Bluetooth Version Information... the software is in REVERSE (R) position ! when a rear view camera is installed on that automatically switches to Basic Operations on the system menu to operate properly, you set up camera) CAUTION Pioneer recommends the use of the connected lead is negative while the gear shift is ...
Owner's Manual
Page 71
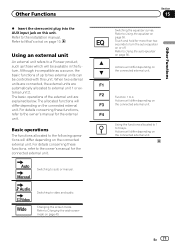
... differ depending on F3 the connected external unit. En 71 Refer to auto or manual. For details concerning these functions, refer to a Pioneer product, such as a source, the basic functions of the external unit are automatically allocated to Using the equalizer on page 40. Auto ...Switching to Changing the wide screen mode on page 55. Refer to the installation manual. The basic operations of up to 4 Actions will differ depending on page 56. Changing the screen mode. Basic operations The ...
... differ depending on F3 the connected external unit. En 71 Refer to auto or manual. For details concerning these functions, refer to a Pioneer product, such as a source, the basic functions of the external unit are automatically allocated to Using the equalizer on page 40. Auto ...Switching to Changing the wide screen mode on page 55. Refer to the installation manual. The basic operations of up to 4 Actions will differ depending on page 56. Changing the screen mode. Basic operations The ...
Owner's Manual
Page 72
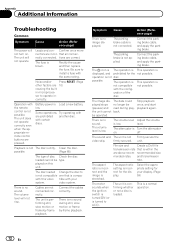
... one that is compa- in - correctly. Battery power is low. Try operating with the config- Clean the disc. The disc loaded Change the disc to install a fuse with the remote control is incorrect for the not possible. The volume level will not turn on. possible. with another disc. Stop playback once...
... one that is compa- in - correctly. Battery power is low. Try operating with the config- Clean the disc. The disc loaded Change the disc to install a fuse with the remote control is incorrect for the not possible. The volume level will not turn on. possible. with another disc. Stop playback once...


