
User manual
Page 2
... S-Video Input 14 4.1.2 Using Component Video Input 14 4.1.3 Using Video Input 15 4.1.4 Using Monitor Output 15 4.1.5 Using DVI Input 15 4.2 External Audio Connection 16 4.2.1 Connecting External Amplified Speakers 16 4.3 Connecting a PC 17 4.3.1 Using RGB (VGA) or DVI Video Input 17 B A SIC FU N C T IO N S 18 5.1 Powering ON/OFF 18 5.2 Selecting Signal Source 18 5.3 Volume Adjustment 19 5.4 MUTE 19 5.5 Display Information 20 A DV A N C E D FU N C T IO N S 22 6.1 Picture Controls 22 6.1.1 Adjusting Picture Settings 22 6.1.2 Reset to the factory defaults 22 6.2 Sound Controls...
... S-Video Input 14 4.1.2 Using Component Video Input 14 4.1.3 Using Video Input 15 4.1.4 Using Monitor Output 15 4.1.5 Using DVI Input 15 4.2 External Audio Connection 16 4.2.1 Connecting External Amplified Speakers 16 4.3 Connecting a PC 17 4.3.1 Using RGB (VGA) or DVI Video Input 17 B A SIC FU N C T IO N S 18 5.1 Powering ON/OFF 18 5.2 Selecting Signal Source 18 5.3 Volume Adjustment 19 5.4 MUTE 19 5.5 Display Information 20 A DV A N C E D FU N C T IO N S 22 6.1 Picture Controls 22 6.1.1 Adjusting Picture Settings 22 6.1.2 Reset to the factory defaults 22 6.2 Sound Controls...

User manual
Page 4
IMPORTANT NOTES AND SAFETY INSTRUCTIONS 1.1 Safty Instructions CAUTION RISK OF ELECTRIC SHOCK DO NOT OPEN .) • • • • • re if it is connected to re.) 3 User Manual BDS4241V/BDH4241/BDH5021V 1.
IMPORTANT NOTES AND SAFETY INSTRUCTIONS 1.1 Safty Instructions CAUTION RISK OF ELECTRIC SHOCK DO NOT OPEN .) • • • • • re if it is connected to re.) 3 User Manual BDS4241V/BDH4241/BDH5021V 1.

User manual
Page 6
... compliance could void the user's authority to radio communications. NOTE: This equipment has been tested and found to Part 15 of the FCC rules. (TV broadcast receivers with this equipment in a residential area is operated in diameter models only) 5 Provided with picture screens 13 inches or larger in a commercial environment. This television receiver provides display of television closed captioning in accordance with Section...
... compliance could void the user's authority to radio communications. NOTE: This equipment has been tested and found to Part 15 of the FCC rules. (TV broadcast receivers with this equipment in a residential area is operated in diameter models only) 5 Provided with picture screens 13 inches or larger in a commercial environment. This television receiver provides display of television closed captioning in accordance with Section...
User manual
Page 9
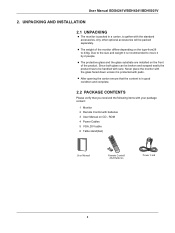
... that you received the following items with your package content : 1 Monitor 2 Remote Control with the glass faced down unless it by 2 people. User Manual BDS4241V/BDH4241/BDH5021V 2. Never place the monitor with batteries 3 User Manual on the type-from29 to move it is protected with pads. UNPACKING AND INSTALLATION 2.1 UNPACKING The monitor is in a carton, to be packed separately. The weight of the...
... that you received the following items with your package content : 1 Monitor 2 Remote Control with the glass faced down unless it by 2 people. User Manual BDS4241V/BDH4241/BDH5021V 2. Never place the monitor with batteries 3 User Manual on the type-from29 to move it is protected with pads. UNPACKING AND INSTALLATION 2.1 UNPACKING The monitor is in a carton, to be packed separately. The weight of the...
User manual
Page 11
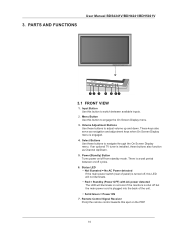
... navigation and adjustment keys when On Screen Display menu is engaged. 4. Power(Standly) Button Turns power on /off but the main power cord is plugged into the back of panel) is shut off cycles. 6. Menu Button Use this LED will illuminate in red color if the monitors is turned off from standby mode. Status LED Not Illumated = No AC Power detected If the main power switch (rear of the unit. 3. Solid Green = Power ON 7. Input Button Use this spot on the PDP. 10 If...
... navigation and adjustment keys when On Screen Display menu is engaged. 4. Power(Standly) Button Turns power on /off but the main power cord is plugged into the back of panel) is shut off cycles. 6. Menu Button Use this LED will illuminate in red color if the monitors is turned off from standby mode. Status LED Not Illumated = No AC Power detected If the main power switch (rear of the unit. 3. Solid Green = Power ON 7. Input Button Use this spot on the PDP. 10 If...
User manual
Page 12
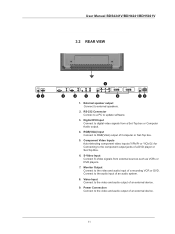
...Power Connection Connect to the audio input of a DVD player or Set-Top Box. 6. Digital DVI Input Connect to the video and audio output of an external device. 11 S-Video Input Connect S-Video signals from a Set-Top box or Computer Audio output. 4. Video Input Connect to digital video signals from external sources such as VCRs or DVD players. 7. RGB(VGA) Input Connect to the video and audio input of Computer or Set-Top box. 5. User Manual BDS4241V/BDH4241/BDH5021V 3.2 REAR VIEW 1 12 17 VIDEO 2 VIDEO 1 13 14 15 16 1 81 1 19 1. Monitor Output Connect to RGB(VGA) output...
...Power Connection Connect to the audio input of a DVD player or Set-Top Box. 6. Digital DVI Input Connect to the video and audio output of an external device. 11 S-Video Input Connect S-Video signals from a Set-Top box or Computer Audio output. 4. Video Input Connect to digital video signals from external sources such as VCRs or DVD players. 7. RGB(VGA) Input Connect to the video and audio input of Computer or Set-Top box. 5. User Manual BDS4241V/BDH4241/BDH5021V 3.2 REAR VIEW 1 12 17 VIDEO 2 VIDEO 1 13 14 15 16 1 81 1 19 1. Monitor Output Connect to RGB(VGA) output...
User manual
Page 13
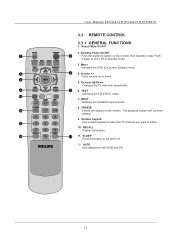
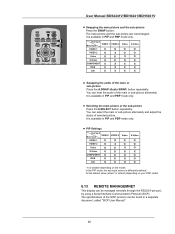
... 18 Freeze the display on the monitor from Standby mode. U ser Manual BD S 4241V /B D H 4241V /B D H 5021V 3.3 REMOTE CONTROL 3.3.1 GENERAL FUNCTIONS 1. Menu Activates the OSD (On Screen Display) menu 13 15 4. Standby Power On/Off 1 12 Push this button to set timer off to turn it again to Standby mode. 3. Volume +/- The playback system will continue playing. 9. Sound Mute On/Off 2. Channel Up/Down Changes the TV channels sequentially. 16 17 6. Number keypad 19 Use number keypad to select...
... 18 Freeze the display on the monitor from Standby mode. U ser Manual BD S 4241V /B D H 4241V /B D H 5021V 3.3 REMOTE CONTROL 3.3.1 GENERAL FUNCTIONS 1. Menu Activates the OSD (On Screen Display) menu 13 15 4. Standby Power On/Off 1 12 Push this button to set timer off to turn it again to Standby mode. 3. Volume +/- The playback system will continue playing. 9. Sound Mute On/Off 2. Channel Up/Down Changes the TV channels sequentially. 16 17 6. Number keypad 19 Use number keypad to select...
User manual
Page 15
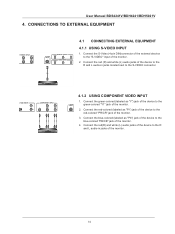
... the green-colored "Y1" jack of the monitor. 14 Connect the red(R) and white (L) audio jacks of the device to the R and L audio-in jacks located next to the R and L audio-in jacks of the monitor. 2. Connect the red (R) and white (L) audio jacks of the monitor. 2. CONNECTIONS TO EXTERNAL EQUIPMENT 4.1 CONNECTING EXTERNAL EQUIPMENT 4.1.1 USING S-VIDEO INPUT 1. Connect the blue-colored (labeled as "Pb") jack of the device to the "S-VIDEO" input of the device to the S-VIDEO connector. 4.1.2 USING COMPONENT VIDEO INPUT 1. User Manual BDS4241V...
... the green-colored "Y1" jack of the monitor. 14 Connect the red(R) and white (L) audio jacks of the device to the R and L audio-in jacks located next to the R and L audio-in jacks of the monitor. 2. Connect the red (R) and white (L) audio jacks of the monitor. 2. CONNECTIONS TO EXTERNAL EQUIPMENT 4.1 CONNECTING EXTERNAL EQUIPMENT 4.1.1 USING S-VIDEO INPUT 1. Connect the blue-colored (labeled as "Pb") jack of the device to the "S-VIDEO" input of the device to the S-VIDEO connector. 4.1.2 USING COMPONENT VIDEO INPUT 1. User Manual BDS4241V...
User manual
Page 18
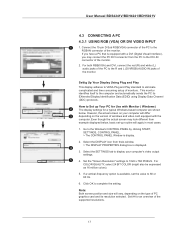
... R and L (DVI/RGB) AUDIO IN jacks of the PC to complete the setting. Settig Up Your Display Using Plug and Play This display adheres to VESA Plug and Play standard to 1024 x 768 PIXELS. Even though the actual screen may connect the PC DVI connector from theis window. > The DISPLAY PROPERTIES dialog box is displayed. 14 3. Set the "Screen Resolution" settings to eliminate complicated and time consuming setup of the monitor. 2. If a vertical-frequency option...
... R and L (DVI/RGB) AUDIO IN jacks of the PC to complete the setting. Settig Up Your Display Using Plug and Play This display adheres to VESA Plug and Play standard to 1024 x 768 PIXELS. Even though the actual screen may connect the PC DVI connector from theis window. > The DISPLAY PROPERTIES dialog box is displayed. 14 3. Set the "Screen Resolution" settings to eliminate complicated and time consuming setup of the monitor. 2. If a vertical-frequency option...
User manual
Page 19
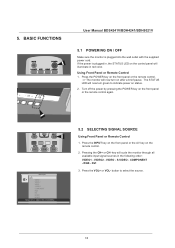
... the remote control. 2. Pressing the CH+ or CH- button to indicate power on after a brief pause. 5. BASIC FUNCTIONS User Manual BDS4241V/BDH4241/BDH5021V 5.1 POWERING ON / OFF Make sure the monitor is plugged in red color. Using Front Panel or Remote Control 1. S-VIDEO - Press the VOL+ or VOL- key will now turn green to select the source. 18 DVI 3. If the power is plugged into the wall outlet with the supplied power cord. VOL +] Exit [MENU] 5.2 SELECTING SIGNAL SOURCE Using Front Panel or Remote Control...
... the remote control. 2. Pressing the CH+ or CH- button to indicate power on after a brief pause. 5. BASIC FUNCTIONS User Manual BDS4241V/BDH4241/BDH5021V 5.1 POWERING ON / OFF Make sure the monitor is plugged in red color. Using Front Panel or Remote Control 1. S-VIDEO - Press the VOL+ or VOL- key will now turn green to select the source. 18 DVI 3. If the power is plugged into the wall outlet with the supplied power cord. VOL +] Exit [MENU] 5.2 SELECTING SIGNAL SOURCE Using Front Panel or Remote Control...

User manual
Page 23
... picture settings to select Image Preset. 2. Sharpness (RGB (PC) mode ) 4. Press the VOL+ or VOL- 6. VOL +] Exit [MENU] 6.1 PICTURE CONTROLS 6.1.1 ADJUSTING PICTURE SETTINGS Various picture adjustments can be adjusted. CH +] Select [- Press the VOL+ or VOL- Contrast - ADVANCED FUNCTIONS User Manual BDS4241V/BDH4241/BDH5021V Image Screen Setup Audio B rightnes s C ontras t S harpness C olor Tint 0 Image Preset Move [- Press the CH- Image preset Brightness - key to the factory defaults. 22 Press the MENU button on the input source, the following menu...
... picture settings to select Image Preset. 2. Sharpness (RGB (PC) mode ) 4. Press the VOL+ or VOL- 6. VOL +] Exit [MENU] 6.1 PICTURE CONTROLS 6.1.1 ADJUSTING PICTURE SETTINGS Various picture adjustments can be adjusted. CH +] Select [- Press the VOL+ or VOL- Contrast - ADVANCED FUNCTIONS User Manual BDS4241V/BDH4241/BDH5021V Image Screen Setup Audio B rightnes s C ontras t S harpness C olor Tint 0 Image Preset Move [- Press the CH- Image preset Brightness - key to the factory defaults. 22 Press the MENU button on the input source, the following menu...
User manual
Page 24
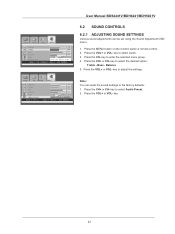
Press the MENU button on the monitor panel or remote control. 2. Bass - S elect [- VOL +] E xit [ME NU] User Manual BDS4241V/BDH4241/BDH5021V 6.2 SOUND CONTROLS 6.2.1 ADJUSTING SOUND SETTINGS Various sound adjustments can reset the sound settings to adjust the settings. key to select the desired option: Treble - key to select Audio. 3. Press the VOL+ or VOL- Image een S crSetup Audio Volume T r eble B as s 072 B alance 043 Mute ON OFF Audio Pr es et [-VOL +] to P res et Audio Move...
Press the MENU button on the monitor panel or remote control. 2. Bass - S elect [- VOL +] E xit [ME NU] User Manual BDS4241V/BDH4241/BDH5021V 6.2 SOUND CONTROLS 6.2.1 ADJUSTING SOUND SETTINGS Various sound adjustments can reset the sound settings to adjust the settings. key to select the desired option: Treble - key to select Audio. 3. Press the VOL+ or VOL- Image een S crSetup Audio Volume T r eble B as s 072 B alance 043 Mute ON OFF Audio Pr es et [-VOL +] to P res et Audio Move...

User manual
Page 25
...] User Manual BDS4241V/BDH4241/BDH5021V 6.3 OSD MENU LANGUAGE This monitor has multiple OSD Menu languages built-in including English, French, Spanish, Italian, German and Dutch. VOL +] E xit [ME NU] 6.4 ADJUSTING THE COLOR TEMPERATURE You can change tint of the entire screen to select Sleep Timer. 5. VOL +] E xit [ME NU] 6.5 POWER SAVE MODE This monitor is equipped with a Power Save mode under RGB(VGA) or DVI input modes. Image S creen S etup Audio...
...] User Manual BDS4241V/BDH4241/BDH5021V 6.3 OSD MENU LANGUAGE This monitor has multiple OSD Menu languages built-in including English, French, Spanish, Italian, German and Dutch. VOL +] E xit [ME NU] 6.4 ADJUSTING THE COLOR TEMPERATURE You can change tint of the entire screen to select Sleep Timer. 5. VOL +] E xit [ME NU] 6.5 POWER SAVE MODE This monitor is equipped with a Power Save mode under RGB(VGA) or DVI input modes. Image S creen S etup Audio...

User manual
Page 26
... the monitor panel or remote control. 2. To return to select OSD Settings. 5. Press the CH- Press the VOL+ or VOL- VOL +] E xit [ ME NU ] User Manual BDS4241V/BDH4241/BDH5021V 6.6 MINIMIZE SCREEN STICKING If the fixed pattern is caused around the lighting area and non-lighting area due to select the required option (OFF or ON). 6.7 FREEZING THE CURRENT PICTURE You can select for a long time...
... the monitor panel or remote control. 2. To return to select OSD Settings. 5. Press the CH- Press the VOL+ or VOL- VOL +] E xit [ ME NU ] User Manual BDS4241V/BDH4241/BDH5021V 6.6 MINIMIZE SCREEN STICKING If the fixed pattern is caused around the lighting area and non-lighting area due to select the required option (OFF or ON). 6.7 FREEZING THE CURRENT PICTURE You can select for a long time...
User manual
Page 29
... User Manual". 28 It is variable depending on your PDP model. 6.13 REMOTE MANAGEMNET This display can select the main or sub-picture alternately and adjust the status of the main or sub-picture alternately It is available in PIP and PBP mode only. You can be managed remotely through the RS232 9-pin port, by using a Serial Interface Communication Protocol (SICP). In the PIP mode, the sub input source...
... User Manual". 28 It is variable depending on your PDP model. 6.13 REMOTE MANAGEMNET This display can select the main or sub-picture alternately and adjust the status of the main or sub-picture alternately It is available in PIP and PBP mode only. You can be managed remotely through the RS232 9-pin port, by using a Serial Interface Communication Protocol (SICP). In the PIP mode, the sub input source...

User manual
Page 31
... the PDP (Otherwise, random signals might appear on the manufacture (and your PC to enter the video mode. If a vertical and horizontal frequency-select mode exists, select 60Hz (vertical) and 31.5kHz (horizontal). When connecting a notebook PC to the PDP, make sure that the PC screen is disconnected). If so, press the INPUT button to a display. INPUT MODE User Manual BDS4241V/BDH4241/BDH5021V VGA Resolution Standard resolution Active Resolution H Pixels V Lines VGA...
... the PDP (Otherwise, random signals might appear on the manufacture (and your PC to enter the video mode. If a vertical and horizontal frequency-select mode exists, select 60Hz (vertical) and 31.5kHz (horizontal). When connecting a notebook PC to the PDP, make sure that the PC screen is disconnected). If so, press the INPUT button to a display. INPUT MODE User Manual BDS4241V/BDH4241/BDH5021V VGA Resolution Standard resolution Active Resolution H Pixels V Lines VGA...
User manual
Page 38
... video inputs and sound inputs are correctly connected. 2. monitor is switched on the monitor. 37 Remedy 1. Check the video signal source to adjust the size of the monitor. Use the WIDE key to hear sound. 3. Use H-Size and V-Size to see the enclosed warranty card for an extended period of the plasma display may not turn on . Make sure that both video inputs and sound inputs are correctly connected. 1. Make sure the power switch is incorrectly set. 2. Make sure that the signal cable...
... video inputs and sound inputs are correctly connected. 2. monitor is switched on the monitor. 37 Remedy 1. Check the video signal source to adjust the size of the monitor. Use the WIDE key to hear sound. 3. Use H-Size and V-Size to see the enclosed warranty card for an extended period of the plasma display may not turn on . Make sure that both video inputs and sound inputs are correctly connected. 1. Make sure the power switch is incorrectly set. 2. Make sure that the signal cable...

User manual
Page 39
... on part of PDP mudule)over the product's lifetime. All parts, including repaired and replaced parts, are covered only for removal, installation or setup of the product, adjustment of customer controls on all defective parts will be repaired or replaced and labor is considered proof of the product. reception problems caused by these modifications. After two years from the product. (some states do not produce light...
... on part of PDP mudule)over the product's lifetime. All parts, including repaired and replaced parts, are covered only for removal, installation or setup of the product, adjustment of customer controls on all defective parts will be repaired or replaced and labor is considered proof of the product. reception problems caused by these modifications. After two years from the product. (some states do not produce light...
Leaflet
Page 2
.... Network controllability: RS232 Network controllability allows user to SXGA. Plasma monitor 42" WVGA Highlights BDS4241V/27 Free DVI cable A DVI cable is standard included with corrected motion positions so video content has perfectly smooth, judder-free, and razor-sharp moving images. Long expected panel lifetime In public display applications 24/7 operation is a razor sharp image. A universal public display solution requires versatile PC input support. Fanless operation Fanless operation is often supplied in various formats in...
.... Network controllability: RS232 Network controllability allows user to SXGA. Plasma monitor 42" WVGA Highlights BDS4241V/27 Free DVI cable A DVI cable is standard included with corrected motion positions so video content has perfectly smooth, judder-free, and razor-sharp moving images. Long expected panel lifetime In public display applications 24/7 operation is a razor sharp image. A universal public display solution requires versatile PC input support. Fanless operation Fanless operation is often supplied in various formats in...
Leaflet
Page 3
... stereo speakers • Network controllable: RS232 • Screen saving functions: Pixel shift, Image reverse • Placement: Portrait, Landscape • Regulatory approvals: FCC Class B, TÜV, UL/cUL, RoHS Power • Consumption (On mode): 240 Watts (typical) • Power supply: 100-240VAC, 50/60Hz • Sleep Mode: 5 Watts Max. Plasma monitor 42" WVGA Specifications BDS4241V/27 Picture/Display • Display screen type: WVGA Plasma panel • Panel Size: 42" / 106.7cm • Aspect ratio: 16:9 • Panel resolution: 852...
... stereo speakers • Network controllable: RS232 • Screen saving functions: Pixel shift, Image reverse • Placement: Portrait, Landscape • Regulatory approvals: FCC Class B, TÜV, UL/cUL, RoHS Power • Consumption (On mode): 240 Watts (typical) • Power supply: 100-240VAC, 50/60Hz • Sleep Mode: 5 Watts Max. Plasma monitor 42" WVGA Specifications BDS4241V/27 Picture/Display • Display screen type: WVGA Plasma panel • Panel Size: 42" / 106.7cm • Aspect ratio: 16:9 • Panel resolution: 852...


