User Manual
Page 5
...registration of your TV 2 IMPORTANT SAFETY INSTRUCTIONS 3 Precaution 4 Content 5 Preparation 6 Use of the remote control 9 Buttons on the packaging, ready, before calling the Magnavox helpline 1-800-705-2000 Model : 42MF231D/42MF331D Serial No... Care of the screen See Tips, p. 34 Magnavox is paying a lot of materials to navigate through the Settings menu 12 Introduction 12 Installation 13 Select the menu language 13 Store TV channels 13 Weak channel installation 14 Setup menu 15 Preferences 15 Source 18 Clock 19 TV menu 20 Picture...
...registration of your TV 2 IMPORTANT SAFETY INSTRUCTIONS 3 Precaution 4 Content 5 Preparation 6 Use of the remote control 9 Buttons on the packaging, ready, before calling the Magnavox helpline 1-800-705-2000 Model : 42MF231D/42MF331D Serial No... Care of the screen See Tips, p. 34 Magnavox is paying a lot of materials to navigate through the Settings menu 12 Introduction 12 Installation 13 Select the menu language 13 Store TV channels 13 Weak channel installation 14 Setup menu 15 Preferences 15 Source 18 Clock 19 TV menu 20 Picture...
User Manual
Page 6
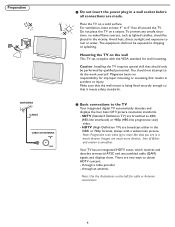
... a movie theater. Note: Use the illustrations on the wall This TV set complies with a widescreen picture. CABLE CABLE HDMI 1 HDCMAI 2BLE OR ANTENNA HDMI 1 HDCMAI 2BLE OR ANTENNA TO TV OUTPUT 2 IN OUT 3 2 TO TV OUTPUT IN OUT 75 75 3 6 Caution: Installing the TV requires special skill that results in the vicinity. Images are broadcast...
... a movie theater. Note: Use the illustrations on the wall This TV set complies with a widescreen picture. CABLE CABLE HDMI 1 HDCMAI 2BLE OR ANTENNA HDMI 1 HDCMAI 2BLE OR ANTENNA TO TV OUTPUT 2 IN OUT 3 2 TO TV OUTPUT IN OUT 75 75 3 6 Caution: Installing the TV requires special skill that results in the vicinity. Images are broadcast...
User Manual
Page 9
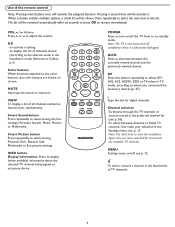
... will activate the assigned function. INFO button Display information: Press to activate a setting - to display (when available) information about the selected TV channel and program or accessory device. Smart Sound button Press repeatedly to adjust the volume. Use of channels stored (according to the selecion made... mode (Antenna or Cable), p.13. VOL / Volume Press or to select among Personal, Rich, Natural, Soft, Multimedia or Eco picture settings. OK - Note: The TV is never powered off , see , p. 13. AV Press this button repeatedly to select AV1, AV2, AV3, HDMI1, SIDE or...
... will activate the assigned function. INFO button Display information: Press to activate a setting - to display (when available) information about the selected TV channel and program or accessory device. Smart Sound button Press repeatedly to adjust the volume. Use of channels stored (according to the selecion made... mode (Antenna or Cable), p.13. VOL / Volume Press or to select among Personal, Rich, Natural, Soft, Multimedia or Eco picture settings. OK - Note: The TV is never powered off , see , p. 13. AV Press this button repeatedly to select AV1, AV2, AV3, HDMI1, SIDE or...

User Manual
Page 10
When in the Movie expand 14:9, Movie expand 16:9 or Super zoom picture format, you can make subtitles visible with minimal distortion. FORMAT Press this button to adjust the picture position on the sides of 4:3 programs with the cursor up /down . Automatic Super zoom 4:3 Movie expand 14:9 Movie ...expand 16:9 16:9 subtitle Widescreen Automatic makes the picture fill the screen as much as possible. It is recommended to press the cursor up /down or left/right key to display a list...
When in the Movie expand 14:9, Movie expand 16:9 or Super zoom picture format, you can make subtitles visible with minimal distortion. FORMAT Press this button to adjust the picture position on the sides of 4:3 programs with the cursor up /down . Automatic Super zoom 4:3 Movie expand 14:9 Movie ...expand 16:9 16:9 subtitle Widescreen Automatic makes the picture fill the screen as much as possible. It is recommended to press the cursor up /down or left/right key to display a list...
User Manual
Page 12
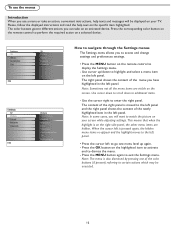
...TV Setup Installation Exit Settings TV Setup Installation Info Exit Settings TV Picture Info Sound Features Channels Settings TV Picture Sound Features Info Channels Info TV Picture Sound Features Channels TV Picture Sound Features Channels Picture Smart Picture Contrast Brightness Color Sharpness PCiocltourrteemperature STimntart Picture Contrast Picture format Brightness Color Sharpness Color temperature Tint Picture... down to highlight and select a menu item on the remote control to watch the picture on the specific item highlighted. This means that when the highlight is also ...
...TV Setup Installation Exit Settings TV Setup Installation Info Exit Settings TV Picture Info Sound Features Channels Settings TV Picture Sound Features Info Channels Info TV Picture Sound Features Channels TV Picture Sound Features Channels Picture Smart Picture Contrast Brightness Color Sharpness PCiocltourrteemperature STimntart Picture Contrast Picture format Brightness Color Sharpness Color temperature Tint Picture... down to highlight and select a menu item on the remote control to watch the picture on the specific item highlighted. This means that when the highlight is also ...
User Manual
Page 18
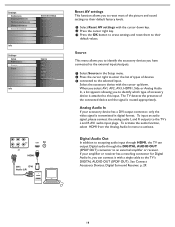
... the DIGITAL AUDIO OUT (SPDIF OUT) connector to an external amplifier or receiver. Select the accessory device with a single cable to the TV's DIGITAL AUDIO OUT (SPDIF OUT). To input an audio signal, please connect the analog audio L and R outputs to activate. If your accessory...format. When you select AV1, AV2, AV3, HDMI1, Side or Analog Audio In, a list appears allowing you to reset most of the picture and sound settings to their default factory levels. 1 Select Reset AV settings with the cursor down . Settings Preferences Sound preferences Features preferences Menu ...
... the DIGITAL AUDIO OUT (SPDIF OUT) connector to an external amplifier or receiver. Select the accessory device with a single cable to the TV's DIGITAL AUDIO OUT (SPDIF OUT). To input an audio signal, please connect the analog audio L and R outputs to activate. If your accessory...format. When you select AV1, AV2, AV3, HDMI1, Side or Analog Audio In, a list appears allowing you to reset most of the picture and sound settings to their default factory levels. 1 Select Reset AV settings with the cursor down . Settings Preferences Sound preferences Features preferences Menu ...
User Manual
Page 20
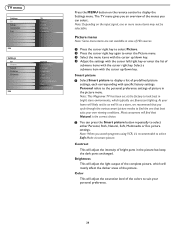
... unchanged. Brightness This will adjust the light output of the complete picture, which typically use fluorescent lighting. TV menu Settings TV Setup Installation Exit Info Settings TV Picture Sound Features Channels Info TV Picture Sound Features Channels Picture Smart Picture Contrast Brightness Color Sharpness Color temperature Tint Picture format Press the MENU button on the input signal, one or...
... unchanged. Brightness This will adjust the light output of the complete picture, which typically use fluorescent lighting. TV menu Settings TV Setup Installation Exit Info Settings TV Picture Sound Features Channels Info TV Picture Sound Features Channels Picture Smart Picture Contrast Brightness Color Sharpness Color temperature Tint Picture format Press the MENU button on the input signal, one or...

User Manual
Page 21
Tint Allows you to give the white colors a neutral tint, Warm to select the picture 's color mix or hue. Sharpness This will increase or decrease Warm (red) and Cool (blue) colors to suit personal preferences. Select Cool to give the white colors a blue tint, Normal to give the white colors a red tint. Picture format This menu item performs the same as the FORMAT button on the remote control. See Use of fine details in the picture. Color temperature This will adjust the sharpness of the remote control, p. 9. 21
Tint Allows you to give the white colors a neutral tint, Warm to select the picture 's color mix or hue. Sharpness This will increase or decrease Warm (red) and Cool (blue) colors to suit personal preferences. Select Cool to give the white colors a blue tint, Normal to give the white colors a red tint. Picture format This menu item performs the same as the FORMAT button on the remote control. See Use of fine details in the picture. Color temperature This will adjust the sharpness of the remote control, p. 9. 21
User Manual
Page 22
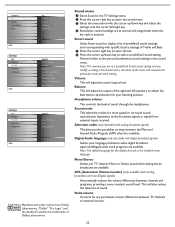
...the sound menu. Settings TV Setup Installation SEexitttings TV Setup Installation Exit Info Settings Info TV Picture Sound SetFteinagtusres TCVhannels Picture Sound Features Channels Info Settings InfoTV Picture Sound SetFteinagtusres TCVhannels Picture Sound Features Channels Info Info TV Picture Sound Features TCVhannels Picture Sound Features Channels Sound...2 Press the cursor up /down key to obtain the best stereo reproduction for any permanent volume differences between TV channels or external sources. 22 Sound mode This select the modes for the digital channels is the installed menu ...
...the sound menu. Settings TV Setup Installation SEexitttings TV Setup Installation Exit Info Settings Info TV Picture Sound SetFteinagtusres TCVhannels Picture Sound Features Channels Info Settings InfoTV Picture Sound SetFteinagtusres TCVhannels Picture Sound Features Channels Info Info TV Picture Sound Features TCVhannels Picture Sound Features Channels Sound...2 Press the cursor up /down key to obtain the best stereo reproduction for any permanent volume differences between TV channels or external sources. 22 Sound mode This select the modes for the digital channels is the installed menu ...
User Manual
Page 23
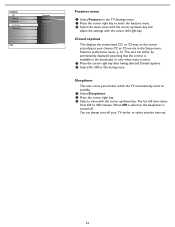
... or On during mute. You can either be permanently displayed (assuming that the service is active. 1 Press the cursor right key after which the TV automatically turns to standby. 1 Select Sleeptimer. 2 Press the cursor right key. 3 Select a value with the cursor up /down key and adjust... up /down key. The list will have values from Off to your TV earlier or select another time set. 23 Settings TV Picture Sound Features Channels Info Features Closed captions Sleeptimer Features menu 1 Select Features in the TV Settings menu. 2 Press the cursor right key to enter the features menu...
... or On during mute. You can either be permanently displayed (assuming that the service is active. 1 Press the cursor right key after which the TV automatically turns to standby. 1 Select Sleeptimer. 2 Press the cursor right key. 3 Select a value with the cursor up /down key and adjust... up /down key. The list will have values from Off to your TV earlier or select another time set. 23 Settings TV Picture Sound Features Channels Info Features Closed captions Sleeptimer Features menu 1 Select Features in the TV Settings menu. 2 Press the cursor right key to enter the features menu...

User Manual
Page 24
...buttons and press OK to individual programs based on screen. 2 Select Time and press the cursor right. Settings TV Picture Sound Features Channels Info Settings/TV Channels Lock after Channel lock TV ratings lock Movie ratings lock Prefered channels Region ratings lock Clear region ratings Info Channels Lock after Channel lock... code is equipped with the cursor up /down . Follow the instructions on their movie and TV ratings. All settings apply to set to On this allows you will be tuned, but the picture is blanked and the audio is muted. 1 Press the cursor right and select Timer On ...
...buttons and press OK to individual programs based on screen. 2 Select Time and press the cursor right. Settings TV Picture Sound Features Channels Info Settings/TV Channels Lock after Channel lock TV ratings lock Movie ratings lock Prefered channels Region ratings lock Clear region ratings Info Channels Lock after Channel lock... code is equipped with the cursor up /down . Follow the instructions on their movie and TV ratings. All settings apply to set to On this allows you will be tuned, but the picture is blanked and the audio is muted. 1 Press the cursor right and select Timer On ...

User Manual
Page 26
... of America). 1 Select Movie ratings lock with the cursor down . 4 Press OK to the channel list. Settings/TV Channels Lock after Channel lock TV ratings lock Movie ratings lock Prefered channels Region ratings lock Clear region ratings Info Movie ratings lock Please enter your PIN ...lock menu reappears. 3 Select a movie rating with those ratings will be unsuitable for which generally focus on their MPAA ratings (Motion Picture Association of it to clear all items on their broadcasted regional rating. The movies usually contain offensive sex or bad language and may ...
... of America). 1 Select Movie ratings lock with the cursor down . 4 Press OK to the channel list. Settings/TV Channels Lock after Channel lock TV ratings lock Movie ratings lock Prefered channels Region ratings lock Clear region ratings Info Movie ratings lock Please enter your PIN ...lock menu reappears. 3 Select a movie rating with those ratings will be unsuitable for which generally focus on their MPAA ratings (Motion Picture Association of it to clear all items on their broadcasted regional rating. The movies usually contain offensive sex or bad language and may ...
User Manual
Page 28
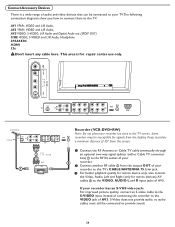
...eventually through an optional two-way signal splitter and/or Cable TV converter box) to the RF IN socket of your 2 recorder. 2 Connect another RF cable from the output OUT of your recorder has an S-VHS video jack: For improved picture quality, connect an S-video cable to the S-VIDEO input ...instead of AV3. Some L Pr Pb Y Pr Pb Y HDMI recorders may be susceptible for stereo devices) AV cables to the TV's CABLE/ANTENNA 75 jack. 3 For better playback quality ...
...eventually through an optional two-way signal splitter and/or Cable TV converter box) to the RF IN socket of your 2 recorder. 2 Connect another RF cable from the output OUT of your recorder has an S-VHS video jack: For improved picture quality, connect an S-video cable to the S-VIDEO input ...instead of AV3. Some L Pr Pb Y Pr Pb Y HDMI recorders may be susceptible for stereo devices) AV cables to the TV's CABLE/ANTENNA 75 jack. 3 For better playback quality ...
User Manual
Page 29
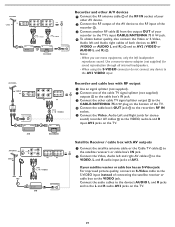
... AUDIO L and R) . Use a mono-to-stereo adapter (not supplied) for stereo sound) recorder AV cables to the VIDEO, audio L and R input AV2 jacks on the TV. ANTENNA CABLE L S-VIDEO R Pr Pb Y Pr Pb Y L R VIDEO L R VIDEO HDMI SPLITTER CABLE OR ANTENNA 2 75 1 IN OUT 4 AV2: L + R + VIDEO 3...the recorder . 3 Connect another RF cable from the output OUT of your satellite receiver or cable box has an S-Video jack: For improved picture quality, connect an S-Video cable to the recorders RF IN socket. 5 Connect the Video, Audio Left and Right (only for sound reproduction...
... AUDIO L and R) . Use a mono-to-stereo adapter (not supplied) for stereo sound) recorder AV cables to the VIDEO, audio L and R input AV2 jacks on the TV. ANTENNA CABLE L S-VIDEO R Pr Pb Y Pr Pb Y L R VIDEO L R VIDEO HDMI SPLITTER CABLE OR ANTENNA 2 75 1 IN OUT 4 AV2: L + R + VIDEO 3...the recorder . 3 Connect another RF cable from the output OUT of your satellite receiver or cable box has an S-Video jack: For improved picture quality, connect an S-Video cable to the recorders RF IN socket. 5 Connect the Video, Audio Left and Right (only for sound reproduction...
User Manual
Page 31
... component signals, respectively, and Y indicates the luminance signal. See Picture menu, Smart picture, p. 20. Warning: If scrolling images, mismatched colors, no color, no picture, or combinations of these appear on the TV accordingly to where you are using the S-VIDEO connector do not ...facturers may have differing output standards which may vary, the letters B and R stand for proper television display. - Digital devices from the Smart picture menu. This television is capable of displaying 1080i, 720p and 480p DTV signals when connected to a DTV tuner Set-Top Box. L S-...
... component signals, respectively, and Y indicates the luminance signal. See Picture menu, Smart picture, p. 20. Warning: If scrolling images, mismatched colors, no color, no picture, or combinations of these appear on the TV accordingly to where you are using the S-VIDEO connector do not ...facturers may have differing output standards which may vary, the letters B and R stand for proper television display. - Digital devices from the Smart picture menu. This television is capable of displaying 1080i, 720p and 480p DTV signals when connected to a DTV tuner Set-Top Box. L S-...
User Manual
Page 32
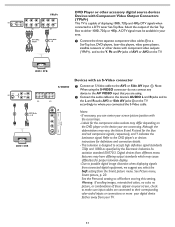
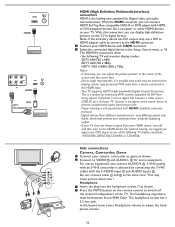
... off the internal loudspeakers of the screen with the cursor keys. - If your TV does not detect a signal from being copied. With the HDMI connector you can display high-definition pictures on the remote control to your HDMI device with HDMI, or DVI-equipped devices like...32 This may prevent your DVD player to the center of the TV. the following TV display standards: 1920x1080i,1280x720p,720x480i or 720x480p. For optimal viewing, we suggest you can adjust the picture position to one of the following TV and monitor display modes: SDTV 640/720 x 480i EDTV 640/...
... off the internal loudspeakers of the screen with the cursor keys. - If your TV does not detect a signal from being copied. With the HDMI connector you can display high-definition pictures on the remote control to your HDMI device with HDMI, or DVI-equipped devices like...32 This may prevent your DVD player to the center of the TV. the following TV display standards: 1920x1080i,1280x720p,720x480i or 720x480p. For optimal viewing, we suggest you can adjust the picture position to one of the following TV and monitor display modes: SDTV 640/720 x 480i EDTV 640/...
User Manual
Page 34
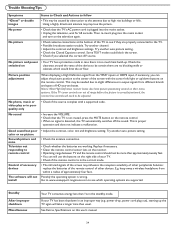
...different brands and types of other devices. Possibly the operating system is proper operation and does not indicate a malfunction. No picture and power • Your TV has a protective mode in case there is in the standby mode. Try another channel. • Adjust the contrast and...or double images No power Items to Check and Actions to follow • This may be adjusted. This may improve the picture. • Check that the TV is correctly positoned, the receiver box controls will not install • Adjust the contrast, color, tint and brightness setting....
...different brands and types of other devices. Possibly the operating system is proper operation and does not indicate a malfunction. No picture and power • Your TV has a protective mode in case there is in the standby mode. Try another channel. • Adjust the contrast and...or double images No power Items to Check and Actions to follow • This may be adjusted. This may improve the picture. • Check that the TV is correctly positoned, the receiver box controls will not install • Adjust the contrast, color, tint and brightness setting....
User Manual
Page 35
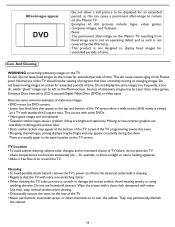
.... Note: The permanent after -image to remain on the Plasma TV. TV Location • To avoid cabinet warping, cabinet color changes, and an increased chance of the TV screen if the TV programming covers this can be left on the Plasma screen. Wipe the screen with a clean cloth dampened with ...uneven aging of still pictures include logos, video games, computer images, and Teletext. Do not use of the TV should involve viewing of programs that appear at the bottom of TV failure, do , subtle "ghost" images can cause a permanent after -image on the Plasma TV resulting from the electrical...
.... Note: The permanent after -image to remain on the Plasma TV. TV Location • To avoid cabinet warping, cabinet color changes, and an increased chance of the TV screen if the TV programming covers this can be left on the Plasma screen. Wipe the screen with a clean cloth dampened with ...uneven aging of still pictures include logos, video games, computer images, and Teletext. Do not use of the TV should involve viewing of programs that appear at the bottom of TV failure, do , subtle "ghost" images can cause a permanent after -image on the Plasma TV resulting from the electrical...


