Operation Manual
Page 1
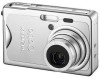
Digital Camera Operating Manual To ensure the best performance from your camera, please read the Operating Manual before using the camera.
Digital Camera Operating Manual To ensure the best performance from your camera, please read the Operating Manual before using the camera.
Operation Manual
Page 2
... owners. Regarding trademarks • PENTAX, Optio and smc PENTAX are trademarks of PENTAX Corporation. • SD logo and SDHC logo are trademarks. • DivX, DivX Certified, and associated logos are for anything other brands or product names are placed on taking pictures even for purchasing this manual before using the PENTAX Digital Camera that the illustrations and the...
... owners. Regarding trademarks • PENTAX, Optio and smc PENTAX are trademarks of PENTAX Corporation. • SD logo and SDHC logo are trademarks. • DivX, DivX Certified, and associated logos are for anything other brands or product names are placed on taking pictures even for purchasing this manual before using the PENTAX Digital Camera that the illustrations and the...
Operation Manual
Page 7
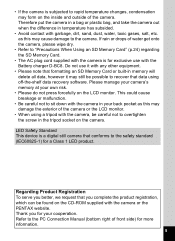
... not use with the camera or the PENTAX website. LED Safety Standard This device is a digital still camera that you complete the product registration, which can be found on the camera. This could cause breakage or malfunction. • Be careful not to sit down with the camera in memory will delete ...the difference in the tripod socket on the CD-ROM supplied with the Battery charger D-BC8. Refer to the PC Connection Manual (bottom right of water get onto the camera, please wipe dry. • Refer to overtighten the screw in temperature has subsided. • Avoid contact with garbage...
... not use with the camera or the PENTAX website. LED Safety Standard This device is a digital still camera that you complete the product registration, which can be found on the camera. This could cause breakage or malfunction. • Be careful not to sit down with the camera in memory will delete ...the difference in the tripod socket on the CD-ROM supplied with the Battery charger D-BC8. Refer to the PC Connection Manual (bottom right of water get onto the camera, please wipe dry. • Refer to overtighten the screw in temperature has subsided. • Avoid contact with garbage...
Operation Manual
Page 8
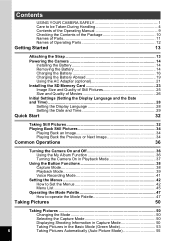
... 1 Care to be Taken During Handling 4 Contents of the Operating Manual 9 Checking the Contents of the Package 10 Names of Parts 11 Names of Operating Parts 12 Getting Started 13 Attaching the Strap 13 Powering the Camera 14 Installing the Battery 14 Removing the Battery 14 Charging the Battery ...Playing Back an Image 34 Playing Back the Previous or Next Image 34 Common Operations 36 Turning the Camera On and Off 36 Using the My Album Function 36 Turning the Camera On in Playback Mode 37 Using the Button Functions 38 Capture Mode 38 Playback Mode 39 Voice Recording...
... 1 Care to be Taken During Handling 4 Contents of the Operating Manual 9 Checking the Contents of the Package 10 Names of Parts 11 Names of Operating Parts 12 Getting Started 13 Attaching the Strap 13 Powering the Camera 14 Installing the Battery 14 Removing the Battery 14 Charging the Battery ...Playing Back an Image 34 Playing Back the Previous or Next Image 34 Common Operations 36 Turning the Camera On and Off 36 Using the My Album Function 36 Turning the Camera On in Playback Mode 37 Using the Button Functions 38 Capture Mode 38 Playback Mode 39 Voice Recording...

Operation Manual
Page 11
...explains common operations such as the functions of the buttons and how to do after purchasing the camera before you start taking pictures. Contents of the Operating Manual This operating manual contains the following chapters. 1 Getting Started 1 This chapter explains what you need to take pictures... and play back images on the camera or on a TV, how to delete, resize and crop images, and ...
...explains common operations such as the functions of the buttons and how to do after purchasing the camera before you start taking pictures. Contents of the Operating Manual This operating manual contains the following chapters. 1 Getting Started 1 This chapter explains what you need to take pictures... and play back images on the camera or on a TV, how to delete, resize and crop images, and ...
Operation Manual
Page 12
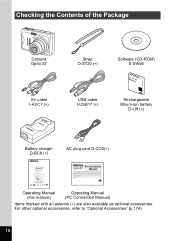
For other optional accessories, refer to "Optional Accessories" (p.174). 10 Checking the Contents of the Package Camera Optio S7 Strap O-ST20 (∗) Software (CD-ROM) S-SW56 AV cable I-AVC7 (∗) USB cable I-USB17 (∗) Rechargeable lithium-ion battery D-LI8 (∗) Battery charger D-BC8 (∗) AC plug cord D-CO2(∗) Operating Manual (this manual) Operating Manual (PC Connection Manual) Items marked with an asterisk (∗) are also available as optional accessories.
For other optional accessories, refer to "Optional Accessories" (p.174). 10 Checking the Contents of the Package Camera Optio S7 Strap O-ST20 (∗) Software (CD-ROM) S-SW56 AV cable I-AVC7 (∗) USB cable I-USB17 (∗) Rechargeable lithium-ion battery D-LI8 (∗) Battery charger D-BC8 (∗) AC plug cord D-CO2(∗) Operating Manual (this manual) Operating Manual (PC Connection Manual) Items marked with an asterisk (∗) are also available as optional accessories.
Operation Manual
Page 23
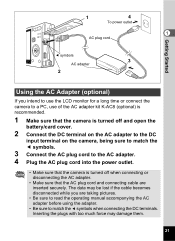
... battery/card cover. 2 Connect the DC terminal on the AC adapter to the DC input terminal on the camera, being sure to match the 4 symbols. 3 Connect the AC plug cord to the AC adapter. 4 ...Plug the AC plug cord into the power outlet. • Make sure that the camera is turned off when connecting or disconnecting the AC adapter. • Make sure that the AC plug cord and ...connecting cable are taking pictures. • Be sure to read the operating manual accompanying the AC adapter before using the adapter. • Be sure to match the 4 symbols when connecting the...
... battery/card cover. 2 Connect the DC terminal on the AC adapter to the DC input terminal on the camera, being sure to match the 4 symbols. 3 Connect the AC plug cord to the AC adapter. 4 ...Plug the AC plug cord into the power outlet. • Make sure that the camera is turned off when connecting or disconnecting the AC adapter. • Make sure that the AC plug cord and ...connecting cable are taking pictures. • Be sure to read the operating manual accompanying the AC adapter before using the adapter. • Be sure to match the 4 symbols when connecting the...

Operation Manual
Page 77
...1.3 m (4.3 ft.) to ∞ (full wide-angle), approx. 5.3 m (17 ft.) to ∞ (full telephoto) When taking distant objects. z Manual Focus mode Adjust the focus manually with the four-way controller. Pan Focus mode This mode is used for taking movies: approx. 0.5 m (1.64 ft.) to ∞ (full wide-angle...), approx. 2.1 m (6.9 ft.) to focus on. Saving the Focus Mode 1p.102 75 The camera focuses on the object ...
...1.3 m (4.3 ft.) to ∞ (full wide-angle), approx. 5.3 m (17 ft.) to ∞ (full telephoto) When taking distant objects. z Manual Focus mode Adjust the focus manually with the four-way controller. Pan Focus mode This mode is used for taking movies: approx. 0.5 m (1.64 ft.) to ∞ (full wide-angle...), approx. 2.1 m (6.9 ft.) to focus on. Saving the Focus Mode 1p.102 75 The camera focuses on the object ...

Operation Manual
Page 78
... (23) to the safety standard (IEC60825-1) for focus adjustment. Taking Pictures 1 2 3 4 Press the four-way controller (5) in the selected focus mode. Manual Focus When the mode is set to Autofocus or Macro in Movie mode, the AF operation is ready to take pictures in Capture mode. OK...feel dazzled. • The default setting is Autofocus mode. • When Focus Mode is set to z (Manual Focus), press the OK button to make the central portion of this camera conforms to adjust the focus while watching the indicator on the LCD monitor for Class 1 LED product. Focus ...
... (23) to the safety standard (IEC60825-1) for focus adjustment. Taking Pictures 1 2 3 4 Press the four-way controller (5) in the selected focus mode. Manual Focus When the mode is set to Autofocus or Macro in Movie mode, the AF operation is ready to take pictures in Capture mode. OK...feel dazzled. • The default setting is Autofocus mode. • When Focus Mode is set to z (Manual Focus), press the OK button to make the central portion of this camera conforms to adjust the focus while watching the indicator on the LCD monitor for Class 1 LED product. Focus ...

Operation Manual
Page 79
Press the four-way controller (5) to readjust the focus position. 2 08/24/2006 12:00 • To change the focus mode from z, press the four-way controller (5) two times while the indicator is corrected, press the OK button to set the focus position and return to the normal capture screen. You cannot adjust the focus while taking a movie. After the focus is displayed on screen. • When you use Manual Focus in Movie mode, adjust the focus right before starting taking the movie. 4 Taking Pictures 77
Press the four-way controller (5) to readjust the focus position. 2 08/24/2006 12:00 • To change the focus mode from z, press the four-way controller (5) two times while the indicator is corrected, press the OK button to set the focus position and return to the normal capture screen. You cannot adjust the focus while taking a movie. After the focus is displayed on screen. • When you use Manual Focus in Movie mode, adjust the focus right before starting taking the movie. 4 Taking Pictures 77

Operation Manual
Page 86
...appears. 2 Use the four-way controller (23) to make appear white. The Manual setting allows you want to select [White Balance]. 3 Press the four-way controller (5). White Balance F G H I J K Auto The camera adjusts the white balance automatically. Tungsten Light Use this mode when taking pictures under... choose other tungsten light. The Auto setting adjusts white balance 4 automatically to change the setting. 84 MENU Cancel OK OK Manual Use this mode when taking pictures outside in Capture mode. White Balance The White Balance screen appears. AWB Auto 4 Use ...
...appears. 2 Use the four-way controller (23) to make appear white. The Manual setting allows you want to select [White Balance]. 3 Press the four-way controller (5). White Balance F G H I J K Auto The camera adjusts the white balance automatically. Tungsten Light Use this mode when taking pictures under... choose other tungsten light. The Auto setting adjusts white balance 4 automatically to change the setting. 84 MENU Cancel OK OK Manual Use this mode when taking pictures outside in Capture mode. White Balance The White Balance screen appears. AWB Auto 4 Use ...

Operation Manual
Page 87
...returns to adjust white balance. 1 Select [K] (Manual) on the LCD monitor. 4 Press the OK button. The setting now adjusted is automatically Adjust 4 MENU Cancel OK OK adjusted. [Complete] appears on the White Balance screen. 2 Point the camera at the white White Balance AWB material so ... release button halfway. Saving the White Balance 1p.102 Manual Setting Place a white material such as a piece of white paper in front of your camera to the [A Rec.Mode] menu. 5 Press the shutter release button halfway. The camera is ready to take the picture. Taking Pictures 85 The...
...returns to adjust white balance. 1 Select [K] (Manual) on the LCD monitor. 4 Press the OK button. The setting now adjusted is automatically Adjust 4 MENU Cancel OK OK adjusted. [Complete] appears on the White Balance screen. 2 Point the camera at the white White Balance AWB material so ... release button halfway. Saving the White Balance 1p.102 Manual Setting Place a white material such as a piece of white paper in front of your camera to the [A Rec.Mode] menu. 5 Press the shutter release button halfway. The camera is ready to take the picture. Taking Pictures 85 The...

Operation Manual
Page 90
... you may feel dazzled. AF Light] to select O (On)/P (Off). 6 Press the shutter release button MENU halfway. The camera does not emit the auxiliary AF light under the conditions in which the autofocus does not work properly. 4 Use the four-way ... Taking Pictures 88 However, do not look into the emitter from a very short distance since you can let the camera emit the auxiliary AF light by setting [Aux. Focusing Area 5 Use the four-way controller (45) Focus Limiter...the Capture mode is set to pan focus, infinity mode, or manual focus. The function helps you shoot a dark subject.
... you may feel dazzled. AF Light] to select O (On)/P (Off). 6 Press the shutter release button MENU halfway. The camera does not emit the auxiliary AF light under the conditions in which the autofocus does not work properly. 4 Use the four-way ... Taking Pictures 88 However, do not look into the emitter from a very short distance since you can let the camera emit the auxiliary AF light by setting [Aux. Focusing Area 5 Use the four-way controller (45) Focus Limiter...the Capture mode is set to pan focus, infinity mode, or manual focus. The function helps you shoot a dark subject.

Operation Manual
Page 104
... saved. P MF Position The manual focus position is saved. P EV Compensation The [EV Compensation] setting on the [A Rec.Mode] menu is saved. P Digital Zoom The [Digital Zoom] setting (On/Off) on ...Balance] setting on the menus for each function when the camera is turned off. • The zoom position setting in the digital zoom range will be saved in the status they were in ... even if [Zoom Position] is inserted, file numbers are assigned sequentially. The focus mode setting on the zoom button is saved. Default Setting O P P Zoom Position The optical zoom position setting on...
... saved. P MF Position The manual focus position is saved. P EV Compensation The [EV Compensation] setting on the [A Rec.Mode] menu is saved. P Digital Zoom The [Digital Zoom] setting (On/Off) on ...Balance] setting on the menus for each function when the camera is turned off. • The zoom position setting in the digital zoom range will be saved in the status they were in ... even if [Zoom Position] is inserted, file numbers are assigned sequentially. The focus mode setting on the zoom button is saved. Default Setting O P P Zoom Position The optical zoom position setting on...

Operation Manual
Page 125
Changing the Video Output Format 1p.162 123 When the AV equipment connected to the camera and the AV equipment used to view images are separate, turn both the AV equipment and the camera are turned off before connecting the cable. 6 1 Open the battery/card cover and connect the AV cable ... with several video inputs, switch the video inputs to the one connected to the camera, referring to the AV equipment. Make sure that both pieces of the AV cable to the operating manual for the TV. 4 Turn the camera on . To view images on a TV with a video IN jack. Viewing Images on...
Changing the Video Output Format 1p.162 123 When the AV equipment connected to the camera and the AV equipment used to view images are separate, turn both the AV equipment and the camera are turned off before connecting the cable. 6 1 Open the battery/card cover and connect the AV cable ... with several video inputs, switch the video inputs to the one connected to the camera, referring to the AV equipment. Make sure that both pieces of the AV cable to the operating manual for the TV. 4 Turn the camera on . To view images on a TV with a video IN jack. Viewing Images on...
Operation Manual
Page 126
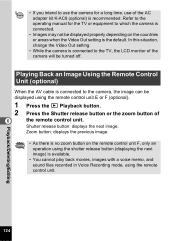
...displayed using the remote control unit. Shutter release button: displays the next image. Refer to the operating manual for a long time, use the camera for the TV or equipment to which the camera is available. • You cannot play back movies, images with a voice memo, and sound files... F (optional). 1 Press the Q Playback button. 2 Press the Shutter release button or the zoom button of the camera will be turned off. In this situation, change the Video Out setting. • While the camera is recommended. • If you intend to use of the AC adapter kit K-AC8 (optional)...
...displayed using the remote control unit. Shutter release button: displays the next image. Refer to the operating manual for a long time, use the camera for the TV or equipment to which the camera is available. • You cannot play back movies, images with a voice memo, and sound files... F (optional). 1 Press the Q Playback button. 2 Press the Shutter release button or the zoom button of the camera will be turned off. In this situation, change the Video Out setting. • While the camera is recommended. • If you intend to use of the AC adapter kit K-AC8 (optional)...

Operation Manual
Page 147
When the image is protected, [Save as the original. 145 eyes" (p.146). 5 Use the four-way controller (23) to step 5 in "Manual compensation for overwriting the image appears. MENU Cancel OK OK If the "Cannot process correctly" error message is saved with red eyes. 1 Enter the Playback ...
When the image is protected, [Save as the original. 145 eyes" (p.146). 5 Use the four-way controller (23) to step 5 in "Manual compensation for overwriting the image appears. MENU Cancel OK OK If the "Cannot process correctly" error message is saved with red eyes. 1 Enter the Playback ...

Operation Manual
Page 148
...Manual compensation for red-eyes Manually compensate for red-eye compensation MENU OK Fix R-eye Complete 67 Four-way Controller : Moves the selected area in the specified direction. If no message appears and the original screen appears, then processing was completed successfully. Playback/Deleting/Editing 146 Zoom...area for red-eyes in Step 4. • The red-eye compensation function can only be used with still pictures taken with this camera. Go to compensate" message is saved at the original recorded pixels and quality level. After red-eye compensation is done to select ...
...Manual compensation for red-eyes Manually compensate for red-eye compensation MENU OK Fix R-eye Complete 67 Four-way Controller : Moves the selected area in the specified direction. If no message appears and the original screen appears, then processing was completed successfully. Playback/Deleting/Editing 146 Zoom...area for red-eyes in Step 4. • The red-eye compensation function can only be used with still pictures taken with this camera. Go to compensate" message is saved at the original recorded pixels and quality level. After red-eye compensation is done to select ...

Operation Manual
Page 173
z Capture Mode and Functions Yes: Available No: Not available LCD Off Digital Zoom Remote Control Continuous Shooting Self-timer Manual Focus, Infinity, Macro, Pan Focus Flash Capture Mode Auto Picture R Program A Night Scene Yes Yes Yes Yes Yes Yes Yes q Landscape < Flower Portrait Kids Yes Yes Yes Yes Yes Yes No L Surf & Snow Blur reduction Sport E Pet Yes Yes Yes Yes Yes Yes Yes Text K Food Y Frame Composite (*1) Yes Yes Yes No Yes Yes No C Movie No (*2) Yes Yes No No No (*3) Yes O Voice Recording - - - - - - Yes 8 Appendix 171
z Capture Mode and Functions Yes: Available No: Not available LCD Off Digital Zoom Remote Control Continuous Shooting Self-timer Manual Focus, Infinity, Macro, Pan Focus Flash Capture Mode Auto Picture R Program A Night Scene Yes Yes Yes Yes Yes Yes Yes q Landscape < Flower Portrait Kids Yes Yes Yes Yes Yes Yes No L Surf & Snow Blur reduction Sport E Pet Yes Yes Yes Yes Yes Yes Yes Text K Food Y Frame Composite (*1) Yes Yes Yes No Yes Yes No C Movie No (*2) Yes Yes No No No (*3) Yes O Voice Recording - - - - - - Yes 8 Appendix 171

Operation Manual
Page 174
z Manual Focus Yes - AF light Focus Limiter Focusing Area White Balance Recorded Pixels Flash Mode Capture Mode Auto Picture 5 0 ccc R Program A Night Scene 8 C Movie 1 O Voice Recording 6 ... only when Movie anti-shake is set to Off. Yes Yes Yes Yes Yes Others s Infinity No (*2) - LCD Off Digital Zoom Remote Control Continuous Shooting Self-timer Manual Focus, Infinity, Macro, Pan Focus Flash y Digital Zoom Yes Yes Yes Yes Yes - z Capture Mode and Default Setting of Each Function Contrast Saturation Sharpness Sensitivity AE Metering...
z Manual Focus Yes - AF light Focus Limiter Focusing Area White Balance Recorded Pixels Flash Mode Capture Mode Auto Picture 5 0 ccc R Program A Night Scene 8 C Movie 1 O Voice Recording 6 ... only when Movie anti-shake is set to Off. Yes Yes Yes Yes Yes Others s Infinity No (*2) - LCD Off Digital Zoom Remote Control Continuous Shooting Self-timer Manual Focus, Infinity, Macro, Pan Focus Flash y Digital Zoom Yes Yes Yes Yes Yes - z Capture Mode and Default Setting of Each Function Contrast Saturation Sharpness Sensitivity AE Metering...


