Operation Manual
Page 2
... cameras, printers and software help photographers to produce images more faithful to connect the printer and digital camera directly, using the PENTAX Digital Camera that the camera may not function correctly when used in surroundings such as SD memory cards in this manual are different from the actual product. • Both SD memory cards and SDHC memory cards are not PRINT Image Matching III compliant. All Rights Reserved. Red Eye software 2003-2006 FotoNation Inc. In Camera Red Eye -- Regarding copyrights Images...
... cameras, printers and software help photographers to produce images more faithful to connect the printer and digital camera directly, using the PENTAX Digital Camera that the camera may not function correctly when used in surroundings such as SD memory cards in this manual are different from the actual product. • Both SD memory cards and SDHC memory cards are not PRINT Image Matching III compliant. All Rights Reserved. Red Eye software 2003-2006 FotoNation Inc. In Camera Red Eye -- Regarding copyrights Images...
Operation Manual
Page 8
... Operating Parts 12 Getting Started 13 Attaching the Strap 13 Powering the Camera 14 Installing the Battery 14 Removing the Battery 14 Charging the Battery 16 Charging the Battery Abroad 19 Using the AC Adapter (optional 21 Installing the SD Memory Card 23 Image Size and Quality of Still Pictures 25 Size and Quality of Movies 26 Initial Settings (Setting the Display Language and the Date and Time) ...28 Setting the Display Language 28 Setting the Date and Time 29 Quick Start 32 Taking Still Pictures 32 Playing Back Still Pictures...
... Operating Parts 12 Getting Started 13 Attaching the Strap 13 Powering the Camera 14 Installing the Battery 14 Removing the Battery 14 Charging the Battery 16 Charging the Battery Abroad 19 Using the AC Adapter (optional 21 Installing the SD Memory Card 23 Image Size and Quality of Still Pictures 25 Size and Quality of Movies 26 Initial Settings (Setting the Display Language and the Date and Time) ...28 Setting the Display Language 28 Setting the Date and Time 29 Quick Start 32 Taking Still Pictures 32 Playing Back Still Pictures...
Operation Manual
Page 9
... Still Pictures 82 Adjusting the White Balance 84 Selecting the Autofocus Settings 86 Setting the Light Metering Mode to Determine the Exposure 89 Setting the Sensitivity 90 Setting the Exposure (EV Compensation 91 Selecting the Settings for Taking Movies 92 Setting the Instant Review Time 95 Setting the Green Button 96 Setting the Image Sharpness 99 Setting the Color Saturation 100 Setting the Image Contrast 101 Saving the Settings 102 Saving the Menu Items (Memory 102 Recording and Playback of Sound 104 Recording Sound (Voice Recording Mode 104 Playing Back Sound...
... Still Pictures 82 Adjusting the White Balance 84 Selecting the Autofocus Settings 86 Setting the Light Metering Mode to Determine the Exposure 89 Setting the Sensitivity 90 Setting the Exposure (EV Compensation 91 Selecting the Settings for Taking Movies 92 Setting the Instant Review Time 95 Setting the Green Button 96 Setting the Image Sharpness 99 Setting the Color Saturation 100 Setting the Image Contrast 101 Saving the Settings 102 Saving the Menu Items (Memory 102 Recording and Playback of Sound 104 Recording Sound (Voice Recording Mode 104 Playing Back Sound...
Operation Manual
Page 10
... Red-eye Compensation 145 Adding a Frame (Frame Composite 147 Copying Files 149 Settings 151 Camera Settings 151 Setting Up the Start-up Screen 151 Formatting an SD Memory Card or the Built-in Memory 152 Changing the Sound Settings 153 Changing the Date and Time 156 Setting the World Time 158 Changing the Display Language 160 Changing the Image Folder Name 161 Changing the USB Connection Mode 162 Changing the Video Output Format 162 Adjusting the Brightness of the LCD Monitor 163 Setting Power Saving 163 Setting Auto Power Off 164 Setting the Guide Display 164 Resetting...
... Red-eye Compensation 145 Adding a Frame (Frame Composite 147 Copying Files 149 Settings 151 Camera Settings 151 Setting Up the Start-up Screen 151 Formatting an SD Memory Card or the Built-in Memory 152 Changing the Sound Settings 153 Changing the Date and Time 156 Setting the World Time 158 Changing the Display Language 160 Changing the Image Folder Name 161 Changing the USB Connection Mode 162 Changing the Video Output Format 162 Adjusting the Brightness of the LCD Monitor 163 Setting Power Saving 163 Setting Auto Power Off 164 Setting the Guide Display 164 Resetting...

Operation Manual
Page 26
Write-protect switch Setting the switch to [LOCK] protects the existing data by prohibiting recording of new data, deletion of existing data or formatting of important data on your SD Memory Card should ensure that have compatibility with a write-protect switch. Inquiries on the card compatibility can also be answered by the user. (2) when the SD Memory Card is exposed to static electricity or electrical interference. • Avoid using or storing the card in direct sunlight or where it may...
Write-protect switch Setting the switch to [LOCK] protects the existing data by prohibiting recording of new data, deletion of existing data or formatting of important data on your SD Memory Card should ensure that have compatibility with a write-protect switch. Inquiries on the card compatibility can also be answered by the user. (2) when the SD Memory Card is exposed to static electricity or electrical interference. • Avoid using or storing the card in direct sunlight or where it may...
Operation Manual
Page 30
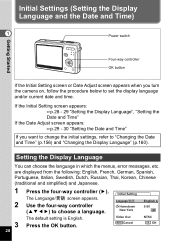
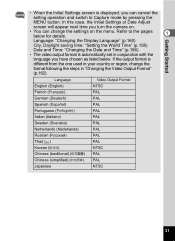
... below to "Changing the Date and Time" (p.156) and "Changing the Display Language" (p.160). Initial Settings (Setting the Display Language and the Date and Time) 1 Power switch Getting Started Four-way controller OK button If the Initial Setting screen or Date Adjust screen appears when you want to change the initial settings, refer to set the display language and/or current date and time. The Language/ screen appears. The default setting is English. Press the OK button. Initial Setting Hometown New York Video Out MENU Cancel English 0:00 ODSFTF...
... below to "Changing the Date and Time" (p.156) and "Changing the Display Language" (p.160). Initial Settings (Setting the Display Language and the Date and Time) 1 Power switch Getting Started Four-way controller OK button If the Initial Setting screen or Date Adjust screen appears when you want to change the initial settings, refer to set the display language and/or current date and time. The Language/ screen appears. The default setting is English. Press the OK button. Initial Setting Hometown New York Video Out MENU Cancel English 0:00 ODSFTF...
Operation Manual
Page 33
... region, change the settings on the menu. Refer to Capture mode by pressing the MENU button. In this case, the Initial Settings or Date Adjust screen will appear next time you have chosen as listed below for details. 1 Language: "Changing the Display Language" (p.160) City, Daylight saving time: "Setting the World Time" (p.158) Date and Time: "Changing the Date and Time" (p.156) • The video output format is automatically set in conjunction with the language you turn the camera on...
... region, change the settings on the menu. Refer to Capture mode by pressing the MENU button. In this case, the Initial Settings or Date Adjust screen will appear next time you have chosen as listed below for details. 1 Language: "Changing the Display Language" (p.160) City, Daylight saving time: "Setting the World Time" (p.158) Date and Time: "Changing the Date and Time" (p.156) • The video output format is automatically set in conjunction with the language you turn the camera on...
Operation Manual
Page 34
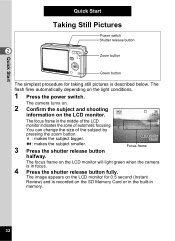
... of the LCD monitor indicates the zone of the subject by pressing the zoom button. The image appears on the LCD monitor for taking still pictures is in focus. 4 Press the shutter release button fully. x : makes the subject bigger. Quick Start Quick Start Taking Still Pictures Power switch Shutter release button 2 Zoom button Green button The simplest procedure for 0.5 second (Instant Review) and is recorded on the light conditions. 1 Press the power switch. The flash fires automatically depending on the SD Memory Card or...
... of the LCD monitor indicates the zone of the subject by pressing the zoom button. The image appears on the LCD monitor for taking still pictures is in focus. 4 Press the shutter release button fully. x : makes the subject bigger. Quick Start Quick Start Taking Still Pictures Power switch Shutter release button 2 Zoom button Green button The simplest procedure for 0.5 second (Instant Review) and is recorded on the light conditions. 1 Press the power switch. The flash fires automatically depending on the SD Memory Card or...
Operation Manual
Page 38
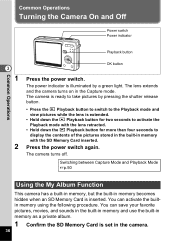
.... • Hold down the Q Playback button for more than four seconds to the Playback mode and view pictures while the lens is inserted. The camera turns off. Switching between Capture Mode and Playback Mode 1p.50 Using the My Album Function This camera has a built-in memory, but the built-in the camera. 36 Common Operations Turning the Camera On and Off Power switch Power indicator Common Operations Playback button 3 1 2 OK button Press the power switch. The camera is ready to take pictures by a green light.
.... • Hold down the Q Playback button for more than four seconds to the Playback mode and view pictures while the lens is inserted. The camera turns off. Switching between Capture Mode and Playback Mode 1p.50 Using the My Album Function This camera has a built-in memory, but the built-in the camera. 36 Common Operations Turning the Camera On and Off Power switch Power indicator Common Operations Playback button 3 1 2 OK button Press the power switch. The camera is ready to take pictures by a green light.
Operation Manual
Page 44
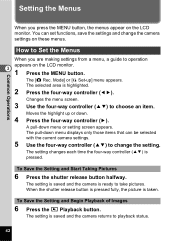
... on the LCD monitor. 3 1 Press the MENU button. Changes the menu screen. 3 Use the four-way controller (23) to playback status. 42 A pull-down . 4 Press the four-way controller (5). The pull-down menu displays only those items that can set functions, save the settings and change the setting. To Save the Setting and Begin Playback of Images 6 Press the Q Playback button. To Save the Setting and Start Taking Pictures 6 Press the shutter release button halfway. Mode] or [H Set-up or down menu or setting screen appears...
... on the LCD monitor. 3 1 Press the MENU button. Changes the menu screen. 3 Use the four-way controller (23) to playback status. 42 A pull-down . 4 Press the four-way controller (5). The pull-down menu displays only those items that can set functions, save the settings and change the setting. To Save the Setting and Begin Playback of Images 6 Press the Q Playback button. To Save the Setting and Start Taking Pictures 6 Press the shutter release button halfway. Mode] or [H Set-up or down menu or setting screen appears...
Operation Manual
Page 52
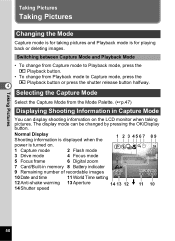
... Q Playback button or press the shutter release button halfway. 4 Selecting the Capture Mode Select the Capture Mode from the Mode Palette. (1p.47) Displaying Shooting Information in memory 8 Battery indicator 9 Remaining number of recordable images 1/160 F2.7 10 Date and time 11 World Time setting 08/24/2006 12:00 12 Anti-shake warning 13 Aperture 14 Shutter speed 14 13 12 11 10 50 Normal Display Shooting information is displayed when the 1 2 3 4567 89 power...
... Q Playback button or press the shutter release button halfway. 4 Selecting the Capture Mode Select the Capture Mode from the Mode Palette. (1p.47) Displaying Shooting Information in memory 8 Battery indicator 9 Remaining number of recordable images 1/160 F2.7 10 Date and time 11 World Time setting 08/24/2006 12:00 12 Anti-shake warning 13 Aperture 14 Shutter speed 14 13 12 11 10 50 Normal Display Shooting information is displayed when the 1 2 3 4567 89 power...

Operation Manual
Page 104
... is saved. P White Balance The [White Balance] setting on the b button is saved. The drive mode setting (gj, etc.) selected using the four-way controller (2) is saved. Saving the Settings Taking Pictures Saving the Menu Items (Memory) You can choose whether you want the set to O(On) in [Memory]. 102 Item 4 Flash Mode Drive Mode Focus Mode Description The flash mode setting on the [A Rec.Mode] menu is saved. P Digital Zoom The [Digital Zoom] setting (On/Off) on the [A Rec.Mode] menu is saved. If you select P (Off), the settings will be reset...
... is saved. P White Balance The [White Balance] setting on the b button is saved. The drive mode setting (gj, etc.) selected using the four-way controller (2) is saved. Saving the Settings Taking Pictures Saving the Menu Items (Memory) You can choose whether you want the set to O(On) in [Memory]. 102 Item 4 Flash Mode Drive Mode Focus Mode Description The flash mode setting on the [A Rec.Mode] menu is saved. P Digital Zoom The [Digital Zoom] setting (On/Off) on the [A Rec.Mode] menu is saved. If you select P (Off), the settings will be reset...
Operation Manual
Page 126
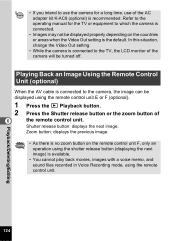
Playing Back an Image Using the Remote Control Unit (optional) When the AV cable is available. • You cannot play back movies, images with a voice memo, and sound files recorded in Voice Recording mode, using the remote control unit E or F (optional). 1 Press the Q Playback button. 2 Press the Shutter release button or the zoom button of 6 the remote control unit. Zoom button: displays the previous image. • As there is no zoom button on the countries or areas when the Video Out setting is the...
Playing Back an Image Using the Remote Control Unit (optional) When the AV cable is available. • You cannot play back movies, images with a voice memo, and sound files recorded in Voice Recording mode, using the remote control unit E or F (optional). 1 Press the Q Playback button. 2 Press the Shutter release button or the zoom button of 6 the remote control unit. Zoom button: displays the previous image. • As there is no zoom button on the countries or areas when the Video Out setting is the...
Operation Manual
Page 130
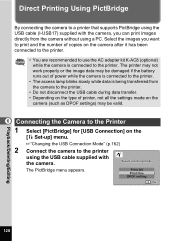
... printer. • You are recommended to use the AC adapter kit K-AC8 (optional) while the camera is being transferred from the camera without using a PC. Select the images you want to print and the number of copies on the [B Set-up] menu. 1"Changing the USB Connection Mode" (p.162) 2 Connect the camera to the printer using the USB cable supplied with the camera, you can print images directly from the camera to the printer. • Do not disconnect the USB cable during data transfer...
... printer. • You are recommended to use the AC adapter kit K-AC8 (optional) while the camera is being transferred from the camera without using a PC. Select the images you want to print and the number of copies on the [B Set-up] menu. 1"Changing the USB Connection Mode" (p.162) 2 Connect the camera to the printer using the USB cable supplied with the camera, you can print images directly from the camera to the printer. • Do not disconnect the USB cable during data transfer...

Operation Manual
Page 160
... taking pictures abroad. 1 Select [World Time] on the map. 6 Use the four-way controller (45) to change the Destination city. Select time 3 Use the four-way controller (45) 12:00AM Destination 7 to select X (Destination) or W New York DST Hometown DST (Hometown). Mode Recorded Pixels Quality Level White Balance AF Setting AE Metering Sensitivity 7M AWB Auto MENU Exit Setting the World Time The date and time selected in "Initial Settings (Setting the Display Language...
... taking pictures abroad. 1 Select [World Time] on the map. 6 Use the four-way controller (45) to change the Destination city. Select time 3 Use the four-way controller (45) 12:00AM Destination 7 to select X (Destination) or W New York DST Hometown DST (Hometown). Mode Recorded Pixels Quality Level White Balance AF Setting AE Metering Sensitivity 7M AWB Auto MENU Exit Setting the World Time The date and time selected in "Initial Settings (Setting the Display Language...
Operation Manual
Page 171
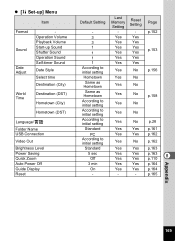
... to initial setting Yes No p.162 Standard Yes Yes p.163 5 sec Off Yes Yes p.163 8 Yes Yes p.110 3 min Yes Yes p.164 On Yes Yes p.164 - - - z [B Set-up] Menu Item Format Sound Date Adjust World Time Operation Volume Playback Volume Start-up Sound Shutter Sound Operation Sound Self-timer Sound Date Style Select time Destination (City) Destination (DST) Hometown (City) Hometown (DST) Language/ Folder Name USB Connection Video Out Brightness Level Power Saving Quick Zoom Auto Power Off Guide Display Reset Default Setting Last Memory Setting Reset Setting Page...
... to initial setting Yes No p.162 Standard Yes Yes p.163 5 sec Off Yes Yes p.163 8 Yes Yes p.110 3 min Yes Yes p.164 On Yes Yes p.164 - - - z [B Set-up] Menu Item Format Sound Date Adjust World Time Operation Volume Playback Volume Start-up Sound Shutter Sound Operation Sound Self-timer Sound Date Style Select time Destination (City) Destination (DST) Hometown (City) Hometown (DST) Language/ Folder Name USB Connection Video Out Brightness Level Power Saving Quick Zoom Auto Power Off Guide Display Reset Default Setting Last Memory Setting Reset Setting Page...
Operation Manual
Page 177
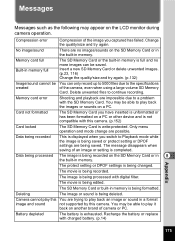
... not compatible with digital filter. Messages Messages such as the following may be able to play back an image or sound in a format image and sound not supported by this camera. (p.152) Card locked The SD Memory Card is being edited. Delete unwanted files to a problem with charged battery. (p.14) Appendix 175 Memory card error Shooting and playback are trying to play back the images or sounds on the SD Memory Card or in 8 the built-in memory. Battery depleted The battery is being recorded...
... not compatible with digital filter. Messages Messages such as the following may be able to play back an image or sound in a format image and sound not supported by this camera. (p.152) Card locked The SD Memory Card is being edited. Delete unwanted files to a problem with charged battery. (p.14) Appendix 175 Memory card error Shooting and playback are trying to play back the images or sounds on the SD Memory Card or in 8 the built-in memory. Battery depleted The battery is being recorded...
Operation Manual
Page 179
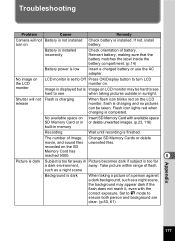
... when taking a picture of battery. The number of flash. recorded on the SD Memory Card has reached 5000. 8 Picture is dark Subject is too far away in sunlight. Take picture within range of image, Change SD Memory Cards or delete movie, and sound files unwanted files. Set to A mode to turn on battery. Battery is set to Off Press OK/Display button to ensure both person and background are clear. (p.50, 61) Appendix 177 No image on the LCD monitor LCD...
... when taking a picture of battery. The number of flash. recorded on the SD Memory Card has reached 5000. 8 Picture is dark Subject is too far away in sunlight. Take picture within range of image, Change SD Memory Cards or delete movie, and sound files unwanted files. Set to A mode to turn on battery. Battery is set to Off Press OK/Display button to ensure both person and background are clear. (p.50, 61) Appendix 177 No image on the LCD monitor LCD...

Operation Manual
Page 183
... + Red-eye, Soft Flash Effective Range Wide: Approx. 0.15 m - Self-timer. 2-sec. Time Function World Time setting for 71 cities (28 time zones) Power Supply Rechargeable lithium-ion battery D-LI8, AC adapter (optional) Battery Life Approx. 180 images (at the standard output sensitivity of Auto) Drive Modes Single-frame, Continuous, 10-sec. In/Out Port USB/AV terminal (PC communication type USB 2.0, high-speedcompatible), external power supply terminal Video Output Format NTSC, PAL Size...
... + Red-eye, Soft Flash Effective Range Wide: Approx. 0.15 m - Self-timer. 2-sec. Time Function World Time setting for 71 cities (28 time zones) Power Supply Rechargeable lithium-ion battery D-LI8, AC adapter (optional) Battery Life Approx. 180 images (at the standard output sensitivity of Auto) Drive Modes Single-frame, Continuous, 10-sec. In/Out Port USB/AV terminal (PC communication type USB 2.0, high-speedcompatible), external power supply terminal Video Output Format NTSC, PAL Size...
Operation Manual
Page 190
... 11 Symbols 9 T Take Movies 62 Take Still Pictures 32 Tele 73 Text 60 Tripod socket 11 TV 123 U USB Connection 162 USB/AV terminal 11 V Video Output Format 162 Voice Memo 107 Voice Recording Mode . . . . . 41, 104 W White Balance 84 Wide 73 World Time 158 Write-protect switch 24 Z Zoom 73 Zoom button 12, 38, 39 Zoom Display 109 Appendix N Night Scene Mode 61 Nine-Image Display 113 Number of recordable images . . . 18 O OK button 12, 38 Operating Time 18 Optional...
... 11 Symbols 9 T Take Movies 62 Take Still Pictures 32 Tele 73 Text 60 Tripod socket 11 TV 123 U USB Connection 162 USB/AV terminal 11 V Video Output Format 162 Voice Memo 107 Voice Recording Mode . . . . . 41, 104 W White Balance 84 Wide 73 World Time 158 Write-protect switch 24 Z Zoom 73 Zoom button 12, 38, 39 Zoom Display 109 Appendix N Night Scene Mode 61 Nine-Image Display 113 Number of recordable images . . . 18 O OK button 12, 38 Operating Time 18 Optional...


