Operation Manual
Page 2
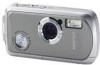
... functions are not available on the recorded image. However, this camera • There is a possibility that recorded data may be erased or that are not PRINT Image Matching III compliant. To users of this has no effect on printers that the camera may not function correctly when used in the LCD display is 99.99% or better, you should be aware that are for buying the PENTAX OptioWP Digital Camera...
... functions are not available on the recorded image. However, this camera • There is a possibility that recorded data may be erased or that are not PRINT Image Matching III compliant. To users of this has no effect on printers that the camera may not function correctly when used in the LCD display is 99.99% or better, you should be aware that are for buying the PENTAX OptioWP Digital Camera...
Operation Manual
Page 8
... Powering the Camera 22 Charging the Battery 22 Installing the Battery 23 Charging the Battery Abroad 25 Using the AC Adapter 27 Installing the SD Memory Card 28 Recorded Pixels and Quality Level of Still Pictures 31 Recorded Pixels and Frame Rate of Movies 33 Turning the Camera On and Off 34 Playback Only Mode 35 Initial Settings 36 Setting the Display Language 37 Setting the Date and Time 38 Quick Start 40 Taking Still Pictures 40 Playing Back Still Pictures 42 Playing Back Images 42 Playing...
... Powering the Camera 22 Charging the Battery 22 Installing the Battery 23 Charging the Battery Abroad 25 Using the AC Adapter 27 Installing the SD Memory Card 28 Recorded Pixels and Quality Level of Still Pictures 31 Recorded Pixels and Frame Rate of Movies 33 Turning the Camera On and Off 34 Playback Only Mode 35 Initial Settings 36 Setting the Display Language 37 Setting the Date and Time 38 Quick Start 40 Taking Still Pictures 40 Playing Back Still Pictures 42 Playing Back Images 42 Playing...
Operation Manual
Page 9
... Zoom 74 Setting the Exposure (EV Compensation 76 Using the Self-timer 77 Taking a Series of Pictures (Continuous Shooting Mode/High Speed Continuous Shooting Mode 78 Displaying Shooting Information in Capture Mode 79 Setting the Shooting Functions 81 Selecting the Focus Mode 81 Selecting the Flash Mode 83 Selecting the Recorded Pixels 85 Selecting the Quality Level 87 Adjusting the White Balance 88 Setting the Autofocus Conditions 90 Setting the Sensitivity 92 Setting the Instant Review Time (Instant Review 93 Setting the Image Sharpness (Sharpness 94 Setting the Color...
... Zoom 74 Setting the Exposure (EV Compensation 76 Using the Self-timer 77 Taking a Series of Pictures (Continuous Shooting Mode/High Speed Continuous Shooting Mode 78 Displaying Shooting Information in Capture Mode 79 Setting the Shooting Functions 81 Selecting the Focus Mode 81 Selecting the Flash Mode 83 Selecting the Recorded Pixels 85 Selecting the Quality Level 87 Adjusting the White Balance 88 Setting the Autofocus Conditions 90 Setting the Sensitivity 92 Setting the Instant Review Time (Instant Review 93 Setting the Image Sharpness (Sharpness 94 Setting the Color...
Operation Manual
Page 10
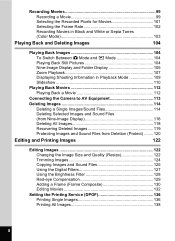
... 102 Recording Movies in Black and White or Sepia Tones (Color Mode 103 Playing Back and Deleting Images 104 Playing Back Images 104 To Switch Between A Mode and Q Mode 104 Playing Back Still Pictures 104 Nine-Image Display and Folder Display 105 Zoom Playback 107 Displaying Shooting Information in Playback Mode 109 Slideshow 110 Playing Back Movies 112 Playing Back a Movie 112 Connecting the Camera to AV Equipment 113 Deleting Images 114 Deleting a Single Images/Sound Files 114 Deleting Selected Images and Sound Files (from Nine-Image Display 116 Deleting All Images 118...
... 102 Recording Movies in Black and White or Sepia Tones (Color Mode 103 Playing Back and Deleting Images 104 Playing Back Images 104 To Switch Between A Mode and Q Mode 104 Playing Back Still Pictures 104 Nine-Image Display and Folder Display 105 Zoom Playback 107 Displaying Shooting Information in Playback Mode 109 Slideshow 110 Playing Back Movies 112 Playing Back a Movie 112 Connecting the Camera to AV Equipment 113 Deleting Images 114 Deleting a Single Images/Sound Files 114 Deleting Selected Images and Sound Files (from Nine-Image Display 116 Deleting All Images 118...
Operation Manual
Page 11
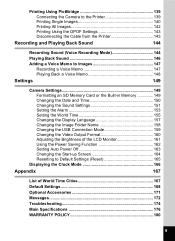
... the Sound Settings 151 Setting the Alarm 153 Setting the World Time 155 Changing the Display Language 157 Changing the Image Folder Name 158 Changing the USB Connection Mode 159 Changing the Video Output Format 160 Adjusting the Brightness of the LCD Monitor 161 Using the Power Saving Function 162 Setting Auto Power Off 163 Changing the Start-up Screen 164 Resetting to Default Settings (Reset 165 Displaying the Clock Mode 166 Appendix 167 List of World Time Cities 167 Default Settings 168 Optional Accessories 171 Messages 172 Troubleshooting 174 Main Specifications...
... the Sound Settings 151 Setting the Alarm 153 Setting the World Time 155 Changing the Display Language 157 Changing the Image Folder Name 158 Changing the USB Connection Mode 159 Changing the Video Output Format 160 Adjusting the Brightness of the LCD Monitor 161 Using the Power Saving Function 162 Setting Auto Power Off 163 Changing the Start-up Screen 164 Resetting to Default Settings (Reset 165 Displaying the Clock Mode 166 Appendix 167 List of World Time Cities 167 Default Settings 168 Optional Accessories 171 Messages 172 Troubleshooting 174 Main Specifications...
Operation Manual
Page 13
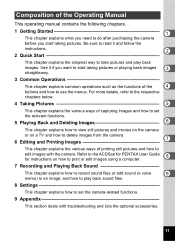
... to take pictures and play back sound files. 8 Settings This chapter explains how to set the relevant functions. 5 Playing Back and Deleting Images 6 This chapter explains how to view still pictures and movies on the camera or on how to print or edit images using a computer. 7 Recording and Playing Back Sound This chapter explains how to record sound files or add sound (a voice 9 memo) to an image, and how to play back images. Composition of the Operating Manual This operating manual contains...
... to take pictures and play back sound files. 8 Settings This chapter explains how to set the relevant functions. 5 Playing Back and Deleting Images 6 This chapter explains how to view still pictures and movies on the camera or on how to print or edit images using a computer. 7 Recording and Playing Back Sound This chapter explains how to record sound files or add sound (a voice 9 memo) to an image, and how to play back images. Composition of the Operating Manual This operating manual contains...

Operation Manual
Page 21
... Camera shake icon (p.79) 6 Digital zoom icon (p.74) 7 Memory status (p.34) + : Built-in memory (without card) a : SD Memory Card r : Card is write-protected 8 Remaining image storage capacity 9 Battery indicator (p.24) 10 Key lock icon (p.64) 11 Focus frame (p.40) 12 EV compensation (p.76) 13 Date and time (p.38) 14 World time setting (p.155) Full Display in Still Picture Capture Mode 38 1 2 3 1/250 4 F5.6 5M 5 6 7 ISO 200 8 +1.0 9 1 Bright portion (blinks red) 2 Dark portion (blinks yellow) 3 Shutter speed 4 Aperture 5 Recorded pixels (p.85) 6 Quality (p.87) 7 White balance (p.88...
... Camera shake icon (p.79) 6 Digital zoom icon (p.74) 7 Memory status (p.34) + : Built-in memory (without card) a : SD Memory Card r : Card is write-protected 8 Remaining image storage capacity 9 Battery indicator (p.24) 10 Key lock icon (p.64) 11 Focus frame (p.40) 12 EV compensation (p.76) 13 Date and time (p.38) 14 World time setting (p.155) Full Display in Still Picture Capture Mode 38 1 2 3 1/250 4 F5.6 5M 5 6 7 ISO 200 8 +1.0 9 1 Bright portion (blinks red) 2 Dark portion (blinks yellow) 3 Shutter speed 4 Aperture 5 Recorded pixels (p.85) 6 Quality (p.87) 7 White balance (p.88...
Operation Manual
Page 22
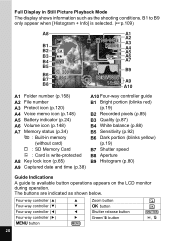
... Folder number (p.158) A2 File number A3 Protect icon (p.120) A4 Voice memo icon (p.148) A5 Battery indicator (p.24) A6 Volume icon (p.148) A7 Memory status (p.34) + : Built-in Still Picture Playback Mode The display shows information such as shown below. The buttons are indicated as the shooting conditions. Four-way controller (2) Four-way controller (3) Four-way controller (4) Four-way controller (5) 3 button 2 3 4 5 MENU Zoom button 4 button Shutter release button Green/i button OK SHUTTER |, i 20 B1 to B9 only appear when [Histogram + Info] is write-protected...
... Folder number (p.158) A2 File number A3 Protect icon (p.120) A4 Voice memo icon (p.148) A5 Battery indicator (p.24) A6 Volume icon (p.148) A7 Memory status (p.34) + : Built-in Still Picture Playback Mode The display shows information such as shown below. The buttons are indicated as the shooting conditions. Four-way controller (2) Four-way controller (3) Four-way controller (4) Four-way controller (5) 3 button 2 3 4 5 MENU Zoom button 4 button Shutter release button Green/i button OK SHUTTER |, i 20 B1 to B9 only appear when [Histogram + Info] is write-protected...
Operation Manual
Page 26
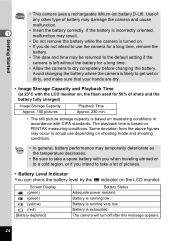
... on the LCD monitor. Screen Display w (green) x (green) y (yellow) z (red) [Battery depleted] Battery Status Adequate power remains. Battery is left without the battery for 50% of pictures. • Battery Level Indicator You can check the battery level by the w indicator on , the flash used for a long time. • Allow the camera to the default setting if the camera is exhausted. Use of any other type of battery may be returned to dry completely before changing the battery.
... on the LCD monitor. Screen Display w (green) x (green) y (yellow) z (red) [Battery depleted] Battery Status Adequate power remains. Battery is left without the battery for 50% of pictures. • Battery Level Indicator You can check the battery level by the w indicator on , the flash used for a long time. • Allow the camera to the default setting if the camera is exhausted. Use of any other type of battery may be returned to dry completely before changing the battery.
Operation Manual
Page 30
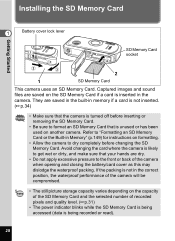
..., and make sure that is not in the camera. If the packing is unused or has been used on another camera. Installing the SD Memory Card Getting Started 1 Battery cover lock lever SD Memory Card socket 2 1 SD Memory Card This camera uses an SD Memory Card. Captured images and sound files are dry. • Do not apply excessive pressure to format an SD Memory Card that your hands are saved on the SD Memory Card if a card is...
..., and make sure that is not in the camera. If the packing is unused or has been used on another camera. Installing the SD Memory Card Getting Started 1 Battery cover lock lever SD Memory Card socket 2 1 SD Memory Card This camera uses an SD Memory Card. Captured images and sound files are dry. • Do not apply excessive pressure to format an SD Memory Card that your hands are saved on the SD Memory Card if a card is...

Operation Manual
Page 32
... not used for a long time, the data on the LCD monitor when the card is write-protected. • Care should be taken when removing the SD Memory Card immediately after using the camera, as the card may be hot. • Do not remove the SD Memory Card or turn the camera off while data is being saved to the card, images or sound files are taking movies even when there is connected to a computer with the USB cable, as...
... not used for a long time, the data on the LCD monitor when the card is write-protected. • Care should be taken when removing the SD Memory Card immediately after using the camera, as the card may be hot. • Do not remove the SD Memory Card or turn the camera off while data is being saved to the card, images or sound files are taking movies even when there is connected to a computer with the USB cable, as...
Operation Manual
Page 39
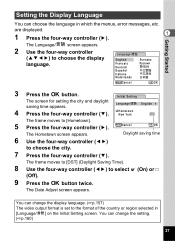
... the four-way controller (3). Daylight saving time 6 Use the four-way controller (45) to choose the display language. English Francais Deutsch Español Italiano Nederlands Svenska MENU Cancel OK OK 3 Press the 4 button. English 4 Press the four-way controller (3). The Date Adjust screen appears. Initial Setting The screen for setting the city and daylight saving time appears. MENU Cancel OK OK The Hometown screen appears. You can change the setting. (1p.160) 37...
... the four-way controller (3). Daylight saving time 6 Use the four-way controller (45) to choose the display language. English Francais Deutsch Español Italiano Nederlands Svenska MENU Cancel OK OK 3 Press the 4 button. English 4 Press the four-way controller (3). The Date Adjust screen appears. Initial Setting The screen for setting the city and daylight saving time appears. MENU Cancel OK OK The Hometown screen appears. You can change the setting. (1p.160) 37...
Operation Manual
Page 42
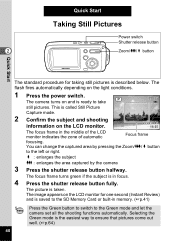
... Still Picture Capture mode. 2 Confirm the subject and shooting information on and is saved to the SD Memory Card or built-in the middle of the LCD monitor indicates the zone of automatic Focus frame focusing. The image appears on the LCD monitor for taking still pictures is the easiest way to take still pictures. The flash fires automatically depending on the light conditions. 1 Press the power switch. 38 The camera turns...
... Still Picture Capture mode. 2 Confirm the subject and shooting information on and is saved to the SD Memory Card or built-in the middle of the LCD monitor indicates the zone of automatic Focus frame focusing. The image appears on the LCD monitor for taking still pictures is the easiest way to take still pictures. The flash fires automatically depending on the light conditions. 1 Press the power switch. 38 The camera turns...
Operation Manual
Page 52
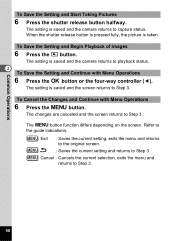
..., the picture is saved and the camera returns to the original screen. MENU Exit : Saves the current setting, exits the menu and returns to playback status. 3 To Save the Setting and Continue with Menu Operations 6 Press the 3 button. Common Operations To Save the Setting and Start Taking Pictures 6 Press the shutter release button halfway. The 3 button function differs depending on the screen. The setting is taken. To Cancel the Changes and Continue with Menu Operations 6 Press the 4 button or the four-way controller (4).
..., the picture is saved and the camera returns to the original screen. MENU Exit : Saves the current setting, exits the menu and returns to playback status. 3 To Save the Setting and Continue with Menu Operations 6 Press the 3 button. Common Operations To Save the Setting and Start Taking Pictures 6 Press the shutter release button halfway. The 3 button function differs depending on the screen. The setting is taken. To Cancel the Changes and Continue with Menu Operations 6 Press the 4 button or the four-way controller (4).
Operation Manual
Page 54
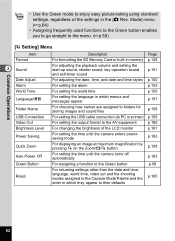
... mode For displaying an image at maximum magnification by pressing y on the Zoom/f/y button. Mode] menu. (1p.64) • Assigning frequently used functions to the Green button enables you to go straight to the menu. (1p.58) [u Setting] Menu Item Format 3 Sound Date Adjust Alarm World Time Language/ Folder Name USB Connection Video Out Brightness Level Power Saving Quick Zoom Auto Power Off Green Button Reset Description For formatting the SD Memory Card or built-in memory For adjusting the playback volume and setting the start-up sound, shutter sound, key operation sound and self-timer...
... mode For displaying an image at maximum magnification by pressing y on the Zoom/f/y button. Mode] menu. (1p.64) • Assigning frequently used functions to the Green button enables you to go straight to the menu. (1p.58) [u Setting] Menu Item Format 3 Sound Date Adjust Alarm World Time Language/ Folder Name USB Connection Video Out Brightness Level Power Saving Quick Zoom Auto Power Off Green Button Reset Description For formatting the SD Memory Card or built-in memory For adjusting the playback volume and setting the start-up sound, shutter sound, key operation sound and self-timer...

Operation Manual
Page 63
... Operations Playback Mode Palette Item Description Page u Slideshow For playing back recorded images one after another p.110 n Resize For changing the recorded pixels and quality of images p.122 o Trimming For deleting the unneeded part of a picture p.124 For copying images and sound files from the p Image/Sound Copy built-in memory to the SD Memory Card and vice versa p.125 s Image Rotation D Digital Filter q Brightness Filter For rotating still pictures For changing the color of still pictures For changing...
... Operations Playback Mode Palette Item Description Page u Slideshow For playing back recorded images one after another p.110 n Resize For changing the recorded pixels and quality of images p.122 o Trimming For deleting the unneeded part of a picture p.124 For copying images and sound files from the p Image/Sound Copy built-in memory to the SD Memory Card and vice versa p.125 s Image Rotation D Digital Filter q Brightness Filter For rotating still pictures For changing the color of still pictures For changing...
Operation Manual
Page 90
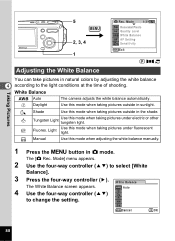
... button in the shade. K Manual Use this mode when taking pictures outside in A mode. The [A Rec. Mode] menu appears. 2 Use the four-way controller (23) to change the setting. Auto 4 Use the four-way controller (23) to select [White Balance]. 3 Press the four-way controller (5). I Tungsten Light Use this mode when taking pictures outside in natural colors by adjusting the white balance 4 according to the light conditions at the time of shooting. G Daylight Use this mode when taking pictures under electric or other tungsten light. White Balance F Auto The camera...
... button in the shade. K Manual Use this mode when taking pictures outside in A mode. The [A Rec. Mode] menu appears. 2 Use the four-way controller (23) to change the setting. Auto 4 Use the four-way controller (23) to select [White Balance]. 3 Press the four-way controller (5). I Tungsten Light Use this mode when taking pictures outside in natural colors by adjusting the white balance 4 according to the light conditions at the time of shooting. G Daylight Use this mode when taking pictures under electric or other tungsten light. White Balance F Auto The camera...

Operation Manual
Page 131
... protected images. 6 Press the 4 button. An error message appears in Step 4. • The red-eye compensation function can correct images where the flash has caused the subject to appear with red eyes. 1 Enter the Q mode and use the four-way controller (45) to choose the image you want to select [Overwrite] or [Save as]. Slideshow 1, 2, 3, 5 4, 6 MENU Guide OK OK Editing and Printing Images Red-eye Compensation You can only be used on movies or on images...
... protected images. 6 Press the 4 button. An error message appears in Step 4. • The red-eye compensation function can correct images where the flash has caused the subject to appear with red eyes. 1 Enter the Q mode and use the four-way controller (45) to choose the image you want to select [Overwrite] or [Save as]. Slideshow 1, 2, 3, 5 4, 6 MENU Guide OK OK Editing and Printing Images Red-eye Compensation You can only be used on movies or on images...
Operation Manual
Page 141
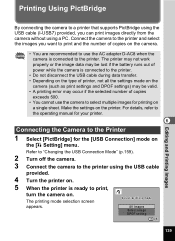
...can print images directly from the camera without using a PC. Refer to "Changing the USB Connection Mode" (p.159). 2 Turn off the camera. 3 Connect the camera to the printer using the USB cable provided. 4 Turn the printer on. 5 When the printer is ready to the printer. The printing mode selection screen Select printing mode appears. For details, refer to the operating manual for your printer. 6 Connecting the Camera to select multiple images for the [USB Connection] mode on the [u Setting] menu. Make the settings on the printer. All Images Select image DPOF setting OK...
...can print images directly from the camera without using a PC. Refer to "Changing the USB Connection Mode" (p.159). 2 Turn off the camera. 3 Connect the camera to the printer using the USB cable provided. 4 Turn the printer on. 5 When the printer is ready to the printer. The printing mode selection screen Select printing mode appears. For details, refer to the operating manual for your printer. 6 Connecting the Camera to select multiple images for the [USB Connection] mode on the [u Setting] menu. Make the settings on the printer. All Images Select image DPOF setting OK...
Operation Manual
Page 174
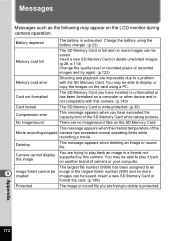
... 9 Image folder cannot be image in a format not supported by this camera. (p.149) Card locked The SD Memory Card is protected. Battery depleted The battery is full and no image/sound files on the LCD monitor during camera operation. Camera cannot display this image You are trying to play it back on the card using the battery charger. (p.22) Memory card full The SD Memory Card is exhausted. Insert a new SD Memory Card or delete unwanted images. (p.28, p.114) Change the quality level or recorded pixels of recorded images...
... 9 Image folder cannot be image in a format not supported by this camera. (p.149) Card locked The SD Memory Card is protected. Battery depleted The battery is full and no image/sound files on the LCD monitor during camera operation. Camera cannot display this image You are trying to play it back on the card using the battery charger. (p.22) Memory card full The SD Memory Card is exhausted. Insert a new SD Memory Card or delete unwanted images. (p.28, p.114) Change the quality level or recorded pixels of recorded images...

