Operation Manual
Page 1
Digital Camera Operating Manual To ensure the best performance from your camera, please read the Operating Manual before using the camera.
Digital Camera Operating Manual To ensure the best performance from your camera, please read the Operating Manual before using the camera.
Operation Manual
Page 2
Regarding trademarks • PENTAX and Optio are placed on printers that the camera may illuminate when they should be used under license. • This product supports PRINT Image Matching III. Copyright 2001 Seiko Epson Corporation. Although the ... crystal panel used in this manual are not available on taking pictures even for the direct printout of images. However, this manual before using this PENTAX Digital Camera. Regarding Product Registration In order to better serve you, we request that 0.01% or fewer of Seiko Epson Corporation. • All other than personal ...
Regarding trademarks • PENTAX and Optio are placed on printers that the camera may illuminate when they should be used under license. • This product supports PRINT Image Matching III. Copyright 2001 Seiko Epson Corporation. Although the ... crystal panel used in this manual are not available on taking pictures even for the direct printout of images. However, this manual before using this PENTAX Digital Camera. Regarding Product Registration In order to better serve you, we request that 0.01% or fewer of Seiko Epson Corporation. • All other than personal ...
Operation Manual
Page 8
...Pictures in a Selected Mode 48 Taking Pictures in the Basic Mode (Green Mode 48 Letting the Camera Choose the Optimal Shooting Mode (Auto Picture Mode 50 Letting the Camera Choose the Optimal Settings (Program Mode 51 Taking Pictures of People (Portrait Mode/Kids Mode 52 Taking... Mode 54 Taking Pictures of Dark Scenes (Night Scene Mode 55 Reducing Camera Shake and Blurring When Taking Pictures (Digital SR Mode 56 Framing Your Pictures (Frame Composite Mode 57 Taking Panoramic Pictures (Digital Panorama Mode 59 Taking Pictures with Customized Settings 61 Selecting the Recorded Pixels...
...Pictures in a Selected Mode 48 Taking Pictures in the Basic Mode (Green Mode 48 Letting the Camera Choose the Optimal Shooting Mode (Auto Picture Mode 50 Letting the Camera Choose the Optimal Settings (Program Mode 51 Taking Pictures of People (Portrait Mode/Kids Mode 52 Taking... Mode 54 Taking Pictures of Dark Scenes (Night Scene Mode 55 Reducing Camera Shake and Blurring When Taking Pictures (Digital SR Mode 56 Framing Your Pictures (Frame Composite Mode 57 Taking Panoramic Pictures (Digital Panorama Mode 59 Taking Pictures with Customized Settings 61 Selecting the Recorded Pixels...
Operation Manual
Page 9
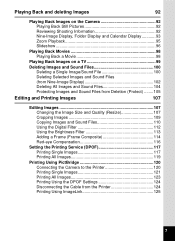
...107 Editing Images 107 Changing the Image Size and Quality (Resize 107 Cropping Images 109 Copying Images and Sound Files 110 Using the Digital Filter 112 Using the Brightness Filter 113 Adding a Frame (Frame Composite 114 Red-eye Compensation 116 Setting the Printing Service (DPOF 117... Printing Single Images 117 Printing All Images 119 Printing Using PictBridge 120 Connecting the Camera to the Printer 120 Printing Single Images 121 Printing All Images 123 Printing Using the DPOF Settings 124 Disconnecting the Cable from ...
...107 Editing Images 107 Changing the Image Size and Quality (Resize 107 Cropping Images 109 Copying Images and Sound Files 110 Using the Digital Filter 112 Using the Brightness Filter 113 Adding a Frame (Frame Composite 114 Red-eye Compensation 116 Setting the Printing Service (DPOF 117... Printing Single Images 117 Printing All Images 119 Printing Using PictBridge 120 Connecting the Camera to the Printer 120 Printing Single Images 121 Printing All Images 123 Printing Using the DPOF Settings 124 Disconnecting the Cable from ...
Operation Manual
Page 16
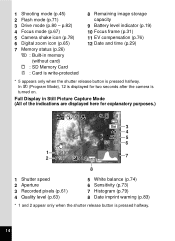
... and time (p.29) * 5 appears only when the shutter release button is pressed halfway. 14 p.82) 4 Focus mode (p.67) 5 Camera shake icon (p.78) 6 Digital zoom icon (p.65) 7 Memory status (p.26) + : Built-in Still Picture Capture Mode (All of the indications are displayed here for... two seconds after the camera is turned on. In R (Program Mode), 12 is displayed for explanatory purposes.) 38 1 1/250 2 F2.8 8M 3 4 5 ISO 80 6 + 1 . 0 DATE...
... and time (p.29) * 5 appears only when the shutter release button is pressed halfway. 14 p.82) 4 Focus mode (p.67) 5 Camera shake icon (p.78) 6 Digital zoom icon (p.65) 7 Memory status (p.26) + : Built-in Still Picture Capture Mode (All of the indications are displayed here for... two seconds after the camera is turned on. In R (Program Mode), 12 is displayed for explanatory purposes.) 38 1 1/250 2 F2.8 8M 3 4 5 ISO 80 6 + 1 . 0 DATE...
Operation Manual
Page 45
...the frame rate (number of frames per second) p.90 Color Mode For choosing a color mode for movies p.91 Digital Zoom For choosing whether to use the digital zoom function p.66 Instant Review For setting the Instant Review time p.84 Memory For choosing whether to save the ...set with the menus and provides descriptions of default settings in the Appendix "Default Settings" (p.146) to decide whether you want the settings returned to the defaults when the camera...
...the frame rate (number of frames per second) p.90 Color Mode For choosing a color mode for movies p.91 Digital Zoom For choosing whether to use the digital zoom function p.66 Instant Review For setting the Instant Review time p.84 Memory For choosing whether to save the ...set with the menus and provides descriptions of default settings in the Appendix "Default Settings" (p.146) to decide whether you want the settings returned to the defaults when the camera...
Operation Manual
Page 48
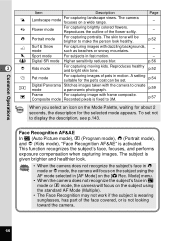
...For capturing portraits. Composite mode Recorded pixels is not looking toward the camera. 46 c Digital SR mode Higher sensitivity reduces blur. Reproduces healthy and bright skin tone. p.54 Digital Panorama mode Stitches images taken with the camera to 3M. p.52 E Pet mode For capturing images of the...the subject using the AF mode selected in fast motion. - p.56 3 Q Kids mode For capturing moving kids. To set . The camera focuses on the Mode Palette, waiting for about 2 seconds, the description for the pet's coat can be brighter to display the description,...
...For capturing portraits. Composite mode Recorded pixels is not looking toward the camera. 46 c Digital SR mode Higher sensitivity reduces blur. Reproduces healthy and bright skin tone. p.54 Digital Panorama mode Stitches images taken with the camera to 3M. p.52 E Pet mode For capturing images of the...the subject using the AF mode selected in fast motion. - p.56 3 Q Kids mode For capturing moving kids. To set . The camera focuses on the Mode Palette, waiting for about 2 seconds, the description for the pet's coat can be brighter to display the description,...
Operation Manual
Page 51
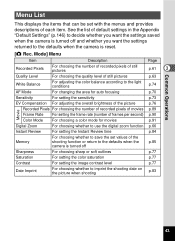
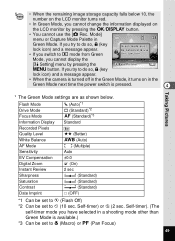
...Auto)*1 9 (Standard)*2 = (Standard)*3 Information Display Standard Recorded Pixels Quality Level White Balance 8M D (Better) F (Auto) AF Mode J (Multiple) Sensitivity Auto EV Compensation Digital Zoom ±0.0 O (On) Instant Review 2 sec Sharpness G (Standard) Saturation G (Standard) Contrast Date Imprint G (Standard) P (OFF) *1 Can be set to... is available.) *3 Can be canceled to do so, - (key lock icon) and a message appear. • When the camera is turned off in the Green Mode, it turns on the LCD monitor by pressing the Auto Picture 3 button. Self-timer) or...
...Auto)*1 9 (Standard)*2 = (Standard)*3 Information Display Standard Recorded Pixels Quality Level White Balance 8M D (Better) F (Auto) AF Mode J (Multiple) Sensitivity Auto EV Compensation Digital Zoom ±0.0 O (On) Instant Review 2 sec Sharpness G (Standard) Saturation G (Standard) Contrast Date Imprint G (Standard) P (OFF) *1 Can be set to... is available.) *3 Can be canceled to do so, - (key lock icon) and a message appear. • When the camera is turned off in the Green Mode, it turns on the LCD monitor by pressing the Auto Picture 3 button. Self-timer) or...
Operation Manual
Page 58
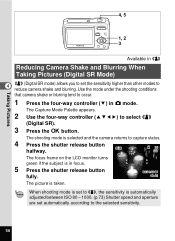
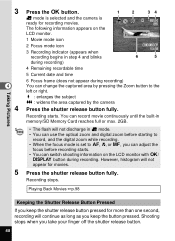
... or blurring tend to occur. 1 Press the four-way controller (3) in c Reducing Camera Shake and Blurring When Taking Pictures (Digital SR Mode) 4 c (Digital SR mode) allows you to set automatically according to reduce camera shake and blurring. When shooting mode is set to c, the sensitivity is automatically adjusted between ISO 80 - 1000. (p.73) Shutter... turns green if the subject is in focus. 5 Press the shutter release button fully. 08/01/2007 19:25 The picture is selected and the camera returns to select c (Digital SR). 3 Press the 4 button.
... or blurring tend to occur. 1 Press the four-way controller (3) in c Reducing Camera Shake and Blurring When Taking Pictures (Digital SR Mode) 4 c (Digital SR mode) allows you to set automatically according to reduce camera shake and blurring. When shooting mode is set to c, the sensitivity is automatically adjusted between ISO 80 - 1000. (p.73) Shutter... turns green if the subject is in focus. 5 Press the shutter release button fully. 08/01/2007 19:25 The picture is selected and the camera returns to select c (Digital SR). 3 Press the 4 button.
Operation Manual
Page 61
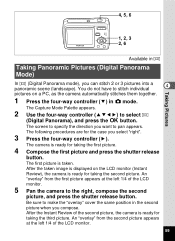
... select "right". 3 Press the four-way controller (5). After the Instant Review of the LCD monitor. 5 Pan the camera to make the "overlay" cover the same position in Taking Panoramic Pictures (Digital Panorama Mode) Taking Pictures In (Digital Panorama mode), you can stitch 2 or 3 pictures into a panoramic scene (landscape). An "overlay" from the first...
... select "right". 3 Press the four-way controller (5). After the Instant Review of the LCD monitor. 5 Pan the camera to make the "overlay" cover the same position in Taking Panoramic Pictures (Digital Panorama Mode) Taking Pictures In (Digital Panorama mode), you can stitch 2 or 3 pictures into a panoramic scene (landscape). An "overlay" from the first...

Operation Manual
Page 67
... pictures at a high magnification rate. • Pictures taken in the digital zoom range appear grainier than pictures taken in A mode. 38 4 x Tele : enlarges the subject w Wide : widens the area captured by the camera The zoom bar indicates the current status of magnification. Zoom bar Press ...x 38 Optical zoom Digital zoom range range • You are recommended to use a tripod to prevent camera shake when taking pictures at up to change the captured ...
... pictures at a high magnification rate. • Pictures taken in the digital zoom range appear grainier than pictures taken in A mode. 38 4 x Tele : enlarges the subject w Wide : widens the area captured by the camera The zoom bar indicates the current status of magnification. Zoom bar Press ...x 38 Optical zoom Digital zoom range range • You are recommended to use a tripod to prevent camera shake when taking pictures at up to change the captured ...
Operation Manual
Page 68
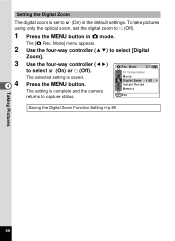
... using only the optical zoom, set to O (On) in A mode. Setting the Digital Zoom The digital zoom is complete and the camera returns to capture status. Mode] menu appears. Mode 2/3 0.0 EV Compensation Movie Digital Zoom QUICK I n s t a n t R e v i e w Memory MENU Exit Saving the Digital Zoom Function Setting 1p.85 Taking Pictures 66 Use the four-way controller...
... using only the optical zoom, set to O (On) in A mode. Setting the Digital Zoom The digital zoom is complete and the camera returns to capture status. Mode] menu appears. Mode 2/3 0.0 EV Compensation Movie Digital Zoom QUICK I n s t a n t R e v i e w Memory MENU Exit Saving the Digital Zoom Function Setting 1p.85 Taking Pictures 66 Use the four-way controller...
Operation Manual
Page 75
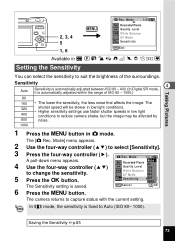
...automatically adjusted within the range of the surroundings. Taking Pictures Rec. Sensitivity 4 Auto Sensitivity is automatically adjusted between ISO 80 - 400. (In Digital SR mode, it is saved. AWB White Balance 200 AF Mode 400 5 Press the 4 button. In c mode, the sensitivity is fixed... [A Rec. The shutter speed will be slower in low light conditions. • Higher sensitivity settings use faster shutter speeds in low light conditions to reduce camera shake, but the image may be affected by noise. 1 Press the 3 button in b R A q < I i \ Q E Y Setting the Sensitivity You ...
...automatically adjusted within the range of the surroundings. Taking Pictures Rec. Sensitivity 4 Auto Sensitivity is automatically adjusted between ISO 80 - 400. (In Digital SR mode, it is saved. AWB White Balance 200 AF Mode 400 5 Press the 4 button. In c mode, the sensitivity is fixed... [A Rec. The shutter speed will be slower in low light conditions. • Higher sensitivity settings use faster shutter speeds in low light conditions to reduce camera shake, but the image may be affected by noise. 1 Press the 3 button in b R A q < I i \ Q E Y Setting the Sensitivity You ...
Operation Manual
Page 78
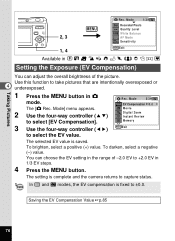
To darken, select a negative (-) value. The setting is complete and the camera returns to ±0.0. In s and b modes, the EV compensation is saved. Taking Pictures Rec. Mode] menu appears. Use this function to select [EV Compensation]. Movie 2 Use the four-way controller (23) Digital Zoom QUICK I i \ c Q E Y Setting the Exposure (EV Compensation) You can...
To darken, select a negative (-) value. The setting is complete and the camera returns to ±0.0. In s and b modes, the EV compensation is saved. Taking Pictures Rec. Mode] menu appears. Use this function to select [EV Compensation]. Movie 2 Use the four-way controller (23) Digital Zoom QUICK I i \ c Q E Y Setting the Exposure (EV Compensation) You can...
Operation Manual
Page 86
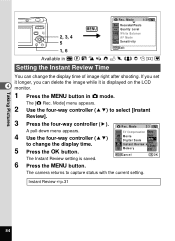
The [A Rec. Mode] menu appears. 2 Use the four-way controller (23) to capture status with the current setting. The camera returns to select [Instant Review]. 3 Press the four-way controller (5). Rec. Instant Review 1p.31 84 Mode 1/3 2, 3, 4 5 1, 6 MENU 8M ... AUTO Sensitivity MENU Exit Available in A mode. Mode 2/3 A pull-down menu appears. 0.0 EV Compensation 5sec 4 Use the four-way controller (23) Movie 3sec Digital Zoom 2sec to change the display time. 1sec QUICK I i \ c Q E Y Setting the Instant Review Time You can delete the image while it is saved...
The [A Rec. Mode] menu appears. 2 Use the four-way controller (23) to capture status with the current setting. The camera returns to select [Instant Review]. 3 Press the four-way controller (5). Rec. Instant Review 1p.31 84 Mode 1/3 2, 3, 4 5 1, 6 MENU 8M ... AUTO Sensitivity MENU Exit Available in A mode. Mode 2/3 A pull-down menu appears. 0.0 EV Compensation 5sec 4 Use the four-way controller (23) Movie 3sec Digital Zoom 2sec to change the display time. 1sec QUICK I i \ c Q E Y Setting the Instant Review Time You can delete the image while it is saved...
Operation Manual
Page 87
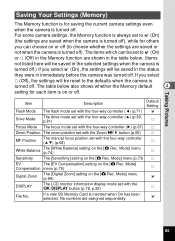
... whether the settings are assigned sequentially. Mode] Compensation menu (p.76) P Digital Zoom The [Digital Zoom] setting on the [A Rec. If you select O (On), the settings will be reset to O (On) or P (Off) in the Memory function are shown in immediately before the camera was turned off. Item Description Default Setting Flash Mode The...
... whether the settings are assigned sequentially. Mode] Compensation menu (p.76) P Digital Zoom The [Digital Zoom] setting on the [A Rec. If you select O (On), the settings will be reset to O (On) or P (Off) in the Memory function are shown in immediately before the camera was turned off. Item Description Default Setting Flash Mode The...
Operation Manual
Page 90
... recordable time 5 Current date and time 6 Focus frame (does not appear during recording) You can adjust the focus before starting to record, and the digital zoom while recording. • When the focus mode is ready for movies. Press the shutter release button fully. Recording stops. Playing Back Movies 1p.98...x : enlarges the subject w : widens the area captured by pressing the Zoom button to =, q, or \, you can change the captured area by the camera Press the shutter release button fully. Taking Pictures 3 4 4 5 Press the 4 button. 1 2 d mode is selected and the...
... recordable time 5 Current date and time 6 Focus frame (does not appear during recording) You can adjust the focus before starting to record, and the digital zoom while recording. • When the focus mode is ready for movies. Press the shutter release button fully. Recording stops. Playing Back Movies 1p.98...x : enlarges the subject w : widens the area captured by pressing the Zoom button to =, q, or \, you can change the captured area by the camera Press the shutter release button fully. Taking Pictures 3 4 4 5 Press the 4 button. 1 2 d mode is selected and the...
Operation Manual
Page 114
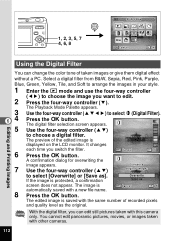
..., you can change the color tone of recorded pixels and quality level as the original. The digital filter selection screen appears. Use the four-way controller (23) to select D (Digital Filter). Select a digital filter from B&W, Sepia, Red, Pink, Purple, Blue, Green, Yellow, Tile, and Soft ...If the image is saved with a new file name. 8 Press the 4 button. You cannot edit panoramic pictures, movies, or images taken with this camera only. to edit. 2 Press the four-way controller (3). 3 64 5 The Playback Mode Palette appears. Press the 4 button. The edited image ...
..., you can change the color tone of recorded pixels and quality level as the original. The digital filter selection screen appears. Use the four-way controller (23) to select D (Digital Filter). Select a digital filter from B&W, Sepia, Red, Pink, Purple, Blue, Green, Yellow, Tile, and Soft ...If the image is saved with a new file name. 8 Press the 4 button. You cannot edit panoramic pictures, movies, or images taken with this camera only. to edit. 2 Press the four-way controller (3). 3 64 5 The Playback Mode Palette appears. Press the 4 button. The edited image ...
Operation Manual
Page 119
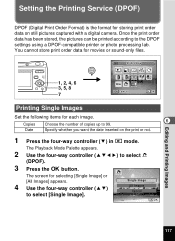
... image. 6 Copies Choose the number of copies up to select [Single Image]. Date Specify whether you want the date inserted on still pictures captured with a digital camera. Setting the Printing Service (DPOF) DPOF (Digital Print Order Format) is the format for movies or sound-only files.
... image. 6 Copies Choose the number of copies up to select [Single Image]. Date Specify whether you want the date inserted on still pictures captured with a digital camera. Setting the Printing Service (DPOF) DPOF (Digital Print Order Format) is the format for movies or sound-only files.
Operation Manual
Page 148
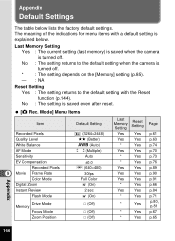
... with a default setting is explained below lists the factory default settings. No : The setting returns to the default setting when the camera is turned off . The meaning of the indications for menu items with the Reset function (p.144). Mode] Menu Items Item Recorded ...Pixels Quality Level White Balance AF Mode Sensitivity EV Compensation Recorded Pixels 9 Movie Frame Rate Color Mode Digital Zoom Instant Review Flash Mode Drive Mode Memory Focus Mode Zoom Position Default Setting 8M (3264×2448) D (Better) F (Auto) J (Multiple...
... with a default setting is explained below lists the factory default settings. No : The setting returns to the default setting when the camera is turned off . The meaning of the indications for menu items with the Reset function (p.144). Mode] Menu Items Item Recorded ...Pixels Quality Level White Balance AF Mode Sensitivity EV Compensation Recorded Pixels 9 Movie Frame Rate Color Mode Digital Zoom Instant Review Flash Mode Drive Mode Memory Focus Mode Zoom Position Default Setting 8M (3264×2448) D (Better) F (Auto) J (Multiple...


