Operation Manual
Page 9
...Sound Files (from Nine-Image Display 102 Deleting All Images and Sound Files 104 Protecting Images and Sound Files from Deletion (Protect) ........105 Editing and Printing Images 107 Editing Images 107 Changing the Image Size and Quality (Resize 107 Cropping Images 109 Copying Images and Sound Files 110 Using the Digital Filter 112 Using the Brightness Filter 113 Adding a Frame (Frame Composite 114 Red-eye Compensation 116 Setting the Printing Service (DPOF 117 Printing Single Images 117 Printing All Images 119 Printing Using PictBridge 120 Connecting the Camera to the Printer...
...Sound Files (from Nine-Image Display 102 Deleting All Images and Sound Files 104 Protecting Images and Sound Files from Deletion (Protect) ........105 Editing and Printing Images 107 Editing Images 107 Changing the Image Size and Quality (Resize 107 Cropping Images 109 Copying Images and Sound Files 110 Using the Digital Filter 112 Using the Brightness Filter 113 Adding a Frame (Frame Composite 114 Red-eye Compensation 116 Setting the Printing Service (DPOF 117 Printing Single Images 117 Printing All Images 119 Printing Using PictBridge 120 Connecting the Camera to the Printer...
Operation Manual
Page 10
... Changing the Sound Settings 132 Changing the Date and Time 134 Changing the Display Language 136 Changing the Image Folder Name 137 Changing the USB Connection Mode 138 Changing the Video Output Format 139 Adjusting the Brightness of the LCD Monitor 140 Using the Power Saving Function 141 Setting Auto Power Off 142 Setting the Guide Display 143 Resetting to Default Settings (Reset 144 Changing the Start-up Screen 145 Appendix 146 Default Settings 146 Functions Available for Each Shooting Mode 149 Optional Accessories 150 Messages 151 Troubleshooting 153 Main Specifications...
... Changing the Sound Settings 132 Changing the Date and Time 134 Changing the Display Language 136 Changing the Image Folder Name 137 Changing the USB Connection Mode 138 Changing the Video Output Format 139 Adjusting the Brightness of the LCD Monitor 140 Using the Power Saving Function 141 Setting Auto Power Off 142 Setting the Guide Display 143 Resetting to Default Settings (Reset 144 Changing the Start-up Screen 145 Appendix 146 Default Settings 146 Functions Available for Each Shooting Mode 149 Optional Accessories 150 Messages 151 Troubleshooting 153 Main Specifications...
Operation Manual
Page 11
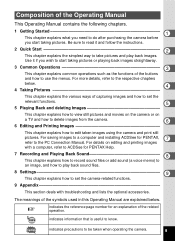
... to start taking pictures or playing back images straightaway. 3 Common Operations 3 This chapter explains common operations such as the functions of capturing images and how to set the relevant functions. 5 5 Playing Back and deleting Images This chapter explains how to view still pictures and movies on the camera or on editing and printing images with a computer, refer to ACDSee for PENTAX Help. 7 Recording and Playing Back Sound 8 This chapter explains how to record sound files or add sound (a voice...
... to start taking pictures or playing back images straightaway. 3 Common Operations 3 This chapter explains common operations such as the functions of capturing images and how to set the relevant functions. 5 5 Playing Back and deleting Images This chapter explains how to view still pictures and movies on the camera or on editing and printing images with a computer, refer to ACDSee for PENTAX Help. 7 Recording and Playing Back Sound 8 This chapter explains how to record sound files or add sound (a voice...
Operation Manual
Page 12
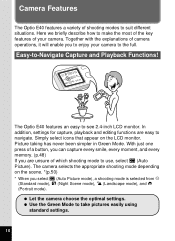
... Green Mode to -see 2.4-inch LCD monitor. The camera selects the appropriate shooting mode depending on the LCD monitor. Together with the explanations of shooting modes to suit different situations. The Optio E40 features an easy-to take pictures easily using standard settings. 10 Simply select icons that appear on the scene. *(p.50) * When you are easy to navigate. Easy-to-Navigate Capture and Playback Functions! Camera Features The Optio E40 features a variety of camera operations...
... Green Mode to -see 2.4-inch LCD monitor. The camera selects the appropriate shooting mode depending on the LCD monitor. Together with the explanations of shooting modes to suit different situations. The Optio E40 features an easy-to take pictures easily using standard settings. 10 Simply select icons that appear on the scene. *(p.50) * When you are easy to navigate. Easy-to-Navigate Capture and Playback Functions! Camera Features The Optio E40 features a variety of camera operations...
Operation Manual
Page 16
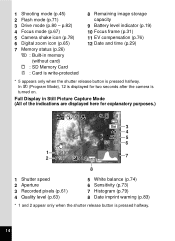
...) 4 Focus mode (p.67) 5 Camera shake icon (p.78) 6 Digital zoom icon (p.65) 7 Memory status (p.26) + : Built-in Still Picture Capture Mode (All of the indications are displayed here for two seconds after the camera is pressed halfway. Full Display in memory (without card) a : SD Memory Card r : Card is write-protected 8 Remaining image storage capacity 9 Battery level indicator (p.19) 10 Focus frame (p.31) 11 EV compensation (p.76) 12 Date and time (p.29) * 5 appears only when the shutter release button is turned on.
...) 4 Focus mode (p.67) 5 Camera shake icon (p.78) 6 Digital zoom icon (p.65) 7 Memory status (p.26) + : Built-in Still Picture Capture Mode (All of the indications are displayed here for two seconds after the camera is pressed halfway. Full Display in memory (without card) a : SD Memory Card r : Card is write-protected 8 Remaining image storage capacity 9 Battery level indicator (p.19) 10 Focus frame (p.31) 11 EV compensation (p.76) 12 Date and time (p.29) * 5 appears only when the shutter release button is turned on.
Operation Manual
Page 17
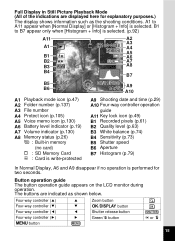
... Playback mode icon (p.47) A2 Folder number (p.137) A3 File number A4 Protect icon (p.105) A5 Voice memo icon (p.130) A6 Battery level indicator (p.19) A7 Volume indicator (p.130) A8 Memory status (p.26) + : Built-in Still Picture Playback Mode (All of the indications are indicated as the shooting conditions. Full Display in memory (no card) a : SD Memory Card r : Card is write-protected A9 Shooting date and time (p.29) A10 Four-way controller operation guide A11 Key lock icon (p.49) B1 Recorded pixels (p.61) B2 Quality level (p.63) B3 White balance...
... Playback mode icon (p.47) A2 Folder number (p.137) A3 File number A4 Protect icon (p.105) A5 Voice memo icon (p.130) A6 Battery level indicator (p.19) A7 Volume indicator (p.130) A8 Memory status (p.26) + : Built-in Still Picture Playback Mode (All of the indications are indicated as the shooting conditions. Full Display in memory (no card) a : SD Memory Card r : Card is write-protected A9 Shooting date and time (p.29) A10 Four-way controller operation guide A11 Key lock icon (p.49) B1 Recorded pixels (p.61) B2 Quality level (p.63) B3 White balance...
Operation Manual
Page 24
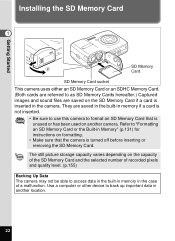
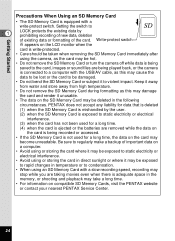
... a malfunction. Getting Started Installing the SD Memory Card 1 SD Memory Card SD Memory Card socket This camera uses either an SD Memory Card or an SDHC Memory Card. (Both cards are referred to as SD Memory Cards hereafter.) Captured images and sound files are saved in the built-in memory if a card is not inserted. • Be sure to use this camera to "Formatting an SD Memory Card or the Built-in Memory" (p.131) for instructions on formatting. • Make sure that...
... a malfunction. Getting Started Installing the SD Memory Card 1 SD Memory Card SD Memory Card socket This camera uses either an SD Memory Card or an SDHC Memory Card. (Both cards are referred to as SD Memory Cards hereafter.) Captured images and sound files are saved in the built-in memory if a card is not inserted. • Be sure to use this camera to "Formatting an SD Memory Card or the Built-in Memory" (p.131) for instructions on formatting. • Make sure that...
Operation Manual
Page 26
... recording speed, recording may stop while you are removed while the data on the card is being played back, or the camera is not used for data that is deleted (1) when the SD Memory Card is mishandled by prohibiting recording of new data, deletion of existing data or formatting of important data on compatible SD Memory Cards, visit the PENTAX website or contact your nearest PENTAX Service Center. 24 Write-protect switch r appears on the LCD monitor when the card is write-protected...
... recording speed, recording may stop while you are removed while the data on the card is being played back, or the camera is not used for data that is deleted (1) when the SD Memory Card is mishandled by prohibiting recording of new data, deletion of existing data or formatting of important data on compatible SD Memory Cards, visit the PENTAX website or contact your nearest PENTAX Service Center. 24 Write-protect switch r appears on the LCD monitor when the card is write-protected...
Operation Manual
Page 29
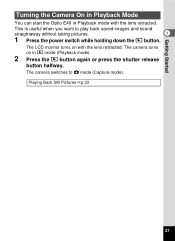
This is useful when you want to A mode (Capture mode). The camera switches to play back saved images and sound straightaway without taking pictures. 1 1 Press the power switch while holding down the Q button. The camera turns on with the lens retracted. The LCD monitor turns on in Playback mode with the lens retracted. Getting Started Turning the Camera On in Playback Mode You can start the Optio E40 in Q mode (Playback mode). 2 Press the Q button again or press the shutter release button halfway. Playing Back Still Pictures 1p.33 27
This is useful when you want to A mode (Capture mode). The camera switches to play back saved images and sound straightaway without taking pictures. 1 1 Press the power switch while holding down the Q button. The camera turns on with the lens retracted. The LCD monitor turns on in Playback mode with the lens retracted. Getting Started Turning the Camera On in Playback Mode You can start the Optio E40 in Q mode (Playback mode). 2 Press the Q button again or press the shutter release button halfway. Playing Back Still Pictures 1p.33 27
Operation Manual
Page 33
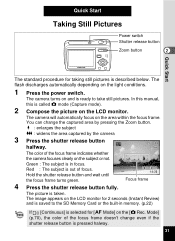
... focus frame turns green. 08/01/2007 14:25 Focus frame 4 Press the shutter release button fully. Quick Start Taking Still Pictures Power switch Shutter release button Zoom button 2 Quick Start The standard procedure for taking still pictures is taken. In this manual, this is saved to take still pictures. The color of focus. Red : The subject is out of the focus frame indicates whether the camera focuses clearly on the LCD monitor for 2 seconds (Instant Review) and is called A mode (Capture mode). 2 Compose the picture...
... focus frame turns green. 08/01/2007 14:25 Focus frame 4 Press the shutter release button fully. Quick Start Taking Still Pictures Power switch Shutter release button Zoom button 2 Quick Start The standard procedure for taking still pictures is taken. In this manual, this is saved to take still pictures. The color of focus. Red : The subject is out of the focus frame indicates whether the camera focuses clearly on the LCD monitor for 2 seconds (Instant Review) and is called A mode (Capture mode). 2 Compose the picture...
Operation Manual
Page 36
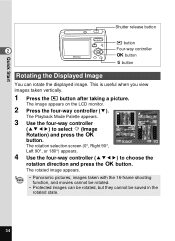
...) and press the 4 button. The Playback Mode Palette appears. 3 Use the four-way controller (2345) to choose the rotation direction and press the 4 button. The image appears on the LCD monitor. 2 Press the four-way controller (3). This is useful when you view images taken vertically. 1 Press the Q button after taking a picture. The rotated image appears. • Panoramic pictures, images taken with the 16-frame shooting function, and movies cannot be saved in the rotated...
...) and press the 4 button. The Playback Mode Palette appears. 3 Use the four-way controller (2345) to choose the rotation direction and press the 4 button. The image appears on the LCD monitor. 2 Press the four-way controller (3). This is useful when you view images taken vertically. 1 Press the Q button after taking a picture. The rotated image appears. • Panoramic pictures, images taken with the 16-frame shooting function, and movies cannot be saved in the rotated...
Operation Manual
Page 44
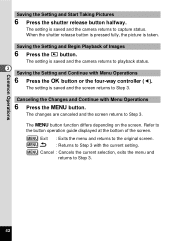
... current selection, exits the menu and returns to the original screen. MENU Exit : Exits the menu and returns to Step 3. 42 Canceling the Changes and Continue with the current setting. When the shutter release button is pressed fully, the picture is saved and the camera returns to the button operation guide displayed at the bottom of Images 6 Press the Q button. The 3 button function differs depending on the screen. The setting is taken.
... current selection, exits the menu and returns to the original screen. MENU Exit : Exits the menu and returns to Step 3. 42 Canceling the Changes and Continue with the current setting. When the shutter release button is pressed fully, the picture is saved and the camera returns to the button operation guide displayed at the bottom of Images 6 Press the Q button. The 3 button function differs depending on the screen. The setting is taken.
Operation Manual
Page 46
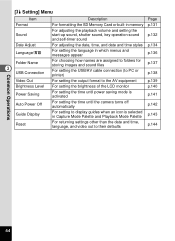
...] Menu Item Format Sound Date Adjust Language/ Folder Name 3 USB Connection Video Out Brightness Level Power Saving Auto Power Off Guide Display Reset Description For formatting the SD Memory Card or built-in memory For adjusting the playback volume and setting the start-up sound, shutter sound, key operation sound and self-timer sound For adjusting the date, time, and date and time styles For setting the language in which menus and messages appear For choosing how names are assigned to folders for storing images and sound files For setting the USB/AV cable connection (to PC or printer...
...] Menu Item Format Sound Date Adjust Language/ Folder Name 3 USB Connection Video Out Brightness Level Power Saving Auto Power Off Guide Display Reset Description For formatting the SD Memory Card or built-in memory For adjusting the playback volume and setting the start-up sound, shutter sound, key operation sound and self-timer sound For adjusting the date, time, and date and time styles For setting the language in which menus and messages appear For choosing how names are assigned to folders for storing images and sound files For setting the USB/AV cable connection (to PC or printer...
Operation Manual
Page 51
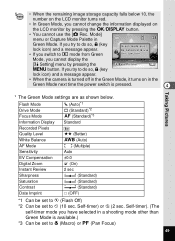
.... 4 Taking Pictures * The Green Mode settings are as shown below 10, the number on the LCD monitor turns red. • In Green Mode, you cannot change the information displayed on in Green Mode. Mode, you cannot display the [H Setting] menu by pressing the 4/W button. • You cannot use this function. If you try to do so, - (key lock icon) and a message appear. • If you switch to Q mode from Green 38 Green mode must be canceled to q (Macro) or 3 (Pan Focus) 49 Self-timer...
.... 4 Taking Pictures * The Green Mode settings are as shown below 10, the number on the LCD monitor turns red. • In Green Mode, you cannot change the information displayed on in Green Mode. Mode, you cannot display the [H Setting] menu by pressing the 4/W button. • You cannot use this function. If you try to do so, - (key lock icon) and a message appear. • If you switch to Q mode from Green 38 Green mode must be canceled to q (Macro) or 3 (Pan Focus) 49 Self-timer...
Operation Manual
Page 68
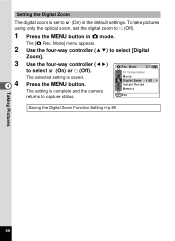
...) to capture status. The selected setting is set the digital zoom to P (Off). 1 2 3 44 Press the 3 button in the default settings. Rec. Mode 2/3 0.0 EV Compensation Movie Digital Zoom QUICK I n s t a n t R e v i e w Memory MENU Exit Saving the Digital Zoom Function Setting 1p.85 Taking Pictures 66 Press the 3 button. Setting the Digital Zoom The digital zoom is saved. The setting is complete and the camera returns to select [Digital Zoom]. Use the four-way controller (45) to O (On) in A mode. To take pictures using only the optical zoom, set to select O (On) or...
...) to capture status. The selected setting is set the digital zoom to P (Off). 1 2 3 44 Press the 3 button in the default settings. Rec. Mode 2/3 0.0 EV Compensation Movie Digital Zoom QUICK I n s t a n t R e v i e w Memory MENU Exit Saving the Digital Zoom Function Setting 1p.85 Taking Pictures 66 Press the 3 button. Setting the Digital Zoom The digital zoom is saved. The setting is complete and the camera returns to select [Digital Zoom]. Use the four-way controller (45) to O (On) in A mode. To take pictures using only the optical zoom, set to select O (On) or...
Operation Manual
Page 73
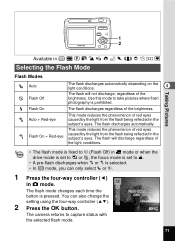
... drive mode is set to 1 or , the focus mode is set to s. • A pre-flash discharges when c or d is selected. • In s mode, you can also change the setting using the four-way controller (23). 2 Press the 4 button. The camera returns to take pictures where flash photography is prohibited. This mode reduces the phenomenon of red eyes d Flash On + Red-eye caused by the light from the flash being reflected in the subject's eyes. c Auto + Red-eye This mode...
... drive mode is set to 1 or , the focus mode is set to s. • A pre-flash discharges when c or d is selected. • In s mode, you can also change the setting using the four-way controller (23). 2 Press the 4 button. The camera returns to take pictures where flash photography is prohibited. This mode reduces the phenomenon of red eyes d Flash On + Red-eye caused by the light from the flash being reflected in the subject's eyes. c Auto + Red-eye This mode...
Operation Manual
Page 153
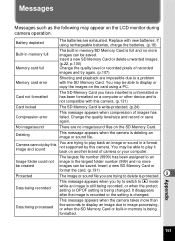
... sound file. If using a PC. The largest file number (9999) has been assigned to an Image folder could not image in the largest folder number (999) and no image/sound files on another brand of images has failed. Appendix 151 Change the quality level/size and record or save again. Data being processed This message appears when the camera takes more images can be saved. Replace with this camera. (p.131) Card locked The SD Memory Card is being formatted. Camera cannot play this image...
... sound file. If using a PC. The largest file number (9999) has been assigned to an Image folder could not image in the largest folder number (999) and no image/sound files on another brand of images has failed. Appendix 151 Change the quality level/size and record or save again. Data being processed This message appears when the camera takes more images can be saved. Replace with this camera. (p.131) Card locked The SD Memory Card is being formatted. Camera cannot play this image...

Operation Manual
Page 159
... Electronic/mechanical shutter Speed Approx. 1/2000 sec. - 4 sec. Focus Modes Exposure Mechanism Capture Modes Movie Digital Filter Shutter Flash Drive Modes Power Supply Autofocus, Macro, Infinity, Pan Focus, Manual Focus AF type TTL contrast detection system by sensor (multi-segment metering) EV ±2 EV (can be set in 1/3 EV steps) Compensation Green, Auto Picture, Program, Night Scene, Movie, Voice Recording, Landscape, Flower, Portrait, Surf & Snow, Sport, Digital SR, Kids, Pet, Digital Panorama, Frame Composite Continuous Recording Time Approx...
... Electronic/mechanical shutter Speed Approx. 1/2000 sec. - 4 sec. Focus Modes Exposure Mechanism Capture Modes Movie Digital Filter Shutter Flash Drive Modes Power Supply Autofocus, Macro, Infinity, Pan Focus, Manual Focus AF type TTL contrast detection system by sensor (multi-segment metering) EV ±2 EV (can be set in 1/3 EV steps) Compensation Green, Auto Picture, Program, Night Scene, Movie, Voice Recording, Landscape, Flower, Portrait, Surf & Snow, Sport, Digital SR, Kids, Pet, Digital Panorama, Frame Composite Continuous Recording Time Approx...
Operation Manual
Page 167
... Digital Zoom 66 Dock insert 125 DPOF printing 124 DPOF settings 117 F Face Recognition AF&AE ...46 File No 85 Flash 71 Flash Off a 71 Flash On b 71 Fluorescent Light J 74 Focus lock 69 Focus Mode 67 Folder display 94 Folder Name 137 Format 131 Four-way controller ........37, 39 Frame Composite 114 Frame Rate 90 G Green Button 37, 39 Green Mode s 48 Guide Display .........46, 47, 143 H Histogram 79 I ImageLink 125 Infinity s 67 Installing batteries...
... Digital Zoom 66 Dock insert 125 DPOF printing 124 DPOF settings 117 F Face Recognition AF&AE ...46 File No 85 Flash 71 Flash Off a 71 Flash On b 71 Fluorescent Light J 74 Focus lock 69 Focus Mode 67 Folder display 94 Folder Name 137 Format 131 Four-way controller ........37, 39 Frame Composite 114 Frame Rate 90 G Green Button 37, 39 Green Mode s 48 Guide Display .........46, 47, 143 H Histogram 79 I ImageLink 125 Infinity s 67 Installing batteries...
Operation Manual
Page 168
... ....116 Red-eye reduction cd .......71 Reset 144 Resize 107 Rotating 34 S Saturation 77 Saving settings 85 SD Memory Card 22 Self-timer g 80 Sensitivity 73 Setting the exposure ...........76 Shade H 74 Sharpness 77 Shooting information .....78, 92 Shutter release button 32, 36, 38 Slideshow 96 Sound settings 132 Sound types 132 Standard 67 Start-up screen 145 Storage Capacity 155 Strap 17 T Tungsten Light I 74 9 TV 99 U USB connection mode ......138 V Video output format...
... ....116 Red-eye reduction cd .......71 Reset 144 Resize 107 Rotating 34 S Saturation 77 Saving settings 85 SD Memory Card 22 Self-timer g 80 Sensitivity 73 Setting the exposure ...........76 Shade H 74 Sharpness 77 Shooting information .....78, 92 Shutter release button 32, 36, 38 Slideshow 96 Sound settings 132 Sound types 132 Standard 67 Start-up screen 145 Storage Capacity 155 Strap 17 T Tungsten Light I 74 9 TV 99 U USB connection mode ......138 V Video output format...

