Operation Manual
Page 8
... (Pet Mode 54 Taking Pictures of Dark Scenes (Night Scene Mode 55 Reducing Camera Shake and Blurring When Taking Pictures (Digital SR Mode 56 Framing Your Pictures (Frame Composite Mode 57 Taking Panoramic Pictures (Digital Panorama Mode 59 Taking Pictures with Customized Settings 61 Selecting the Recorded Pixels 61 ... Shooting Information 78 Using the Self-timer 80 Taking a Series of Pictures 81 Setting the Date Imprint 83 Setting the Instant Review Time 84 Saving Your Settings (Memory 85 Recording Movies 87 Recording a Movie 87 Selecting the Settings for Taking Movies 89 6
... (Pet Mode 54 Taking Pictures of Dark Scenes (Night Scene Mode 55 Reducing Camera Shake and Blurring When Taking Pictures (Digital SR Mode 56 Framing Your Pictures (Frame Composite Mode 57 Taking Panoramic Pictures (Digital Panorama Mode 59 Taking Pictures with Customized Settings 61 Selecting the Recorded Pixels 61 ... Shooting Information 78 Using the Self-timer 80 Taking a Series of Pictures 81 Setting the Date Imprint 83 Setting the Instant Review Time 84 Saving Your Settings (Memory 85 Recording Movies 87 Recording a Movie 87 Selecting the Settings for Taking Movies 89 6
Operation Manual
Page 9
Playing Back and deleting Images 92 Playing Back Images on the Camera 92 Playing Back Still Pictures 92 Reviewing Shooting Information 92 Nine-Image Display, Folder Display and Calendar Display 93 Zoom Playback 95 Slideshow 96 Playing Back Movies 98 Playing Back a ...Printing Images 107 Editing Images 107 Changing the Image Size and Quality (Resize 107 Cropping Images 109 Copying Images and Sound Files 110 Using the Digital Filter 112 Using the Brightness Filter 113 Adding a Frame (Frame Composite 114 Red-eye Compensation 116 Setting the Printing Service (DPOF 117 Printing ...
Playing Back and deleting Images 92 Playing Back Images on the Camera 92 Playing Back Still Pictures 92 Reviewing Shooting Information 92 Nine-Image Display, Folder Display and Calendar Display 93 Zoom Playback 95 Slideshow 96 Playing Back Movies 98 Playing Back a ...Printing Images 107 Editing Images 107 Changing the Image Size and Quality (Resize 107 Cropping Images 109 Copying Images and Sound Files 110 Using the Digital Filter 112 Using the Brightness Filter 113 Adding a Frame (Frame Composite 114 Red-eye Compensation 116 Setting the Printing Service (DPOF 117 Printing ...
Operation Manual
Page 33
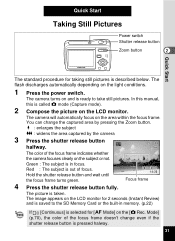
... built-in focus. You can change even if the shutter release button is out of the focus frame doesn't change the captured area by the camera 3 Press the shutter release button 38 halfway. x : enlarges the subject w : widens the area captured by pressing the Zoom button. The .... The flash discharges automatically depending on the subject or not. The camera will automatically focus on the [A Rec. Red : The subject is pressed halway. 31 The image appears on the LCD monitor for 2 seconds (Instant Review) and is selected for taking still pictures is taken. Hold the ...
... built-in focus. You can change even if the shutter release button is out of the focus frame doesn't change the captured area by the camera 3 Press the shutter release button 38 halfway. x : enlarges the subject w : widens the area captured by pressing the Zoom button. The .... The flash discharges automatically depending on the subject or not. The camera will automatically focus on the [A Rec. Red : The subject is pressed halway. 31 The image appears on the LCD monitor for 2 seconds (Instant Review) and is selected for taking still pictures is taken. Hold the ...
Operation Manual
Page 45
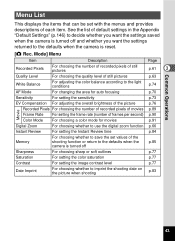
... of frames per second) p.90 Color Mode For choosing a color mode for movies p.91 Digital Zoom For choosing whether to use the digital zoom function p.66 Instant Review For setting the Instant Review time p.84 Memory For choosing whether to save the set with the menus and provides descriptions ...77 Contrast For setting the image contrast level p.77 Date Imprint For choosing whether to the defaults when the camera is turned off and whether you want the settings saved when the camera is reset. [A Rec. See the list of default settings in the Appendix "Default Settings" (p.146)...
... of frames per second) p.90 Color Mode For choosing a color mode for movies p.91 Digital Zoom For choosing whether to use the digital zoom function p.66 Instant Review For setting the Instant Review time p.84 Memory For choosing whether to save the set with the menus and provides descriptions ...77 Contrast For setting the image contrast level p.77 Date Imprint For choosing whether to the defaults when the camera is turned off and whether you want the settings saved when the camera is reset. [A Rec. See the list of default settings in the Appendix "Default Settings" (p.146)...
Operation Manual
Page 51
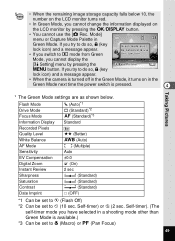
... or Z (2 sec. If you try to do so, - (key lock icon) and a message appear. • When the camera is turned off in the Green Mode, it turns on in the Green Mode next time the power switch is available.) *3 Can be... 9 (Standard)*2 = (Standard)*3 Information Display Standard Recorded Pixels Quality Level White Balance 8M D (Better) F (Auto) AF Mode J (Multiple) Sensitivity Auto EV Compensation Digital Zoom ±0.0 O (On) Instant Review 2 sec Sharpness G (Standard) Saturation G (Standard) Contrast Date Imprint G (Standard) P (OFF) *1 Can be set to a (Flash Off) *2 Can be...
... or Z (2 sec. If you try to do so, - (key lock icon) and a message appear. • When the camera is turned off in the Green Mode, it turns on in the Green Mode next time the power switch is available.) *3 Can be... 9 (Standard)*2 = (Standard)*3 Information Display Standard Recorded Pixels Quality Level White Balance 8M D (Better) F (Auto) AF Mode J (Multiple) Sensitivity Auto EV Compensation Digital Zoom ±0.0 O (On) Instant Review 2 sec Sharpness G (Standard) Saturation G (Standard) Contrast Date Imprint G (Standard) P (OFF) *1 Can be set to a (Flash Off) *2 Can be...
Operation Manual
Page 61
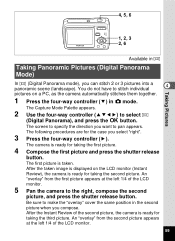
...right, compose the second picture, and press the shutter release button. Be sure to stitch individual 4 pictures on the LCD monitor (Instant Review), the camera is ready for taking the third picture. An "overlay" from the first picture appears at the left 1/4 of the LCD monitor. 59...cover the same position in Taking Panoramic Pictures (Digital Panorama Mode) Taking Pictures In (Digital Panorama mode), you can stitch 2 or 3 pictures into a panoramic scene (landscape). After the Instant Review of the second picture, the camera is ready for taking the second picture. After...
...right, compose the second picture, and press the shutter release button. Be sure to stitch individual 4 pictures on the LCD monitor (Instant Review), the camera is ready for taking the third picture. An "overlay" from the first picture appears at the left 1/4 of the LCD monitor. 59...cover the same position in Taking Panoramic Pictures (Digital Panorama Mode) Taking Pictures In (Digital Panorama mode), you can stitch 2 or 3 pictures into a panoramic scene (landscape). After the Instant Review of the second picture, the camera is ready for taking the second picture. After...
Operation Manual
Page 62
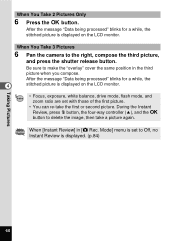
...picture. • You can re-take a picture again. When You Take 3 Pictures 6 Pan the camera to delete the image, then take the first or second picture. Be sure to Off, no Instant Review is displayed on the LCD monitor. • Focus, exposure, white balance, drive mode, flash mode,... are set to make the "overlay" cover the same position in [A Rec. When You Take 2 Pictures Only 6 Press the 4 button. When [Instant Review] in the third picture when you compose. After the message "Data being processed" blinks for a while, the 4 stitched picture is displayed on the LCD ...
...picture. • You can re-take a picture again. When You Take 3 Pictures 6 Pan the camera to delete the image, then take the first or second picture. Be sure to Off, no Instant Review is displayed on the LCD monitor. • Focus, exposure, white balance, drive mode, flash mode,... are set to make the "overlay" cover the same position in [A Rec. When You Take 2 Pictures Only 6 Press the 4 button. When [Instant Review] in the third picture when you compose. After the message "Data being processed" blinks for a while, the 4 stitched picture is displayed on the LCD ...
Operation Manual
Page 81
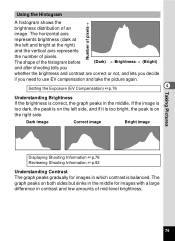
...) 1p.76 4 Understanding Brightness If the brightness is balanced. The shape of an image. Dark image Correct image Bright image Displaying Shooting Information 1p.78 Reviewing Shooting Information 1p.92 Understanding Contrast The graph peaks gradually for images with a large difference in the middle. If the image is too dark, the...
...) 1p.76 4 Understanding Brightness If the brightness is balanced. The shape of an image. Dark image Correct image Bright image Displaying Shooting Information 1p.78 Reviewing Shooting Information 1p.92 Understanding Contrast The graph peaks gradually for images with a large difference in the middle. If the image is too dark, the...
Operation Manual
Page 86
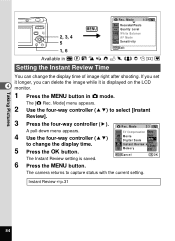
... is displayed on the LCD 4 monitor. 1 Press the 3 button in b R A q < I i \ c Q E Y Setting the Instant Review Time You can delete the image while it longer, you can change the display time. 1sec QUICK I n s t a n t R e v i e w 0.5sec 5 Press the... 0.0 EV Compensation 5sec 4 Use the four-way controller (23) Movie 3sec Digital Zoom 2sec to change the display time of image right after shooting. The camera returns to select [Instant Review]. 3 Press the four-way controller (5). The [A Rec. Instant Review 1p.31 84 Mode 1/3 2, 3, 4 5 1, 6 MENU 8M Recorded ...
... is displayed on the LCD 4 monitor. 1 Press the 3 button in b R A q < I i \ c Q E Y Setting the Instant Review Time You can delete the image while it longer, you can change the display time. 1sec QUICK I n s t a n t R e v i e w 0.5sec 5 Press the... 0.0 EV Compensation 5sec 4 Use the four-way controller (23) Movie 3sec Digital Zoom 2sec to change the display time of image right after shooting. The camera returns to select [Instant Review]. 3 Press the four-way controller (5). The [A Rec. Instant Review 1p.31 84 Mode 1/3 2, 3, 4 5 1, 6 MENU 8M Recorded ...
Operation Manual
Page 94
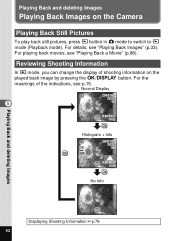
For playing back movies, see p.15. For the meanings of shooting information on the Camera Playing Back Still Pictures To play back still pictures, press Q button in A mode to switch to Q mode (Playback mode). Normal Display 100-0026 5 08/01/... 92 Playing Back and deleting Images Playing Back Images on the played back image by pressing the 4/W button. For details, see "Playing Back Images" (p.33). Reviewing Shooting Information In Q mode, you can change the display of the indications, see "Playing Back a Movie" (p.98).
For playing back movies, see p.15. For the meanings of shooting information on the Camera Playing Back Still Pictures To play back still pictures, press Q button in A mode to switch to Q mode (Playback mode). Normal Display 100-0026 5 08/01/... 92 Playing Back and deleting Images Playing Back Images on the played back image by pressing the 4/W button. For details, see "Playing Back Images" (p.33). Reviewing Shooting Information In Q mode, you can change the display of the indications, see "Playing Back a Movie" (p.98).
Operation Manual
Page 101
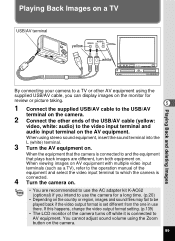
... viewing images on AV equipment with multiple video input terminals (such as a TV), refer to the operation manual of the camera turns off while it is set different from the one in use the camera for review or picture taking. 5 1 Connect the supplied USB/AV cable to the USB/AV terminal on the... camera. 2 Connect the other AV equipment using the supplied USB/AV cable, you intend to use there. When using the Zoom button...
... viewing images on AV equipment with multiple video input terminals (such as a TV), refer to the operation manual of the camera turns off while it is set different from the one in use the camera for review or picture taking. 5 1 Connect the supplied USB/AV cable to the USB/AV terminal on the... camera. 2 Connect the other AV equipment using the supplied USB/AV cable, you intend to use there. When using the Zoom button...
Operation Manual
Page 102
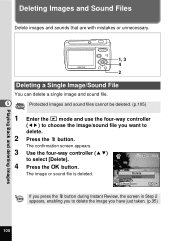
... choose the image/sound file you have just taken. (p.35) 100 Delete Cancel All Images/Sounds OK OK If you press the i button during Instant Review, the screen in Step 2 appears, enabling you to delete the image you want to select [Delete]. 100-0017 4 Press the 4 button. The confirmation screen appears...
... choose the image/sound file you have just taken. (p.35) 100 Delete Cancel All Images/Sounds OK OK If you press the i button during Instant Review, the screen in Step 2 appears, enabling you to delete the image you want to select [Delete]. 100-0017 4 Press the 4 button. The confirmation screen appears...
Operation Manual
Page 148
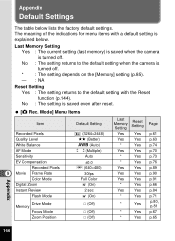
... returns to the default setting when the camera is saved even after reset. [A Rec. No : The setting is turned off . Mode] Menu Items Item Recorded Pixels Quality Level White Balance AF Mode Sensitivity EV Compensation Recorded Pixels 9 Movie Frame Rate Color Mode Digital Zoom Instant Review Flash Mode Drive Mode Memory Focus Mode...
... returns to the default setting when the camera is saved even after reset. [A Rec. No : The setting is turned off . Mode] Menu Items Item Recorded Pixels Quality Level White Balance AF Mode Sensitivity EV Compensation Recorded Pixels 9 Movie Frame Rate Color Mode Digital Zoom Instant Review Flash Mode Drive Mode Memory Focus Mode...
Operation Manual
Page 151
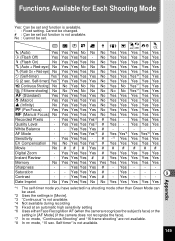
... Yes Yes*4 # -- - -Yes Yes*3 Yes Yes*6 Yes -*5 Yes Yes Yes Yes Yes Yes Yes Yes Yes Movie No # # # Yes # # # # # # Digital Zoom - Yes Yes Yes # - Yes - - - 9 - - s bRA d O c Y q< i IQ \ E , (Auto) Yes Yes Yes No No No ... Not available during recording *5 Fixed at an automatic high sensitivity setting *6 Uses either Face Recognition AF (when the camera recognizes the subject's face) or the setting in [Movie]. *3 "Continuous" is available. - : Fixed setting.... Yes Yes Yes Yes Yes Instant Review - Saturation Contrast - - Self-timer" is not available. Appendix 149
... Yes Yes*4 # -- - -Yes Yes*3 Yes Yes*6 Yes -*5 Yes Yes Yes Yes Yes Yes Yes Yes Yes Movie No # # # Yes # # # # # # Digital Zoom - Yes Yes Yes # - Yes - - - 9 - - s bRA d O c Y q< i IQ \ E , (Auto) Yes Yes Yes No No No ... Not available during recording *5 Fixed at an automatic high sensitivity setting *6 Uses either Face Recognition AF (when the camera recognizes the subject's face) or the setting in [Movie]. *3 "Continuous" is available. - : Fixed setting.... Yes Yes Yes Yes Yes Instant Review - Saturation Contrast - - Self-timer" is not available. Appendix 149
Operation Manual
Page 162
• This warranty policy does not affect the customer's statutory rights. • The local warranty policies available from PENTAX distributors in your product at the time of the European Union. 160 Appendix Therefore, we recommend that you review the warranty card supplied with your country for more information and to receive a copy of the warranty policy. 9 The CE Mark is a Directive conformity mark of purchase, or contact the PENTAX distributor in some countries can supersede this warranty policy.
• This warranty policy does not affect the customer's statutory rights. • The local warranty policies available from PENTAX distributors in your product at the time of the European Union. 160 Appendix Therefore, we recommend that you review the warranty card supplied with your country for more information and to receive a copy of the warranty policy. 9 The CE Mark is a Directive conformity mark of purchase, or contact the PENTAX distributor in some countries can supersede this warranty policy.
Operation Manual
Page 167
Digital Panorama ......... 59 Digital SR c 56 Digital Zoom 66 Dock insert 125 DPOF printing 124 DPOF settings 117 F Face Recognition AF&AE ...46 File No 85 Flash 71 Flash Off a 71 Flash ... Frame Rate 90 G Green Button 37, 39 Green Mode s 48 Guide Display .........46, 47, 143 H Histogram 79 I ImageLink 125 Infinity s 67 Installing batteries 18 Instant Review 84 L Language 28, 136 M 3 button 37, 39 Macro q 67 Magnify y 95 Manual Focus 67 Manual K 74 Memory 85 N Nine-image display f ........ 93 NTSC 139 O 4/W button...
Digital Panorama ......... 59 Digital SR c 56 Digital Zoom 66 Dock insert 125 DPOF printing 124 DPOF settings 117 F Face Recognition AF&AE ...46 File No 85 Flash 71 Flash Off a 71 Flash ... Frame Rate 90 G Green Button 37, 39 Green Mode s 48 Guide Display .........46, 47, 143 H Histogram 79 I ImageLink 125 Infinity s 67 Installing batteries 18 Instant Review 84 L Language 28, 136 M 3 button 37, 39 Macro q 67 Magnify y 95 Manual Focus 67 Manual K 74 Memory 85 N Nine-image display f ........ 93 NTSC 139 O 4/W button...