
Operation Manual
Page 1
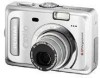
Digital Camera Operating Manual To ensure the best performance from your camera, please read the Operating Manual before using the camera.
Digital Camera Operating Manual To ensure the best performance from your camera, please read the Operating Manual before using the camera.

Operation Manual
Page 2
... is a possibility that the illustrations and the display screen of the LCD monitor in helping you to connect the printer and digital camera directly, using the PENTAX Digital Camera that 0.01% or fewer of their intentions. Regarding PictBridge PictBridge allows the user to understand all the features and functions. ... Images taken using the unified standard for personal enjoyment during demonstrations, performances or of Seiko Epson Corporation. Regarding trademarks • PENTAX, Optio and smc PENTAX are for purchasing the PENTAX Digital Camera. All Rights Reserved.
... is a possibility that the illustrations and the display screen of the LCD monitor in helping you to connect the printer and digital camera directly, using the PENTAX Digital Camera that 0.01% or fewer of their intentions. Regarding PictBridge PictBridge allows the user to understand all the features and functions. ... Images taken using the unified standard for personal enjoyment during demonstrations, performances or of Seiko Epson Corporation. Regarding trademarks • PENTAX, Optio and smc PENTAX are for purchasing the PENTAX Digital Camera. All Rights Reserved.
Operation Manual
Page 9
... the Capture Mode 46 Displaying Shooting Information in Capture Mode 47 Taking Pictures in Auto Select Mode (Auto Select Mode 49 Letting the camera set the functions (Program Mode 52 Selecting the Picture Mode According to the Shooting Scene (Picture Mode 53 Taking Pictures of Dark Scenes...Using the Self-Timer 61 Continuous Shooting (Continuous Shooting Mode 62 Using the Remote Control Unit (optional 63 Taking Pictures with Color Filters (Digital Filter Mode 64 Taking Two-in-One Pictures (Two-in-One Mode 65 Taking Panorama Pictures (Panorama Assist Mode 66 Setting the Shooting ...
... the Capture Mode 46 Displaying Shooting Information in Capture Mode 47 Taking Pictures in Auto Select Mode (Auto Select Mode 49 Letting the camera set the functions (Program Mode 52 Selecting the Picture Mode According to the Shooting Scene (Picture Mode 53 Taking Pictures of Dark Scenes...Using the Self-Timer 61 Continuous Shooting (Continuous Shooting Mode 62 Using the Remote Control Unit (optional 63 Taking Pictures with Color Filters (Digital Filter Mode 64 Taking Two-in-One Pictures (Two-in-One Mode 65 Taking Panorama Pictures (Panorama Assist Mode 66 Setting the Shooting ...

Operation Manual
Page 10
... Next Image 104 Setting the Printing Service (DPOF 105 Printing Single Images 105 Printing All Images 107 Direct Printing Using PictBridge 108 Connecting the Camera to the Printer 108 Printing Single Images 109 Printing All Images 110 Printing Using the DPOF Settings 110 Disconnecting the... the Printer 111 Editing Images 112 Changing the Image Size and Quality 112 Editing Pictures with Digital Filters 114 Copying Files 116 Settings 118 Camera Settings 118 Formatting an SD Memory Card or the Built-in Memory 118 Changing the Sound Settings 119 Changing the Date and Time 120 ...
... Next Image 104 Setting the Printing Service (DPOF 105 Printing Single Images 105 Printing All Images 107 Direct Printing Using PictBridge 108 Connecting the Camera to the Printer 108 Printing Single Images 109 Printing All Images 110 Printing Using the DPOF Settings 110 Disconnecting the... the Printer 111 Editing Images 112 Changing the Image Size and Quality 112 Editing Pictures with Digital Filters 114 Copying Files 116 Settings 118 Camera Settings 118 Formatting an SD Memory Card or the Built-in Memory 118 Changing the Sound Settings 119 Changing the Date and Time 120 ...

Operation Manual
Page 45
...p.75 AE Metering For setting the metering method to save the shooting digital zoom - No of pixels) and quality Super Yes - (compression rate). (In Auto Select Mode only) 3 - function settings when and file Yes the camera is turned off On - Mode] Menu Yes ... Any changes made... p.80 43 Rd= H.+ C Page For selecting a combination of recorded Image Quality image size (number of frames per second) Yes p.78 Digital Zoom For turning digital zoom on the menu, but any changes you make are invalid. Yes Yes p.59 Instant Review For setting the Instant Review time 0.5 sec...
...p.75 AE Metering For setting the metering method to save the shooting digital zoom - No of pixels) and quality Super Yes - (compression rate). (In Auto Select Mode only) 3 - function settings when and file Yes the camera is turned off On - Mode] Menu Yes ... Any changes made... p.80 43 Rd= H.+ C Page For selecting a combination of recorded Image Quality image size (number of frames per second) Yes p.78 Digital Zoom For turning digital zoom on the menu, but any changes you make are invalid. Yes Yes p.59 Instant Review For setting the Instant Review time 0.5 sec...

Operation Manual
Page 48
...Lets you take pictures with a variety of special effects. Selecting the Capture Mode Capture Modes R Program mode d Picture mode - Lets the camera automatically recognize the shooting scene and set the functions. Lets you take pictures of landscapes using the optimal settings. p.52 p.53 p.49 ...people using the optimal settings. Auto Select mode = Portrait mode H Landscape mode . Night-Scene mode C Movie mode + Digital Effect mode Lets the camera automatically select the shutter speed and aperture, this is the basic picture-taking pictures and Playback mode is retracted. Lets you...
...Lets you take pictures with a variety of special effects. Selecting the Capture Mode Capture Modes R Program mode d Picture mode - Lets the camera automatically recognize the shooting scene and set the functions. Lets you take pictures of landscapes using the optimal settings. p.52 p.53 p.49 ...people using the optimal settings. Auto Select mode = Portrait mode H Landscape mode . Night-Scene mode C Movie mode + Digital Effect mode Lets the camera automatically select the shutter speed and aperture, this is the basic picture-taking pictures and Playback mode is retracted. Lets you...
Operation Manual
Page 59
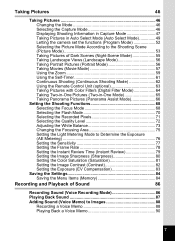
... 10:25 flashes during recording. Taking Pictures 1 2, 3 Taking Movies (Movie Mode) This mode lets you take movies. Sound can change the captured area, with the digital zoom, by the camera. 57
... 10:25 flashes during recording. Taking Pictures 1 2, 3 Taking Movies (Movie Mode) This mode lets you take movies. Sound can change the captured area, with the digital zoom, by the camera. 57
Operation Manual
Page 61
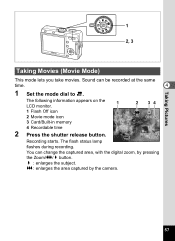
...can use the optical zoom in the "A Rec. Digital zoom range When digital zoom is enabled 4 Zoom bar When digital zoom is disabled Saving the Zoom Position 1p.84 You cannot use the zoom to eight times. 1 Taking Pictures - When the digital zoom function is turned on in Capture mode. When... you can combine the digital zoom with the optical zoom. w (Wide) : enlarges the area captured by the camera. 4 4 The digital zoom function is enabled, you turn off the digital zoom in Movie mode. 59 H = Using the Zoom You can only take ...
...can use the optical zoom in the "A Rec. Digital zoom range When digital zoom is enabled 4 Zoom bar When digital zoom is disabled Saving the Zoom Position 1p.84 You cannot use the zoom to eight times. 1 Taking Pictures - When the digital zoom function is turned on in Capture mode. When... you can combine the digital zoom with the optical zoom. w (Wide) : enlarges the area captured by the camera. 4 4 The digital zoom function is enabled, you turn off the digital zoom in Movie mode. 59 H = Using the Zoom You can only take ...

Operation Manual
Page 62
...• You should compose the picture on the LCD monitor when you use the digital zoom function. • The default setting for the digital zoom is ready to select P(Off). Disabling the Digital Zoom Function 1 Press the MENU button in Capture mode. Frame Rate 30fps 3 Use... the four-way controller (45) Digital Zoom Instant Review 0.5sec to take pictures. Saturation MENU E x i t OK OK The camera is O (On). Mode]...
...• You should compose the picture on the LCD monitor when you use the digital zoom function. • The default setting for the digital zoom is ready to select P(Off). Disabling the Digital Zoom Function 1 Press the MENU button in Capture mode. Frame Rate 30fps 3 Use... the four-way controller (45) Digital Zoom Instant Review 0.5sec to take pictures. Saturation MENU E x i t OK OK The camera is O (On). Mode]...

Operation Manual
Page 66
...Pictures You can take pictures with digital filters in focus. 6 Press the shutter release button fully. The focus frame turns green if the subject is set to choose a color filter. You can choose from the remote control unit to the camera approximately 30,000 times. The screen... for the Remote Control Unit A signal can be changed when the focus mode is in a variety of the Battery for choosing a digital effect mode appears. 3 Use the four-way controller (2345) to z. 64 Contact your nearest PENTAX customer ...
...Pictures You can take pictures with digital filters in focus. 6 Press the shutter release button fully. The focus frame turns green if the subject is set to choose a color filter. You can choose from the remote control unit to the camera approximately 30,000 times. The screen... for the Remote Control Unit A signal can be changed when the focus mode is in a variety of the Battery for choosing a digital effect mode appears. 3 Use the four-way controller (2345) to z. 64 Contact your nearest PENTAX customer ...

Operation Manual
Page 68
...-way controller to select F (Panorama Assist). The software (ACDSee for PENTAX) on the CD-ROM (S-SW32) provided with the camera and a computer are easier to join together into a panorama picture. 1 Set the mode dial to form a panorama picture. The screen for choosing a digital effect mode appears. 3 Use the four-way controller (2345) to...
...-way controller to select F (Panorama Assist). The software (ACDSee for PENTAX) on the CD-ROM (S-SW32) provided with the camera and a computer are easier to join together into a panorama picture. 1 Set the mode dial to form a panorama picture. The screen for choosing a digital effect mode appears. 3 Use the four-way controller (2345) to...
Operation Manual
Page 70
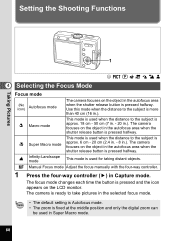
... pictures in the selected focus mode. • The default setting is Autofocus mode. • The zoom is fixed at the middle position and only the digital zoom can be used when the distance to the subject is approx. 6 cm - 20 cm (2.4 in. - 8 in the autofocus area when the ...shutter release button is pressed halfway. H = 4 Selecting the Focus Mode Focus mode (No icon) q r s z Autofocus mode The camera focuses on the object in .). The focus mode changes each time the button is used when the distance to the subject is pressed halfway. Infinity...
... pictures in the selected focus mode. • The default setting is Autofocus mode. • The zoom is fixed at the middle position and only the digital zoom can be used when the distance to the subject is approx. 6 cm - 20 cm (2.4 in. - 8 in the autofocus area when the ...shutter release button is pressed halfway. H = 4 Selecting the Focus Mode Focus mode (No icon) q r s z Autofocus mode The camera focuses on the object in .). The focus mode changes each time the button is used when the distance to the subject is pressed halfway. Infinity...
Operation Manual
Page 80
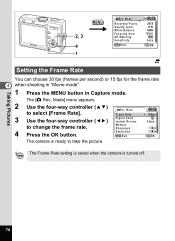
... rate. The Frame Rate setting is saved when the camera is ready to take the picture. The [A Rec. Mode] menu appears. 2 Use the four-way controller (23) Rec. Memory Sharpness 4 Press the OK button. Frame Rate 30fps 3 Use the four-way controller (45) Digital Zoom Instant Review 0.5sec to select [Frame Rate... second) or 15 fps for the frame rate 4 when shooting in "Movie mode". 1 Press the MENU button in Capture mode. Saturation MENU E x i t OK OK The camera is turned off.
... rate. The Frame Rate setting is saved when the camera is ready to take the picture. The [A Rec. Mode] menu appears. 2 Use the four-way controller (23) Rec. Memory Sharpness 4 Press the OK button. Frame Rate 30fps 3 Use the four-way controller (45) Digital Zoom Instant Review 0.5sec to select [Frame Rate... second) or 15 fps for the frame rate 4 when shooting in "Movie mode". 1 Press the MENU button in Capture mode. Saturation MENU E x i t OK OK The camera is turned off.
Operation Manual
Page 81
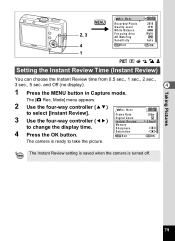
...Mode to change the display time. Frame Rate 30fps 3 Use the four-way controller (45) Digital Zoom Instant Review 0.5sec to select [Instant Review]. The Instant Review setting is saved when the camera is ready to take the picture. Mode] menu appears. 2 Use the four-way controller (23...., 1 sec., 2 sec., 3 sec., 5 sec. The [A Rec. Memory Sharpness 4 Press the OK button. Saturation MENU E x i t OK OK The camera is turned off. Taking Pictures 79 Mode Recorded Pixels Quality Level White Balance Focusing Area AE Metering Sensitivity MENU E x i t 2816 AWB Multi Auto OK OK...
...Mode to change the display time. Frame Rate 30fps 3 Use the four-way controller (45) Digital Zoom Instant Review 0.5sec to select [Instant Review]. The Instant Review setting is saved when the camera is ready to take the picture. Mode] menu appears. 2 Use the four-way controller (23...., 1 sec., 2 sec., 3 sec., 5 sec. The [A Rec. Memory Sharpness 4 Press the OK button. Saturation MENU E x i t OK OK The camera is turned off. Taking Pictures 79 Mode Recorded Pixels Quality Level White Balance Focusing Area AE Metering Sensitivity MENU E x i t 2816 AWB Multi Auto OK OK...
Operation Manual
Page 82
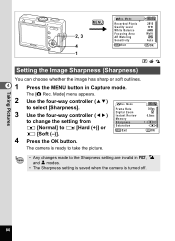
... the image has sharp or soft outlines. 4 1 Press the MENU button in d, H and = modes. • The Sharpness setting is saved when the camera is ready to take the picture. • Any changes made to the Sharpness setting are invalid in Capture mode. Taking Pictures MENU 2, 3 4 1 Rec.... Frame Rate 30fps 3 Use the four-way controller (45) Digital Zoom Instant Review 0.5sec to change the setting from Memory Sharpness x [Normal] to select [Sharpness]. The camera is turned off. 80 The [A Rec.
... the image has sharp or soft outlines. 4 1 Press the MENU button in d, H and = modes. • The Sharpness setting is saved when the camera is ready to take the picture. • Any changes made to the Sharpness setting are invalid in Capture mode. Taking Pictures MENU 2, 3 4 1 Rec.... Frame Rate 30fps 3 Use the four-way controller (45) Digital Zoom Instant Review 0.5sec to change the setting from Memory Sharpness x [Normal] to select [Sharpness]. The camera is turned off. 80 The [A Rec.

Operation Manual
Page 83
... You can set the color saturation. 1 Press the MENU button in d, H and = modes. • The Saturation setting is saved when the camera is ready to take the picture. • Any changes made to the Saturation setting are invalid in Capture mode. 4 The [A Rec. Taking Pictures ...-way controller (23) Rec. Frame Rate 30fps 3 Use the four-way controller (45) Digital Zoom Instant Review 0.5sec to change the setting from Memory Sharpness x [Normal] to select [Saturation]. The camera is turned off. 81 Mode to z [High (+)] or Saturation y [Low (-)]. Mode Recorded...
... You can set the color saturation. 1 Press the MENU button in d, H and = modes. • The Saturation setting is saved when the camera is ready to take the picture. • Any changes made to the Saturation setting are invalid in Capture mode. 4 The [A Rec. Taking Pictures ...-way controller (23) Rec. Frame Rate 30fps 3 Use the four-way controller (45) Digital Zoom Instant Review 0.5sec to change the setting from Memory Sharpness x [Normal] to select [Saturation]. The camera is turned off. 81 Mode to z [High (+)] or Saturation y [Low (-)]. Mode Recorded...

Operation Manual
Page 86
... [Sensitivity] setting on the [A Rec. P File # The file number is saved. P Digital Zoom The [Digital Zoom] setting on the [A Rec. Item Flash Description The flash mode setting on the menus for each function when the camera is saved. Mode] menu is saved. Default Setting O 4 White Balance The [White Balance]...Pictures Saving the Menu Items (Memory) You can choose whether you want the set values to be saved when the camera is turned off . • The zoom position setting in the digital zoom range will not be saved even if [Zoom Position] is set to O (On) in [Memory]. &#...
... [Sensitivity] setting on the [A Rec. P File # The file number is saved. P Digital Zoom The [Digital Zoom] setting on the [A Rec. Item Flash Description The flash mode setting on the menus for each function when the camera is saved. Mode] menu is saved. Default Setting O 4 White Balance The [White Balance]...Pictures Saving the Menu Items (Memory) You can choose whether you want the set values to be saved when the camera is turned off . • The zoom position setting in the digital zoom range will not be saved even if [Zoom Position] is set to O (On) in [Memory]. &#...

Operation Manual
Page 87
...-way controller (23) Memory to take the picture. Taking Pictures 85 Sensitivity MENU E x i t OK OK The camera is ready to choose an item. Mode] menu appears. 2 Use the four-way controller (23) Rec. The [A Rec. Digital Zoom Instant Review 30fps 0.5sec 4 The [Memory] menu appears. Frame Rate 3 Press the four-way controller...
...-way controller (23) Memory to take the picture. Taking Pictures 85 Sensitivity MENU E x i t OK OK The camera is ready to choose an item. Mode] menu appears. 2 Use the four-way controller (23) Rec. The [A Rec. Digital Zoom Instant Review 30fps 0.5sec 4 The [Memory] menu appears. Frame Rate 3 Press the four-way controller...

Connection Guide
Page 1
... necessary during installation). When installation is not guaranteed. Step 2 Install the image processing software (ACDSee for PENTAX is required. Enjoy viewing and editing images transferred to your digital camera pictures and movies on the desktop. 2) Double-click the [CD-ROM drive (S-SW32)] icon. 3) Double...that the DC terminal is not connected to the Internet, contact your nearest PENTAX customer service center. for PENTAX 2.0) on the provided CD-ROM to your computer and connecting your digital camera to your PC, install them by installing the software recorded on your PC...
... necessary during installation). When installation is not guaranteed. Step 2 Install the image processing software (ACDSee for PENTAX is required. Enjoy viewing and editing images transferred to your digital camera pictures and movies on the desktop. 2) Double-click the [CD-ROM drive (S-SW32)] icon. 3) Double...that the DC terminal is not connected to the Internet, contact your nearest PENTAX customer service center. for PENTAX 2.0) on the provided CD-ROM to your computer and connecting your digital camera to your PC, install them by installing the software recorded on your PC...

Connection Guide
Page 2
...the [Components missing] dialog box. The ACDSee for Internet Product Registration is disconnected. Disconnecting the Camera from your computer: Ghostscript 7.0 (or later)" may appear in "Setting Up Your Digital Camera" to set to [PictBridge], do not have the following operation according to your PC in... hardware can be safely removed. 4 Disconnect the USB cable from the camera after transfer is being used by an application such as ACDSee for USB connection Follow this instruction Recognized as PENTAX Optio S60, but the image cannot be transmitted to a PC while the USB ...
...the [Components missing] dialog box. The ACDSee for Internet Product Registration is disconnected. Disconnecting the Camera from your computer: Ghostscript 7.0 (or later)" may appear in "Setting Up Your Digital Camera" to set to [PictBridge], do not have the following operation according to your PC in... hardware can be safely removed. 4 Disconnect the USB cable from the camera after transfer is being used by an application such as ACDSee for USB connection Follow this instruction Recognized as PENTAX Optio S60, but the image cannot be transmitted to a PC while the USB ...


