V20 Operating Manual
Page 8
... Operating Parts 17 Monitor Indications 18 Getting Started 21 Attaching the Strap 21 Powering the Camera 22 Charging the Battery 22 Installing the Battery 23 Using the AC Adapter 26 Installing the SD Memory Card 28 Recorded Pixels and Quality Level of Still Pictures 31 Recorded Pixels, Quality Level and Frame Rate of Movies ...........32 Turning the Camera On and Off 34 Playback Mode 35 Initial Settings 36 Setting the Display Language 36 Setting the Date and Time 38 Quick Start 40 Taking...
... Operating Parts 17 Monitor Indications 18 Getting Started 21 Attaching the Strap 21 Powering the Camera 22 Charging the Battery 22 Installing the Battery 23 Using the AC Adapter 26 Installing the SD Memory Card 28 Recorded Pixels and Quality Level of Still Pictures 31 Recorded Pixels, Quality Level and Frame Rate of Movies ...........32 Turning the Camera On and Off 34 Playback Mode 35 Initial Settings 36 Setting the Display Language 36 Setting the Date and Time 38 Quick Start 40 Taking...
V20 Operating Manual
Page 9
... 68 Taking Pictures of Your Pet (Pet Mode 70 Taking Pictures of Children (Kids Mode 72 Taking Panoramic Pictures (Digital Panorama Mode 74 Using the Self-timer 76 Taking a Series of Pictures (Continuous Shooting Mode 77 Using the Zoom 78 Using the Digital Wide Function (Digital Wide Mode 81 Setting the Exposure (EV Compensation 84 Displaying Shooting Information in Capture Mode 85 Setting the Shooting Functions 87 Selecting the Focus Mode 87 Selecting the Flash Mode 89 Selecting the Recorded Pixels 91 Selecting the Quality Level 93 Adjusting the White Balance 94 Setting the...
... 68 Taking Pictures of Your Pet (Pet Mode 70 Taking Pictures of Children (Kids Mode 72 Taking Panoramic Pictures (Digital Panorama Mode 74 Using the Self-timer 76 Taking a Series of Pictures (Continuous Shooting Mode 77 Using the Zoom 78 Using the Digital Wide Function (Digital Wide Mode 81 Setting the Exposure (EV Compensation 84 Displaying Shooting Information in Capture Mode 85 Setting the Shooting Functions 87 Selecting the Focus Mode 87 Selecting the Flash Mode 89 Selecting the Recorded Pixels 91 Selecting the Quality Level 93 Adjusting the White Balance 94 Setting the...
V20 Operating Manual
Page 10
...-Image Display 130 Deleting All Images and Sound Files 132 Recovering Deleted Images 133 Protecting Images and Sound Files from Deletion (Protect) ........ 134 Editing and Printing Images 136 Editing Images 136 Changing the Image Size and Quality (Resize 136 Cropping Images 138 Copying Images and Sound Files 139 Using the Digital Filters 141 Red-eye Compensation 144 Adding a Frame (Frame Composite 145 Editing Movies 147 Setting the Printing Service (DPOF 149 Printing Single Images 149 Printing All Images 151 Printing Using PictBridge 152 Connecting the Camera to the Printer...
...-Image Display 130 Deleting All Images and Sound Files 132 Recovering Deleted Images 133 Protecting Images and Sound Files from Deletion (Protect) ........ 134 Editing and Printing Images 136 Editing Images 136 Changing the Image Size and Quality (Resize 136 Cropping Images 138 Copying Images and Sound Files 139 Using the Digital Filters 141 Red-eye Compensation 144 Adding a Frame (Frame Composite 145 Editing Movies 147 Setting the Printing Service (DPOF 149 Printing Single Images 149 Printing All Images 151 Printing Using PictBridge 152 Connecting the Camera to the Printer...
V20 Operating Manual
Page 11
...Recording a Voice Memo 160 Playing Back a Voice Memo 161 Settings 162 Camera Settings 162 Formatting an SD Memory Card or the Built-in Memory 162 Changing the Sound Settings 163 Changing the Date and Time 165 Setting the World Time 167 Changing the Display Language 169 Changing the Image Folder Name 170 Changing the USB Connection Mode 171 Changing the Video Output Format 172 Adjusting the Brightness of the Display 173 Using the Power Saving Function 174 Setting Auto Power Off 175 Setting the Quick Zoom Function 176 Setting the Guide Display 177 Resetting to Default Settings...
...Recording a Voice Memo 160 Playing Back a Voice Memo 161 Settings 162 Camera Settings 162 Formatting an SD Memory Card or the Built-in Memory 162 Changing the Sound Settings 163 Changing the Date and Time 165 Setting the World Time 167 Changing the Display Language 169 Changing the Image Folder Name 170 Changing the USB Connection Mode 171 Changing the Video Output Format 172 Adjusting the Brightness of the Display 173 Using the Power Saving Function 174 Setting Auto Power Off 175 Setting the Quick Zoom Function 176 Setting the Guide Display 177 Resetting to Default Settings...

V20 Operating Manual
Page 15
... date in calendar format. (p.117) This lets you quickly find the image or sound file you can select the shooting mode (p.53) and choose the optimal settings for a few buttons. With the Optio V20, you want to use them. (p.53, p.59) A shooting mode guide is selected. (p.53, p.59) Use the Green Mode to -Navigate Capture and Playback Functions! Easy-to take pictures easily using standard settings. (p.63) Display Images and Sound Files in Calendar Format! The user-friendly design of the Optio V20 enables easy operation...
... date in calendar format. (p.117) This lets you quickly find the image or sound file you can select the shooting mode (p.53) and choose the optimal settings for a few buttons. With the Optio V20, you want to use them. (p.53, p.59) A shooting mode guide is selected. (p.53, p.59) Use the Green Mode to -Navigate Capture and Playback Functions! Easy-to take pictures easily using standard settings. (p.63) Display Images and Sound Files in Calendar Format! The user-friendly design of the Optio V20 enables easy operation...
V20 Operating Manual
Page 17
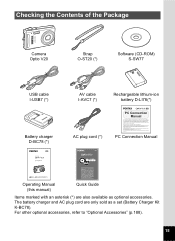
.... Checking the Contents of the Package Camera Optio V20 Strap O-ST20 (*) Software (CD-ROM) S-SW77 USB cable I-USB7 (*) Battery charger D-BC78 (*) Digital Camera Operating Manual AV cable I-AVC7 (*) Rechargeable lithium-ion battery D-LI78(*) AC plug cord (*) PC Connection Manual You can transfer images and movies captured with your digital camera to your computer and then display and manage them by installing the software included on your computer. PENTAX and Optio are registered trademarks of HOYA CORPORATION. ©...
.... Checking the Contents of the Package Camera Optio V20 Strap O-ST20 (*) Software (CD-ROM) S-SW77 USB cable I-USB7 (*) Battery charger D-BC78 (*) Digital Camera Operating Manual AV cable I-AVC7 (*) Rechargeable lithium-ion battery D-LI78(*) AC plug cord (*) PC Connection Manual You can transfer images and movies captured with your digital camera to your computer and then display and manage them by installing the software included on your computer. PENTAX and Optio are registered trademarks of HOYA CORPORATION. ©...
V20 Operating Manual
Page 20
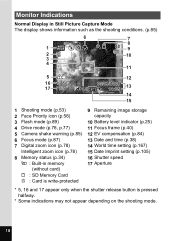
...) 3 Flash mode (p.89) 4 Drive mode (p.76, p.77) 5 Camera shake warning (p.85) 6 Focus mode (p.87) 7 Digital zoom icon (p.78) Intelligent zoom icon (p.78) 8 Memory status (p.34) + : Built-in memory (without card) a : SD Memory Card r : Card is write-protected 9 Remaining image storage capacity 10 Battery level indicator (p.25) 11 Focus frame (p.40) 12 EV compensation (p.84) 13 Date and time (p.38) 14 World time setting (p.167) 15 Date Imprint setting (p.105) 16 Shutter speed 17 Aperture * 5, 16 and 17 appear only when the shutter release button...
...) 3 Flash mode (p.89) 4 Drive mode (p.76, p.77) 5 Camera shake warning (p.85) 6 Focus mode (p.87) 7 Digital zoom icon (p.78) Intelligent zoom icon (p.78) 8 Memory status (p.34) + : Built-in memory (without card) a : SD Memory Card r : Card is write-protected 9 Remaining image storage capacity 10 Battery level indicator (p.25) 11 Focus frame (p.40) 12 EV compensation (p.84) 13 Date and time (p.38) 14 World time setting (p.167) 15 Date Imprint setting (p.105) 16 Shutter speed 17 Aperture * 5, 16 and 17 appear only when the shutter release button...
V20 Operating Manual
Page 22
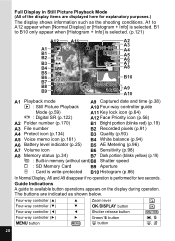
... Captured date and time (p.38) w : Still Picture Playback A10 Four-way controller guide Mode (p.59) A11 Key lock icon (p.64) P : Digital SR (p.122) A12 Face Priority icon (p.56) A2 Folder number (p.170) B1 Bright portion (blinks red) (p.19) A3 File number B2 Recorded pixels (p.91) A4 Protect icon (p.134) B3 Quality (p.93) A5 Voice memo icon (p.161) B4 White balance (p.94) A6 Battery level indicator (p.25) B5 AE Metering (p.96) A7 Volume icon B6 Sensitivity (p.98) A8 Memory...
... Captured date and time (p.38) w : Still Picture Playback A10 Four-way controller guide Mode (p.59) A11 Key lock icon (p.64) P : Digital SR (p.122) A12 Face Priority icon (p.56) A2 Folder number (p.170) B1 Bright portion (blinks red) (p.19) A3 File number B2 Recorded pixels (p.91) A4 Protect icon (p.134) B3 Quality (p.93) A5 Voice memo icon (p.161) B4 White balance (p.94) A6 Battery level indicator (p.25) B5 AE Metering (p.96) A7 Volume icon B6 Sensitivity (p.98) A8 Memory...
V20 Operating Manual
Page 30
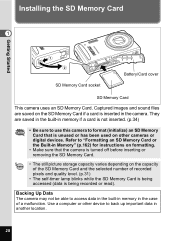
... self-timer lamp blinks while the SD Memory Card is being accessed (data is unused or has been used on other device to back up important data in another location. 28 Installing the SD Memory Card 1 Getting Started SD Memory Card socket Battery/Card cover SD Memory Card This camera uses an SD Memory Card. Refer to format (initialize) an SD Memory Card that the camera is inserted in Memory" (p.162) for instructions on the capacity of the SD Memory Card...
... self-timer lamp blinks while the SD Memory Card is being accessed (data is unused or has been used on other device to back up important data in another location. 28 Installing the SD Memory Card 1 Getting Started SD Memory Card socket Battery/Card cover SD Memory Card This camera uses an SD Memory Card. Refer to format (initialize) an SD Memory Card that the camera is inserted in Memory" (p.162) for instructions on the capacity of the SD Memory Card...

V20 Operating Manual
Page 32
... data deletion software programs available that is unused or has been used for data that is deleted (1) when the SD Memory Card is mishandled by 1 prohibiting recording of new data, deletion of existing data or formatting of important data on another camera. There are taking movies even when there is adequate space in the memory, or shooting and playback may become unreadable. Setting the switch to LOCK protects the existing data by the user. (2) when the SD Memory Card...
... data deletion software programs available that is unused or has been used for data that is deleted (1) when the SD Memory Card is mishandled by 1 prohibiting recording of new data, deletion of existing data or formatting of important data on another camera. There are taking movies even when there is adequate space in the memory, or shooting and playback may become unreadable. Setting the switch to LOCK protects the existing data by the user. (2) when the SD Memory Card...
V20 Operating Manual
Page 42
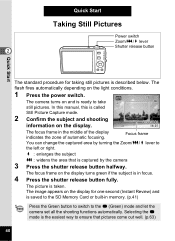
.... Quick Start Taking Still Pictures Power switch Zoom/w/x lever Shutter release button 2 Quick Start The standard procedure for one second (Instant Review) and is saved to the SD Memory Card or built-in memory. (p.41) Press the Green button to switch to the 9 (Green) mode and let the camera set all the shooting functions automatically. The flash fires automatically depending on the light conditions. 1 Press the power switch. 38 The camera turns on the display. 03/03/2008 14:25 The focus frame...
.... Quick Start Taking Still Pictures Power switch Zoom/w/x lever Shutter release button 2 Quick Start The standard procedure for one second (Instant Review) and is saved to the SD Memory Card or built-in memory. (p.41) Press the Green button to switch to the 9 (Green) mode and let the camera set all the shooting functions automatically. The flash fires automatically depending on the light conditions. 1 Press the power switch. 38 The camera turns on the display. 03/03/2008 14:25 The focus frame...
V20 Operating Manual
Page 43
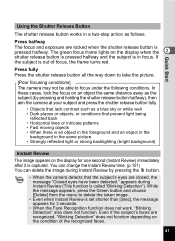
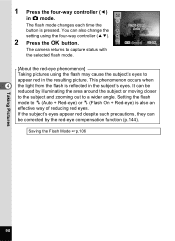
... shutter release button all the way down to take the picture. [Poor focusing conditions] The camera may not be able to delete the taken image. • Even when Instant Review is pressed halfway. While the message appears, press the Green button and choose [Delete] from the menu to focus under the following conditions. The green focus frame lights on the condition of focus, the frame turns red. In these cases, lock the focus...
... shutter release button all the way down to take the picture. [Poor focusing conditions] The camera may not be able to delete the taken image. • Even when Instant Review is pressed halfway. While the message appears, press the Green button and choose [Delete] from the menu to focus under the following conditions. The green focus frame lights on the condition of focus, the frame turns red. In these cases, lock the focus...
V20 Operating Manual
Page 52
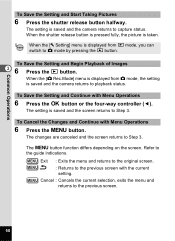
... to Step 3. The setting is saved and the screen returns to the guide indications. When the [W Setting] menu is taken. The 3 button function differs depending on the screen. Common Operations To Save the Setting and Start Taking Pictures 6 Press the shutter release button halfway. When the shutter release button is pressed fully, the picture is displayed from A mode, the setting is saved and the camera returns to the previous screen with the current setting. The changes are canceled and...
... to Step 3. The setting is saved and the screen returns to the guide indications. When the [W Setting] menu is taken. The 3 button function differs depending on the screen. Common Operations To Save the Setting and Start Taking Pictures 6 Press the shutter release button halfway. When the shutter release button is pressed fully, the picture is displayed from A mode, the setting is saved and the camera returns to the previous screen with the current setting. The changes are canceled and...
V20 Operating Manual
Page 54
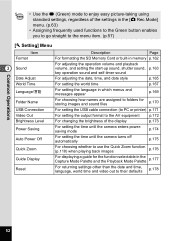
... Rec.Mode] menu. (p.63) • Assigning frequently used functions to the Green button enables you to go straight to the menu item. (p.57) [W Setting] Menu Item Format 3 Sound Date Adjust World Time Language/ Folder Name USB Connection Video Out Brightness Level Power Saving Auto Power Off Quick Zoom Guide Display Reset Description Page For formatting the SD Memory Card or built-in memory p.162 For adjusting the operation volume and playback volume, and setting the start-up sound, shutter sound, p.163 key operation sound and self-timer sound For adjusting the date, time, and date style...
... Rec.Mode] menu. (p.63) • Assigning frequently used functions to the Green button enables you to go straight to the menu item. (p.57) [W Setting] Menu Item Format 3 Sound Date Adjust World Time Language/ Folder Name USB Connection Video Out Brightness Level Power Saving Auto Power Off Quick Zoom Guide Display Reset Description Page For formatting the SD Memory Card or built-in memory p.162 For adjusting the operation volume and playback volume, and setting the start-up sound, shutter sound, p.163 key operation sound and self-timer sound For adjusting the date, time, and date style...
V20 Operating Manual
Page 92
... also change the setting using the flash may cause the subject's eyes to a wider angle. This phenomenon occurs when 4 the light from the flash is reflected in A mode. Saving the Flash Mode 1p.106 Taking Pictures 90 It can be reduced by the red-eye compensation function (p.144). The flash mode changes each time the button is also an effective way of reducing red eyes. 1 Press the four-way controller (4) in the subject's eyes. Setting the flash mode...
... also change the setting using the flash may cause the subject's eyes to a wider angle. This phenomenon occurs when 4 the light from the flash is reflected in A mode. Saving the Flash Mode 1p.106 Taking Pictures 90 It can be reduced by the red-eye compensation function (p.144). The flash mode changes each time the button is also an effective way of reducing red eyes. 1 Press the four-way controller (4) in the subject's eyes. Setting the flash mode...
V20 Operating Manual
Page 96
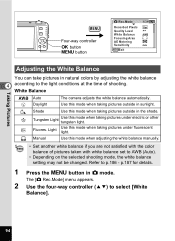
... light. Manual Use this mode when taking pictures under electric or other tungsten light. Shade Use this mode when adjusting the white balance manually. • Set another white balance if you are not satisfied with the color balance of shooting. p.187 for details. 1 Press the 3 button in A mode. Taking Pictures MENU Four-way controller 4 button 3 button Rec.Mode 1/3 Recorded Pixels 8M Quality Level White Balance AWB Focusing Area AE Metering Sensitivity Auto MENU Exit Adjusting the White Balance You can take pictures in natural colors by adjusting the white balance...
... light. Manual Use this mode when taking pictures under electric or other tungsten light. Shade Use this mode when adjusting the white balance manually. • Set another white balance if you are not satisfied with the color balance of shooting. p.187 for details. 1 Press the 3 button in A mode. Taking Pictures MENU Four-way controller 4 button 3 button Rec.Mode 1/3 Recorded Pixels 8M Quality Level White Balance AWB Focusing Area AE Metering Sensitivity Auto MENU Exit Adjusting the White Balance You can take pictures in natural colors by adjusting the white balance...
V20 Operating Manual
Page 119
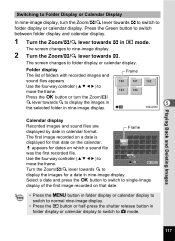
... the shutter release button in nine-image display. The screen changes to folder display or calendar display. The first image recorded on the calendar. Select a date and press the 4 button to switch to single-image display of folders with recorded images and sound files appears. Frame 100 101 102 103 104 5 100-0010 Calendar display Recorded images and sound files are displayed by date in calendar format. Playing Back and Deleting Images Switching to Folder Display or Calendar Display In nine-image display, turn the Zoom/f/ y lever towards y to display the images...
... the shutter release button in nine-image display. The screen changes to folder display or calendar display. The first image recorded on the calendar. Select a date and press the 4 button to switch to single-image display of folders with recorded images and sound files appears. Frame 100 101 102 103 104 5 100-0010 Calendar display Recorded images and sound files are displayed by date in calendar format. Playing Back and Deleting Images Switching to Folder Display or Calendar Display In nine-image display, turn the Zoom/f/ y lever towards y to display the images...
V20 Operating Manual
Page 169
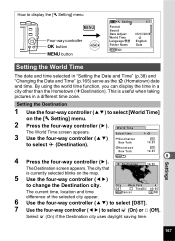
...). Select time 3 Use the four-way controller (23) Destination DOSFTF to display the [W Setting] menu MENU Four-way controller 4 button 3 button Setting 1/3 Format Sound Date Adjust World Time 03/03/2008 Folder Name MENU Exit Date Setting the World Time The date and time selected in a city other than the Hometown (XDestination). Select O (On) if the Destination city uses daylight saving time. By using the world time function, you can display the time in "Setting the Date and Time" (p.38) and "Changing the Date and Time" (p.165...
...). Select time 3 Use the four-way controller (23) Destination DOSFTF to display the [W Setting] menu MENU Four-way controller 4 button 3 button Setting 1/3 Format Sound Date Adjust World Time 03/03/2008 Folder Name MENU Exit Date Setting the World Time The date and time selected in a city other than the Hometown (XDestination). Select O (On) if the Destination city uses daylight saving time. By using the world time function, you can display the time in "Setting the Date and Time" (p.38) and "Changing the Date and Time" (p.165...
V20 Operating Manual
Page 178
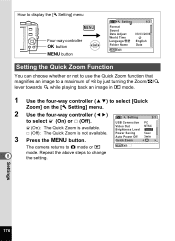
... camera returns to change the setting. Setting USB Connection Video Out Brightness Level Power Saving Auto Power Off Quick Zoom MENU CExaintcel 2/3 PC NTSC 5sec 3min OK Settings 176 How to display the [W Setting] menu MENU Four-way controller 4 button 3 button Setting 1/3 Format Sound Date Adjust World Time 03/03/2008 Folder Name MENU Exit Date Setting the Quick Zoom Function You can choose whether or not to use the Quick Zoom function that magnifies an image to a maximum of ×8 by just turning the Zoom/f/y lever towards y while playing back an image in Q mode. 1 2 3 8 Use...
... camera returns to change the setting. Setting USB Connection Video Out Brightness Level Power Saving Auto Power Off Quick Zoom MENU CExaintcel 2/3 PC NTSC 5sec 3min OK Settings 176 How to display the [W Setting] menu MENU Four-way controller 4 button 3 button Setting 1/3 Format Sound Date Adjust World Time 03/03/2008 Folder Name MENU Exit Date Setting the Quick Zoom Function You can choose whether or not to use the Quick Zoom function that magnifies an image to a maximum of ×8 by just turning the Zoom/f/y lever towards y while playing back an image in Q mode. 1 2 3 8 Use...
V20 Operating Manual
Page 208
..., 115, 125, 159, 161 Playback Mode 35 Playback Mode Palette ...... 59 Playing back movies ........ 125 Playing back sounds ....... 159 Power Saving 174 Power switch ......... 34, 44, 46 Press fully (shutter release button) ..... 41 Press halfway (shutter release button) ..... 41 Printing 152 Protect Z 134 Q Quality Level 31, 93 Quick Zoom 176 R Recorded Pixels 31, 32, 91, 110 Recording movies 108 Recording sounds 157 9 Recovering images .......... 133 Red-eye Compensation ... 144 Red-eye reduction cd 89, 90 Resetting settings 178 Resize 136 Rotating 43...
..., 115, 125, 159, 161 Playback Mode 35 Playback Mode Palette ...... 59 Playing back movies ........ 125 Playing back sounds ....... 159 Power Saving 174 Power switch ......... 34, 44, 46 Press fully (shutter release button) ..... 41 Press halfway (shutter release button) ..... 41 Printing 152 Protect Z 134 Q Quality Level 31, 93 Quick Zoom 176 R Recorded Pixels 31, 32, 91, 110 Recording movies 108 Recording sounds 157 9 Recovering images .......... 133 Red-eye Compensation ... 144 Red-eye reduction cd 89, 90 Resetting settings 178 Resize 136 Rotating 43...

