
User's Manual
Page 2
... Information 4 Eye Safety Warnings 5 Precautions 5 Product Features 7 Introduction 8 Package Overview 8 Product Overview 9 Main Unit 9 Connectors View 10 Control Panel 11 Remote Control 12 Connecting the Projector 14 Connect to Computer/Notebook...14 Connect to Memory Drive 15 Connect to Network 16 Connect to Video Sources............17 Using the... System Requirements....63 Network Display 64 For Windows Systems 64 For MAC-OS Systems 65 Network Display mode 66 Activating Network Display Mode..66 Open Optoma Web Utility 67 English 2
... Information 4 Eye Safety Warnings 5 Precautions 5 Product Features 7 Introduction 8 Package Overview 8 Product Overview 9 Main Unit 9 Connectors View 10 Control Panel 11 Remote Control 12 Connecting the Projector 14 Connect to Computer/Notebook...14 Connect to Memory Drive 15 Connect to Network 16 Connect to Video Sources............17 Using the... System Requirements....63 Network Display 64 For Windows Systems 64 For MAC-OS Systems 65 Network Display mode 66 Activating Network Display Mode..66 Open Optoma Web Utility 67 English 2
User's Manual
Page 3
...Contents Optoma Presentation Software.....68 Downloading the Software 68 Login 70 How to Project Image 71 Using the OPS Menu 73 Using Remote Desktop 75 Web Utility: Conference Control...76 Web Utility: Admin Settings...........78 ADMIN | Config 79 ADMIN | Video Output Setup 79 ADMIN | Change Passwords 80 ADMIN | Projector Control... Viewer 107 RS232 Commands and Protocol Function List 108 RS232 Pin Assignments 108 RS232 Protocol Function List......109 Ceiling Mount Installation 113 Optoma Global Offices 114 Regulation & Safety Notices....... 116 Class 1 Laser Product 117 3 English
...Contents Optoma Presentation Software.....68 Downloading the Software 68 Login 70 How to Project Image 71 Using the OPS Menu 73 Using Remote Desktop 75 Web Utility: Conference Control...76 Web Utility: Admin Settings...........78 ADMIN | Config 79 ADMIN | Video Output Setup 79 ADMIN | Change Passwords 80 ADMIN | Projector Control... Viewer 107 RS232 Commands and Protocol Function List 108 RS232 Pin Assignments 108 RS232 Protocol Function List......109 Ceiling Mount Installation 113 Optoma Global Offices 114 Regulation & Safety Notices....... 116 Class 1 Laser Product 117 3 English

User's Manual
Page 4
.... Please call Optoma before you to protect from over heating, it has been physically damaged or abused. DANGEROUS HIGH VOLTAGES ARE PRESENT INSIDE THE ENCLOSURE. Class B emissions limits This Class B digital apparatus meets all requirements of the Canadian Interference-Causing Equipment Regulations. To ensure reliable operation of the projector and to dangerous...
.... Please call Optoma before you to protect from over heating, it has been physically damaged or abused. DANGEROUS HIGH VOLTAGES ARE PRESENT INSIDE THE ENCLOSURE. Class B emissions limits This Class B digital apparatus meets all requirements of the Canadian Interference-Causing Equipment Regulations. To ensure reliable operation of the projector and to dangerous...

User's Manual
Page 5
...local reseller or service center to eyesight. 5 English Please contact your back to the beam as much as possible. ▀■ When projector is used in a classroom, adequately supervise students when they are asked to rain or moisture. ▀■ Warning- Laser pointer can ...▀■ Warning- Precautions Please follow all times. Usage Notice Eye Safety Warnings ▀■ Avoid staring/facing directly into the projector beam at all warnings, precautions and maintenance as recommended in this may hurt and damage your or someone's eyes. The bright light may...
...local reseller or service center to eyesight. 5 English Please contact your back to the beam as much as possible. ▀■ When projector is used in a classroom, adequately supervise students when they are asked to rain or moisture. ▀■ Warning- Laser pointer can ...▀■ Warning- Precautions Please follow all times. Usage Notice Eye Safety Warnings ▀■ Avoid staring/facing directly into the projector beam at all warnings, precautions and maintenance as recommended in this may hurt and damage your or someone's eyes. The bright light may...
User's Manual
Page 8
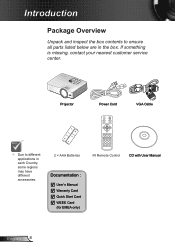
Introduction Package Overview Unpack and inspect the box contents to different applications in the box. FOCUS Projector Power Cord VGA Cable Due to ensure all parts listed below are in each Country, some regions may have different accessories. 2 × AAA Batteries ...
Introduction Package Overview Unpack and inspect the box contents to different applications in the box. FOCUS Projector Power Cord VGA Cable Due to ensure all parts listed below are in each Country, some regions may have different accessories. 2 × AAA Batteries ...

User's Manual
Page 11
Introduction Control Panel 12 34 5 10 6 9 8 7 Using the Control Panel 1 Light LED Indicate the projector light status. 2 Temp LED Indicate the projector temperature status. 3 Four Directional Select Keys 4 Enter 5 IR Receiver 6 Re-Sync 7 Power / Standy LED 8 Keystone 9 ... to select items or make adjustments to the input source. Automatically synchronize the projector to your item selection. Indicate the projector power status. Use to adjust image distortion caused by tilting the projector. (±40 degrees) Press to select an input signal. 11 English To...
Introduction Control Panel 12 34 5 10 6 9 8 7 Using the Control Panel 1 Light LED Indicate the projector light status. 2 Temp LED Indicate the projector temperature status. 3 Four Directional Select Keys 4 Enter 5 IR Receiver 6 Re-Sync 7 Power / Standy LED 8 Keystone 9 ... to select items or make adjustments to the input source. Automatically synchronize the projector to your item selection. Indicate the projector power status. Use to adjust image distortion caused by tilting the projector. (±40 degrees) Press to select an input signal. 11 English To...

User's Manual
Page 12
English 12 Introduction Remote Control Power Switch 1 26 2 Source Re-Sync 25 3 L R 24 4 23 Enter 5 22 6 Mode Page+ Page- 21 Keystone Volume 7 - + - + 20 Brightness Menu Zoom 8 1 2 3 19 HDMI Freeze AV mute 9 4 5 6 18 S-Video VGA Video 10 7 8 9 17 Contrast USB 3D 11 0 16 12 13 14 15 Using the Remote Control 1 Power Refer to the "Power On/Off the Projector" section on pages 14-15. 2 Source Press Source to select an input signal. 3 L Button Mouse left click. 4 Enter Confirm your item selection.
English 12 Introduction Remote Control Power Switch 1 26 2 Source Re-Sync 25 3 L R 24 4 23 Enter 5 22 6 Mode Page+ Page- 21 Keystone Volume 7 - + - + 20 Brightness Menu Zoom 8 1 2 3 19 HDMI Freeze AV mute 9 4 5 6 18 S-Video VGA Video 10 7 8 9 17 Contrast USB 3D 11 0 16 12 13 14 15 Using the Remote Control 1 Power Refer to the "Power On/Off the Projector" section on pages 14-15. 2 Source Press Source to select an input signal. 3 L Button Mouse left click. 4 Enter Confirm your item selection.

User's Manual
Page 13
...increase / decrease the volume. Choose HDMI as the source. Press the keys to the input source. Choose Composite video as the source. Automatically synchronizes the projector to enter numbers. Pause the screen image. Launch the on /off /on model) 6 Keystone +/- 7 Brightness 8 Freeze 9 HDMI 10 S-Video ... on the audio and video. Without Laser version: Press Mode to page down. Adjust image distortion caused by tilting the projector. Press this button to use the laser pointer. Momentarily turns off . Use this button to change modes. Mouse right click.
...increase / decrease the volume. Choose HDMI as the source. Press the keys to the input source. Choose Composite video as the source. Automatically synchronizes the projector to enter numbers. Pause the screen image. Launch the on /off /on model) 6 Keystone +/- 7 Brightness 8 Freeze 9 HDMI 10 S-Video ... on the audio and video. Without Laser version: Press Mode to page down. Adjust image distortion caused by tilting the projector. Press this button to use the laser pointer. Momentarily turns off . Use this button to change modes. Mouse right click.

User's Manual
Page 14
USB Type B Cable* 6. RS-232 Cable* 3. HDMI Cable* 5. Audio Input Cable* 7. Power Cord 2. Audio Output Cable* 8. VGA Output Cable* English 14 VGA Cable 4. Connecting the Projector Connect to Computer/Notebook 1 Due to the difference in applications for each country, some regions may have different accessories. (*) Optional accessory E62405SP R MOLEX MOLEX 6 2 34 5 molex RS232C VIDEO S-VIDEO SD Card RJ-45 VGA-IN/YPbPr VGA-OUT HDMI USB / AUDIO-IN MOUSE/SERVICE DISPLAY AUDIO-OUT PICTURE BY 8 7 1.
USB Type B Cable* 6. RS-232 Cable* 3. HDMI Cable* 5. Audio Input Cable* 7. Power Cord 2. Audio Output Cable* 8. VGA Output Cable* English 14 VGA Cable 4. Connecting the Projector Connect to Computer/Notebook 1 Due to the difference in applications for each country, some regions may have different accessories. (*) Optional accessory E62405SP R MOLEX MOLEX 6 2 34 5 molex RS232C VIDEO S-VIDEO SD Card RJ-45 VGA-IN/YPbPr VGA-OUT HDMI USB / AUDIO-IN MOUSE/SERVICE DISPLAY AUDIO-OUT PICTURE BY 8 7 1.

User's Manual
Page 15
USB flash drive* 15 English SD Card* 3. Power Cord 2. Connecting the Projector Connect to Memory Drive 1 RS232C VIDEO S-VIDEO SD Card RJ-45 VGA-IN/YPbPr VGA-OUT HDMI USB / AUDIO-IN MOUSE/SERVICE DISPLAY AUDIO-OUT E62405SP R 2 3 (*) Optional accessory 1.
USB flash drive* 15 English SD Card* 3. Power Cord 2. Connecting the Projector Connect to Memory Drive 1 RS232C VIDEO S-VIDEO SD Card RJ-45 VGA-IN/YPbPr VGA-OUT HDMI USB / AUDIO-IN MOUSE/SERVICE DISPLAY AUDIO-OUT E62405SP R 2 3 (*) Optional accessory 1.

User's Manual
Page 16
Network Cable* 3. Wi-Fi Dongle* (for wireless network functionality) English 16 Connecting the Projector Connect to Network 1 E62405SP R RS232C VIDEO S-VIDEO SD Card RJ-45 VGA-IN/YPbPr VGA-OUT HDMI USB / AUDIO-IN MOUSE/SERVICE DISPLAY AUDIO-OUT PICTURE BY 2 3 (*) Optional accessory 1. Power Cord 2.
Network Cable* 3. Wi-Fi Dongle* (for wireless network functionality) English 16 Connecting the Projector Connect to Network 1 E62405SP R RS232C VIDEO S-VIDEO SD Card RJ-45 VGA-IN/YPbPr VGA-OUT HDMI USB / AUDIO-IN MOUSE/SERVICE DISPLAY AUDIO-OUT PICTURE BY 2 3 (*) Optional accessory 1. Power Cord 2.

User's Manual
Page 17
... Cable 4. Audio Cable/RCA* 8. 15-Pin to the difference in applications for each country, some regions may have different accessories. (*) Optional accessory 1. Connecting the Projector Connect to Video Sources DVD Player, Set-top Box, HDTV receiver S-Video Output 2 3 4 5 6 Composite Video Output 1 R RS232C VIDEO S-VIDEO SD Card RJ-45 VGA-IN...
... Cable 4. Audio Cable/RCA* 8. 15-Pin to the difference in applications for each country, some regions may have different accessories. (*) Optional accessory 1. Connecting the Projector Connect to Video Sources DVD Player, Set-top Box, HDTV receiver S-Video Output 2 3 4 5 6 Composite Video Output 1 R RS232C VIDEO S-VIDEO SD Card RJ-45 VGA-IN...

User's Manual
Page 18
... on the control panel or the direct source key on the remote control to display on the remote control. Using the Projector Powering the projector On / Off Powering On the Projector 1. Press on the control panel or on the screen (computer, notebook, video player, etc). See page 42. The...in standby mode, VGA output, Audio pass-through and RJ45 are deactivated. 2. If you want to switch between inputs. If the projector does not automatically search for source, press on the control panel or the Menu button on the remote control. When connected, the POWER/STANDBY ...
... on the control panel or the direct source key on the remote control to display on the remote control. Using the Projector Powering the projector On / Off Powering On the Projector 1. Press on the control panel or on the screen (computer, notebook, video player, etc). See page 42. The...in standby mode, VGA output, Audio pass-through and RJ45 are deactivated. 2. If you want to switch between inputs. If the projector does not automatically search for source, press on the control panel or the Menu button on the remote control. When connected, the POWER/STANDBY ...

User's Manual
Page 19
...yellow green and the 68-69 for assistance. 19 English information. Press on , press to turn the projector on the control panel or the remote control to restart the projector. 3. Warning Indicator Warning indicators light up again, contact your nearest service center for more "POWER/STANDBY"... indicator flashes red. If you wish to turn off , disconnect the power cord from the projector, wait for 30 seconds and try again. Under normal conditions, the projector can be switched back on the screen. The "Power Off" message disappears if no button is...
...yellow green and the 68-69 for assistance. 19 English information. Press on , press to turn the projector on the control panel or the remote control to restart the projector. 3. Warning Indicator Warning indicators light up again, contact your nearest service center for more "POWER/STANDBY"... indicator flashes red. If you wish to turn off , disconnect the power cord from the projector, wait for 30 seconds and try again. Under normal conditions, the projector can be switched back on the screen. The "Power Off" message disappears if no button is...

User's Manual
Page 20
Repeat with elevator feet for adjusting the image height. 1. English 20 Tilt-Adjustment Feet Tilt-Adjustment Ring Using the Projector Adjusting the Projected Image Adjusting the Projector's Height The projector is equipped with the remaining feet as needed. Locate the adjustable foot you wish to lower it. Rotate the adjustable ring clockwise to raise the projector or counter clockwise to modify on the underside of the projector. 2.
Repeat with elevator feet for adjusting the image height. 1. English 20 Tilt-Adjustment Feet Tilt-Adjustment Ring Using the Projector Adjusting the Projected Image Adjusting the Projector's Height The projector is equipped with the remaining feet as needed. Locate the adjustable foot you wish to lower it. Rotate the adjustable ring clockwise to raise the projector or counter clockwise to modify on the underside of the projector. 2.

User's Manual
Page 21
... (D) Screen Screen (H) Offset (Hd) Height Diagonal Width 21 English Using the Projector Adjusting the Projector's Focus To focus the image, rotate the focus ring until the image is clear. XGA series: The projector will focus at distances from 1.64 to 8.2 feet (0.5 to 2.5 meters). ... WXGA series: The projector will focus at distances from 44.6" to 222.8" (1.1 to 2.5 meters). FOCUS Focus Ring...
... (D) Screen Screen (H) Offset (Hd) Height Diagonal Width 21 English Using the Projector Adjusting the Projector's Focus To focus the image, rotate the focus ring until the image is clear. XGA series: The projector will focus at distances from 1.64 to 8.2 feet (0.5 to 2.5 meters). ... WXGA series: The projector will focus at distances from 44.6" to 222.8" (1.1 to 2.5 meters). FOCUS Focus Ring...

User's Manual
Page 22
....00 5.08 3.81 200.00 150.00 300.00 6.10 4.57 240.16 179.92 This table is for user's reference only. Using the Projector XGA Diagonal length (inch) size of 16:10 Screen Screen Size W x H (m) (inch) Width Height Width Height 40.00 0.86 0.54 33.86 21.26 60...
....00 5.08 3.81 200.00 150.00 300.00 6.10 4.57 240.16 179.92 This table is for user's reference only. Using the Projector XGA Diagonal length (inch) size of 16:10 Screen Screen Size W x H (m) (inch) Width Height Width Height 40.00 0.86 0.54 33.86 21.26 60...

User's Manual
Page 23
... Input Source menu (see *) will be auto searched by doing one input source devices are connected, you can switch the input source manually by the projector. The number of input sources to auto search may affect the length of the input source, such as in: Only input sources selected... to scroll through the options. ►► Press the Source key on the remote control repeatedly to scroll through the mini USB port of the projector (see "USB Display mode" on page 62). ►► Memory Drive Display: When a flash drive or SD card is detected, the...
... Input Source menu (see *) will be auto searched by doing one input source devices are connected, you can switch the input source manually by the projector. The number of input sources to auto search may affect the length of the input source, such as in: Only input sources selected... to scroll through the options. ►► Press the Source key on the remote control repeatedly to scroll through the mini USB port of the projector (see "USB Display mode" on page 62). ►► Memory Drive Display: When a flash drive or SD card is detected, the...

User's Manual
Page 24
...panel or Menu on the main menu. or Enter to the main menu. 6. To exit, press or Menu again. The OSD menu closes and the projector automatically saves the new settings. Main Menu Sub Menu Settings English 24 The screen returns to 4. Adjusting the Settings On-screen Display Menu The... a multilingual On-screen Display menu that allows you to confirm. Press or Enter to make image adjustments and change your projector settings. When the OSD menu is highlighted, press enter the sub menu. How to select 3. keys to operate 1. Use the keys to select the desired...
...panel or Menu on the main menu. or Enter to the main menu. 6. To exit, press or Menu again. The OSD menu closes and the projector automatically saves the new settings. Main Menu Sub Menu Settings English 24 The screen returns to 4. Adjusting the Settings On-screen Display Menu The... a multilingual On-screen Display menu that allows you to confirm. Press or Enter to make image adjustments and change your projector settings. When the OSD menu is highlighted, press enter the sub menu. How to select 3. keys to operate 1. Use the keys to select the desired...

User's Manual
Page 26
... -5~5 -5~5 -5~5 On / Off 0~99 On / Off English 26 Position V. Adjusting the Settings Main Menu Sub Menu Language Setup Projection Menu Location 2Screen Type Network 4Signal Security Projector ID Mute Network State DHCP IP Address Subnet Mask Gateway DNS Apply Exit Automatic Phase Frequency H.
... -5~5 -5~5 -5~5 On / Off 0~99 On / Off English 26 Position V. Adjusting the Settings Main Menu Sub Menu Language Setup Projection Menu Location 2Screen Type Network 4Signal Security Projector ID Mute Network State DHCP IP Address Subnet Mask Gateway DNS Apply Exit Automatic Phase Frequency H.


