User's Manual
Page 1
...Zoom / Focus (0.65 WXGA Series)...20 Adjusting Projection Image Size...20 User Controls...21 Control Panel & Remote Control 21 On-screen Display Menus...24 How to operate...24 Menu Tree...25 Image...26 Display...31 Setup...33 Options...43 LAN_RJ45 (RJ45 models only 48 Appendices...51 Troubleshooting...51 Image Problems...51 Intermission Problems...53 Projector Status Indication...54 Remote Control Problems...55 Audio Problems...55 Replacing the Lamp...56 Cleaning the Projector...57 Compatibility Modes...58 RS232 Commands...60 RS232 Protocol Function List...61 Ceiling Installation...64 Optoma...
...Zoom / Focus (0.65 WXGA Series)...20 Adjusting Projection Image Size...20 User Controls...21 Control Panel & Remote Control 21 On-screen Display Menus...24 How to operate...24 Menu Tree...25 Image...26 Display...31 Setup...33 Options...43 LAN_RJ45 (RJ45 models only 48 Appendices...51 Troubleshooting...51 Image Problems...51 Intermission Problems...53 Projector Status Indication...54 Remote Control Problems...55 Audio Problems...55 Replacing the Lamp...56 Cleaning the Projector...57 Compatibility Modes...58 RS232 Commands...60 RS232 Protocol Function List...61 Ceiling Installation...64 Optoma...
User's Manual
Page 2
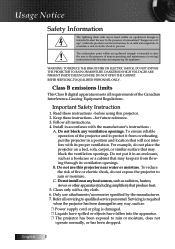
... fallen into the apparatus. Read these instructions -for future reference. 3. Keep these instructions -before using this projector near any heat sources, such as : r Power supply cord or plug is damaged. Follow all servicing to qualified service personnel. Only use this projector. 2. r The projector has been exposed to persons. To ensure reliable operation of the projector and to protect it from overheating, put it in an enclosure, such...
... fallen into the apparatus. Read these instructions -for future reference. 3. Keep these instructions -before using this projector near any heat sources, such as : r Power supply cord or plug is damaged. Follow all servicing to qualified service personnel. Only use this projector. 2. r The projector has been exposed to persons. To ensure reliable operation of the projector and to protect it from overheating, put it in an enclosure, such...
User's Manual
Page 4
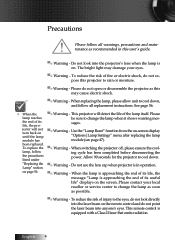
... warning messages. ▀■ Warning - Use the "Lamp Reset" function from the on page 56. ▀■ Warning - When switching the projector off, please ensure the cooling cycle has been completed before disconnecting the power. Please contact your eyes. ▀■ Warning - This remote control is in this projector to cool down , and follow the procedures listed under "Replacing the Lamp" section on -screen display "Options|Lamp Settings" menu after replacing the lamp...
... warning messages. ▀■ Warning - Use the "Lamp Reset" function from the on page 56. ▀■ Warning - When switching the projector off, please ensure the cooling cycle has been completed before disconnecting the power. Please contact your eyes. ▀■ Warning - This remote control is in this projector to cool down , and follow the procedures listed under "Replacing the Lamp" section on -screen display "Options|Lamp Settings" menu after replacing the lamp...
User's Manual
Page 6
.... ▀■ Ensure that projectors are located out of the line of light at the projector lamp. Usage Notice Eye Safety Warnings ▀■ Avoid staring directly into the projector's beam of sight from the screen to the audience; Keep your back to the beam as much as possible. ▀■ Using a stick or laser pointer is used in a classroom, adequately...
.... ▀■ Ensure that projectors are located out of the line of light at the projector lamp. Usage Notice Eye Safety Warnings ▀■ Avoid staring directly into the projector's beam of sight from the screen to the audience; Keep your back to the beam as much as possible. ▀■ Using a stick or laser pointer is used in a classroom, adequately...

User's Manual
Page 7
...+, SXGA, WXGA, WUXGA, XGA, SVGA, VGA u Video Compatibility: ■ NTSC, NTSC4.43 ■ PAL/PAL-M/PAL-N/SECAM ■ SDTV and EDTV compatible ■ HDTV compatible (720p, 1080i, 1080p) u Auto source detection with user definable settings u Fully featured IR remote control with laser pointer and mouse control u User friendly multilingual On Screen Menu u Advanced digital keystone correction and high quality full screen image re-scaling u User friendly control panel u One built-in...
...+, SXGA, WXGA, WUXGA, XGA, SVGA, VGA u Video Compatibility: ■ NTSC, NTSC4.43 ■ PAL/PAL-M/PAL-N/SECAM ■ SDTV and EDTV compatible ■ HDTV compatible (720p, 1080i, 1080p) u Auto source detection with user definable settings u Fully featured IR remote control with laser pointer and mouse control u User friendly multilingual On Screen Menu u Advanced digital keystone correction and high quality full screen image re-scaling u User friendly control panel u One built-in...
User's Manual
Page 15
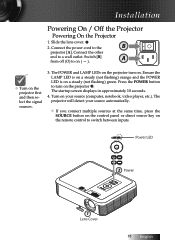
...notebook, video player, etc.). u 2. v If you connect multiple sources at the same time, press the SOURCE button on the control panel or direct source key on the remote control to on your source automatically. A v Turn on a steady (not flashing) green. Press the POWER button to turn on the projector v. Slide the lens cover. The POWER and LAMP LEDs on the projector turn on . Installation Powering On / Off the Projector Powering On the Projector 1. SOURCE LAMP POWER KEYSTONE Power LED RE-SYNC ENTER KEYSTONE POWER AV-MUTE MENU VOLUME 2 Power 1 Lens Cover 15...
...notebook, video player, etc.). u 2. v If you connect multiple sources at the same time, press the SOURCE button on the control panel or direct source key on the remote control to on your source automatically. A v Turn on a steady (not flashing) green. Press the POWER button to turn on the projector v. Slide the lens cover. The POWER and LAMP LEDs on the projector turn on . Installation Powering On / Off the Projector Powering On the Projector 1. SOURCE LAMP POWER KEYSTONE Power LED RE-SYNC ENTER KEYSTONE POWER AV-MUTE MENU VOLUME 2 Power 1 Lens Cover 15...
User's Manual
Page 16
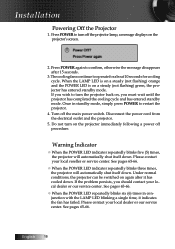
... the POWER LED indicator repeatedly blinks three times, the projector will automatically shut itself down . If the problem persists, you must wait until the projector has completed the cooling cycle and has entered standby mode. Press POWER again to restart the projector. 4. Installation Powering Off the Projector 1. Press POWER to operate for about 10 seconds for cooling cycle. The cooling fans continue to turn on the projector's screen. 2. Do not turn off the projector lamp, a message displays...
... the POWER LED indicator repeatedly blinks three times, the projector will automatically shut itself down . If the problem persists, you must wait until the projector has completed the cooling cycle and has entered standby mode. Press POWER again to restart the projector. 4. Installation Powering Off the Projector 1. Press POWER to operate for about 10 seconds for cooling cycle. The cooling fans continue to turn on the projector's screen. 2. Do not turn off the projector lamp, a message displays...

User's Manual
Page 21
.... SOURCE Press SOURCE to the input source. MENU Press MENU to the "Power On/Off the Projector" section on -screen display (OSD) menu. POWER LED Indicate the projector's status. ENTER Confirm your item selection. RE-SYNC Automatically synchronizes the projector to select an input signal. 21 English User Controls Control Panel & Remote Control Control Panel LAMP POWER KEYSTONE SOURCE RE-SYNC ENTER KEYSTONE POWER AV-MUTE MENU VOLUME Using the Control Panel KEYSTONE Adjust the image Keystone positively. AV-MUTE Momentarily turns off / on the audio and video...
.... SOURCE Press SOURCE to the input source. MENU Press MENU to the "Power On/Off the Projector" section on -screen display (OSD) menu. POWER LED Indicate the projector's status. ENTER Confirm your item selection. RE-SYNC Automatically synchronizes the projector to select an input signal. 21 English User Controls Control Panel & Remote Control Control Panel LAMP POWER KEYSTONE SOURCE RE-SYNC ENTER KEYSTONE POWER AV-MUTE MENU VOLUME Using the Control Panel KEYSTONE Adjust the image Keystone positively. AV-MUTE Momentarily turns off / on the audio and video...

User's Manual
Page 32
... adjust image distortion vertically and to move the image left on the projected screen. English 32 V Image Shift (16:9 only) Shifts the projected image position vertically (in a video image. Overscan the image to move the image up on the projected screen. 4 Press ► to remove video encoding noise on the projected screen. Zoom 4 Press ◄ to reduce the size of the image. 4 Press ► to magnify an image on the edge of video source. User Controls Display...
... adjust image distortion vertically and to move the image left on the projected screen. English 32 V Image Shift (16:9 only) Shifts the projected image position vertically (in a video image. Overscan the image to move the image up on the projected screen. 4 Press ► to remove video encoding noise on the projected screen. Zoom 4 Press ◄ to reduce the size of the image. 4 Press ► to magnify an image on the edge of video source. User Controls Display...

User's Manual
Page 36
Phase Phase synchronizes the signal timing of your computer's graphic card. V. User Controls Setup | Signal Frequency Change the display data frequency to match the frequency of the display with the graphic card. If you experience an unstable or flickering image, use this function to move the image up. Position 4 Press ◄ to move the image left. 4 Press ► to correct it. English 36 H. Position 4 Press ◄...
Phase Phase synchronizes the signal timing of your computer's graphic card. V. User Controls Setup | Signal Frequency Change the display data frequency to match the frequency of the display with the graphic card. If you experience an unstable or flickering image, use this function to move the image up. Position 4 Press ◄ to move the image left. 4 Press ► to correct it. English 36 H. Position 4 Press ◄...

User's Manual
Page 37
... following screen displays 60 seconds before the password is required to the security menu. Enter the Months, Days, and hours that the projector can be used without entering the password. User Controls Setup | Security Security Timer Enter the Security Timer sub menu. Once activated, the projector requires a password on the specified dates and times to allow power on and access to access Setup | Security unless the Security Timer or Security Setting...
... following screen displays 60 seconds before the password is required to the security menu. Enter the Months, Days, and hours that the projector can be used without entering the password. User Controls Setup | Security Security Timer Enter the Security Timer sub menu. Once activated, the projector requires a password on the specified dates and times to allow power on and access to access Setup | Security unless the Security Timer or Security Setting...

User's Manual
Page 47
Select Yes to reset the lamp counter to accurately reflect the new lamp's life span. 1. A confirmation screen displays. 2. User Controls Options | Lamp Setting Lamp Reset After replacing the lamp, reset the lamp counter to zero. 47 English Select Lamp Reset.
Select Yes to reset the lamp counter to accurately reflect the new lamp's life span. 1. A confirmation screen displays. 2. User Controls Options | Lamp Setting Lamp Reset After replacing the lamp, reset the lamp counter to zero. 47 English Select Lamp Reset.
User's Manual
Page 51
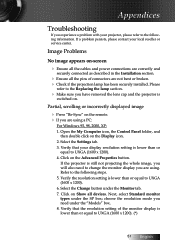
... reseller or service center. Appendices Troubleshooting If you need to change the monitor display you are using a PC: For Windows 95, 98, 2000, XP: 1. Open the My Computer icon, the Control Panel folder, and then double click on the Advanced Properties button. If the projector is lower than or equal to UXGA (1600 x 1200). 6. Click on -screen 4 Ensure all the cables and power connections are...
... reseller or service center. Appendices Troubleshooting If you need to change the monitor display you are using a PC: For Windows 95, 98, 2000, XP: 1. Open the My Computer icon, the Control Panel folder, and then double click on the Advanced Properties button. If the projector is lower than or equal to UXGA (1600 x 1200). 6. Click on -screen 4 Ensure all the cables and power connections are...

User's Manual
Page 53
... power cord and wait at least 60 seconds before reconnecting power. Image is reversed 4 Select Setup | Projection from the screen. 4 Press [Menu] button on the remote control or projector panel, go to all controls 4 If possible, turn on until the sides are vertical on the Keystone is not remote control. Lamp burns out or makes a popping sound 4 When the lamp reaches its end of 4 Press [Keystone +/-] button until the lamp module has been replaced. v Use of life...
... power cord and wait at least 60 seconds before reconnecting power. Image is reversed 4 Select Setup | Projection from the screen. 4 Press [Menu] button on the remote control or projector panel, go to all controls 4 If possible, turn on until the sides are vertical on the Keystone is not remote control. Lamp burns out or makes a popping sound 4 When the lamp reaches its end of 4 Press [Keystone +/-] button until the lamp module has been replaced. v Use of life...

User's Manual
Page 55
... the remote control and the projector. Audio Problems There is distorted 4 Check the audio cable connection. 4 Test the source audio output with other speakers. 4 Have the projector serviced. 55 English Message Reminders 4 Replacing the lamp: Appendices 4 Out of the audio source. 4 Check the audio cable connection. 4 Test the source audio output with other speakers. 4 Have the projector serviced. Move to within 7m (23 ft) of the projector. 4 Make sure the batteries are no sound 4 Adjust the volume on the remote control. 4 Adjust...
... the remote control and the projector. Audio Problems There is distorted 4 Check the audio cable connection. 4 Test the source audio output with other speakers. 4 Have the projector serviced. 55 English Message Reminders 4 Replacing the lamp: Appendices 4 Out of the audio source. 4 Check the audio cable connection. 4 Test the source audio output with other speakers. 4 Have the projector serviced. Move to within 7m (23 ft) of the projector. 4 Make sure the batteries are no sound 4 Adjust the volume on the remote control. 4 Adjust...

User's Manual
Page 61
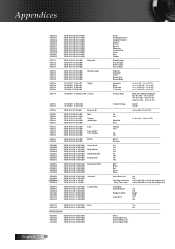
...37 20 31 0D Color Space Auto ~XX37 2 7E 30 30 33 37 20 32 0D RGB ~XX37 3 7E 30 30 33 37 20 33 0D YUV ~XX39 2 7E 30 30 33 39 20 32 0D Input Source DVI-I ~XX39 5 7E 30 30 33 39 20 35 0D VGA ~XX39 9 7E 30... RS232 Commands Baud Rate : 9600 Data Bits: 8 Parity: None Stop Bits: 1 Flow Control None UART16550 FIFO: Disable Projector Return (Pass): P Projector Return (Fail): F XX=01-99, projector's ID XX=00 is for all projectors SEND to projector Note : There is a after all ASCII commands 0D is the HEX code for in ASCII code 232 ASCII Code HEX Code Function Description...
...37 20 31 0D Color Space Auto ~XX37 2 7E 30 30 33 37 20 32 0D RGB ~XX37 3 7E 30 30 33 37 20 33 0D YUV ~XX39 2 7E 30 30 33 39 20 32 0D Input Source DVI-I ~XX39 5 7E 30 30 33 39 20 35 0D VGA ~XX39 9 7E 30... RS232 Commands Baud Rate : 9600 Data Bits: 8 Parity: None Stop Bits: 1 Flow Control None UART16550 FIFO: Disable Projector Return (Pass): P Projector Return (Fail): F XX=01-99, projector's ID XX=00 is for all projectors SEND to projector Note : There is a after all ASCII commands 0D is the HEX code for in ASCII code 232 ASCII Code HEX Code Function Description...
User's Manual
Page 62
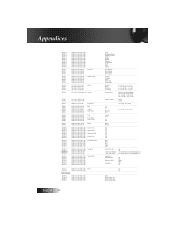
... 31 20 31 0D Projection Front-Desktop ~XX71 2 7E 30 30 37 31 20 32 0D Rear-Desktop ~XX71 3 7E 30 30 37 31 20 33 0D Front-Ceiling ~XX71 4 7E 30 30 37 31 20 34 0D Rear-Ceiling ~XX72 1 7E 30 30 37 32 20 31 0D Menu Location Top Left ~XX72 2 7E... 30 30 31 30 36 20 a 0D Auto Power Off (min) n=0 (a=30)-120 (a=31 32 30) (multiple of 5) ~XX107 n 7E 30 30 31 30 37 20 a 0D Sleep Timer (min) n=0 (a=30)-900 (a=39 30 30) (multiple of 5) ~XX108 1 7E 30 30 31 30 38 20 31 0D Lamp Setting Lamp Hour ~XX109 1 7E 30 30 31 30...
... 31 20 31 0D Projection Front-Desktop ~XX71 2 7E 30 30 37 31 20 32 0D Rear-Desktop ~XX71 3 7E 30 30 37 31 20 33 0D Front-Ceiling ~XX71 4 7E 30 30 37 31 20 34 0D Rear-Ceiling ~XX72 1 7E 30 30 37 32 20 31 0D Menu Location Top Left ~XX72 2 7E... 30 30 31 30 36 20 a 0D Auto Power Off (min) n=0 (a=30)-120 (a=31 32 30) (multiple of 5) ~XX107 n 7E 30 30 31 30 37 20 a 0D Sleep Timer (min) n=0 (a=30)-900 (a=39 30 30) (multiple of 5) ~XX108 1 7E 30 30 31 30 38 20 31 0D Lamp Setting Lamp Hour ~XX109 1 7E 30 30 31 30...
Protocol Function
Page 3
... 31 20 31 0D Projection Front-Desktop ~XX71 2 ~XX71 3 7E 30 30 37 31 20 32 0D 7E 30 30 37 31 20 33 0D Rear-Desktop Front-Ceiling ~XX71 4 7E 30 30 37 31 20 34 0D Rear-Ceiling ~XX72 1 7E 30 30 37 32 20 31 0D Menu Location Top Left ~XX72 2 7E... 30 30 31 30 36 20 a 0D Auto Power Off (min) n=0 (a=30)-120 (a=31 32 30) (multiple of 5) ~XX107 n 7E 30 30 31 30 37 20 a 0D Sleep Timer (min) n=0 (a=30)-900 (a=39 30 30) (multiple of 5) ~XX108 1 7E 30 30 31 30 38 20 31 0D Lamp Setting Lamp Hour ~XX109 1 7E 30 30 31 30...
... 31 20 31 0D Projection Front-Desktop ~XX71 2 ~XX71 3 7E 30 30 37 31 20 32 0D 7E 30 30 37 31 20 33 0D Rear-Desktop Front-Ceiling ~XX71 4 7E 30 30 37 31 20 34 0D Rear-Ceiling ~XX72 1 7E 30 30 37 32 20 31 0D Menu Location Top Left ~XX72 2 7E... 30 30 31 30 36 20 a 0D Auto Power Off (min) n=0 (a=30)-120 (a=31 32 30) (multiple of 5) ~XX107 n 7E 30 30 31 30 37 20 a 0D Sleep Timer (min) n=0 (a=30)-900 (a=39 30 30) (multiple of 5) ~XX108 1 7E 30 30 31 30 38 20 31 0D Lamp Setting Lamp Hour ~XX109 1 7E 30 30 31 30...

Datasheet
Page 1
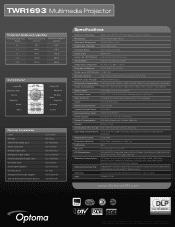
...) Lamp Life and Type 3000/2000 Hours (STD/Bright) 280W UHP Throw Ratio 1.51-1.74:1 (Distance/Width) Image Size (Diagonal) 27" to 307" (0.68 to 7.79m) Projection Distance 3.3' to 32.8' (1.0 to 10.0 m) Remote Control Fully Featured Remote Control w/Mouse and Laser Pointer Displayable Colors 134.2 Million Audio One 3-Watt Speaker User Controls Complete On Screen Menu Adjustments in 22 Languages Aspect Ratio 16:10 Native, 16:9, 4:3 Compatible Computer Compatibility VGA, SVGA, XGA...
...) Lamp Life and Type 3000/2000 Hours (STD/Bright) 280W UHP Throw Ratio 1.51-1.74:1 (Distance/Width) Image Size (Diagonal) 27" to 307" (0.68 to 7.79m) Projection Distance 3.3' to 32.8' (1.0 to 10.0 m) Remote Control Fully Featured Remote Control w/Mouse and Laser Pointer Displayable Colors 134.2 Million Audio One 3-Watt Speaker User Controls Complete On Screen Menu Adjustments in 22 Languages Aspect Ratio 16:10 Native, 16:9, 4:3 Compatible Computer Compatibility VGA, SVGA, XGA...
Brochure
Page 2
TWR1693| Multimedia Projector Projection Distance/Image Size Projection Distance (Feet) Maximum Diagonal (Inches) Minimum Diagonal (Inches) 3.3 30.7 26.7 11.2 104.5 90.7 18 169.1 146.8 25.3 236.8 205.5 32.8 307.5 266.8 Control Panel Lamp LED Directional Keys Source Keystone Power Menu Power LED Keystone Re-Sync Enter Keystone AV-Mute Volume Optional Accessories Lamp: Remote: VGA to VGA Cable (2m): Power Cord (1m): S-Video Cable (2m): Composite Cable (1.8m): VGA to Component Cable (2m): DVI Cable (2m): DVI to HDMI Adapter: Carrying Case: Minijack to RCA Audio Adapter: 106"...
TWR1693| Multimedia Projector Projection Distance/Image Size Projection Distance (Feet) Maximum Diagonal (Inches) Minimum Diagonal (Inches) 3.3 30.7 26.7 11.2 104.5 90.7 18 169.1 146.8 25.3 236.8 205.5 32.8 307.5 266.8 Control Panel Lamp LED Directional Keys Source Keystone Power Menu Power LED Keystone Re-Sync Enter Keystone AV-Mute Volume Optional Accessories Lamp: Remote: VGA to VGA Cable (2m): Power Cord (1m): S-Video Cable (2m): Composite Cable (1.8m): VGA to Component Cable (2m): DVI Cable (2m): DVI to HDMI Adapter: Carrying Case: Minijack to RCA Audio Adapter: 106"...


