

Optoma_TW615-3D_Datasheet
Page 1
Featuring a built-in 10-watt speaker system and wired network management, the TW615-3D is equipped with Laser Pointer and Mouse Functions Displayable Colors 1.07 Billion Offset 112.5% Uniformity 85% Computer Compatibility UXGA, WXGA, ... for nearly any installation. TW615-3D Dazzle & Captivate Your Audience The Optoma TW615-3D delivers exceptional brightness to 40°C), 80% Max Humidity Power Supply AC Input 100-240V, 50-60Hz, Auto-Switching Power Consumption 328 Watts (Bright), 272 Watts (STD) Projector Expert TW615-3D − Multimedia Projector Datasheet - bright at 3500...
Featuring a built-in 10-watt speaker system and wired network management, the TW615-3D is equipped with Laser Pointer and Mouse Functions Displayable Colors 1.07 Billion Offset 112.5% Uniformity 85% Computer Compatibility UXGA, WXGA, ... for nearly any installation. TW615-3D Dazzle & Captivate Your Audience The Optoma TW615-3D delivers exceptional brightness to 40°C), 80% Max Humidity Power Supply AC Input 100-240V, 50-60Hz, Auto-Switching Power Consumption 328 Watts (Bright), 272 Watts (STD) Projector Expert TW615-3D − Multimedia Projector Datasheet - bright at 3500...
User Manual
Page 1
... Adjusting the Projector's Height ........ 15 Adjusting the Projector's Zoom / Focus 16 Adjusting Projection Image Size......... 16 User Controls 18 Control Panel & Remote Control.......18 Control Panel 18 Remote Control 19 On-screen Display Menus 24 How to operate 24 Menu Tree 25 IMAGE 27 IMAGE | Advanced 29 DISPLAY 31 DISPLAY | 3D 34 SETUP...Compatibility 57 Video Compatibility 58 RS232 Commands and Protocol Function List 59 RS232 Pin Assignments 59 RS232 Protocol Function List 60 Ceiling Mount Installation 64 Optoma Global Offices 65 Regulation & Safety Notices 67 1 English
... Adjusting the Projector's Height ........ 15 Adjusting the Projector's Zoom / Focus 16 Adjusting Projection Image Size......... 16 User Controls 18 Control Panel & Remote Control.......18 Control Panel 18 Remote Control 19 On-screen Display Menus 24 How to operate 24 Menu Tree 25 IMAGE 27 IMAGE | Advanced 29 DISPLAY 31 DISPLAY | 3D 34 SETUP...Compatibility 57 Video Compatibility 58 RS232 Commands and Protocol Function List 59 RS232 Pin Assignments 59 RS232 Protocol Function List 60 Ceiling Mount Installation 64 Optoma Global Offices 65 Regulation & Safety Notices 67 1 English
User Manual
Page 2
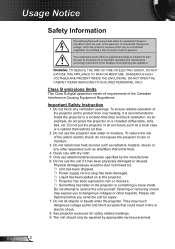
...coffee table, sofa, bed, etc. Physical damage/abuse would be (but not limited to persons. DO NOT OPEN THE CABINET. Please call Optoma before you to protect from over heating, it has been physically damaged or abused. The unit should only be of sufficient magnitude to constitute ...a risk of the projector and to dangerous voltages or other apparatus such as radiators, heaters, stoves or any ventilation openings. The exclamation point within an equilateral ...
...coffee table, sofa, bed, etc. Physical damage/abuse would be (but not limited to persons. DO NOT OPEN THE CABINET. Please call Optoma before you to protect from over heating, it has been physically damaged or abused. The unit should only be of sufficient magnitude to constitute ...a risk of the projector and to dangerous voltages or other apparatus such as radiators, heaters, stoves or any ventilation openings. The exclamation point within an equilateral ...

User Manual
Page 3
...page 49). ▀■ Warning- Please be sure to change the lamp as soon as this may hurt and damage your remote control into the projector's lens when the lamp is on your eyes. ▀■ Warning- Reset the "Lamp Reset" function from the on-screen display "OPTIONS .... ▀■ Warning- Do not look into or point the laser pointer on . When the lamp is in this projector to eyesight. 3 English When switching the projector off, please ensure the cooling cycle has been completed before disconnecting power. The bright light may cause electric shock. ▀■...
...page 49). ▀■ Warning- Please be sure to change the lamp as soon as this may hurt and damage your remote control into the projector's lens when the lamp is on your eyes. ▀■ Warning- Reset the "Lamp Reset" function from the on-screen display "OPTIONS .... ▀■ Warning- Do not look into or point the laser pointer on . When the lamp is in this projector to eyesight. 3 English When switching the projector off, please ensure the cooling cycle has been completed before disconnecting power. The bright light may cause electric shock. ▀■...

User Manual
Page 5
Usage Notice Eye Safety Warnings ▀■ Avoid staring/facing directly into the projector beam at all times. Keep your back to reduce ambient light levels. Product Features Monitor loop through only support in VGA1-In/ SCART/YPbPr. &#... on the screen. ▀■ In order to minimize the lamp power, use room blinds to the beam as much as possible. ▀■ When projector is used in speakers ▀■ Network support 5 English
Usage Notice Eye Safety Warnings ▀■ Avoid staring/facing directly into the projector beam at all times. Keep your back to reduce ambient light levels. Product Features Monitor loop through only support in VGA1-In/ SCART/YPbPr. &#... on the screen. ▀■ In order to minimize the lamp power, use room blinds to the beam as much as possible. ▀■ When projector is used in speakers ▀■ Network support 5 English
User Manual
Page 6
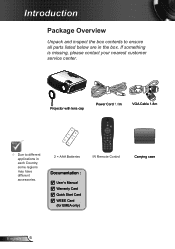
POWER Projector with lens cap Power Cord 1.8m VGA Cable 1.8m Due to ensure all parts listed below are in each Country, some regions may have different accessories. 2 × AAA Batteries Documentation : User's Manual Warranty Card Quick Start Card WEEE Card (for EMEA only) IR Remote Control Carrying case English 6 Introduction Package Overview Unpack and inspect the box contents to different applications in the box. If something is missing, please contact your nearest customer service center. ?
POWER Projector with lens cap Power Cord 1.8m VGA Cable 1.8m Due to ensure all parts listed below are in each Country, some regions may have different accessories. 2 × AAA Batteries Documentation : User's Manual Warranty Card Quick Start Card WEEE Card (for EMEA only) IR Remote Control Carrying case English 6 Introduction Package Overview Unpack and inspect the box contents to different applications in the box. If something is missing, please contact your nearest customer service center. ?

User Manual
Page 11
Installation Connecting the Projector Connect to Computer/Notebook 3 MOLEX 5 4 Audio Output +12V Output 8 9 1 Due to the difference in applications for each country, some regions may have different accessories. &#...
Installation Connecting the Projector Connect to Computer/Notebook 3 MOLEX 5 4 Audio Output +12V Output 8 9 1 Due to the difference in applications for each country, some regions may have different accessories. &#...

User Manual
Page 13
Securely connect the power cord and signal cable. Installation Powering the projector On / Off Powering On the Projector 1. Turn on the lamp by pressing " " button either on the top of When Power mode (Standby) is set to Eco ( Remove the lens cap. 2. When connected, the POWER/STANDBY LED will turn Amber. 3.
Securely connect the power cord and signal cable. Installation Powering the projector On / Off Powering On the Projector 1. Turn on the lamp by pressing " " button either on the top of When Power mode (Standby) is set to Eco ( Remove the lens cap. 2. When connected, the POWER/STANDBY LED will turn Amber. 3.

User Manual
Page 14
...turn on . "TEMP" LED indicator flashes red and if "POWER/STAND- When the POWER/STANDBY LED lights solid Amber, the projector has entered standby mode. Warning Indicator When the warning indicators (see below) come on the screen. Press the " " button on the ...remote control or on , you wish to restart the projector. 3. Press the " " button again to confirm otherwise the message will automatically shutdown: Contact the nearest service center if the ...
...turn on . "TEMP" LED indicator flashes red and if "POWER/STAND- When the POWER/STANDBY LED lights solid Amber, the projector has entered standby mode. Warning Indicator When the warning indicators (see below) come on the screen. Press the " " button on the ...remote control or on , you wish to restart the projector. 3. Press the " " button again to confirm otherwise the message will automatically shutdown: Contact the nearest service center if the ...

User Manual
Page 15
Repeat with elevator feet for adjusting the image height. 1. Rotate the adjustable ring clockwise to raise the projector or counter clockwise to modify on the underside of the projector. 2. Tilt-Adjustment Feet Tilt-Adjustment Ring 15 English Installation Adjusting the Projected Image Adjusting the Projector's Height The projector is equipped with the remaining feet as needed. Locate the adjustable foot you wish to lower it.
Repeat with elevator feet for adjusting the image height. 1. Rotate the adjustable ring clockwise to raise the projector or counter clockwise to modify on the underside of the projector. 2. Tilt-Adjustment Feet Tilt-Adjustment Ring 15 English Installation Adjusting the Projected Image Adjusting the Projector's Height The projector is equipped with the remaining feet as needed. Locate the adjustable foot you wish to lower it.

User Manual
Page 16
..., rotate the focus ring until the image is clear. XGA series: The projector will focus at distances from 4.92 to 39.4 feet (1.5 to 12.0 meters). WXGA series: The projector will focus at distances from 36.3" to 362.0" (0.9 to 9.2 meters). Top View ...Side View Screen Screen (W) Projection Distance (D) Projection Distance (D) Screen Screen (H) Offset (Hd) Height Diagonal Width English 16 POWER Installation Adjusting the Projector's Zoom / Focus You may turn the zoom ring to 10.0 meters). Zoom Ring Focus Ring Adjusting Projection Image Size XGA series:...
..., rotate the focus ring until the image is clear. XGA series: The projector will focus at distances from 4.92 to 39.4 feet (1.5 to 12.0 meters). WXGA series: The projector will focus at distances from 36.3" to 362.0" (0.9 to 9.2 meters). Top View ...Side View Screen Screen (W) Projection Distance (D) Projection Distance (D) Screen Screen (H) Offset (Hd) Height Diagonal Width English 16 POWER Installation Adjusting the Projector's Zoom / Focus You may turn the zoom ring to 10.0 meters). Zoom Ring Focus Ring Adjusting Projection Image Size XGA series:...

User Manual
Page 18
...to select items or make adjust- Enter Confirm your selection. Menu Four Directional Select Keys Keystone HELP ? Temp LED Indicate the projector's temperature status. ments to your item selection. SOURCE Press "SOURCE" to the input source. To exit OSD, Press "... 18 User Controls Control Panel & Remote Control Control Panel ? Automatically synchronize the projector to select an input signal. POWER/ STANDBY LED Indicate the projector's status. Indicate the projector's lamp status. POWER Using the Control Panel POWER RE-SYNC Refer to launch the...
...to select items or make adjust- Enter Confirm your selection. Menu Four Directional Select Keys Keystone HELP ? Temp LED Indicate the projector's temperature status. ments to your item selection. SOURCE Press "SOURCE" to the input source. To exit OSD, Press "... 18 User Controls Control Panel & Remote Control Control Panel ? Automatically synchronize the projector to select an input signal. POWER/ STANDBY LED Indicate the projector's status. Indicate the projector's lamp status. POWER Using the Control Panel POWER RE-SYNC Refer to launch the...

User Manual
Page 19
...select items or make adjustments to turn the 3D OSD menu on -screen display (OSD) menu. Adjust to use laser pointer. Adjust image distortion caused by tilting the projector. Brightness Adjust the brightness of the image. 3D Menu HDMI Press the "3D" to your item selection. Laser Press ...to increase / decrease the volume. Press "Menu" to the "Power On/Off the Projector" section on pages 13-14. User ...
...select items or make adjustments to turn the 3D OSD menu on -screen display (OSD) menu. Adjust to use laser pointer. Adjust image distortion caused by tilting the projector. Brightness Adjust the brightness of the image. 3D Menu HDMI Press the "3D" to your item selection. Laser Press ...to increase / decrease the volume. Press "Menu" to the "Power On/Off the Projector" section on pages 13-14. User ...

User Manual
Page 24
... return to select any item in the sub menu and adjust as described above. 5. While making a selection on the Remote Control or Projector Keypad. 2 When OSD is displayed, use keys to the main menu. 6. Main Menu Sub Menu English 24 Settings To open the OSD menu, press "...Menu" on a particular page, press or "Enter" key to be adjusted in the main menu. User Controls On-screen Display Menus The Projector has multilingual On-screen Display menus that allow you to operate 1. Select the next item to enter sub menu. 3. How to make image adjustments and...
... return to select any item in the sub menu and adjust as described above. 5. While making a selection on the Remote Control or Projector Keypad. 2 When OSD is displayed, use keys to the main menu. 6. Main Menu Sub Menu English 24 Settings To open the OSD menu, press "...Menu" on a particular page, press or "Enter" key to be adjusted in the main menu. User Controls On-screen Display Menus The Projector has multilingual On-screen Display menus that allow you to operate 1. Select the next item to enter sub menu. 3. How to make image adjustments and...
User Manual
Page 26
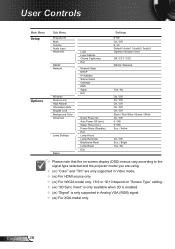
... Hours Lamp Reminder Brightness Mode Lamp Reset Exit Settings 0~99 On / Off 0~10 Default / Audio1 / Audio2 / Audio3 Optoma / Neutral / User Off / CC1 / CC2 RS232 / Network Yes / No On / Off On / Off On ...Please note that the on-screen display (OSD) menus vary according to the signal type selected and the projector model you are using. (#1) "Color" and "Tint" are only supported in Video mode. ... model only. 16:9 or 16:10 depend on "Screen Type" setting. (#4) "3D Sync Invert" is only available when 3D is enabled. (#5) "Signal" is only supported in Analog VGA (RGB) signal....
... Hours Lamp Reminder Brightness Mode Lamp Reset Exit Settings 0~99 On / Off 0~10 Default / Audio1 / Audio2 / Audio3 Optoma / Neutral / User Off / CC1 / CC2 RS232 / Network Yes / No On / Off On / Off On ...Please note that the on-screen display (OSD) menus vary according to the signal type selected and the projector model you are using. (#1) "Color" and "Tint" are only supported in Video mode. ... model only. 16:9 or 16:10 depend on "Screen Type" setting. (#4) "3D Sync Invert" is only available when 3D is enabled. (#5) "Signal" is only supported in Analog VGA (RGB) signal....

User Manual
Page 30
User Controls Color Space Select an appropriate color matrix type from AUTO, RGB or YUV. Press "Enter" to enter the sub menu and select which sources you require. The projector will not search for inputs that are not selected. Press to finalize the selection. Input Source Use this option to enable / disable input sources. English 30
User Controls Color Space Select an appropriate color matrix type from AUTO, RGB or YUV. Press "Enter" to enter the sub menu and select which sources you require. The projector will not search for inputs that are not selected. Press to finalize the selection. Input Source Use this option to enable / disable input sources. English 30

User Manual
Page 36
... ID definition can be set up by menu (range 0~99), and allow user control an individual projector by RS232. Use this option to turn mute off. Menu Location Choose the menu location on . Choose the "Off" to reassign any of RS232 ...-Ceiling When selected, the image will appear reversed in upside down position. Audio Input The default audio settings are on the back panel of the projector. English 36 Volume Press the to decrease the volume. Press the to default video source. Each Audio input can be assigned to more...
... ID definition can be set up by menu (range 0~99), and allow user control an individual projector by RS232. Use this option to turn mute off. Menu Location Choose the menu location on . Choose the "Off" to reassign any of RS232 ...-Ceiling When selected, the image will appear reversed in upside down position. Audio Input The default audio settings are on the back panel of the projector. English 36 Volume Press the to decrease the volume. Press the to default video source. Each Audio input can be assigned to more...

User Manual
Page 37
Warning: Wired VGA will not function and the projector maybe shut down if Wireless is only- functional with VGA connector. User Controls SETUP RS232 RS232: Allow RS232 control of an individual projector. (Default setting) Network: Allow projector control via web browser (Internet Explorer) using the network. Wireless Choose the "On" to turn on the Wireless. "Wireless" is turned on. 37 English
Warning: Wired VGA will not function and the projector maybe shut down if Wireless is only- functional with VGA connector. User Controls SETUP RS232 RS232: Allow RS232 control of an individual projector. (Default setting) Network: Allow projector control via web browser (Internet Explorer) using the network. Wireless Choose the "On" to turn on the Wireless. "Wireless" is turned on. 37 English
User Manual
Page 38
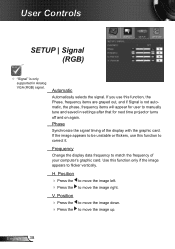
.... If you use this function, the Phase, frequency items are grayed out, and if Signal is only supported in settings after that for next time projector turns off and on again. Frequency Change the display data frequency to manually tune and saved in Analog VGA (RGB) signal. Automatic Automatically selects the...
.... If you use this function, the Phase, frequency items are grayed out, and if Signal is only supported in settings after that for next time projector turns off and on again. Frequency Change the display data frequency to manually tune and saved in Analog VGA (RGB) signal. Automatic Automatically selects the...

User Manual
Page 39
... English Security Timer Use this time has elapsed you will be 4 digits. 3. Press " " to set the how long (Month/Day/Hour) the projector can be able to switch on the projector. Off: Choose "Off" to set the password. 2. The password has to be requested to confirm. 4. Use number button on the...
... English Security Timer Use this time has elapsed you will be 4 digits. 3. Press " " to set the how long (Month/Day/Hour) the projector can be able to switch on the projector. Off: Choose "Off" to set the password. 2. The password has to be requested to confirm. 4. Use number button on the...


