
Optoma_TW615-3D_Datasheet
Page 1
... Normal and Standby Modes) Projection Lens 1.2x Manual Zoom and Focus User Controls Complete On-Screen Menu Adjustments in 10-watt speaker system and wired network management, the TW615-3D is equipped with the latest color and image processing technologies from Texas Instruments. bright at 3500 ANSI lumens and high 3000:1 contrast ratio VGA and audio pass-thru operational on standby mode Filter-free design means lower cost of ownership Remote management via...
... Normal and Standby Modes) Projection Lens 1.2x Manual Zoom and Focus User Controls Complete On-Screen Menu Adjustments in 10-watt speaker system and wired network management, the TW615-3D is equipped with the latest color and image processing technologies from Texas Instruments. bright at 3500 ANSI lumens and high 3000:1 contrast ratio VGA and audio pass-thru operational on standby mode Filter-free design means lower cost of ownership Remote management via...
User Manual
Page 1
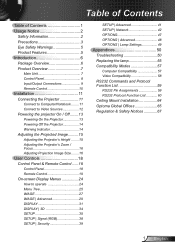
...15 Adjusting the Projector's Height ........ 15 Adjusting the Projector's Zoom / Focus 16 Adjusting Projection Image Size......... 16 User Controls 18 Control Panel & Remote Control.......18 Control Panel 18 Remote Control 19 On-screen Display Menus 24 How to operate 24 Menu Tree 25 IMAGE 27 IMAGE | Advanced 29 DISPLAY 31 DISPLAY | 3D 34 SETUP 35 SETUP | Signal (RGB 38 SETUP | Security 39 SETUP | Advanced 41 SETUP | Network 42 OPTIONS 47 OPTIONS | Advanced 48 OPTIONS | Lamp Settings 49 Appendices 50 Troubleshooting 50 Replacing the lamp 55 Compatibility Modes 57...
...15 Adjusting the Projector's Height ........ 15 Adjusting the Projector's Zoom / Focus 16 Adjusting Projection Image Size......... 16 User Controls 18 Control Panel & Remote Control.......18 Control Panel 18 Remote Control 19 On-screen Display Menus 24 How to operate 24 Menu Tree 25 IMAGE 27 IMAGE | Advanced 29 DISPLAY 31 DISPLAY | 3D 34 SETUP 35 SETUP | Signal (RGB 38 SETUP | Security 39 SETUP | Advanced 41 SETUP | Network 42 OPTIONS 47 OPTIONS | Advanced 48 OPTIONS | Lamp Settings 49 Appendices 50 Troubleshooting 50 Replacing the lamp 55 Compatibility Modes 57...
User Manual
Page 2
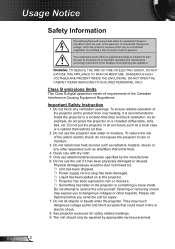
... in the projector or something is recommended to install the projector in a location that restricts air flow. 2. Clean only with arrow head within an equilateral triangle is intended to alert the user to the presence of uninsulated "dangerous voltage" within an equilateral triangle is intended to alert the user to the presence of important operating and maintenance (servicing) instructions in an...
... in the projector or something is recommended to install the projector in a location that restricts air flow. 2. Clean only with arrow head within an equilateral triangle is intended to alert the user to the presence of uninsulated "dangerous voltage" within an equilateral triangle is intended to alert the user to the presence of important operating and maintenance (servicing) instructions in an...

User Manual
Page 3
... use lens cap when projector is approaching the end of the lamp itself. To reduce the risk of fire or electric shock, do not open or disassemble the projector as this projector to change the lamp when it shows warning messages. ▀■ Warning- Please contact your local reseller or service center to rain or moisture. ▀■ Warning- This projector will show on -screen display "OPTIONS | Lamp Settings" menu...
... use lens cap when projector is approaching the end of the lamp itself. To reduce the risk of fire or electric shock, do not open or disassemble the projector as this projector to change the lamp when it shows warning messages. ▀■ Warning- Please contact your local reseller or service center to rain or moisture. ▀■ Warning- This projector will show on -screen display "OPTIONS | Lamp Settings" menu...

User Manual
Page 13
Turn on the lamp by pressing " " button either on the top of When Power mode (Standby) is set to Eco ( When connected, the POWER/STANDBY LED will turn Amber. 3. Installation Powering the projector On / Off Powering On the Projector 1. Remove the lens cap. 2. Securely connect the power cord and signal cable.
Turn on the lamp by pressing " " button either on the top of When Power mode (Standby) is set to Eco ( When connected, the POWER/STANDBY LED will turn Amber. 3. Installation Powering the projector On / Off Powering On the Projector 1. Remove the lens cap. 2. Securely connect the power cord and signal cable.

User Manual
Page 14
... "POWER/STANDBY" indicator flashes amber. If the warning indicator light up again, please contact your nearest service center for cooling cycle and the POWER/STANDBY LED will disappear after 15 seconds. If you wish to turn the projector back on the screen. Once in standby mode, simply press " " button to turn on . "TEMP" LED indicator flashes red and if "POWER/STAND- projector displays these symptoms. See pages 65-66 for the second time, the projector will display countdown timer...
... "POWER/STANDBY" indicator flashes amber. If the warning indicator light up again, please contact your nearest service center for cooling cycle and the POWER/STANDBY LED will disappear after 15 seconds. If you wish to turn the projector back on the screen. Once in standby mode, simply press " " button to turn on . "TEMP" LED indicator flashes red and if "POWER/STAND- projector displays these symptoms. See pages 65-66 for the second time, the projector will display countdown timer...

User Manual
Page 25
.../ Suomi Magyar / ýeština 0 Türkçe 16:10 / 16:9 On / Off 0~31 -5~5 -5~5 -5~5 ʳ On / Off Month / Day / Hour ʳ 25 English User Controls Menu Tree Main Menu Image Sub Menu Display Mode Brightness Contrast Sharpness #1 Color #1 Tint Advanced Display Setup Format Edge Mask Zoom H Image Shift V Image Shift V Keystone Auto Keystone 3D Language Gamma BrilliantColor™ Color Temp. Invert Exit #3 Screen Type Projection Menu Location #5 Signal Security Automatic Phase (VGA) Frequency (VGA) H. Color Settings Color Space Input Source Exit 3D #4 3D Sync.
.../ Suomi Magyar / ýeština 0 Türkçe 16:10 / 16:9 On / Off 0~31 -5~5 -5~5 -5~5 ʳ On / Off Month / Day / Hour ʳ 25 English User Controls Menu Tree Main Menu Image Sub Menu Display Mode Brightness Contrast Sharpness #1 Color #1 Tint Advanced Display Setup Format Edge Mask Zoom H Image Shift V Image Shift V Keystone Auto Keystone 3D Language Gamma BrilliantColor™ Color Temp. Invert Exit #3 Screen Type Projection Menu Location #5 Signal Security Automatic Phase (VGA) Frequency (VGA) H. Color Settings Color Space Input Source Exit 3D #4 3D Sync.
User Manual
Page 26
English 26 User Controls Main Menu Setup Options Sub Menu Projector ID Mute Volume Audio Input Advanced RS232 Network Wireless Source Lock High Altitude Information Hide Keypad Lock Background Color Advanced Lamp Settings Reset Logo Logo Capture Closed Captioning Exit Network State DHCP IP Address Subnet mask Gateway DNS Apply Exit Direct Power On Auto Power Off (min.) Sleep Timer (min.) Power Mode (Standby) Exit Lamp Hours Lamp Reminder Brightness Mode Lamp Reset Exit Settings 0~99 On / Off 0~10 Default / Audio1 / Audio2 / Audio3 Optoma / Neutral / User Off / CC1...
English 26 User Controls Main Menu Setup Options Sub Menu Projector ID Mute Volume Audio Input Advanced RS232 Network Wireless Source Lock High Altitude Information Hide Keypad Lock Background Color Advanced Lamp Settings Reset Logo Logo Capture Closed Captioning Exit Network State DHCP IP Address Subnet mask Gateway DNS Apply Exit Direct Power On Auto Power Off (min.) Sleep Timer (min.) Power Mode (Standby) Exit Lamp Hours Lamp Reminder Brightness Mode Lamp Reset Exit Settings 0~99 On / Off 0~10 Default / Audio1 / Audio2 / Audio3 Optoma / Neutral / User Off / CC1...

User Manual
Page 33
User Controls Each I/O has different setting of an image. Press the to magnify an image on the edge of video source. V Image Shift Shift the projected image position vertically. If the image looks trapezoidal, this option can 't work at same time. V Keystone Press the or to remove video encoding noise on the projection screen. Auto Keystone Automatically adjusts vertical image distortion. 33 English Zoom Press the to reduce the size of "Edge...
User Controls Each I/O has different setting of an image. Press the to magnify an image on the edge of video source. V Image Shift Shift the projected image position vertically. If the image looks trapezoidal, this option can 't work at same time. V Keystone Press the or to remove video encoding noise on the projection screen. Auto Keystone Automatically adjusts vertical image distortion. 33 English Zoom Press the to reduce the size of "Edge...

User Manual
Page 36
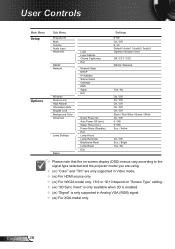
... definition can be set up by menu (range 0~99), and allow user control an individual projector by RS232. Audio Input The default audio settings are on the display screen. Menu Location Choose the menu location on the back panel of the projector. Volume Press the to decrease the volume. Press the to the current image source. Use this option to reassign any of the Audio Inputs (1 ,2 or 3) to increase the volume...
... definition can be set up by menu (range 0~99), and allow user control an individual projector by RS232. Audio Input The default audio settings are on the display screen. Menu Location Choose the menu location on the back panel of the projector. Volume Press the to decrease the volume. Press the to the current image source. Use this option to reassign any of the Audio Inputs (1 ,2 or 3) to increase the volume...

User Manual
Page 39
... to switch on the remote, then press " " to set the how long (Month/Day/Hour) the projector can be requested to be 4 digits. 3. Enter new password (4 digits in length) using the number buttons on the projector without password verification. Use number button on the projector. Off: Choose "Off" to enter your password. Change Password: 1. Enter new password again and press " " to confirm your password again. User Controls SETUP | Security Password default value is "1234" (first time). Security...
... to switch on the remote, then press " " to set the how long (Month/Day/Hour) the projector can be requested to be 4 digits. 3. Enter new password (4 digits in length) using the number buttons on the projector without password verification. Use number button on the projector. Off: Choose "Off" to enter your password. Change Password: 1. Enter new password again and press " " to confirm your password again. User Controls SETUP | Security Password default value is "1234" (first time). Security...

User Manual
Page 43
... display as shown in the table below : When you used the projector IP address, you will can only contain a limited number of characters, as below . (spaces and the other punctuation included): 2. Category Item Crestron Control Projector Network Configuration User Password Admin Password IP Address IP ID Port Projector Name Location Assigned To DHCP (Enabled) IP Address Subnet Mask Default Gateway DNS Server Enabled New Password Confirm Enabled New Password Confirm Input...
... display as shown in the table below : When you used the projector IP address, you will can only contain a limited number of characters, as below . (spaces and the other punctuation included): 2. Category Item Crestron Control Projector Network Configuration User Password Admin Password IP Address IP ID Port Projector Name Location Assigned To DHCP (Enabled) IP Address Subnet Mask Default Gateway DNS Server Enabled New Password Confirm Enabled New Password Confirm Input...
User Manual
Page 45
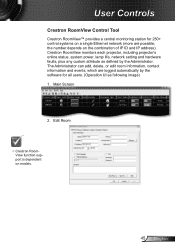
... models. 45 English The Administrator can add, delete, or edit room information, contact information and events, which are possible, the number depends on the combination of IP ID and IP address). User Controls Crestron RoomView Control Tool Crestron RoomView™ provides a central monitoring station for all users. (Operation UI as following image) 1. Crestron RoomView monitors each projector, including projector's online status, system power, lamp life, network setting...
... models. 45 English The Administrator can add, delete, or edit room information, contact information and events, which are possible, the number depends on the combination of IP ID and IP address). User Controls Crestron RoomView Control Tool Crestron RoomView™ provides a central monitoring station for all users. (Operation UI as following image) 1. Crestron RoomView monitors each projector, including projector's online status, system power, lamp life, network setting...

User Manual
Page 49
... to show or to hide the warning message when the changing lamp message is over 40°C in operating, the projector will lower power consumption and extend the lamp life. BRIGHT: Choose "BRIGHT" to [Eco.] automatically. The message will appear 30 hours before suggested replacement of lamp. When ambient temperature is displayed. Lamp Reset Reset the lamp hour counter after replacing the lamp. 49 English Brightness Mode Eco.: Choose "Eco." User Controls OPTIONS | Lamp Settings Lamp Hours Display the projection time.
... to show or to hide the warning message when the changing lamp message is over 40°C in operating, the projector will lower power consumption and extend the lamp life. BRIGHT: Choose "BRIGHT" to [Eco.] automatically. The message will appear 30 hours before suggested replacement of lamp. When ambient temperature is displayed. Lamp Reset Reset the lamp hour counter after replacing the lamp. 49 English Brightness Mode Eco.: Choose "Eco." User Controls OPTIONS | Lamp Settings Lamp Hours Display the projection time.
User Manual
Page 50
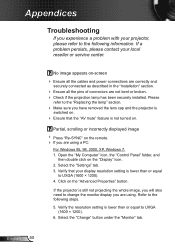
.... Please refer to the "Replacing the lamp" section. Make sure you have removed the lens cap and the projector is switched on. Ensure that your display resolution setting is not turned on the "Display" icon. 2. Partial, scrolling or incorrectly displayed image Press "Re-SYNC" on -screen Ensure all the cables and power connections are correctly and securely connected as described in the "Installation" section. Ensure...
.... Please refer to the "Replacing the lamp" section. Make sure you have removed the lens cap and the projector is switched on. Ensure that your display resolution setting is not turned on the "Display" icon. 2. Partial, scrolling or incorrectly displayed image Press "Re-SYNC" on -screen Ensure all the cables and power connections are correctly and securely connected as described in the "Installation" section. Ensure...

User Manual
Page 52
... projector display mode is set to 16:9 in the OSD. If you play 4:3 format DVD titles, please change the format to 4:3 in the projector OSD. If the image is still stretched, you will also need to adjust the aspect ratio by referring to "DISPLAY Format" and try the different settings. Use of the screen. Press "Keystone +/-" button on the remote control...
... projector display mode is set to 16:9 in the OSD. If you play 4:3 format DVD titles, please change the format to 4:3 in the projector OSD. If the image is still stretched, you will also need to adjust the aspect ratio by referring to "DISPLAY Format" and try the different settings. Use of the screen. Press "Keystone +/-" button on the remote control...

User Manual
Page 53
... a loud popping sound. LED lighting message Message POWER/STANDBY LED (Green/Amber) Standby State (Input power cord) Amber Power on until the lamp module has been replaced. Appendices The projector stops responding to all controls If possible, turn on (Warming) Flashing Green Temp-LED (Red) Lamp-LED (Red) Lamp lighting Green Power off the projector, then unplug the power cord and wait at least 60 seconds before reconnecting power. Check that "Keypad Lock" is not activated by trying to control the projector with the remote control. Lamp burns out or...
... a loud popping sound. LED lighting message Message POWER/STANDBY LED (Green/Amber) Standby State (Input power cord) Amber Power on until the lamp module has been replaced. Appendices The projector stops responding to all controls If possible, turn on (Warming) Flashing Green Temp-LED (Red) Lamp-LED (Red) Lamp lighting Green Power off the projector, then unplug the power cord and wait at least 60 seconds before reconnecting power. Check that "Keypad Lock" is not activated by trying to control the projector with the remote control. Lamp burns out or...

User Manual
Page 54
... batteries are inserted correctly. Replace batteries if they are not any obstructions between the remote control and the projector. Appendices On Screen Messages Temperature warning: Fan failed: Lamp warning: Out of display range: If the remote control does not work Check the operating angle of the remote control is within 7 m (±0°) of the IR receivers on the projector. Make sure there are...
... batteries are inserted correctly. Replace batteries if they are not any obstructions between the remote control and the projector. Appendices On Screen Messages Temperature warning: Fan failed: Lamp warning: Out of display range: If the remote control does not work Check the operating angle of the remote control is within 7 m (±0°) of the IR receivers on the projector. Make sure there are...

User Manual
Page 56
.... 3. Lift up the lamp handle and remove the lamp module slowly and carefully. 4 To replace the lamp module, reverse the previous steps. 8. Lamp Reset: (i) Press "Menu" (ii) Select "OPTIONS" (iii) Select "Lamp Settings" (iv) Select "Lamp Reset" (v) Select "Yes". Appendices The screws on the lamp cover and the lamp cannot be removed. The projector cannot be turned on if the lamp cover has not been...
.... 3. Lift up the lamp handle and remove the lamp module slowly and carefully. 4 To replace the lamp module, reverse the previous steps. 8. Lamp Reset: (i) Press "Menu" (ii) Select "OPTIONS" (iii) Select "Lamp Settings" (iv) Select "Lamp Reset" (v) Select "Yes". Appendices The screws on the lamp cover and the lamp cannot be removed. The projector cannot be turned on if the lamp cover has not been...

User Manual
Page 62
... ~XX82 1 7E 30 30 38 32 20 31 0D Logo Optoma ~XX82 2 7E 30 30 38 32 20 32 0D User ~XX82 3 7E 30 30 38 32 20 33 0D Neutral ... 30 30 31 30 30 20 33 0D Next Source ~XX101 1 7E 30 30 31 30 31 20 31 0D High Altitude On ~XX101 0 7E 30 30 31 30...Color Blue ~XX104 2 7E 30 30 31 30 34 20 32 0D Black ~XX104 3 7E 30 30 31 30 34 20 33 0D Red ~XX104 4 7E 30 30 31 30 34 20 34 0D Green ~XX104 5 7E 30 30 31 30 34 20 35 0D White... 30 30 31 30 36 20 a 0D Auto Power Off (min) n = 0 (a=30) ~ 180 (a=31 38 30) step:5 ~XX107 n 7E 30 30 31 30 37 20 a 0D Sleep Timer (min) n = 0 (a=30) ~...
... ~XX82 1 7E 30 30 38 32 20 31 0D Logo Optoma ~XX82 2 7E 30 30 38 32 20 32 0D User ~XX82 3 7E 30 30 38 32 20 33 0D Neutral ... 30 30 31 30 30 20 33 0D Next Source ~XX101 1 7E 30 30 31 30 31 20 31 0D High Altitude On ~XX101 0 7E 30 30 31 30...Color Blue ~XX104 2 7E 30 30 31 30 34 20 32 0D Black ~XX104 3 7E 30 30 31 30 34 20 33 0D Red ~XX104 4 7E 30 30 31 30 34 20 34 0D Green ~XX104 5 7E 30 30 31 30 34 20 35 0D White... 30 30 31 30 36 20 a 0D Auto Power Off (min) n = 0 (a=30) ~ 180 (a=31 38 30) step:5 ~XX107 n 7E 30 30 31 30 37 20 a 0D Sleep Timer (min) n = 0 (a=30) ~...


