

User Manual
Page 1
Dangerous high voltages are present inside the enclosure. Refer servicing to certified service partner. Safety Information Do Read, keep, and follow instructions. Heed all warnings. Turn off and unplug the power plug from the AC outlet before cleaning the unit. Use a soft dry cloth with mild detergent to clean the housing. Only use attachments/accessories certified by the manufacturer...
Dangerous high voltages are present inside the enclosure. Refer servicing to certified service partner. Safety Information Do Read, keep, and follow instructions. Heed all warnings. Turn off and unplug the power plug from the AC outlet before cleaning the unit. Use a soft dry cloth with mild detergent to clean the housing. Only use attachments/accessories certified by the manufacturer...
User Manual
Page 2
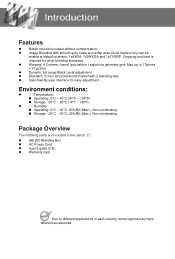
...;C ~ 60°C (-4°F ~ 140°F) Humidity: Operating: 5°C ~ 40°C, 80%RH (Max.), Non-condensing Storage: -20°C ~ 60°C, 80%RH (Max.), Non-condensing Package Overview The following parts are included in the carton. (*) GB-200 Blending Box AC Power Cord User's guide (CD) Warranty card Due to different applications...
...;C ~ 60°C (-4°F ~ 140°F) Humidity: Operating: 5°C ~ 40°C, 80%RH (Max.), Non-condensing Storage: -20°C ~ 60°C, 80%RH (Max.), Non-condensing Package Overview The following parts are included in the carton. (*) GB-200 Blending Box AC Power Cord User's guide (CD) Warranty card Due to different applications...

User Manual
Page 3
Failed HDMI Tx. and Warp Failed LED Blue Steady light Flashing LED Yellow OFF Flashing Interval (Second) N/A OFF 1 OFF Flashing 1 OFF Flashing 2 OFF Flashing 4 Flashing Alternately 1 Flashing Alternately 2 Flashing Alternately 4 Front Side: LED indicators and Power Switch 2. Failed Warp Failed HDMI Rx. and Warp Failed HDMI Tx. and Tx. Failed HDMI Rx. Rear Side: Input / Output and control panel LED Light Message Status Power On (Normal) Standby HDMI Rx. Product Overview Front Back 1 1.
Failed HDMI Tx. and Warp Failed LED Blue Steady light Flashing LED Yellow OFF Flashing Interval (Second) N/A OFF 1 OFF Flashing 1 OFF Flashing 2 OFF Flashing 4 Flashing Alternately 1 Flashing Alternately 2 Flashing Alternately 4 Front Side: LED indicators and Power Switch 2. Failed Warp Failed HDMI Rx. and Warp Failed HDMI Tx. and Tx. Failed HDMI Rx. Rear Side: Input / Output and control panel LED Light Message Status Power On (Normal) Standby HDMI Rx. Product Overview Front Back 1 1.
User Manual
Page 6
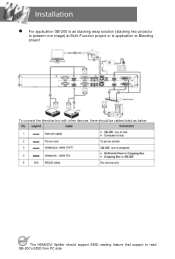
For application GB-200 is as stacking warp solution (stacking two projector to present one image) at Multi-Function project or is application at Blending project To connect the blending box with other devices, there should be cables listed as below The HDMI/DVI Splitter should support EDID reading feature that support to read GB-200's EDID from PC side
For application GB-200 is as stacking warp solution (stacking two projector to present one image) at Multi-Function project or is application at Blending project To connect the blending box with other devices, there should be cables listed as below The HDMI/DVI Splitter should support EDID reading feature that support to read GB-200's EDID from PC side

User Manual
Page 8
Warping Box does NOT support Mac OS. Setting the IP Address Setting the Computer's IP Address Step 1: Open the "Internet Protocol (TCP/IP) Properties" Go to the start up menu and click Control Panel". Click on "Network and Internet Connections". Warping Box supports Windows XP, Windows Vista (Home), Windows7 (Home);
Warping Box does NOT support Mac OS. Setting the IP Address Setting the Computer's IP Address Step 1: Open the "Internet Protocol (TCP/IP) Properties" Go to the start up menu and click Control Panel". Click on "Network and Internet Connections". Warping Box supports Windows XP, Windows Vista (Home), Windows7 (Home);

User Manual
Page 11
Setting the Computer's Proxy Server Step 1: Click on "Internet Options" You can find it in the following path: "Start up menu -> Control Panel -> Network and Internet Connections -> Internet Options". Or open the web browser and select the "Tools" menu and then choose the "Internet Options". Or Step 2: Select the "Connections" tab and then press the "LAN Settings" button.
Setting the Computer's Proxy Server Step 1: Click on "Internet Options" You can find it in the following path: "Start up menu -> Control Panel -> Network and Internet Connections -> Internet Options". Or open the web browser and select the "Tools" menu and then choose the "Internet Options". Or Step 2: Select the "Connections" tab and then press the "LAN Settings" button.

User Manual
Page 13
Do NOT connect all boxes to adjust the default IP address A ( 192.168.0.11) and B (192.168.0.12) in rear panel into other IP address when need other's IP Address for control. it will cause IP address confilction. Step 2: the architecture looks like the image shown as below. ..... Setting the Blending Box's IP Address The default IP address of blending box is A (192.168.0.11) and B (192.168.0.12). Step 1: Use flat screw to the same IP address; If user (NOTE #6) needs to modify IP address, please follow instruction.
Do NOT connect all boxes to adjust the default IP address A ( 192.168.0.11) and B (192.168.0.12) in rear panel into other IP address when need other's IP Address for control. it will cause IP address confilction. Step 2: the architecture looks like the image shown as below. ..... Setting the Blending Box's IP Address The default IP address of blending box is A (192.168.0.11) and B (192.168.0.12). Step 1: Use flat screw to the same IP address; If user (NOTE #6) needs to modify IP address, please follow instruction.
User Manual
Page 16
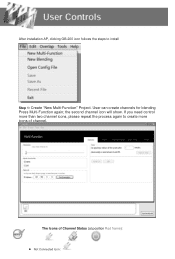
the second channel icon will show. The Icons of channel. After installation AP, clicking GB-200 icon follows the steps to create more than two channel icons, please repeat the process again to install Step 1: Create "New Multi-Function" Project. If you need control more icons of Channel Status (at position Red frame): Not Connected Icon : User can create channels for blending Press Multi-Function again;
the second channel icon will show. The Icons of channel. After installation AP, clicking GB-200 icon follows the steps to create more than two channel icons, please repeat the process again to install Step 1: Create "New Multi-Function" Project. If you need control more icons of Channel Status (at position Red frame): Not Connected Icon : User can create channels for blending Press Multi-Function again;

User Manual
Page 18
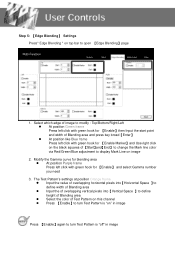
Select【Input source port 】:HDMI or DVI 3. Repeat Step 1 and Step 2 to load default setting at rear panel of IP address at AP into Box 5. Editing 【IP address 】at this channel that should be as same as one of GB-200 BOX and click【Connect】to link 4. After the channel network is linked well with green hook on the icon of channel ,Clicking 【Synchronize】to create other channel's settings for control Step 2: 【Generic】Settings 1. Select【Resolution】 :XGA/WXGA/1080P/WUXGA 2.
Select【Input source port 】:HDMI or DVI 3. Repeat Step 1 and Step 2 to load default setting at rear panel of IP address at AP into Box 5. Editing 【IP address 】at this channel that should be as same as one of GB-200 BOX and click【Connect】to link 4. After the channel network is linked well with green hook on the icon of channel ,Clicking 【Synchronize】to create other channel's settings for control Step 2: 【Generic】Settings 1. Select【Resolution】 :XGA/WXGA/1080P/WUXGA 2.

User Manual
Page 19
...;with defined Move Pitch setting for each point. 5. Select Cursor When the point is Blue that means the point is 10. For example :using 【】 to increase quantity of Cursor you are 9 Cursors 4. Adjust the Grid Number :Range are 2X2 (Min) , 3X3 ,5X5,9X9,17X17(Max) Use mouse to adjust Grid Number or Key broad 【...
...;with defined Move Pitch setting for each point. 5. Select Cursor When the point is Blue that means the point is 10. For example :using 【】 to increase quantity of Cursor you are 9 Cursors 4. Adjust the Grid Number :Range are 2X2 (Min) , 3X3 ,5X5,9X9,17X17(Max) Use mouse to adjust Grid Number or Key broad 【...

User Manual
Page 21
... open following page to adjust fine tune of color for whole image Adjust contrast and brightness Typing the value of Red/Green/Blue then pressing key broad【Enter】 Press 【Ok】to close this page If the monitor or LCD projector don't have any color fine tune interface, please use【Global】 to reset all settings at【Color...
... open following page to adjust fine tune of color for whole image Adjust contrast and brightness Typing the value of Red/Green/Blue then pressing key broad【Enter】 Press 【Ok】to close this page If the monitor or LCD projector don't have any color fine tune interface, please use【Global】 to reset all settings at【Color...
User Manual
Page 22
...;Enable Marker】and Use right click on the black squares of 【Start】and【End】 to change the Mark line color via Red/Green/Blue adjustment to turn Test Pattern is "off" in image Press 【Enable】again to display Mark Line on " in image The Test Pattern's settings at position Orange frame Input the value of overlapping horizontal...
...;Enable Marker】and Use right click on the black squares of 【Start】and【End】 to change the Mark line color via Red/Green/Blue adjustment to turn Test Pattern is "off" in image Press 【Enable】again to display Mark Line on " in image The Test Pattern's settings at position Orange frame Input the value of overlapping horizontal...

User Manual
Page 25
... number(color) of Palette at Orange frame to define a quadrangle with this color (ii) Use mouse or key broad 【W】、【A】、【S】、【D】to select the point become a hollow point (like ) for control following settings And Use right click on the selected point( like a hollow point) to change the cursor color via Red/Green/Blue adjustment and use...
... number(color) of Palette at Orange frame to define a quadrangle with this color (ii) Use mouse or key broad 【W】、【A】、【S】、【D】to select the point become a hollow point (like ) for control following settings And Use right click on the selected point( like a hollow point) to change the cursor color via Red/Green/Blue adjustment and use...
User Manual
Page 28
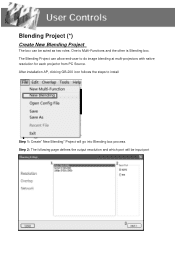
The Blending Project can be input port After installation AP, clicking GB-200 icon follows the steps to do image blending at multi-projectors with native resolution for each projector from PC Source. Step 2: The following page defines the output resolution and which port will go into Blending box process. Blending Project (*) Create New Blending Project The box can allow end-user to install Step 1: Create" New Blending" Project will be acted as two roles. One is Multi-Functions and the other is Blending box.
The Blending Project can be input port After installation AP, clicking GB-200 icon follows the steps to do image blending at multi-projectors with native resolution for each projector from PC Source. Step 2: The following page defines the output resolution and which port will go into Blending box process. Blending Project (*) Create New Blending Project The box can allow end-user to install Step 1: Create" New Blending" Project will be acted as two roles. One is Multi-Functions and the other is Blending box.
User Manual
Page 30
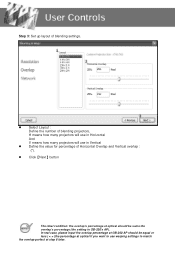
... many projectors will use in Vertical Define the value for percentage of Horizontal Overlap and Vertical overlap : (*). Click【Next】button The ideal condition: the overlap's percentage at optical should be equal or less ( < = )the percentage at optical if you want to use warping settings to match the overlap perfect at GB-200 AP...
... many projectors will use in Vertical Define the value for percentage of Horizontal Overlap and Vertical overlap : (*). Click【Next】button The ideal condition: the overlap's percentage at optical should be equal or less ( < = )the percentage at optical if you want to use warping settings to match the overlap perfect at GB-200 AP...

User Manual
Page 32
Detail settings will become orange after press 【OK】,Please remembering to load default setting at AP into Box 5-2 If OS is Windows XP(Not for Windows 7), the image will be Case E of "Trouble Shooting" in final page Step 5: AP will synchronize the status for advanced fine tune items. (1) Waiting each channels network is linked well with green hook( like ) (2) Choose one channel and Clicking 【Synchronize All】to change manually the high resolution timing.
Detail settings will become orange after press 【OK】,Please remembering to load default setting at AP into Box 5-2 If OS is Windows XP(Not for Windows 7), the image will be Case E of "Trouble Shooting" in final page Step 5: AP will synchronize the status for advanced fine tune items. (1) Waiting each channels network is linked well with green hook( like ) (2) Choose one channel and Clicking 【Synchronize All】to change manually the high resolution timing.

User Manual
Page 35
Saving the setting >Clicking【File】【Save】 Information status at screen Red Screen BOX is saving Warp settings Green Screen BOX is saving Color settings Red+ Green+ Blue +Cyan BOX is saving Edge Blending settings screen Red+ Green+ Blue +Cyan + BOX is saving Black Level settings Yellow+ Purple screen In Blending Project: Orange screen There is no input source or the timing won't support
Saving the setting >Clicking【File】【Save】 Information status at screen Red Screen BOX is saving Warp settings Green Screen BOX is saving Color settings Red+ Green+ Blue +Cyan BOX is saving Edge Blending settings screen Red+ Green+ Blue +Cyan + BOX is saving Black Level settings Yellow+ Purple screen In Blending Project: Orange screen There is no input source or the timing won't support
User Manual
Page 36
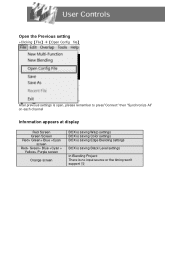
Open the Previous setting >Clicking【File】【Open Config file】 After previous settings is open, please remember to press"Connect" then "Synchronize All" on each channel Information appears at display Red Screen Green Screen Red+ Green+ Blue +Cyan screen Red+ Green+ Blue +Cyan + Yellow+ Purple screen Orange screen BOX is saving Warp settings BOX is saving Color settings BOX is saving Edge Blending settings BOX is saving Black Level settings In Blending Project: There is no input source or the timing won't support 援
Open the Previous setting >Clicking【File】【Open Config file】 After previous settings is open, please remember to press"Connect" then "Synchronize All" on each channel Information appears at display Red Screen Green Screen Red+ Green+ Blue +Cyan screen Red+ Green+ Blue +Cyan + Yellow+ Purple screen Orange screen BOX is saving Warp settings BOX is saving Color settings BOX is saving Edge Blending settings BOX is saving Black Level settings In Blending Project: There is no input source or the timing won't support 援

User Manual
Page 40
...V: 400 1280×1600 ˇ ˇ Compatibility Timing table at Blending Project (1080P@24) Layout Overlap (%) Overlap (pixel) Total Resolution HDMI DVI H: 10 H: 192 3648×1080 ˇ...projectors (monitors) than above numbers, suggesting to work with other professional cropping video Boxes or powerful PC with multi-image-outputs graphic card that can send multi-native resolutions to multi-projector and GB102 can operate all features under "Multi-Function" Project at this case。 ※ If customer need professional technical support ,please call Optoma For operating...
...V: 400 1280×1600 ˇ ˇ Compatibility Timing table at Blending Project (1080P@24) Layout Overlap (%) Overlap (pixel) Total Resolution HDMI DVI H: 10 H: 192 3648×1080 ˇ...projectors (monitors) than above numbers, suggesting to work with other professional cropping video Boxes or powerful PC with multi-image-outputs graphic card that can send multi-native resolutions to multi-projector and GB102 can operate all features under "Multi-Function" Project at this case。 ※ If customer need professional technical support ,please call Optoma For operating...
User Manual
Page 41
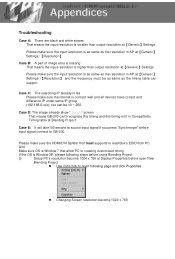
... can be as same as the resolution in Compatibility Timing table at Blending Project Case E: It will take100 second to source input signal if you press "Synchronize" before using Blending Project (i) Setup PC's resolution become 1024 x 768 Please make sure the HDMI/DVI Splitter that must be 10 ~ 250 Case D: The image already show "Orange" screen That means GB-200 can support Case C: The searching IP already...
... can be as same as the resolution in Compatibility Timing table at Blending Project Case E: It will take100 second to source input signal if you press "Synchronize" before using Blending Project (i) Setup PC's resolution become 1024 x 768 Please make sure the HDMI/DVI Splitter that must be 10 ~ 250 Case D: The image already show "Orange" screen That means GB-200 can support Case C: The searching IP already...


