
User Manual
Page 1
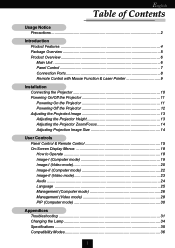
... 7 Connection Ports 8 Remote Control with Mouse Function & Laser Pointer 9 Installation Connecting the Projector 10 Powering On/Off the Projector 11 Powering On the Projector 11 Powering Off the Projector 12 Adjusting the Projected Image 13 Adjusting the Projector Height 13 Adjusting the Projector Zoom/Focus 14 Adjusting Projection Image Size 14 User Controls Panel Control & Remote...
... 7 Connection Ports 8 Remote Control with Mouse Function & Laser Pointer 9 Installation Connecting the Projector 10 Powering On/Off the Projector 11 Powering On the Projector 11 Powering Off the Projector 12 Adjusting the Projected Image 13 Adjusting the Projector Height 13 Adjusting the Projector Zoom/Focus 14 Adjusting Projection Image Size 14 User Controls Panel Control & Remote...
User Manual
Page 2
... Warning- This remote control contains a Class II laser product. To replace the lamp, follow all warnings, precautions and maintenance as this happens, the projector will not turn on until the lamp module has been replaced. To reduce the risk of your eyes. Warning- Warning- Warning- If this may ... is selected in this product to change the lamp when it will detect the life of injury to computer, please turn back on the projector first. Warning- When changing the lamp, please allow unit to maximize the life of fire or electric shock, do not expose this user...
... Warning- This remote control contains a Class II laser product. To replace the lamp, follow all warnings, precautions and maintenance as this happens, the projector will not turn on until the lamp module has been replaced. To reduce the risk of your eyes. Warning- Warning- Warning- If this may ... is selected in this product to change the lamp when it will detect the life of injury to computer, please turn back on the projector first. Warning- When changing the lamp, please allow unit to maximize the life of fire or electric shock, do not expose this user...
User Manual
Page 4
..., SVGA re-sizing u 250 Watts user replaceable UHP AC lamp u Mac compatible 4 English Introduction Product Features This product is an XGA single chip 0.7” DLPTM projector.
..., SVGA re-sizing u 250 Watts user replaceable UHP AC lamp u Mac compatible 4 English Introduction Product Features This product is an XGA single chip 0.7” DLPTM projector.

User Manual
Page 5
Check to D-15 Cable Remote Mouse Y Cable RS232 Cable User’s Guide Carrying Case Remote Control with Mouse Function and Laser Pointer Quick Start Card Warranty Card 5 Battery x 2 Contact your unit is missing. Projector with all the items shown below. English Introduction Package Overview This projector comes with lens cap Power Cord VGA Cable S-Video Cable Audio Cable Jack/RCA Composite Video Cable DVI to make sure your dealer immediately if anything is complete.
Check to D-15 Cable Remote Mouse Y Cable RS232 Cable User’s Guide Carrying Case Remote Control with Mouse Function and Laser Pointer Quick Start Card Warranty Card 5 Battery x 2 Contact your unit is missing. Projector with all the items shown below. English Introduction Package Overview This projector comes with lens cap Power Cord VGA Cable S-Video Cable Audio Cable Jack/RCA Composite Video Cable DVI to make sure your dealer immediately if anything is complete.

User Manual
Page 10
... (optional) 6 7 2 RGB USB 9 Digital Tuner Output Antenna v To ensure the projector works well with your computer, please configure the display mode of the display mode is compatible with the projector. Audio Cable Jack/RCA 5. Remote Mouse Y Cable 8. Refer to the “Compatibility ...Modes” section on page 36. 10 English Installation Connecting the Projector Digital Tuner Output Video Output 8 INPUT OUTPUT 4 RS232 AUDIO AUDIO AUDIO AUDIO VIDEO DVI COMPUTER MONITOR 5 S-VIDEO MOUSE 3 1 RS232 ...
... (optional) 6 7 2 RGB USB 9 Digital Tuner Output Antenna v To ensure the projector works well with your computer, please configure the display mode of the display mode is compatible with the projector. Audio Cable Jack/RCA 5. Remote Mouse Y Cable 8. Refer to the “Compatibility ...Modes” section on page 36. 10 English Installation Connecting the Projector Digital Tuner Output Video Output 8 INPUT OUTPUT 4 RS232 AUDIO AUDIO AUDIO AUDIO VIDEO DVI COMPUTER MONITOR 5 S-VIDEO MOUSE 3 1 RS232 ...

User Manual
Page 11
... and then the computer. 3 Power / Standby Lens cap 1 11 2 Power Switch vTurn on the side of the projector and allow the projector to switch. Remove the lens cap.Œ 2. The “LAMP” LED indicator will detect your source (computer, notebook, or video ... indicator will light solid amber. Ensure that the power cord and signal cable are securely connected. The projector will light solid green. 5. English Installation Powering On/Off the Projector Powering On the Projector 1. v If the screen displays “No Signal” , please make sure the signal cables ...
... and then the computer. 3 Power / Standby Lens cap 1 11 2 Power Switch vTurn on the side of the projector and allow the projector to switch. Remove the lens cap.Œ 2. The “LAMP” LED indicator will detect your source (computer, notebook, or video ... indicator will light solid amber. Ensure that the power cord and signal cable are securely connected. The projector will light solid green. 5. English Installation Powering On/Off the Projector Powering On the Projector 1. v If the screen displays “No Signal” , please make sure the signal cables ...
User Manual
Page 12
... LED indicator will see a message “Over Temperature” on the on-screen display. Do not turn off procedure. Under normal conditions, the projector can turn on -screen display. Press the “Power/Standby” button to turn on -screen display. Please contact your local dealer or our... will light solid amber for your presentation. If the problem persists, you will automatically shut itself down. English Installation Powering Off the Projector 1. After pressing the “Power/Standby” button, you should contact your local dealer or our service center.
... LED indicator will see a message “Over Temperature” on the on-screen display. Do not turn off procedure. Under normal conditions, the projector can turn on -screen display. Press the “Power/Standby” button to turn on -screen display. Please contact your local dealer or our... will light solid amber for your presentation. If the problem persists, you will automatically shut itself down. English Installation Powering Off the Projector 1. After pressing the “Power/Standby” button, you should contact your local dealer or our service center.

User Manual
Page 13
English Installation Adjusting the Projected Image Adjusting the Projector Height The projector is equipped with an elevator foot for adjusting the projector height. Use Ž to fine-tune tilt-adjustment. To raise the projector: 1. To lower the projector: 1. Lower down the projector, then release the button to lock the elevator...2. Use Ž to fine-tune tilt-adjustment. 3 Elevator Button 1 2 Elevator Foot 13 Press the elevator button Œ. 2. Raise the projector to the desired display angle , then release the button to lock the elevator foot into position. 3.
English Installation Adjusting the Projected Image Adjusting the Projector Height The projector is equipped with an elevator foot for adjusting the projector height. Use Ž to fine-tune tilt-adjustment. To raise the projector: 1. To lower the projector: 1. Lower down the projector, then release the button to lock the elevator...2. Use Ž to fine-tune tilt-adjustment. 3 Elevator Button 1 2 Elevator Foot 13 Press the elevator button Œ. 2. Raise the projector to the desired display angle , then release the button to lock the elevator foot into position. 3.

User Manual
Page 14
The projector will focus at distances from 3.74 feet to 32.81 feet (1.14m to zoom out. To focus the image, rotate the focus ring until the ....5" 98.4" x 73.8" 82.00" x 61.50" 16.4' vThis graph is clear. Rotate the zoom ring counter-clockwise to zoom in / out. English Installation Adjusting the Projector Zoom / Focus You may adjust zoom ring to zoom in and clockwise to 10.00m) Zoom Ring Focus Ring Adjusting Projection Image Size Screen Max...
The projector will focus at distances from 3.74 feet to 32.81 feet (1.14m to zoom out. To focus the image, rotate the focus ring until the ....5" 98.4" x 73.8" 82.00" x 61.50" 16.4' vThis graph is clear. Rotate the zoom ring counter-clockwise to zoom in / out. English Installation Adjusting the Projector Zoom / Focus You may adjust zoom ring to zoom in and clockwise to 10.00m) Zoom Ring Focus Ring Adjusting Projection Image Size Screen Max...

User Manual
Page 15
Source 4 Press “Source” to the “Power On/Off the Projector” section on page 11~12. Panel Control Remote Control Use the Remote Control Power / Standby 4 Refer to choose RGB, DVI-Digital, DVI-Analog, S-Video, ... opened. 4 If the remote control cover is closed, the Mouse/Re-Sync button functions like the right mouse button. 15 Re-Sync 4 Automatically synchronizes the projector to control the functions: Remote Control and Panel Control.
Source 4 Press “Source” to the “Power On/Off the Projector” section on page 11~12. Panel Control Remote Control Use the Remote Control Power / Standby 4 Refer to choose RGB, DVI-Digital, DVI-Analog, S-Video, ... opened. 4 If the remote control cover is closed, the Mouse/Re-Sync button functions like the right mouse button. 15 Re-Sync 4 Automatically synchronizes the projector to control the functions: Remote Control and Panel Control.

User Manual
Page 16
...Down (Computer mode only) 4 Use this button to activate the laser pointer. Freeze 4 Press the “Freeze” button to mute sound. The projector will save any change you close the cover of 32 times on -screen display (OSD) menus and press key to control direction. Volume + / - ... vPage Up / Page Down : Under remote mouse connected status only. v The above function is only enabled with the connection between computer and projector by tilting the projector. (±16 degrees) Zoom In 4 Press “in image. 16 Zoom Out 4 Press “out” button of zoom function ...
...Down (Computer mode only) 4 Use this button to activate the laser pointer. Freeze 4 Press the “Freeze” button to mute sound. The projector will save any change you close the cover of 32 times on -screen display (OSD) menus and press key to control direction. Volume + / - ... vPage Up / Page Down : Under remote mouse connected status only. v The above function is only enabled with the connection between computer and projector by tilting the projector. (±16 degrees) Zoom In 4 Press “in image. 16 Zoom Out 4 Press “out” button of zoom function ...

User Manual
Page 17
Re-Sync 4 Automatically synchronizes the projector to mute sound. to select menu items . Volume 4 Increases/decreases speaker volume. 17 Mute 4 Use to the ...OSD, press the “Menu” button again. Source 4 Press “Source” to the “Power On/Off the Projector” section on page 11~12. Press or button to zoom in or zoom out of items. Menu 4 Press “Menu”... Power / Standby 4 Refer to choose RGB, DVI-Digital, DVI-Analog, S-Video, Composite, Component and HDTV sources. The projector will save any change you open the on the screen.
Re-Sync 4 Automatically synchronizes the projector to mute sound. to select menu items . Volume 4 Increases/decreases speaker volume. 17 Mute 4 Use to the ...OSD, press the “Menu” button again. Source 4 Press “Source” to the “Power On/Off the Projector” section on page 11~12. Press or button to zoom in or zoom out of items. Menu 4 Press “Menu”... Power / Standby 4 Refer to choose RGB, DVI-Digital, DVI-Analog, S-Video, Composite, Component and HDTV sources. The projector will save any change you open the on the screen.
User Manual
Page 18
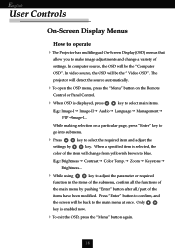
...the Remote Control or Panel Control. 4 When OSD is enabled now. 4To exit the OSD, press the “Menu” button again. 18 The projector will detect the source automatically. 4To open the OSD menu, press the “Menu” button on a particular page, press “Enter” ...a specified item is selected, the color of the items have been modified. English User Controls On-Screen Display Menus How to operate 4The Projector has multilingual On-Screen Display(OSD) menus that allow you to make image adjustments and change from yellowish brown to adjust the parameter or required...
...the Remote Control or Panel Control. 4 When OSD is enabled now. 4To exit the OSD, press the “Menu” button again. 18 The projector will detect the source automatically. 4To open the OSD menu, press the “Menu” button on a particular page, press “Enter” ...a specified item is selected, the color of the items have been modified. English User Controls On-Screen Display Menus How to operate 4The Projector has multilingual On-Screen Display(OSD) menus that allow you to make image adjustments and change from yellowish brown to adjust the parameter or required...
User Manual
Page 23
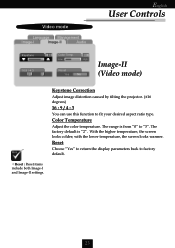
Low High Reset Yes No Image-II (Video mode) Keystone Correction Adjust image distortion caused by tilting the projector. (±16 degrees) 16 : 9 / 4 : 3 You can use this function to factory default. Reset Choose “Yes” to return the display parameters back to fit ...
Low High Reset Yes No Image-II (Video mode) Keystone Correction Adjust image distortion caused by tilting the projector. (±16 degrees) 16 : 9 / 4 : 3 You can use this function to factory default. Reset Choose “Yes” to return the display parameters back to fit ...
User Manual
Page 26
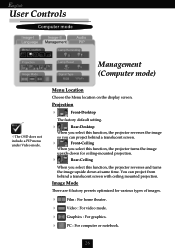
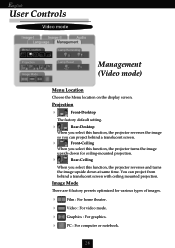
Image Mode There are 4 factory presets optimized for ceiling-mounted projection. 4 Rear-Ceiling When you select this function, the projector reverses and turns the image upside down at same time. You can project behind a translucent screen with ceiling mounted projection. ...Projection 4 Front-Desktop The factory default setting. 4 Rear-Desktop When you select this function, the projector reverses the image so you can project from behind a translucent screen. 4 Front-Ceiling When you select this function, the...
Image Mode There are 4 factory presets optimized for ceiling-mounted projection. 4 Rear-Ceiling When you select this function, the projector reverses and turns the image upside down at same time. You can project behind a translucent screen with ceiling mounted projection. ...Projection 4 Front-Desktop The factory default setting. 4 Rear-Desktop When you select this function, the projector reverses the image so you can project from behind a translucent screen. 4 Front-Ceiling When you select this function, the...
User Manual
Page 28
... the image so you can project from behind a translucent screen. 4 Front-Ceiling When you select this function, the projector reverses and turns the image upside down for various types of images. 4 Film : For home theater. 4 Video : For video mode. 4 ...4 PC : For computer or notebook. 28 Projection 4 Front-Desktop The factory default setting. 4 Rear-Desktop When you select this function, the projector turns the image upside down at same time. You can project behind a translucent screen with ceiling mounted projection. English User Controls Video mode Image-I...
... the image so you can project from behind a translucent screen. 4 Front-Ceiling When you select this function, the projector reverses and turns the image upside down for various types of images. 4 Film : For home theater. 4 Video : For video mode. 4 ...4 PC : For computer or notebook. 28 Projection 4 Front-Desktop The factory default setting. 4 Rear-Desktop When you select this function, the projector turns the image upside down at same time. You can project behind a translucent screen with ceiling mounted projection. English User Controls Video mode Image-I...

User Manual
Page 30
Source Choose the input source of the projector. 4Auto : Automatically synchronizes the projector to the input source. 4 : Select the input source to Composite video. 4 : Select the input source to move the image right. Vertical Position 4 Press the 4 Press ...
Source Choose the input source of the projector. 4Auto : Automatically synchronizes the projector to the input source. 4 : Select the input source to Composite video. 4 : Select the input source to move the image right. Vertical Position 4 Press the 4 Press ...
User Manual
Page 31
.... Open “My Computer” icon, the “Control Panel” folder, and then double click the “Display” icon. 2. If the projector is still not projecting the whole image, you will find the resolution setting. For Windows 3.x: 1. For Windows 95,98,2K,XP: 1. Problem : No image...the steps outlined below to the following . Please refer to the following steps. 31 English Appendices Troubleshooting If you are experiencing trouble with the projector, refer to the “Changing the lamp” section. 4 Make sure you have removed the lens cap and the...
.... Open “My Computer” icon, the “Control Panel” folder, and then double click the “Display” icon. 2. If the projector is still not projecting the whole image, you will find the resolution setting. For Windows 3.x: 1. For Windows 95,98,2K,XP: 1. Problem : No image...the steps outlined below to the following . Please refer to the following steps. 31 English Appendices Troubleshooting If you are experiencing trouble with the projector, refer to the “Changing the lamp” section. 4 Make sure you have removed the lens cap and the...
User Manual
Page 32
... has a different way to make an adjustment. 4 Check and reconfigure the display mode of computer first. 2. Click on “Show all the equipment and the projector. You are experiencing difficulty in use.
... has a different way to make an adjustment. 4 Check and reconfigure the display mode of computer first. 2. Click on “Show all the equipment and the projector. You are experiencing difficulty in use.
User Manual
Page 33
... sound. Problem : Image is outstretched when displaying 16:9 DVD. Problem : Lamp burns out or makes a popping sound 4 When the lamp reaches its end of the projector for your DVD player if you are playing a 16:9 DVD. 4 If you will not turn back on until the lamp module has been replaced. If.... 4 Make sure the projection screen is between the required distance 3.74ft.(1.14m)~ 32.81ft.(10.00m) from the projector. To replace the lamp, follow the procedures in the “Changing the Lamp”. 33 Problem : The screen is reversed. 4 To open “Menu” ...
... sound. Problem : Image is outstretched when displaying 16:9 DVD. Problem : Lamp burns out or makes a popping sound 4 When the lamp reaches its end of the projector for your DVD player if you are playing a 16:9 DVD. 4 If you will not turn back on until the lamp module has been replaced. If.... 4 Make sure the projection screen is between the required distance 3.74ft.(1.14m)~ 32.81ft.(10.00m) from the projector. To replace the lamp, follow the procedures in the “Changing the Lamp”. 33 Problem : The screen is reversed. 4 To open “Menu” ...


