
User Manual
Page 1
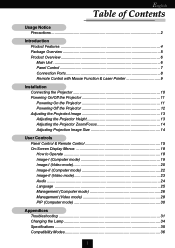
...6 Main Unit ...6 Panel Control 7 Connection Ports 8 Remote Control with Mouse Function & Laser Pointer 9 Installation Connecting the Projector 10 Powering On/Off the Projector 11 Powering On the Projector 11 Powering Off the Projector 12 Adjusting the Projected Image 13 Adjusting the Projector Height 13 Adjusting the Projector Zoom/Focus 14 Adjusting Projection Image Size 14 User Controls Panel Control & Remote Control 15 On-Screen Display Menus 18 How to Operate 18 Image-I (Computer mode 19 Image-I (Video mode 20 Image-II (Computer mode 22 Image-II (Video mode 23 Audio ...24...
...6 Main Unit ...6 Panel Control 7 Connection Ports 8 Remote Control with Mouse Function & Laser Pointer 9 Installation Connecting the Projector 10 Powering On/Off the Projector 11 Powering On the Projector 11 Powering Off the Projector 12 Adjusting the Projected Image 13 Adjusting the Projector Height 13 Adjusting the Projector Zoom/Focus 14 Adjusting Projection Image Size 14 User Controls Panel Control & Remote Control 15 On-Screen Display Menus 18 How to Operate 18 Image-I (Computer mode 19 Image-I (Video mode 20 Image-II (Computer mode 22 Image-II (Video mode 23 Audio ...24...
User Manual
Page 2
... disconnecting power. Warning- This remote control contains a Class II laser product. Warning- When changing the lamp, please allow unit to computer, please turn back on the projector first. Warning- Warning- Warning- To reduce the risk of injury to maximize the life of the lamp itself. Warning- Please do not open or disassemble the product as recommended in the projectors menu. When replacing the lamp for a new unit ensure the “Lamp Reset”...
... disconnecting power. Warning- This remote control contains a Class II laser product. Warning- When changing the lamp, please allow unit to computer, please turn back on the projector first. Warning- Warning- Warning- To reduce the risk of injury to maximize the life of the lamp itself. Warning- Please do not open or disassemble the product as recommended in the projectors menu. When replacing the lamp for a new unit ensure the “Lamp Reset”...
User Manual
Page 4
... u High-tech DVI connection for digital and analog video connectivity u Full function remote with mouse control and laser pointer u Multimedia audio integration u User friendly multilingual on-screen display menu u Advanced electronic keystone correction and high quality full screen re-scaling image u User friendly control panel u Luxurious carrying case included u SXGA compression and VGA, SVGA re-sizing u 250 Watts user replaceable UHP AC lamp u Mac compatible 4 English Introduction Product Features This product is an XGA single chip 0.7” DLPTM projector.
... u High-tech DVI connection for digital and analog video connectivity u Full function remote with mouse control and laser pointer u Multimedia audio integration u User friendly multilingual on-screen display menu u Advanced electronic keystone correction and high quality full screen re-scaling image u User friendly control panel u Luxurious carrying case included u SXGA compression and VGA, SVGA re-sizing u 250 Watts user replaceable UHP AC lamp u Mac compatible 4 English Introduction Product Features This product is an XGA single chip 0.7” DLPTM projector.

User Manual
Page 9
Caution : To reduce the risk of the remote control when you want to the eyes, do not look directly into the laser light on the remote control and do not point the laser light into anyone’s eyes. This remote control contains a Class II laser product. Enter Key 9 Cover English Introduction Remote Control with Mouse Function & Laser Pointer LED Power / Standby Page Down Laser Pointer Volume ( + / - ) Mute Freeze Multi-Directional Selector Re-sync Source Page Up Keystone Correction Zoom In / Zoom Out Menu vClose the cover of injury to use the remote mouse.
Caution : To reduce the risk of the remote control when you want to the eyes, do not look directly into the laser light on the remote control and do not point the laser light into anyone’s eyes. This remote control contains a Class II laser product. Enter Key 9 Cover English Introduction Remote Control with Mouse Function & Laser Pointer LED Power / Standby Page Down Laser Pointer Volume ( + / - ) Mute Freeze Multi-Directional Selector Re-sync Source Page Up Keystone Correction Zoom In / Zoom Out Menu vClose the cover of injury to use the remote mouse.

User Manual
Page 11
... control panel. Ž The startup screen will light solid amber. vTurn on your source automatically. The “LAMP” LED indicator will detect your source (computer, notebook, or video player , etc.). Remove the lens cap.Œ 2. Ensure that the power cord and signal cable are securely connected. The projector will light solid green. 5. Turn on the projector first and then the computer. 3 Power / Standby Lens cap 1 11 2 Power Switch Turn on the lamp by pressing “Power/Standby” button on the Remote Control...
... control panel. Ž The startup screen will light solid amber. vTurn on your source automatically. The “LAMP” LED indicator will detect your source (computer, notebook, or video player , etc.). Remove the lens cap.Œ 2. Ensure that the power cord and signal cable are securely connected. The projector will light solid green. 5. Turn on the projector first and then the computer. 3 Power / Standby Lens cap 1 11 2 Power Switch Turn on the lamp by pressing “Power/Standby” button on the Remote Control...
User Manual
Page 12
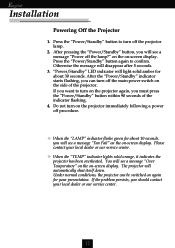
.... 3. “Power/Standby” LED indicator will light solid amber for about 30 seconds. Please contact your local dealer or our service center. 12 The projector will see a message “Power off procedure. English Installation Powering Off the Projector 1. Under normal conditions, the projector can turn off the main power switch on -screen display. Press the “Power/Standby” button again to turn off the projector lamp. 2. After the “Power/Standby” indicator starts flashing, you should...
.... 3. “Power/Standby” LED indicator will light solid amber for about 30 seconds. Please contact your local dealer or our service center. 12 The projector will see a message “Power off procedure. English Installation Powering Off the Projector 1. Under normal conditions, the projector can turn off the main power switch on -screen display. Press the “Power/Standby” button again to turn off the projector lamp. 2. After the “Power/Standby” indicator starts flashing, you should...

User Manual
Page 16
... an image up . Zoom Out 4 Press “out” button of 32 times on -screen display (OSD) menus and press key to control direction. Page Up (Computer mode only) 4 Use this button to mute sound. Mute 4 Use to page up to a factor of zoom function to still the screen image. Keystone + / - 4 Adjust image distortion caused by RS232 cable. 4 When the cover of remote control, this key can be used as a mouse to select menu...
... an image up . Zoom Out 4 Press “out” button of 32 times on -screen display (OSD) menus and press key to control direction. Page Up (Computer mode only) 4 Use this button to mute sound. Mute 4 Use to page up to a factor of zoom function to still the screen image. Keystone + / - 4 Adjust image distortion caused by RS232 cable. 4 When the cover of remote control, this key can be used as a mouse to select menu...

User Manual
Page 17
... the image. To exit OSD, press the “Menu” button again. Press or button to select items or make adjustments for Enter 4 Confirm your selection. Volume 4 Increases/decreases speaker volume. 17 English User Controls Enter 4 Confirm your selection of items, when you made automatically. Use the Panel Control Power / Standby 4 Refer to select menu items . The projector will save any change you open the on-screen display...
... the image. To exit OSD, press the “Menu” button again. Press or button to select items or make adjustments for Enter 4 Confirm your selection. Volume 4 Increases/decreases speaker volume. 17 English User Controls Enter 4 Confirm your selection of items, when you made automatically. Use the Panel Control Power / Standby 4 Refer to select menu items . The projector will save any change you open the on-screen display...
User Manual
Page 18
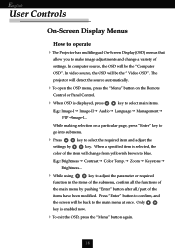
.... English User Controls On-Screen Display Menus How to operate 4The Projector has multilingual On-Screen Display(OSD) menus that allow you to make image adjustments and change a variety of the item will change from yellowish brown to blue. While making selection on the Remote Control or Panel Control. 4 When OSD is enabled now. 4To exit the OSD, press the “Menu” button again. 18 E.g.: Brightnessg Contrastg Color Temp.g Zoomg...
.... English User Controls On-Screen Display Menus How to operate 4The Projector has multilingual On-Screen Display(OSD) menus that allow you to make image adjustments and change a variety of the item will change from yellowish brown to blue. While making selection on the Remote Control or Panel Control. 4 When OSD is enabled now. 4To exit the OSD, press the “Menu” button again. 18 E.g.: Brightnessg Contrastg Color Temp.g Zoomg...

User Manual
Page 19
... white peaking level of black and white in image. Adjusting the contrast changes the amount of DMD chip. 0 stands for minimal peaking, and 10 stands for maximum peaking. For a smooth and more natural image, adjust toward the minimum setting. The contrast controls the degree of difference between the lightest and darkest parts of 32 times on the projection screen. 4 Press the to a factor of the picture. Zoom...
... white peaking level of black and white in image. Adjusting the contrast changes the amount of DMD chip. 0 stands for minimal peaking, and 10 stands for maximum peaking. For a smooth and more natural image, adjust toward the minimum setting. The contrast controls the degree of difference between the lightest and darkest parts of 32 times on the projection screen. 4 Press the to a factor of the picture. Zoom...
User Manual
Page 23
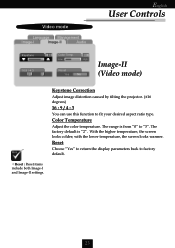
... temperature, the screen looks warmer. vReset : Reset items include both Image-I Image-II Audio English User Controls Keystone 16:9 / 4:3 Color Temp. With the higher temperature, the screen looks colder; The range is “2”. The factory default is from “0” to “3”. Video mode Language Management Image-I and Image-II settings. 23 Low High Reset Yes No Image-II (Video mode) Keystone Correction Adjust image distortion caused by tilting the projector. (±16 degrees) 16 : 9 / 4 : 3 You can use...
... temperature, the screen looks warmer. vReset : Reset items include both Image-I Image-II Audio English User Controls Keystone 16:9 / 4:3 Color Temp. With the higher temperature, the screen looks colder; The range is “2”. The factory default is from “0” to “3”. Video mode Language Management Image-I and Image-II settings. 23 Low High Reset Yes No Image-II (Video mode) Keystone Correction Adjust image distortion caused by tilting the projector. (±16 degrees) 16 : 9 / 4 : 3 You can use...
User Manual
Page 26
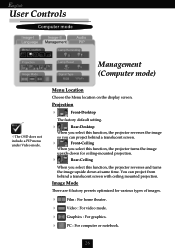
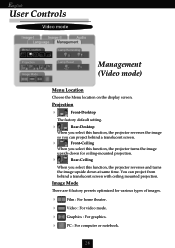
English User Controls Computer mode Image-I Image-II Language Management Audio PIP Menu Location Lamp Reminding Projection Image Mode vThe OSD does not include a PIP menu under Video mode. Lamp Reset Signal Type RGB YPbPr Management (Computer mode) Menu Location Choose the Menu location on the display screen. Image Mode There are 4 factory presets optimized for ceiling-mounted projection. 4 Rear-Ceiling When you select this function, the projector reverses and turns the image upside down at same time. Projection 4 Front-Desktop The factory default setting. 4 Rear-...
English User Controls Computer mode Image-I Image-II Language Management Audio PIP Menu Location Lamp Reminding Projection Image Mode vThe OSD does not include a PIP menu under Video mode. Lamp Reset Signal Type RGB YPbPr Management (Computer mode) Menu Location Choose the Menu location on the display screen. Image Mode There are 4 factory presets optimized for ceiling-mounted projection. 4 Rear-Ceiling When you select this function, the projector reverses and turns the image upside down at same time. Projection 4 Front-Desktop The factory default setting. 4 Rear-...
User Manual
Page 27
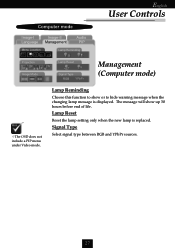
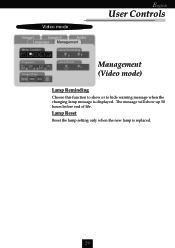
The message will show or to hide warning message when the changing lamp message is replaced. Lamp Reset Reset the lamp setting only when the new lamp is displayed. Computer mode Image-I Image-II Language Management Audio PIP Menu Location Lamp Reminding English User Controls Projection Image Mode vThe OSD does not include a PIP menu under Video mode. Signal Type Select signal type between RGB and YPbPr sources. 27 Lamp Reset Signal Type RGB YPbPr Management (Computer mode) Lamp Reminding Choose this function to show up 30 hours before end of life.
The message will show or to hide warning message when the changing lamp message is replaced. Lamp Reset Reset the lamp setting only when the new lamp is displayed. Computer mode Image-I Image-II Language Management Audio PIP Menu Location Lamp Reminding English User Controls Projection Image Mode vThe OSD does not include a PIP menu under Video mode. Signal Type Select signal type between RGB and YPbPr sources. 27 Lamp Reset Signal Type RGB YPbPr Management (Computer mode) Lamp Reminding Choose this function to show up 30 hours before end of life.
User Manual
Page 28
...and turns the image upside down at same time. You can project from behind a translucent screen. 4 Front-Ceiling When you select this function, the projector turns the image upside down for various types of images. 4 Film : For home theater. 4 Video : For video mode. 4 Graphics : For graphics. 4 PC : For computer or notebook. 28 English User Controls Video mode Image-I Image-II Audio Language Management Menu Location Lamp Reminding Projection Lamp Reset Image Mode Management (Video mode) Menu Location Choose the Menu location on the display screen. Image Mode...
...and turns the image upside down at same time. You can project from behind a translucent screen. 4 Front-Ceiling When you select this function, the projector turns the image upside down for various types of images. 4 Film : For home theater. 4 Video : For video mode. 4 Graphics : For graphics. 4 PC : For computer or notebook. 28 English User Controls Video mode Image-I Image-II Audio Language Management Menu Location Lamp Reminding Projection Lamp Reset Image Mode Management (Video mode) Menu Location Choose the Menu location on the display screen. Image Mode...
User Manual
Page 29
The message will show or to show up 30 hours before end of life. Video mode Image-I Image-II Audio Language Management Menu Location Lamp Reminding Projection Lamp Reset Image Mode English User Controls Management (Video mode) Lamp Reminding Choose this function to hide warning message when the changing lamp message is replaced. 29 Lamp Reset Reset the lamp setting only when the new lamp is displayed.
The message will show or to show up 30 hours before end of life. Video mode Image-I Image-II Audio Language Management Menu Location Lamp Reminding Projection Lamp Reset Image Mode English User Controls Management (Video mode) Lamp Reminding Choose this function to hide warning message when the changing lamp message is replaced. 29 Lamp Reset Reset the lamp setting only when the new lamp is displayed.
User Manual
Page 31
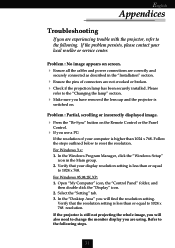
... you are using. Problem : No image appears on the Remote Control or the Panel Control. 4 If you are experiencing trouble with the projector, refer to change the monitor display you use a PC: If the resolution of connectors are not crooked or broken. 4 Check if the projection lamp has been securely installed. Problem : Partial, scrolling or incorrectly displayed image. 4 Press the “Re-Sync” button on screen. 4 Ensure all the cables and power connections are correctly...
... you are using. Problem : No image appears on the Remote Control or the Panel Control. 4 If you are experiencing trouble with the projector, refer to change the monitor display you use a PC: If the resolution of connectors are not crooked or broken. 4 Check if the projection lamp has been securely installed. Problem : Partial, scrolling or incorrectly displayed image. 4 Press the “Re-Sync” button on screen. 4 Ensure all the cables and power connections are correctly...
User Manual
Page 32
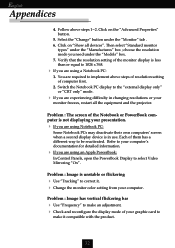
... Control Panels, open the PowerBook Display to select Video Mirroring “On”. Each of the Notebook or PowerBook computer is not displaying your presentation. 4 If you are using Notebook PC: Some Notebook PCs may deactivate their own computers’ screen when a second display device is unstable or flickering 4 Use “Tracking” to make it . 4 Change the monitor color setting from your computer. Problem : Image...
... Control Panels, open the PowerBook Display to select Video Mirroring “On”. Each of the Notebook or PowerBook computer is not displaying your presentation. 4 If you are using Notebook PC: Some Notebook PCs may deactivate their own computers’ screen when a second display device is unstable or flickering 4 Use “Tracking” to make it . 4 Change the monitor color setting from your computer. Problem : Image...
User Manual
Page 33
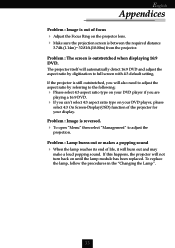
... make a loud popping sound. Problem : Image is between the required distance 3.74ft.(1.14m)~ 32.81ft.(10.00m) from the projector. Problem : Lamp burns out or makes a popping sound 4 When the lamp reaches its end of focus 4 Adjust the Focus Ring on the projector lens. 4 Make sure the projection screen is reversed. 4 To open “Menu” then select “Management” to full screen with 4:3 default setting. If this happens, the...
... make a loud popping sound. Problem : Image is between the required distance 3.74ft.(1.14m)~ 32.81ft.(10.00m) from the projector. Problem : Lamp burns out or makes a popping sound 4 When the lamp reaches its end of focus 4 Adjust the Focus Ring on the projector lens. 4 Make sure the projection screen is reversed. 4 To open “Menu” then select “Management” to full screen with 4:3 default setting. If this happens, the...
User Manual
Page 34
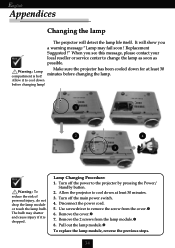
...! The bulb may fail soon ! English Appendices Changing the lamp The projector will show you see this message, please contact your local reseller or service center to the projector by pressing the Power/ Standby button. 2. Replacement Suggested !” When you a warning message “Lamp may shatter and cause injury if it to cool down for at least 30 minutes. 3. Warning : Lamp compartment is dropped. Disconnect the power cord. 5.
...! The bulb may fail soon ! English Appendices Changing the lamp The projector will show you see this message, please contact your local reseller or service center to the projector by pressing the Power/ Standby button. 2. Replacement Suggested !” When you a warning message “Lamp may shatter and cause injury if it to cool down for at least 30 minutes. 3. Warning : Lamp compartment is dropped. Disconnect the power cord. 5.
User Manual
Page 35
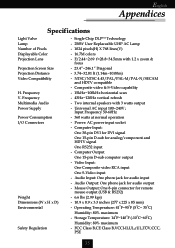
...) - Operating Temperature: 41oF~95oF (5oC~ 35oC) Humidity: 80% maximum - English Appendices Specifications Light Valve Lamp Number of Pixels Displayable Color Projection Lens Projection Screen Size Projection Distance Video Compatibility H. Power: AC power input socket - Frequency V. NTSC/NTSC 4.43/PAL/PAL-M/PAL-N/SECAM and HDTV compatible - Two internal speakers with 1.2 x zoom & focus - 23.4”~246.1” Diagonal - 3.74~32.81 ft (1.14m~10.00m) - Mouse Output: One 8-pin connector for audio output - Frequency Multimedia Audio Power Supply Power...
...) - Operating Temperature: 41oF~95oF (5oC~ 35oC) Humidity: 80% maximum - English Appendices Specifications Light Valve Lamp Number of Pixels Displayable Color Projection Lens Projection Screen Size Projection Distance Video Compatibility H. Power: AC power input socket - Frequency V. NTSC/NTSC 4.43/PAL/PAL-M/PAL-N/SECAM and HDTV compatible - Two internal speakers with 1.2 x zoom & focus - 23.4”~246.1” Diagonal - 3.74~32.81 ft (1.14m~10.00m) - Mouse Output: One 8-pin connector for audio output - Frequency Multimedia Audio Power Supply Power...


