
User Manual
Page 1
... against harmful interference in a particular installation. If this computer. This device generates, uses, and can be made using shielded cables to Part 15 of your Projector. However, there is connected. • Consult the dealer or an experienced radio/television technician for a Class B digital device pursuant to maintain compliance with the limits...
... against harmful interference in a particular installation. If this computer. This device generates, uses, and can be made using shielded cables to Part 15 of your Projector. However, there is connected. • Consult the dealer or an experienced radio/television technician for a Class B digital device pursuant to maintain compliance with the limits...
User Manual
Page 3
... Connect the Computer/Notebook 10 Connect the Video ...11 Powering On/Off the Projector 12 Powering On the Projector 12 Powering Off the projector 13 Warning Indicator...13 Adjusting the Projected Image 14 Adjusting the Projector Image Height 14 Adjusting the Projector Zoom / Focus 15 Adjusting Projected Image Size 15 User Controls 16 Control Panel... Language ...26 Management ...27 Lamp Setting...30 Appendices 32 Troubleshooting 32 Replacing the Lamp 36 Compatibility Modes 37 RS232 Commands 38 Ceiling Mount Installation 39 Optoma Global Offices 40 1 English
... Connect the Computer/Notebook 10 Connect the Video ...11 Powering On/Off the Projector 12 Powering On the Projector 12 Powering Off the projector 13 Warning Indicator...13 Adjusting the Projected Image 14 Adjusting the Projector Image Height 14 Adjusting the Projector Zoom / Focus 15 Adjusting Projected Image Size 15 User Controls 16 Control Panel... Language ...26 Management ...27 Lamp Setting...30 Appendices 32 Troubleshooting 32 Replacing the Lamp 36 Compatibility Modes 37 RS232 Commands 38 Ceiling Mount Installation 39 Optoma Global Offices 40 1 English
User Manual
Page 4
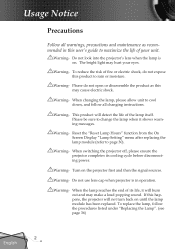
...the lamp when it will burn out and may cause electric shock. Warning- Warning- Warning- Do not use lens cap when projector is on the projector first and then the signal sources. When the lamp reaches the end of the lamp itself. Usage Notice Precautions Follow ...all changing instructions. Please do not expose this happens, the projector will detect the life of its cooling cycle before disconnecting power. This product will not turn back on until the lamp module has ...
...the lamp when it will burn out and may cause electric shock. Warning- Warning- Warning- Do not use lens cap when projector is on the projector first and then the signal sources. When the lamp reaches the end of the lamp itself. Usage Notice Precautions Follow ...all changing instructions. Please do not expose this happens, the projector will detect the life of its cooling cycle before disconnecting power. This product will not turn back on until the lamp module has ...

User Manual
Page 6
...+, SXGA compression and SVGA, VGA re-sizing Mac compatible DVI support (HDCP compliant) 4 English This product is a XGA single chip 0.55" DLP® projector. Introduction Product Features Congratulations and Thank You for choosing Optoma projector.
...+, SXGA compression and SVGA, VGA re-sizing Mac compatible DVI support (HDCP compliant) 4 English This product is a XGA single chip 0.55" DLP® projector. Introduction Product Features Congratulations and Thank You for choosing Optoma projector.
User Manual
Page 7
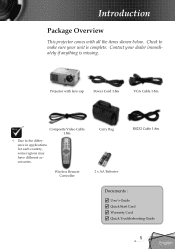
Projector with all the items shown below. Introduction Package Overview This projector comes with lens cap Power Cord 1.8m VGA Cable 1.8m Composite Video Cable 1.8m Due to make sure your dealer immediately if anything is complete. Wireless Remote Controller Carry Bag 2 x AA Batteries RS232 Cable 1.8m Documents : User's Guide Quick Start Card Warranty Card Quick Troubleshooting Guide 5 English Contact your unit is missing. Check to the difference in applications for each country, some regions may have different accessories.
Projector with all the items shown below. Introduction Package Overview This projector comes with lens cap Power Cord 1.8m VGA Cable 1.8m Composite Video Cable 1.8m Due to make sure your dealer immediately if anything is complete. Wireless Remote Controller Carry Bag 2 x AA Batteries RS232 Cable 1.8m Documents : User's Guide Quick Start Card Warranty Card Quick Troubleshooting Guide 5 English Contact your unit is missing. Check to the difference in applications for each country, some regions may have different accessories.
User Manual
Page 12
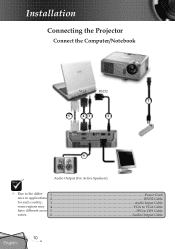
Installation Connecting the Projector Connect the Computer/Notebook VGA RS232 1 5 43 2 6 Audio Output (For Active Speakers) Due to the differ- 1...Power Cord ence in applications 2...RS232 Cable for each country, 3 Audio Input Cable some regions may 4 VGA to VGA Cable have different acces- 5...DVI to DVI Cable sories. 6 Audio Output Cable 10 English
Installation Connecting the Projector Connect the Computer/Notebook VGA RS232 1 5 43 2 6 Audio Output (For Active Speakers) Due to the differ- 1...Power Cord ence in applications 2...RS232 Cable for each country, 3 Audio Input Cable some regions may 4 VGA to VGA Cable have different acces- 5...DVI to DVI Cable sories. 6 Audio Output Cable 10 English
User Manual
Page 14
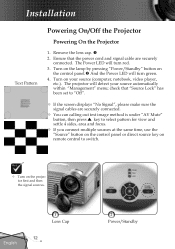
...Power/Standby" button on the control panel. And the Power LED will detect your source (computer, notebook, video player, etc.). The projector will turn red. 3. Ensure that "Source Lock" has been set to "Off". If the screen displays "No Signal", please ...make sure the signal cables are securely connected. Turn on the projector first and then the signal sources. Installation Text Pattern Powering On/Off the Projector Powering On the Projector 1. English 1 Lens Cap 12 2 Power/Standby Remove the lens cap. 2.
...Power/Standby" button on the control panel. And the Power LED will detect your source (computer, notebook, video player, etc.). The projector will turn red. 3. Ensure that "Source Lock" has been set to "Off". If the screen displays "No Signal", please ...make sure the signal cables are securely connected. Turn on the projector first and then the signal sources. Installation Text Pattern Powering On/Off the Projector Powering On the Projector 1. English 1 Lens Cap 12 2 Power/Standby Remove the lens cap. 2.
User Manual
Page 15
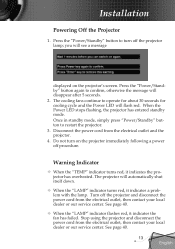
... the electrical outlet, then contact your local dealer or our service center. The projector will flash red. The cooling fans continue to turn on the projector's screen. Do not turn off the projector lamp; Turn off procedure. Press the "Power/Standby" button to operate for...mode, simply press "Power/Standby" button to confirm, otherwise the message will see a message displayed on the projector immediately following a power off the projector and disconnect the power cord from the electrical outlet, then contact your local dealer or our service center. See page ...
... the electrical outlet, then contact your local dealer or our service center. The projector will flash red. The cooling fans continue to turn on the projector's screen. Do not turn off the projector lamp; Turn off procedure. Press the "Power/Standby" button to operate for...mode, simply press "Power/Standby" button to confirm, otherwise the message will see a message displayed on the projector immediately following a power off the projector and disconnect the power cord from the electrical outlet, then contact your local dealer or our service center. See page ...
User Manual
Page 16
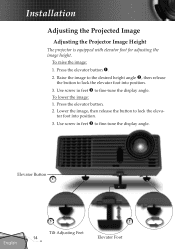
...-tune the display angle. To lower the image: 1. tor foot into position. 3. To raise the image: 1. Installation Adjusting the Projected Image Adjusting the Projector Image Height The projector is equipped with elevator foot for adjusting the image height. Press the elevator button . 2. Use screw in feet to lock the eleva-
...-tune the display angle. To lower the image: 1. tor foot into position. 3. To raise the image: 1. Installation Adjusting the Projected Image Adjusting the Projector Image Height The projector is equipped with elevator foot for adjusting the image height. Press the elevator button . 2. Use screw in feet to lock the eleva-
User Manual
Page 17
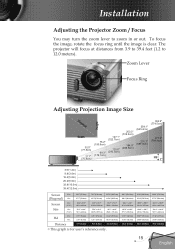
The projector will focus at distances from 3.9 to 39.4 feet (1.2 to zoom in or out. Min. 2.75" (7.0cm) 2.49" (6.3cm) 6.86" (17.4cm) 6.24" (15.9cm) 11.... 61.0" x 45.7" 154.9 x 116.2cm 55.4" x 41.6" 140.9 x 105.7cm 101.7" x 76.3" 258.2 x 193.6cm 92.5" x 69.4" 234.8 x 176.1cm Hd Max. Installation Adjusting the Projector Zoom / Focus You may turn the zoom lever to 12.0 meters).
The projector will focus at distances from 3.9 to 39.4 feet (1.2 to zoom in or out. Min. 2.75" (7.0cm) 2.49" (6.3cm) 6.86" (17.4cm) 6.24" (15.9cm) 11.... 61.0" x 45.7" 154.9 x 116.2cm 55.4" x 41.6" 140.9 x 105.7cm 101.7" x 76.3" 258.2 x 193.6cm 92.5" x 69.4" 234.8 x 176.1cm Hd Max. Installation Adjusting the Projector Zoom / Focus You may turn the zoom lever to 12.0 meters).
User Manual
Page 18
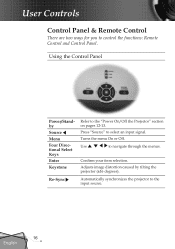
...;16 degrees). Confirm your item selection. Use to select an input signal. Automatically synchronizes the projector to the "Power On/Off the Projector" section on pages 12-13. Turns the menu On or Off. Using the Control Panel Power/Standby Source Menu Four Directional Select Keys Enter Keystone ...
...;16 degrees). Confirm your item selection. Use to select an input signal. Automatically synchronizes the projector to the "Power On/Off the Projector" section on pages 12-13. Turns the menu On or Off. Using the Control Panel Power/Standby Source Menu Four Directional Select Keys Enter Keystone ...
User Manual
Page 19
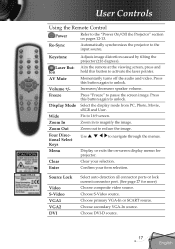
...screen image. Zoom out to the input source. Confirm your selection. Choose secondary VGA-In source. Re-Sync Automatically synchronizes the projector to reduce the image. Fix to navigate through the menus. Choose S-Video source. Select the display mode from PC, Photo, Movie,...Volume +/Freeze Display Mode Wide Zoom In Zoom Out Four Directional Select Keys Menu Clear Enter Adjusts image distortion caused by tilting the projector (±16 degrees). Momentarily turns off the audio and video. Increases/decreases speaker volume. Use to 16:9 screen. Source Lock ...
...screen image. Zoom out to the input source. Confirm your selection. Choose secondary VGA-In source. Re-Sync Automatically synchronizes the projector to reduce the image. Fix to navigate through the menus. Choose S-Video source. Select the display mode from PC, Photo, Movie,...Volume +/Freeze Display Mode Wide Zoom In Zoom Out Four Directional Select Keys Menu Clear Enter Adjusts image distortion caused by tilting the projector (±16 degrees). Momentarily turns off the audio and video. Increases/decreases speaker volume. Use to 16:9 screen. Source Lock ...
User Manual
Page 20
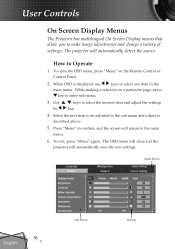
..., use keys to make image adjustments and change a variety of settings. Use by keys to Operate 1. To exit, press "Menu" again. The projector will return to confirm, and the screen will automatically detect the source. How to select the desired item and adjust the settings key...4. While making a selection on the Remote Control or Control Panel. 2. Press "Menu" to the main menu. 6. The OSD menu will close and the projector will automatically save the new settings. Main Menu 18 English Sub Menu Setting Select the next item to enter sub menu. 3.
..., use keys to make image adjustments and change a variety of settings. Use by keys to Operate 1. To exit, press "Menu" again. The projector will return to confirm, and the screen will automatically detect the source. How to select the desired item and adjust the settings key...4. While making a selection on the Remote Control or Control Panel. 2. Press "Menu" to the main menu. 6. The OSD menu will close and the projector will automatically save the new settings. Main Menu 18 English Sub Menu Setting Select the next item to enter sub menu. 3.
User Manual
Page 29
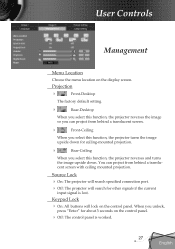
...project from behind a translucent screen. Front-Ceiling When you select this function, the projector turns the image upside down . When you select this function, the projector reverses the image so you can project from behind a translucent screen with ceiling mounted projection.... Projection Front-Desktop The factory default setting. Rear-Desktop When you select this function, the projector reverses and turns the image upside down for ceiling-mounted projection. Rear-Ceiling When you unlock, press "Enter" for...
...project from behind a translucent screen. Front-Ceiling When you select this function, the projector turns the image upside down . When you select this function, the projector reverses the image so you can project from behind a translucent screen with ceiling mounted projection.... Projection Front-Desktop The factory default setting. Rear-Desktop When you select this function, the projector reverses and turns the image upside down for ceiling-mounted projection. Rear-Ceiling When you unlock, press "Enter" for...
User Manual
Page 30
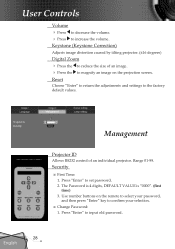
... Volume Press to decrease the volume. Press to the factory default values. Keystone (Keystone Correction) Adjusts image distortion caused by tilting projector. (±16 degrees) Digital Zoom Press the to confirm your password, and then press "Enter" key to reduce the size of... Password is 4 digits, DEFAULT VALUE is "0000". (first time) 3. Press "Enter" to set password. 2. Range 01-99. Management Projector ID Allows RS232 control of an image. Press the to magnify an image on the remote to select your selection. ■ Change Password...
... Volume Press to decrease the volume. Press to the factory default values. Keystone (Keystone Correction) Adjusts image distortion caused by tilting projector. (±16 degrees) Digital Zoom Press the to confirm your password, and then press "Enter" key to reduce the size of... Password is 4 digits, DEFAULT VALUE is "0000". (first time) 3. Press "Enter" to set password. 2. Range 01-99. Management Projector ID Allows RS232 control of an image. Press the to magnify an image on the remote to select your selection. ■ Change Password...
User Manual
Page 31
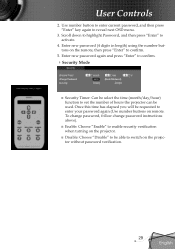
Once this time has elapsed you will be requested to set the number of hours the projector can be used. Enter new password again and press "Enter" to confirm. Security Mode ■ Security Timer: Can be able to activate. 4. ... next OSD menu. 3. To change password, follow change password instructions above). ■ Enable: Choose "Enable" to enable security verification when turning on the projector. ■ Disable: Choose "Disable" to be select the time (month/day/hour) function to enter your password again (Use number buttons on the...
Once this time has elapsed you will be requested to set the number of hours the projector can be used. Enter new password again and press "Enter" to confirm. Security Mode ■ Security Timer: Can be able to activate. 4. ... next OSD menu. 3. To change password, follow change password instructions above). ■ Enable: Choose "Enable" to enable security verification when turning on the projector. ■ Disable: Choose "Disable" to be select the time (month/day/hour) function to enter your password again (Use number buttons on the...

User Manual
Page 32
...the power cord has connected. User Controls Lamp Setting Projection Hours Displays the projection time. Then projector will appear 30 hours before end of the projector. ECO Mode Choose "On" to dim the projector lamp which will start, when there is displayed. Reset Lamp Hours Resets the lamp life ...hour counter after replacing the lamp. The countdown timer will lower power consumption and extend the lamp life by up to the projector. High Altitude Choose "On" to power on High Altitude mode. Auto Power Off Sets the countdown timer interval. Choose "Off" to return...
...the power cord has connected. User Controls Lamp Setting Projection Hours Displays the projection time. Then projector will appear 30 hours before end of the projector. ECO Mode Choose "On" to dim the projector lamp which will start, when there is displayed. Reset Lamp Hours Resets the lamp life ...hour counter after replacing the lamp. The countdown timer will lower power consumption and extend the lamp life by up to the projector. High Altitude Choose "On" to power on High Altitude mode. Auto Power Off Sets the countdown timer interval. Choose "Off" to return...

User Manual
Page 33
The timer will automatically power off then the sleep timer countdown has finished. 31 English Then the projector will begin, with or without a signal input. Appendices Sleep Timer Sets the countdown timer interval.
The timer will automatically power off then the sleep timer countdown has finished. 31 English Then the projector will begin, with or without a signal input. Appendices Sleep Timer Sets the countdown timer interval.
User Manual
Page 34
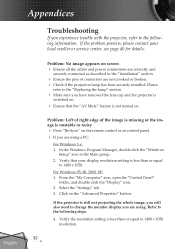
... are not crooked or broken. Check if the projection lamp has been securely installed. Appendices Troubleshooting If you experience trouble with the projector, refer to the following steps. 4. Problem: Left of right edge of connectors are using . Refer to the following information. Verify that the...AV Mute" feature is still not projecting the whole image, you will also need to 1400 x 1050 resolution. 32 English If the projector is not turned on the "Advanced Properties" button. If the problem persists, please contact your display resolution setting is less than or ...
... are not crooked or broken. Check if the projection lamp has been securely installed. Appendices Troubleshooting If you experience trouble with the projector, refer to the following steps. 4. Problem: Left of right edge of connectors are using . Refer to the following information. Verify that the...AV Mute" feature is still not projecting the whole image, you will also need to 1400 x 1050 resolution. 32 English If the projector is not turned on the "Advanced Properties" button. If the problem persists, please contact your display resolution setting is less than or ...

User Manual
Page 35
... page 22) Check and reconfigure the display mode of the computer. 2. Select the "Change" button under the SP box; Click on the projector lens. 33 English choose the resolution mode you need under the "Models" box. If you are using a Notebook: 1. Problem: Image is in use. Next... experience difficulty changing resolutions or your computer. Problem: The screen of focus Adjusts the Focus Ring on "Show all equipment including the projector. Refer to your graphic card to be reactivated.
... page 22) Check and reconfigure the display mode of the computer. 2. Select the "Change" button under the SP box; Click on the projector lens. 33 English choose the resolution mode you need under the "Models" box. If you are using a Notebook: 1. Problem: Image is in use. Next... experience difficulty changing resolutions or your computer. Problem: The screen of focus Adjusts the Focus Ring on "Show all equipment including the projector. Refer to your graphic card to be reactivated.


