
User Manual
Page 3
... ...22 Colour Setting ...24 Language ...26 Management ...27 Lamp Setting...30 Appendices 32 Troubleshooting 32 Replacing the Lamp 36 Compatibility Modes 37 RS232 Commands 38 Ceiling Mount Installation 39 Optoma Global Offices 40 1 English
... ...22 Colour Setting ...24 Language ...26 Management ...27 Lamp Setting...30 Appendices 32 Troubleshooting 32 Replacing the Lamp 36 Compatibility Modes 37 RS232 Commands 38 Ceiling Mount Installation 39 Optoma Global Offices 40 1 English
User Manual
Page 29
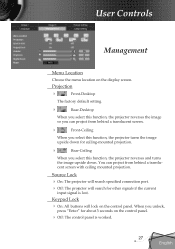
... Rear-Desktop When you select this function, the projector reverses the image so you can project from behind a translucent screen with ceiling mounted projection. Keypad Lock On: All buttons will search for about 3 seconds on the control panel. Off: The ...upside down . You can project from behind a translucent screen. Front-Ceiling When you select this function, the projector reverses and turns the image upside down for ceiling-mounted projection. Rear-Ceiling When you unlock, press "Enter" for other signals if the current input ...
... Rear-Desktop When you select this function, the projector reverses the image so you can project from behind a translucent screen with ceiling mounted projection. Keypad Lock On: All buttons will search for about 3 seconds on the control panel. Off: The ...upside down . You can project from behind a translucent screen. Front-Ceiling When you select this function, the projector reverses and turns the image upside down for ceiling-mounted projection. Rear-Ceiling When you unlock, press "Enter" for other signals if the current input ...
User Manual
Page 41
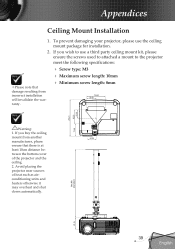
...the following specifications: Please note that there is at least 10cm distance be- If you buy the ceiling mount from another 50.05 manufacturer, please ensure that damage resulting from incorrect installation will invalidate the warranty. Screw... otherwise it may overheat and shut down automatically. 67.55 39 English Appendices Ceiling Mount Installation 1. To prevent damaging your projector, please use a third party ceiling mount kit, please ensure the screws used to attached a mount to use the ceiling mount package for installation. 2.
...the following specifications: Please note that there is at least 10cm distance be- If you buy the ceiling mount from another 50.05 manufacturer, please ensure that damage resulting from incorrect installation will invalidate the warranty. Screw... otherwise it may overheat and shut down automatically. 67.55 39 English Appendices Ceiling Mount Installation 1. To prevent damaging your projector, please use a third party ceiling mount kit, please ensure the screws used to attached a mount to use the ceiling mount package for installation. 2.
