

User Manual
Page 9
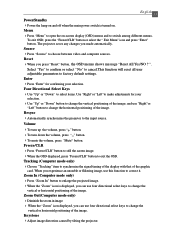
... turn off the lamp by pressing " POWER/STANDBY" button. u Powering Off the Projection Display. Please select "Yes" to the image from the projector's On-Screen Display (OSD)menus. After the "LAMP" LED indicator stops flashing, you may unplug the power cord. The "POWER/STANDBY" LED ...POWER/STANDBY" LED indicator will detect your presentation. The "LAMP" LED indicator will show up. The projector will lit green and stop flashing. " will flash amber for a long period of the projector and plug it indicates the display has been overheated. Warning: * When the "LAMP" LED indicator ...
... turn off the lamp by pressing " POWER/STANDBY" button. u Powering Off the Projection Display. Please select "Yes" to the image from the projector's On-Screen Display (OSD)menus. After the "LAMP" LED indicator stops flashing, you may unplug the power cord. The "POWER/STANDBY" LED ...POWER/STANDBY" LED indicator will detect your presentation. The "LAMP" LED indicator will show up. The projector will lit green and stop flashing. " will flash amber for a long period of the projector and plug it indicates the display has been overheated. Warning: * When the "LAMP" LED indicator ...
User Manual
Page 13
... No" to cancel.This function will reset all user adjustable parameters to exit the OSD. Resync 4Automatically synchronizes the projector to choose between video and computer sources. The projector saves any changes you press "Reset" button, the OSD menus shows message "Reset All Yes/NO ? Source ...4Press "Source" to the input source. Menu 4Press "Menu" to open the on . ". Keystone 4Adjust image distortion caused by tilting the projector. English 13 Power/Standby 4Power the lamp on and off when the main power switch is displayed, you experience an unstable or flikering image...
... No" to cancel.This function will reset all user adjustable parameters to exit the OSD. Resync 4Automatically synchronizes the projector to choose between video and computer sources. The projector saves any changes you press "Reset" button, the OSD menus shows message "Reset All Yes/NO ? Source ...4Press "Source" to the input source. Menu 4Press "Menu" to open the on . ". Keystone 4Adjust image distortion caused by tilting the projector. English 13 Power/Standby 4Power the lamp on and off when the main power switch is displayed, you experience an unstable or flikering image...
User Manual
Page 14
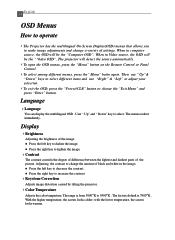
.... The range is 7900°K . The factory default is from 5000°K to increase the contrast 4Keystone Correction Adjusts image distortion caused by tilting the projector. 4Color Temperature Adjusts the color temperture. Then use "Up"& "Down" keys to select different items and use "Right" & "Left" to lighten the image. ...key to adjust your selection. 4To exit the OSD, press the "Freeze/CLR" button or choose the "Exit Menu" and press "Enter" button. The projector will be the " Video OSD". With the higher temperature, the screen looks colder; English 14 OSD Menus How to operate 4The...
.... The range is 7900°K . The factory default is from 5000°K to increase the contrast 4Keystone Correction Adjusts image distortion caused by tilting the projector. 4Color Temperature Adjusts the color temperture. Then use "Up"& "Down" keys to select different items and use "Right" & "Left" to lighten the image. ...key to adjust your selection. 4To exit the OSD, press the "Freeze/CLR" button or choose the "Exit Menu" and press "Enter" button. The projector will be the " Video OSD". With the higher temperature, the screen looks colder; English 14 OSD Menus How to operate 4The...
User Manual
Page 15
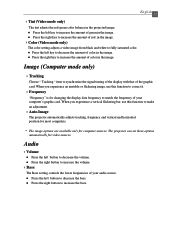
...mode only) The color setting adjusts a video image from black and white to increase the amount of green in the image. The projector can set these options automatically for computer sources. l Press the right key to fully saturated color. When you experience an unstable or... a vertical flickering bar, use this function to decrease the volume. l Press the left button to make an adjustment. 4Auto-Image The projector automatically adjusts tracking, frequency and vertical and horizontal position for most computers. * The image options are available only for video sources. l ...
...mode only) The color setting adjusts a video image from black and white to increase the amount of green in the image. The projector can set these options automatically for computer sources. l Press the right key to fully saturated color. When you experience an unstable or... a vertical flickering bar, use this function to decrease the volume. l Press the left button to make an adjustment. 4Auto-Image The projector automatically adjusts tracking, frequency and vertical and horizontal position for most computers. * The image options are available only for video sources. l ...

User Manual
Page 16
... the left button to fit your audio source. Projection 4Front-Desktop The factory default setting. 4Rear-Desktop When you select this function, the projector reverses the image so you can project behind a translucent screen with ceiling mounted projection. 416 : 9 (Video mode only) You can select ...this function, the projector reverses and truns the image upside down for ceiling-mounted projection. 4Rear-Ceiling When you select this function, the projector truns the image upside down at same time. English 16 4Treble The treble setting ...
... the left button to fit your audio source. Projection 4Front-Desktop The factory default setting. 4Rear-Desktop When you select this function, the projector reverses the image so you can project behind a translucent screen with ceiling mounted projection. 416 : 9 (Video mode only) You can select ...this function, the projector reverses and truns the image upside down for ceiling-mounted projection. 4Rear-Ceiling When you select this function, the projector truns the image upside down at same time. English 16 4Treble The treble setting ...
User Manual
Page 18
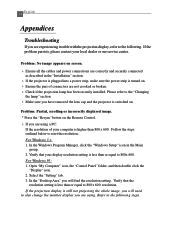
... Check if the projection lamp has been securely installed. In the Windows Program Manager, click the "Windows Setup" icon in the "Installation" section. 4 If the projector is plugged into a power strip, make sure the power strip is less than or equal to the "Changing the lamp" section. 4 Make sure you have... removed the lens cap and the projector is still not projecting the whole image, you will find the resolution setting. For Windows 95: 1. If the projection display is switched on the ...
... Check if the projection lamp has been securely installed. In the Windows Program Manager, click the "Windows Setup" icon in the "Installation" section. 4 If the projector is plugged into a power strip, make sure the power strip is less than or equal to the "Changing the lamp" section. 4 Make sure you have... removed the lens cap and the projector is still not projecting the whole image, you will find the resolution setting. For Windows 95: 1. If the projection display is switched on the ...
User Manual
Page 19
...4 If you are using an Apple PowerBook: In Control Panels, open the PowerBook Display to make it . 4 Change the monitor color setting from the projector. Follow above steps of resolution setting of your graphic card to select Video Mirroring "On". Select the "Change" button under the " Manufactures " box; ... way to implement above steps 1~2. Click on the "Advanced Properties " button. 5. Each of focus 4 Adjust the Focus Ring on the projector lens. 4 Make sure the projection screen is not displaying your computer. English 19 4. You are required to be reactivated.
...4 If you are using an Apple PowerBook: In Control Panels, open the PowerBook Display to make it . 4 Change the monitor color setting from the projector. Follow above steps of resolution setting of your graphic card to select Video Mirroring "On". Select the "Change" button under the " Manufactures " box; ... way to implement above steps 1~2. Click on the "Advanced Properties " button. 5. Each of focus 4 Adjust the Focus Ring on the projector lens. 4 Make sure the projection screen is not displaying your computer. English 19 4. You are required to be reactivated.

User Manual
Page 20
If the projection display is outstretched when displaying 16:9 DVD. The projector itself will also need to adjust the aspect ratio by digitization to the following: 4 Please select 4:3 aspect ratio type on your DVD player if you are playing a 16:9 DVD. 4 If you can not select 4:3 aspect ratio type on your DVD player, please select 4:3 OnScreen-Display(OSD) function of the projector for your display. English 20 Problem : The screen is still outstretched, you will automatically detect 16:9 DVD and adjust the aspect ratio by referring to full screen with 4:3 default setting.
If the projection display is outstretched when displaying 16:9 DVD. The projector itself will also need to adjust the aspect ratio by digitization to the following: 4 Please select 4:3 aspect ratio type on your DVD player if you are playing a 16:9 DVD. 4 If you can not select 4:3 aspect ratio type on your DVD player, please select 4:3 OnScreen-Display(OSD) function of the projector for your display. English 20 Problem : The screen is still outstretched, you will automatically detect 16:9 DVD and adjust the aspect ratio by referring to full screen with 4:3 default setting.


