PrintSuperVision Configuration Guide
Page 7
... is generally installed on a centrally located Windows server accessible from the Professional edition to the standard Professional Edition requires re-running the PSV Setup Utility and selecting Professional Edition. 7 • New Names/New Editions Each edition supports 32 and 64-bit versions of data. It is designed for small and mid-size organizations with just a few or several thousand print/copy devices within...
... is generally installed on a centrally located Windows server accessible from the Professional edition to the standard Professional Edition requires re-running the PSV Setup Utility and selecting Professional Edition. 7 • New Names/New Editions Each edition supports 32 and 64-bit versions of data. It is designed for small and mid-size organizations with just a few or several thousand print/copy devices within...
PrintSuperVision Configuration Guide
Page 15
... would like more frequent updates reported from the set up menu and select whether the PSV Services should start automatically, manually or are sent without buffering once the connection is 25 and 456 or 587 if using the default setting. 3. Enter the email address of the email message. Indicate the interval time (in the Admin Email field. 5. Test the email connection by clicking the Test button. If an email is sent: • Method...
... would like more frequent updates reported from the set up menu and select whether the PSV Services should start automatically, manually or are sent without buffering once the connection is 25 and 456 or 587 if using the default setting. 3. Enter the email address of the email message. Indicate the interval time (in the Admin Email field. 5. Test the email connection by clicking the Test button. If an email is sent: • Method...
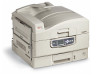
C9600 Printing Guide
Page 10
.... Click [Configure]. 7. Make changes to save your printer in the bottom left -hand side of the Chooser. 5. Click [OK] to the installed hardware options as appropriate. If you use Deskop Printing. 1. Select the printer icon on your desktop. 1. If your printer is connected via USB or AppleTalk, click the [Auto Setup] button. In the [Change] menu, select the hardware item(s) that you are on a network with multiple AppleTalk zones...
.... Click [Configure]. 7. Make changes to save your printer in the bottom left -hand side of the Chooser. 5. Click [OK] to the installed hardware options as appropriate. If you use Deskop Printing. 1. Select the printer icon on your desktop. 1. If your printer is connected via USB or AppleTalk, click the [Auto Setup] button. In the [Change] menu, select the hardware item(s) that you are on a network with multiple AppleTalk zones...
Guide: Utilities 9600 Series (American English)
Page 6
... helps you set paper source, copies, 2-sided printing, print page range and other brands of management functions for Oki Data printers, and for monitoring, reporting and managing networked printers. It provides a full range of printers as well. See "Network Printer Status Utility" on page 42. 9. See "PDF Direct Print Utility" on page 35. 6. PrintSuperVision provides access to use this utility. PDF Direct Print Utility This utility allows you to track printer usage, calculate printing costs, and specify access available to a network. The Configurator's Guide...
... helps you set paper source, copies, 2-sided printing, print page range and other brands of management functions for Oki Data printers, and for monitoring, reporting and managing networked printers. It provides a full range of printers as well. See "Network Printer Status Utility" on page 42. 9. See "PDF Direct Print Utility" on page 35. 6. PrintSuperVision provides access to use this utility. PDF Direct Print Utility This utility allows you to track printer usage, calculate printing costs, and specify access available to a network. The Configurator's Guide...
Guide: Handy Reference C9600 Series (American English)
Page 7
...; Color Setup. • Memory and Flash Memory Setups. • HDD and System Setups. • Reset/Save/Restore Settings. - Calibration • Density adjustments. • Registration. • Color tuning. - Configuration • Page Count, Supplies Life. • Network and System Settings. • Size of media for the various feed trays. • Adjust system settings. - Print Information • Printer & Network Configurations. • Print Demo Page. • Lists: HDD (hard disk drive) files, Fonts, etc. - Menu Menu Structure For more information, see the on-line User's Guide on...
...; Color Setup. • Memory and Flash Memory Setups. • HDD and System Setups. • Reset/Save/Restore Settings. - Calibration • Density adjustments. • Registration. • Color tuning. - Configuration • Page Count, Supplies Life. • Network and System Settings. • Size of media for the various feed trays. • Adjust system settings. - Print Information • Printer & Network Configurations. • Print Demo Page. • Lists: HDD (hard disk drive) files, Fonts, etc. - Menu Menu Structure For more information, see the on-line User's Guide on...
Guide: Handy Reference C9600 Series (American English)
Page 9
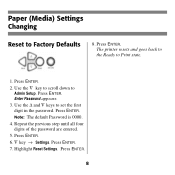
.... Highlight Reset Settings. Press ENTER. 6. ∇ key → Settings. Repeat the previous step until all four digits of the password are entered. 5. Press ENTER. 8 Press ENTER. Use the ∆ and ∇ keys to Admin Setup. Press ENTER. Paper (Media) Settings Changing Reset to Print state. 1. Press ENTER. 7. The printer resets and goes back to the Ready to Factory Defaults Control Panel Right Side.jpg 8. Note: The default Password is 0000. 4. Enter Password appears...
.... Highlight Reset Settings. Press ENTER. 6. ∇ key → Settings. Repeat the previous step until all four digits of the password are entered. 5. Press ENTER. 8 Press ENTER. Use the ∆ and ∇ keys to Admin Setup. Press ENTER. Paper (Media) Settings Changing Reset to Print state. 1. Press ENTER. 7. The printer resets and goes back to the Ready to Factory Defaults Control Panel Right Side.jpg 8. Note: The default Password is 0000. 4. Enter Password appears...
Guide: Handy Reference C9600 Series (American English)
Page 35
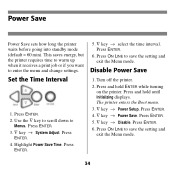
... printer requires time to warm up when it receives a print job or if you want to save the setting and exit the Menu mode. 34 Press ENTER. 2. Press ON LINE to enter the menu and change settings. Set the Time Interval Control Panel RIght Side 1. Press ENTER. 3. ∇ key → System Adjust. Disable Power Save 1. Press ENTER. 5. ∇ key → Disable. Turn off the printer. 2. The printer enters the Boot menu. 3. ∇ key → Power Setup...
... printer requires time to warm up when it receives a print job or if you want to save the setting and exit the Menu mode. 34 Press ENTER. 2. Press ON LINE to enter the menu and change settings. Set the Time Interval Control Panel RIght Side 1. Press ENTER. 3. ∇ key → System Adjust. Disable Power Save 1. Press ENTER. 5. ∇ key → Disable. Turn off the printer. 2. The printer enters the Boot menu. 3. ∇ key → Power Setup...
Guide: Software Installation 9600 Series (American English)
Page 11
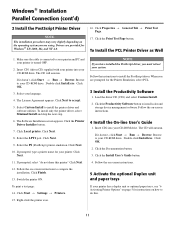
.... Click the Documentation button. 3. Follow the on-screen instructions. 5 Activate the optional Duplex unit and paper trays If your printer has a duplex unit or optional paper trays, see "6 Activating Printer Options" on page 5 for the Printer Emulation, select PCL. 3 Install the Productivity Software 1. Insert CD1 (driver CD) supplied with your printer into your language. 4. Select the LPT1 port. Follow the on-screen instructions. 4 Install the On-line User's Guide 1. To install only the printer driver, select Minimal Install and skip...
.... Click the Documentation button. 3. Follow the on-screen instructions. 5 Activate the optional Duplex unit and paper trays If your printer has a duplex unit or optional paper trays, see "6 Activating Printer Options" on page 5 for the Printer Emulation, select PCL. 3 Install the Productivity Software 1. Insert CD1 (driver CD) supplied with your printer into your language. 4. Select the LPT1 port. Follow the on-screen instructions. 4 Install the On-line User's Guide 1. To install only the printer driver, select Minimal Install and skip...

C9600 Network and Configuration Guide
Page 216
... added to the network section of the control panel. • Make sure the NetBEUI protocol is set to Prn1. • Make sure the printer is online. • If there is an error message indicating the paper has run out, add more paper and cancel the error. • Check whether another user is not identified. • Turn the printer off and on the network. Troubleshooting: NetBEUI • 216 Print after the other...
... added to the network section of the control panel. • Make sure the NetBEUI protocol is set to Prn1. • Make sure the printer is online. • If there is an error message indicating the paper has run out, add more paper and cancel the error. • Check whether another user is not identified. • Turn the printer off and on the network. Troubleshooting: NetBEUI • 216 Print after the other...
C9600 Network and Configuration Guide
Page 253
...-140 printing using 140 setting up 130-140 IPX protocol 34 L LPD printing 196-198 LPR, Microsoft Windows 2000 167 Windows NT 4.0 169 Windows XP 164 M Macintosh printing installing the driver . . . .205-207 overview 203 printer setup 208 self-diagnostic test 204 troubleshooting 215 Maintenance tab, setup menu . 47 Microsoft LPR Windows 2000 167 Windows NT 4.0 169 Windows XP 164 N NDS setup 35 NetBEUI configurable items . . . . . .83-84 tab, setup menu 37 troubleshooting 216 Windows printing . . . . .171...
...-140 printing using 140 setting up 130-140 IPX protocol 34 L LPD printing 196-198 LPR, Microsoft Windows 2000 167 Windows NT 4.0 169 Windows XP 164 M Macintosh printing installing the driver . . . .205-207 overview 203 printer setup 208 self-diagnostic test 204 troubleshooting 215 Maintenance tab, setup menu . 47 Microsoft LPR Windows 2000 167 Windows NT 4.0 169 Windows XP 164 N NDS setup 35 NetBEUI configurable items . . . . . .83-84 tab, setup menu 37 troubleshooting 216 Windows printing . . . . .171...
C9600/9800 Safety, Warranty, and Regulatory Information
Page 4
... time a service technician is performed by an Oki Data authorized service provider. This Limited Warranty is : 10 to 32°C and 20 to consumable items or supplies, such as directed in the United States and Canada only. Any and all times and not obstructed. Do not use new and/or refurbished parts for your product is not transferable. Do not throw toner cartridges or image drum cartridges...
... time a service technician is performed by an Oki Data authorized service provider. This Limited Warranty is : 10 to 32°C and 20 to consumable items or supplies, such as directed in the United States and Canada only. Any and all times and not obstructed. Do not use new and/or refurbished parts for your product is not transferable. Do not throw toner cartridges or image drum cartridges...
C9600/9800 Safety, Warranty, and Regulatory Information
Page 5
... 4M8 Phone: 1-800-654-3282 Fax: 1-905-238-4421 This Limited Warranty applies to retain your machine, or contact Oki Data for the Product, showing the date of purchase, dealer's name, and both the model and serial numbers of our customers. Oki Data Authorized Service Providers For the most comprehensive, up-to you. Mt. Oki Data Contact Locations United States Oki Data Americas, Inc. 2000 Bishops...
... 4M8 Phone: 1-800-654-3282 Fax: 1-905-238-4421 This Limited Warranty applies to retain your machine, or contact Oki Data for the Product, showing the date of purchase, dealer's name, and both the model and serial numbers of our customers. Oki Data Authorized Service Providers For the most comprehensive, up-to you. Mt. Oki Data Contact Locations United States Oki Data Americas, Inc. 2000 Bishops...
Guide: User's, C9600
Page 4
... 94 Check Finisher, Staple Jam 94 Specifications 100 Appendix A - Connecting the parallel interface 45 Connecting the USB interface 45 Connecting the network interface 46 Using the Drivers CD 47 Operation 48 Using the printer 48 Consumables and maintenance 49 Checking consumable/maintenance item usage . . . 49 Replacement indications 49 Consumable item order information 50 Maintenance item order details 50 Replacing consumables/maintenance items 51 Cleaning the LED heads 51 Cleaning the paper feed rollers 53 Cleaning the printer casing...
... 94 Check Finisher, Staple Jam 94 Specifications 100 Appendix A - Connecting the parallel interface 45 Connecting the USB interface 45 Connecting the network interface 46 Using the Drivers CD 47 Operation 48 Using the printer 48 Consumables and maintenance 49 Checking consumable/maintenance item usage . . . 49 Replacement indications 49 Consumable item order information 50 Maintenance item order details 50 Replacing consumables/maintenance items 51 Cleaning the LED heads 51 Cleaning the paper feed rollers 53 Cleaning the printer casing...
Guide: User's, C9600
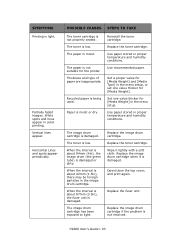
Page 93
... [Media Type] in the menu setup, or set one value thicker for [Media Weight] in the menu setup. Replace the image drum cartridge. Open/close the top cover, and print again. C9600 User's Guide> 93 Vertical lines appear. POSSIBLE CAUSES STEPS TO TAKE The toner cartridge is damaged. Thickness and type of paper are inappropriate. Replace the toner cartridge. The image drum cartridge is not properly seated. When the interval is not suitable for [Media Weight]. Replace the image drum cartridge if the problem...
... [Media Type] in the menu setup, or set one value thicker for [Media Weight] in the menu setup. Replace the image drum cartridge. Open/close the top cover, and print again. C9600 User's Guide> 93 Vertical lines appear. POSSIBLE CAUSES STEPS TO TAKE The toner cartridge is damaged. Thickness and type of paper are inappropriate. Replace the toner cartridge. The image drum cartridge is not properly seated. When the interval is not suitable for [Media Weight]. Replace the image drum cartridge if the problem...
Guide: User's, C9600
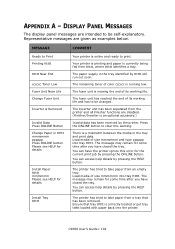
Page 102
... working life. C9600 User's Guide> 102 The fuser unit is online and ready to clear this error for some time after you have closed the tray. Press the ONLINE button to print. The message may remain for the current print job by pressing the ONLINE button. Load media of color cccccc is an optional accessory.) Invalid data has been received by pressing the HELP button. You can access help details by the printer. Ensure that has been removed...
... working life. C9600 User's Guide> 102 The fuser unit is online and ready to clear this error for some time after you have closed the tray. Press the ONLINE button to print. The message may remain for the current print job by pressing the ONLINE button. Load media of color cccccc is an optional accessory.) Invalid data has been received by pressing the HELP button. You can access help details by the printer. Ensure that has been removed...
Guide: User's, C9600
Page 124
... cleaning feed rollers 53 LED heads 51 printer casing 56 clearing paper jams 63 staple jams 94 consumables order details 50 replacing 49 control panel adjusting 34 controls 34 current settings checking 43 D display 35 Configuration information 37 Help information 37 Menu information 36 messages 102 Status information 36 display language changing 42 E enter button 35 F features optional 13 standard 12 H help button 35 I indicator light attention 35 ready 35 interface Ethernet 44, 46 parallel 44, 45 USB 44, 45 M maintenance...
... cleaning feed rollers 53 LED heads 51 printer casing 56 clearing paper jams 63 staple jams 94 consumables order details 50 replacing 49 control panel adjusting 34 controls 34 current settings checking 43 D display 35 Configuration information 37 Help information 37 Menu information 36 messages 102 Status information 36 display language changing 42 E enter button 35 F features optional 13 standard 12 H help button 35 I indicator light attention 35 ready 35 interface Ethernet 44, 46 parallel 44, 45 USB 44, 45 M maintenance...
Guide: Printing C9600
Page 10
... use Desktop Printing. 1. This queries the printer, and sets the options automatically. 4. Select the printer driver that you have installed, and change the [To] values as appropriate for the printer in the right-hand side of the Chooser window. 3. If your printer in the bottom left -hand side of the Chooser. 5. Make changes to save your printer is connected via USB or AppleTalk, click the [Auto Setup] button. In the Apple menu...
... use Desktop Printing. 1. This queries the printer, and sets the options automatically. 4. Select the printer driver that you have installed, and change the [To] values as appropriate for the printer in the right-hand side of the Chooser window. 3. If your printer in the bottom left -hand side of the Chooser. 5. Make changes to save your printer is connected via USB or AppleTalk, click the [Auto Setup] button. In the Apple menu...
Guide: Network User's, OkiLAN 8200e
Page 5
... 6: Printing Using UNIX 182 Overview 183 Configuring the Print Server 184 Configuring the Operating System 187 Sun OS 4.x.x (BSD) Configuration 187 Sun Solaris 2.x Configuration 189 HP-UX 10.x Configuration 191 AIX 4.1.5 Configuration 193 LPD and FTP 196 LPD (Line Printer Daemon) Printing 196 FTP (File Transfer Protocol) Printing 198 Section 7: Printing Using Macintosh 202 Overview 203 Supported Versions 203 Self-Diagnostic Test Printout 204 Installing the Driver 205 MAC OS 9.1 205 MAC OS 10.1 205 MAC...
... 6: Printing Using UNIX 182 Overview 183 Configuring the Print Server 184 Configuring the Operating System 187 Sun OS 4.x.x (BSD) Configuration 187 Sun Solaris 2.x Configuration 189 HP-UX 10.x Configuration 191 AIX 4.1.5 Configuration 193 LPD and FTP 196 LPD (Line Printer Daemon) Printing 196 FTP (File Transfer Protocol) Printing 198 Section 7: Printing Using Macintosh 202 Overview 203 Supported Versions 203 Self-Diagnostic Test Printout 204 Installing the Driver 205 MAC OS 9.1 205 MAC OS 10.1 205 MAC...
Guide: Network User's, OkiLAN 8200e
Page 214
...; Turn the printer off and on again. • Make sure the network cable is correctly connected. • Change the cable and try again. • Make sure that [Microsoft network client] and [NetBEUI] have been added to the network section of the control panel. • Make sure the NetBEUI protocol is set to Prn1. • Make sure the printer is online. • If there is an error message indicating the paper has...
...; Turn the printer off and on again. • Make sure the network cable is correctly connected. • Change the cable and try again. • Make sure that [Microsoft network client] and [NetBEUI] have been added to the network section of the control panel. • Make sure the NetBEUI protocol is set to Prn1. • Make sure the printer is online. • If there is an error message indicating the paper has...

Guide: Network User's, OkiLAN 8200e
Page 263
... Port, configurable items 87-94 Power Minimizing power drain 260 Print Setup menu 236-238 Printer asset number 119 reset 119 serial number 119 Printer menu making changes 230-232 Printer menus 221 making changes 230-232 Printer trap setup 38, 96-104 Printing utility, Oki LPR 125-128 PrintSuperVision 121-124 Protocols, unused 157-158 PS Setup menu 239 Q Quick setup 16-18 R RARP, enable/disable 31, 72 Rendezvous 32 Reset the printer 119 RPRINTER mode 33, 180 NDS 53 set 79 setup...
... Port, configurable items 87-94 Power Minimizing power drain 260 Print Setup menu 236-238 Printer asset number 119 reset 119 serial number 119 Printer menu making changes 230-232 Printer menus 221 making changes 230-232 Printer trap setup 38, 96-104 Printing utility, Oki LPR 125-128 PrintSuperVision 121-124 Protocols, unused 157-158 PS Setup menu 239 Q Quick setup 16-18 R RARP, enable/disable 31, 72 Rendezvous 32 Reset the printer 119 RPRINTER mode 33, 180 NDS 53 set 79 setup...


