
User Guide (English)
Page 10
... 155 Paper Jam in Tray 5 (MPF 157 Paper Jams in Trays 1-4 158 Paper Jam in Tray 6 161 Installing Accessories 164 Duplex Module 164 Check the contents of the Duplex option . . . . . 164 Installing the Duplex Module 164 1000 Sheet Feeder or Tandem Tray Module . . . . . 170 2000 Sheet High Capacity Feeder 175 3500 Sheet Finisher...
... 155 Paper Jam in Tray 5 (MPF 157 Paper Jams in Trays 1-4 158 Paper Jam in Tray 6 161 Installing Accessories 164 Duplex Module 164 Check the contents of the Duplex option . . . . . 164 Installing the Duplex Module 164 1000 Sheet Feeder or Tandem Tray Module . . . . . 170 2000 Sheet High Capacity Feeder 175 3500 Sheet Finisher...
User Guide (English)
Page 14
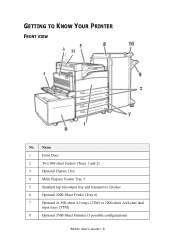
GETTING TO KNOW YOUR PRINTER FRONT VIEW 5 3 11 4 2 1 No. Name 1 Front Door 2 Two 500-sheet feeders (Trays 1 and 2) 3 Optional Duplex Unit 4 Multi Purpose Feeder Tray 5 5 Standard top bin output tray and transport to finisher 6 Optional 2000-Sheet Feeder (Tray 6) 7 Optional 2x 500-sheet A3 trays (2TM) or 2000-sheet A4/Letter dual input trays (TTM) 8 Optional 3500-Sheet Finisher (3 possible configurations) B930n User's Guide> 8
GETTING TO KNOW YOUR PRINTER FRONT VIEW 5 3 11 4 2 1 No. Name 1 Front Door 2 Two 500-sheet feeders (Trays 1 and 2) 3 Optional Duplex Unit 4 Multi Purpose Feeder Tray 5 5 Standard top bin output tray and transport to finisher 6 Optional 2000-Sheet Feeder (Tray 6) 7 Optional 2x 500-sheet A3 trays (2TM) or 2000-sheet A4/Letter dual input trays (TTM) 8 Optional 3500-Sheet Finisher (3 possible configurations) B930n User's Guide> 8

User Guide (English)
Page 15
No. Name 9 Stacker Main Bin (3000 Sheets) 10 Stacker Upper Bin (500 Sheets) 11 Exit 2 is used in conjunction with duplex unit and finisher, comes with the Duplex unit. Name 1 Parallel Port, IEEE 1284 2 Ethernet 10/100 BaseT connection 3 USB 2.0 connection 4 Serial RS232 port 5 Ground Fault Interrupt (GFI) reset 6 Power cord connection B930n User's Guide> 9 REAR VIEW No.
No. Name 9 Stacker Main Bin (3000 Sheets) 10 Stacker Upper Bin (500 Sheets) 11 Exit 2 is used in conjunction with duplex unit and finisher, comes with the Duplex unit. Name 1 Parallel Port, IEEE 1284 2 Ethernet 10/100 BaseT connection 3 USB 2.0 connection 4 Serial RS232 port 5 Ground Fault Interrupt (GFI) reset 6 Power cord connection B930n User's Guide> 9 REAR VIEW No.
User Guide (English)
Page 16
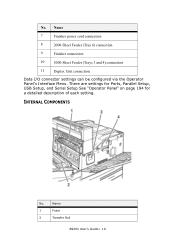
Name 1 Fuser 2 Transfer Roll B930n User's Guide> 10 INTERNAL COMPONENTS No. No. Name 7 Finisher power cord connection 8 2000-Sheet Feeder (Tray 6) connection 9 Finisher connection 10 1000-Sheet Feeder (Trays 3 and 4) connection 11 Duplex Unit connection Data I/O connector settings can be configured via the Operator Panel's Interface Menu. There are settings for Ports, Parallel Setup, USB Setup, and Serial Setup See "Operator Panel" on page 194 for a detailed description of each setting.
Name 1 Fuser 2 Transfer Roll B930n User's Guide> 10 INTERNAL COMPONENTS No. No. Name 7 Finisher power cord connection 8 2000-Sheet Feeder (Tray 6) connection 9 Finisher connection 10 1000-Sheet Feeder (Trays 3 and 4) connection 11 Duplex Unit connection Data I/O connector settings can be configured via the Operator Panel's Interface Menu. There are settings for Ports, Parallel Setup, USB Setup, and Serial Setup See "Operator Panel" on page 194 for a detailed description of each setting.
User Guide (English)
Page 18
... accessed via the Operator Panel PS and PCL Menus. When accessing the driver through your Printers and Faxes Menu, you to view and B930n User's Guide> 12 When accessing the driver through an application, the Printing Properties entered apply only to modify printing options. The settings... options for these emulations are available for use with most current Unix CUPS drivers. The installation CD contains PPDs for each of copies, duplexing, and collating may be set through the application. It contains the display, indicators, and push buttons that allow you reach the Printing ...
... accessed via the Operator Panel PS and PCL Menus. When accessing the driver through your Printers and Faxes Menu, you to view and B930n User's Guide> 12 When accessing the driver through an application, the Printing Properties entered apply only to modify printing options. The settings... options for these emulations are available for use with most current Unix CUPS drivers. The installation CD contains PPDs for each of copies, duplexing, and collating may be set through the application. It contains the display, indicators, and push buttons that allow you reach the Printing ...
User Guide (English)
Page 44
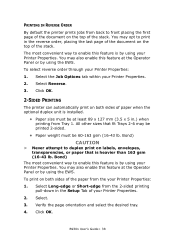
...be printed 2-sided. • Paper weight must be 60-163 gsm (16-43 lb. To print on both sides of the stack. Click OK. B930n User's Guide> 38 To select reverse order through your Printer Properties. 2. Select. 3. Verify the page orientation and select the desired tray. 4. Select the Job... your Printer Properties: 1. Bond) The most convenient way to front placing the first page of the document on the top of paper when the optional duplex unit is installed. • Paper size must be at least 89 x 127 mm (3.5 x 5 in the Setup Tab of your Printer Properties. 2. PRINTING ...
...be printed 2-sided. • Paper weight must be 60-163 gsm (16-43 lb. To print on both sides of the stack. Click OK. B930n User's Guide> 38 To select reverse order through your Printer Properties. 2. Select. 3. Verify the page orientation and select the desired tray. 4. Select the Job... your Printer Properties: 1. Bond) The most convenient way to front placing the first page of the document on the top of paper when the optional duplex unit is installed. • Paper size must be at least 89 x 127 mm (3.5 x 5 in the Setup Tab of your Printer Properties. 2. PRINTING ...

User Guide (English)
Page 45
... any tray. Otherwise, image quality cannot be printed on the long-edge or short-edge of your Printer Properties. Before printing transparencies: B930n User's Guide> 39 The diagram below for media loaded in dirty and poor quality printouts. The most convenient way to inserting the media... Short-edge Short-edge Long-edge PRINTING ON SPECIAL MEDIA The printer can select how the printer will orient the page layout when duplexing. Read the sections below illustrates these results. To select the special media types through your Printer Properties are required for each special media...
... any tray. Otherwise, image quality cannot be printed on the long-edge or short-edge of your Printer Properties. Before printing transparencies: B930n User's Guide> 39 The diagram below for media loaded in dirty and poor quality printouts. The most convenient way to inserting the media... Short-edge Short-edge Long-edge PRINTING ON SPECIAL MEDIA The printer can select how the printer will orient the page layout when duplexing. Read the sections below illustrates these results. To select the special media types through your Printer Properties are required for each special media...
User Guide (English)
Page 63
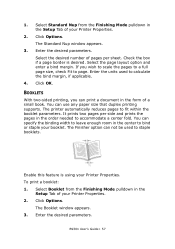
... specify the binding width to leave enough room in the Setup Tab of a small book. You can use any paper size that duplex printing supports. Enable this feature is desired. B930n User's Guide> 57 Select Standard Nup from the Finishing Mode pulldown in the center to page. The Standard Nup window appears...
... specify the binding width to leave enough room in the Setup Tab of a small book. You can use any paper size that duplex printing supports. Enable this feature is desired. B930n User's Guide> 57 Select Standard Nup from the Finishing Mode pulldown in the center to page. The Standard Nup window appears...
User Guide (English)
Page 90
... that came with the workstation for Solaris 2.6 where the printer host name is printer1. 1. 1. Refer to different versions of Solaris 2.x workstation for duplex printing #lpadmin -p P002 -s printer1\!PS A4_DUP B930n User's Guide> 84 EXAMPLES OF SETTINGS FOR SOLARIS 2.X The examples below show printer settings for details. • To setup the printer, the...
... that came with the workstation for Solaris 2.6 where the printer host name is printer1. 1. 1. Refer to different versions of Solaris 2.x workstation for duplex printing #lpadmin -p P002 -s printer1\!PS A4_DUP B930n User's Guide> 84 EXAMPLES OF SETTINGS FOR SOLARIS 2.X The examples below show printer settings for details. • To setup the printer, the...
User Guide (English)
Page 129
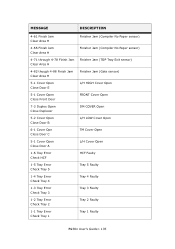
Misfeed Jam Paper Tray Area - Misfeed Jam Paper Tray Area - Misfeed Jam B930n User's Guide> 133 MESSAGE 4-6 Paper Jam Clear Area A/E 8-2 Paper Jam Clear Area A/E 6-1 through 6-2 Feed Error Clear Duplexer 1-2 Feed Error Area A/Tray 2 1-3 Feed Error Area A/Tray 1 2-1 Feed Error Area B/Tray 2 2-2 Feed Error Area B/Tray 3 2-3 Feed Error Clear Area A 3-0 Feed Error Area...
Misfeed Jam Paper Tray Area - Misfeed Jam Paper Tray Area - Misfeed Jam B930n User's Guide> 133 MESSAGE 4-6 Paper Jam Clear Area A/E 8-2 Paper Jam Clear Area A/E 6-1 through 6-2 Feed Error Clear Duplexer 1-2 Feed Error Area A/Tray 2 1-3 Feed Error Area A/Tray 1 2-1 Feed Error Area B/Tray 2 2-2 Feed Error Area B/Tray 3 2-3 Feed Error Clear Area A 3-0 Feed Error Area...

User Guide (English)
Page 130
...Misfeed Jam 9-3 Feed Error Clear Area A Paper Tray Area - sensor) 4-32 through 4-56 Finish Jam Clear Area G Finisher Jam (Compile Exit sensor) B930n User's Guide> 134 Misfeed Jam 8-4 Feed Error Clear Area C Paper Tray Area - Misfeed Jam 8-5 Feed Error Area C/HCF Paper Tray Area - ... Feed Error Clear Area B/C Paper Tray Area - Misfeed Jam 8-2 Feed Error Clear Area B Paper Tray Area - Misfeed Jam 8-6 Feed Error Clear Duplexer Paper Tray Area - Misfeed Jam 4-12 through 4-26 Finish Jam Clear Area F Finisher Jam (H-X'port Ent. MESSAGE DESCRIPTION 4-4 Feed Error Clear Area...
...Misfeed Jam 9-3 Feed Error Clear Area A Paper Tray Area - sensor) 4-32 through 4-56 Finish Jam Clear Area G Finisher Jam (Compile Exit sensor) B930n User's Guide> 134 Misfeed Jam 8-4 Feed Error Clear Area C Paper Tray Area - Misfeed Jam 8-5 Feed Error Area C/HCF Paper Tray Area - ... Feed Error Clear Area B/C Paper Tray Area - Misfeed Jam 8-2 Feed Error Clear Area B Paper Tray Area - Misfeed Jam 8-6 Feed Error Clear Duplexer Paper Tray Area - Misfeed Jam 4-12 through 4-26 Finish Jam Clear Area F Finisher Jam (H-X'port Ent. MESSAGE DESCRIPTION 4-4 Feed Error Clear Area...
User Guide (English)
Page 131
... 4-88 Finish Jam Clear Area H Finisher Jam (Gate sensor) 5-1 Cover Open Close Door E L/H HIGH Cover Open 5-1 Cover Open Close Front Door FRONT Cover Open 7-3 Duplex Open Close Duplexer DM COVER Open 5-2 Cover Open Close Door B L/H LOW Cover Open 6-1 Cover Ope Close Door C TM Cover Open 5-1 Cover Open Close Door A L/H Cover Open 1-6 Tray... 5 Faulty 1-4 Tray Error Check Tray 4 Tray 4 Faulty 1-3 Tray Error Check Tray 3 Tray 3 Faulty 1-2 Tray Error Check Tray 2 Tray 2 Faulty 1-1 Tray Error Check Tray 1 Tray 1 Faulty B930n User's Guide> 135
... 4-88 Finish Jam Clear Area H Finisher Jam (Gate sensor) 5-1 Cover Open Close Door E L/H HIGH Cover Open 5-1 Cover Open Close Front Door FRONT Cover Open 7-3 Duplex Open Close Duplexer DM COVER Open 5-2 Cover Open Close Door B L/H LOW Cover Open 6-1 Cover Ope Close Door C TM Cover Open 5-1 Cover Open Close Door A L/H Cover Open 1-6 Tray... 5 Faulty 1-4 Tray Error Check Tray 4 Tray 4 Faulty 1-3 Tray Error Check Tray 3 Tray 3 Faulty 1-2 Tray Error Check Tray 2 Tray 2 Faulty 1-1 Tray Error Check Tray 1 Tray 1 Faulty B930n User's Guide> 135
User Guide (English)
Page 132
Staple Pin Warning. Mechanical failure in "Paper Full' state. Stacker Tray is in"Paper Full" state. Face Down Tray is in Stacker Tray B930n User's Guide> 136 MESSAGE Paper Out Tray 1 Paper Out Tray 2 Paper Out Tray 3 Paper Out Tray 4 Paper Out Tray 5 Paper Out HCF 8-3 EP... Cartridge Reset EP Cart 7-7 TM Error Check TM 6-7 HCF Error Check HCF 5-7 Finisher Err Check Finisher 3-7 EXIT Error Check EXIT 2-7 Duplex Fail Call Service Paper Overlap F/D Tray Full Remove Paper Staple Cart Check Stapler Staple Suply Low Add Staples Stacker Full Remove Paper 5-11 FIN Error...
Staple Pin Warning. Mechanical failure in "Paper Full' state. Stacker Tray is in"Paper Full" state. Face Down Tray is in Stacker Tray B930n User's Guide> 136 MESSAGE Paper Out Tray 1 Paper Out Tray 2 Paper Out Tray 3 Paper Out Tray 4 Paper Out Tray 5 Paper Out HCF 8-3 EP... Cartridge Reset EP Cart 7-7 TM Error Check TM 6-7 HCF Error Check HCF 5-7 Finisher Err Check Finisher 3-7 EXIT Error Check EXIT 2-7 Duplex Fail Call Service Paper Overlap F/D Tray Full Remove Paper Staple Cart Check Stapler Staple Suply Low Add Staples Stacker Full Remove Paper 5-11 FIN Error...

User Guide (English)
Page 134
... DRUM ID Mismatch ATC sensor defects DRUM warning Toner Cartridge (CRUM) NV Read/Write Error Toner Cartridge Communication failure Toner Cartidge Type Mismatch B930n User's Guide> 138 MESSAGE 2-8 Duplex Error Call Service Staple Fail Check Stapler Staple Set Error Check Stapler Stacker Error Check Finisher Punch Waste Full Empty Waste Box No...
... DRUM ID Mismatch ATC sensor defects DRUM warning Toner Cartridge (CRUM) NV Read/Write Error Toner Cartridge Communication failure Toner Cartidge Type Mismatch B930n User's Guide> 138 MESSAGE 2-8 Duplex Error Call Service Staple Fail Check Stapler Staple Set Error Check Stapler Stacker Error Check Finisher Punch Waste Full Empty Waste Box No...

User Guide (English)
Page 137
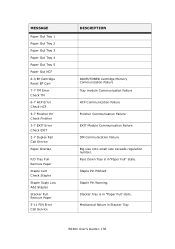
Switch off . 2. Remove the paper from the paper trays and store it before moving the printer. If the optional duplex module or tray module has been installed, uninstall it in front and one behind the printer, to your back NOTE > The weight of this printer, ... if you are not going to turn the power off the machine immediately, and contact your knees to avoid possible injuries to firmly grip the B930n User's Guide> 107 CAUTION > When lifting the machine, get a firm footing and bend your service provider. • Remove any remaining pieces of time. 1. If a sheet...
Switch off . 2. Remove the paper from the paper trays and store it before moving the printer. If the optional duplex module or tray module has been installed, uninstall it in front and one behind the printer, to your back NOTE > The weight of this printer, ... if you are not going to turn the power off the machine immediately, and contact your knees to avoid possible injuries to firmly grip the B930n User's Guide> 107 CAUTION > When lifting the machine, get a firm footing and bend your service provider. • Remove any remaining pieces of time. 1. If a sheet...

User Guide (English)
Page 170
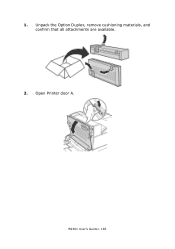
B930n User's Guide> 164 CHECK THE CONTENTS OF THE DUPLEX OPTION Unpack the carton and confirm that all components are undamaged. INSTALLING ACCESSORIES DUPLEX MODULE CAUTION > Be sure to this printer. INSTALLING THE DUPLEX MODULE You can install an optional duplex module to switch off the power and unplug the power cord from the outlet before carrying out the operations.If not, you might get an electric shock. Ensure that the part numbers of the Duplex Transport and all components are correct.
B930n User's Guide> 164 CHECK THE CONTENTS OF THE DUPLEX OPTION Unpack the carton and confirm that all components are undamaged. INSTALLING ACCESSORIES DUPLEX MODULE CAUTION > Be sure to this printer. INSTALLING THE DUPLEX MODULE You can install an optional duplex module to switch off the power and unplug the power cord from the outlet before carrying out the operations.If not, you might get an electric shock. Ensure that the part numbers of the Duplex Transport and all components are correct.
User Guide (English)
Page 171
Open Printer door A. B930n User's Guide> 165 Unpack the Option Duplex, remove cushioning materials, and confirm that all attachments are available. 2. 1.
Open Printer door A. B930n User's Guide> 165 Unpack the Option Duplex, remove cushioning materials, and confirm that all attachments are available. 2. 1.

User Guide (English)
Page 173
Place the Duplex Unit in position while inserting the 2 hooks on the bottom of the unit into the shown locations in the receptors of the printer. B930n User's Guide> 167 Close printer door A. 6. 5.
Place the Duplex Unit in position while inserting the 2 hooks on the bottom of the unit into the shown locations in the receptors of the printer. B930n User's Guide> 167 Close printer door A. 6. 5.
User Guide (English)
Page 174
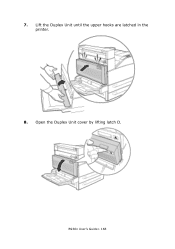
Lift the Duplex Unit until the upper hooks are latched in the printer. 8. B930n User's Guide> 168 Open the Duplex Unit cover by lifting latch D. 7.
Lift the Duplex Unit until the upper hooks are latched in the printer. 8. B930n User's Guide> 168 Open the Duplex Unit cover by lifting latch D. 7.
User Guide (English)
Page 175
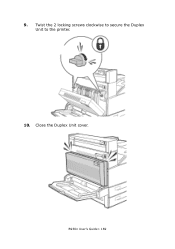
Close the Duplex Unit cover. 9. B930n User's Guide> 169 Twist the 2 locking screws clockwise to secure the Duplex Unit to the printer. 10.
Close the Duplex Unit cover. 9. B930n User's Guide> 169 Twist the 2 locking screws clockwise to secure the Duplex Unit to the printer. 10.

