S550 User's Manual
Page 4
... break open as this equipment. Handle the camera strap with care Never place the strap around the neck of children Particular care should be taken to prevent infants from failure to a Nikon-authorized service representative for inspection, after unplugging the product and/or removing the battery. Keep out of reach of an infant...
... break open as this equipment. Handle the camera strap with care Never place the strap around the neck of children Particular care should be taken to prevent infants from failure to a Nikon-authorized service representative for inspection, after unplugging the product and/or removing the battery. Keep out of reach of an infant...

S550 User's Manual
Page 5
...result in contact with clothing or skin, rinse immediately with a dry cloth. To avoid damage to heat or flames. Failure to the battery case for inspection. Do not transport or store with metal objects such as discoloration or deformation. • If liquid from the damaged...place it under heavy objects, or expose it is prone to observe this product: • Before replacing the battery, turn the product off. Observe the following precautions when handling the battery charger • Keep dry. iii Should the insulation be sure it to the product, be removed with plenty ...
...result in contact with clothing or skin, rinse immediately with a dry cloth. To avoid damage to heat or flames. Failure to the battery case for inspection. Do not transport or store with metal objects such as discoloration or deformation. • If liquid from the damaged...place it under heavy objects, or expose it is prone to observe this product: • Before replacing the battery, turn the product off. Observe the following precautions when handling the battery charger • Keep dry. iii Should the insulation be sure it to the product, be removed with plenty ...

S550 User's Manual
Page 9
... e (Mode) Button...8 The Multi Selector...9 The d Button...10 Help Displays...11 Attaching the Camera Strap ...11 Shutter-release Button ...11 First Steps ...12 Charging the Battery ...12 Inserting the Battery ...14 Removing the Battery ...15 Turning On and Off the Camera...15 Setting Display Language, Date and Time 16 Inserting Memory Cards ...18 Removing Memory...
... e (Mode) Button...8 The Multi Selector...9 The d Button...10 Help Displays...11 Attaching the Camera Strap ...11 Shutter-release Button ...11 First Steps ...12 Charging the Battery ...12 Inserting the Battery ...14 Removing the Battery ...15 Turning On and Off the Camera...15 Setting Display Language, Date and Time 16 Inserting Memory Cards ...18 Removing Memory...

S550 User's Manual
Page 14
...For more information about Nikon brand accessories, contact a local authorized Nikon dealer. See the URL below for contact information: http://nikonimaging.com/ Use Only Nikon Brand Electronic Accessories Nikon COOLPIX cameras are engineered and proven ...Nikon digital camera are designed to the attention of the Nikon representative in your area. About the Manuals • No part of the manuals included with this product may result from the Nikon representative in your area (address provided separately). 2 Only Nikon brand electronic accessories (including battery chargers, batteries...
...For more information about Nikon brand accessories, contact a local authorized Nikon dealer. See the URL below for contact information: http://nikonimaging.com/ Use Only Nikon Brand Electronic Accessories Nikon COOLPIX cameras are engineered and proven ...Nikon digital camera are designed to the attention of the Nikon representative in your area. About the Manuals • No part of the manuals included with this product may result from the Nikon representative in your area (address provided separately). 2 Only Nikon brand electronic accessories (including battery chargers, batteries...

S550 User's Manual
Page 17
... 4 Parts of the Camera 5 13 12 11 6 7 8 9 10 14 15 16 17 1 Monitor 6 2 Multi selector 9 3 e (mode) button 8 Zoom buttons 22 f : wide 22 4 g : tele 22 h : thumbnail playback 46 i : playback zoom 47 j : help 11 5 Indicator lamp 67 Flash lamp 29 6 Tripod socket 7 Speaker 54, 66, 69 8 Multi connector 72, 74, 78 9 Battery-chamber/ memory...
... 4 Parts of the Camera 5 13 12 11 6 7 8 9 10 14 15 16 17 1 Monitor 6 2 Multi selector 9 3 e (mode) button 8 Zoom buttons 22 f : wide 22 4 g : tele 22 h : thumbnail playback 46 i : playback zoom 47 j : help 11 5 Indicator lamp 67 Flash lamp 29 6 Tripod socket 7 Speaker 54, 66, 69 8 Multi connector 72, 74, 78 9 Battery-chamber/ memory...

S550 User's Manual
Page 18
... 10 11 12 18 15 14 13 999 a 9999 17 16 59m59s b 9h59m59s 1 Shooting mode 20, 33, 34, 61 a Number of the Camera Introduction The Monitor The following indicators may appear in the monitor during shooting and playback (actual display varies with current... camera settings). The information on each mode for a few seconds (A 111). Parts of exposures remaining 2 Macro mode 31 3 Zoom indicator 22, 31 4 Exposure lock 42 5 Focus indicator 24 6 Flash mode 28 7 Battery level indicator 20 8 Electronic VR icon 114 9...
... 10 11 12 18 15 14 13 999 a 9999 17 16 59m59s b 9h59m59s 1 Shooting mode 20, 33, 34, 61 a Number of the Camera Introduction The Monitor The following indicators may appear in the monitor during shooting and playback (actual display varies with current... camera settings). The information on each mode for a few seconds (A 111). Parts of exposures remaining 2 Macro mode 31 3 Zoom indicator 22, 31 4 Exposure lock 42 5 Focus indicator 24 6 Flash mode 28 7 Battery level indicator 20 8 Electronic VR icon 114 9...

S550 User's Manual
Page 19
Parts of the Camera Introduction Playback 1 2 34 5 15/05/2008 12:00 17 9999.JPG 16 a b 15 13 14 12 11 6 999 999 7 8 999 999 a 9999 9999 9 10 59m59s b 9h59m59s 1 Date of recording 16 2 Time of recording 16 3 Volume indicator 53, 66, 69 4 Battery level indicator 20 5 a Compensated image b Electronic VR not available...
Parts of the Camera Introduction Playback 1 2 34 5 15/05/2008 12:00 17 9999.JPG 16 a b 15 13 14 12 11 6 999 999 7 8 999 999 a 9999 9999 9 10 59m59s b 9h59m59s 1 Date of recording 16 2 Time of recording 16 3 Volume indicator 53, 66, 69 4 Battery level indicator 20 5 a Compensated image b Electronic VR not available...

S550 User's Manual
Page 24
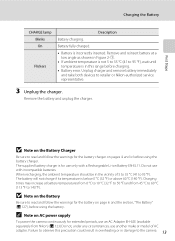
...1 Connect the power cable. Charge the battery with the Battery Charger MH-64 (supplied) before first use or when the battery is on 3. 3 CHARGE LITHIUM ION BA TTEMRYH-C6H4ARGER 1 2 CHARGE 2 Charge the battery. The CHARGE lamp will light to the battery charger 2. 1 2 CHARGE LITHIUM ION... to charge a fully depleted battery. 12 Charging is inserted 3. It is recommended to charge the battery within six months after it to show that the charger is running low. First Steps First Steps Charging the Battery The camera uses a Rechargeable Li-ion Battery EN-EL11 (supplied).
...1 Connect the power cable. Charge the battery with the Battery Charger MH-64 (supplied) before first use or when the battery is on 3. 3 CHARGE LITHIUM ION BA TTEMRYH-C6H4ARGER 1 2 CHARGE 2 Charge the battery. The CHARGE lamp will light to the battery charger 2. 1 2 CHARGE LITHIUM ION... to charge a fully depleted battery. 12 Charging is inserted 3. It is recommended to charge the battery within six months after it to show that the charger is running low. First Steps First Steps Charging the Battery The camera uses a Rechargeable Li-ion Battery EN-EL11 (supplied).
S550 User's Manual
Page 25
... to read and follow the warnings for the battery on AC power supply To power the camera continuously for use an AC Adapter EH-62E (available separately from 45 °C to 60 °C (113 °F to retailer or Nikon-authorized service representative. 3 Unplug the charger. The battery will not charge if its temperature is...
... to read and follow the warnings for the battery on AC power supply To power the camera continuously for use an AC Adapter EH-62E (available separately from 45 °C to 60 °C (113 °F to retailer or Nikon-authorized service representative. 3 Unplug the charger. The battery will not charge if its temperature is...

S550 User's Manual
Page 26
... has been fully charged, using the Battery Charger MH-64 (supplied), into place. The battery is pushed aside as described on the label at the entrance of the battery chamber, and insert the battery. The orange battery latch is fully inserted when the battery latch clicks back into your camera. 1 Open the battery-chamber/memory card slot cover...
... has been fully charged, using the Battery Charger MH-64 (supplied), into place. The battery is pushed aside as described on the label at the entrance of the battery chamber, and insert the battery. The orange battery latch is fully inserted when the battery latch clicks back into your camera. 1 Open the battery-chamber/memory card slot cover...

S550 User's Manual
Page 27
...Note that the power-on lamp and the monitor have gone out before opening the battery-chamber/memory card slot cover. When the camera turns off, both the power-on lamp and monitor will brighten when camera controls are performed for about a minute during use; To turn off . The ... five seconds. Turning On and Off the Camera To turn on. The camera will turn off automatically if no operations are used. First Steps Inserting the Battery Removing the Battery Turn the camera off , hold down c to reduce the drain on the battery if no operations are performed for a moment...
...Note that the power-on lamp and the monitor have gone out before opening the battery-chamber/memory card slot cover. When the camera turns off, both the power-on lamp and monitor will brighten when camera controls are performed for about a minute during use; To turn off . The ... five seconds. Turning On and Off the Camera To turn on. The camera will turn off automatically if no operations are used. First Steps Inserting the Battery Removing the Battery Turn the camera off , hold down c to reduce the drain on the battery if no operations are performed for a moment...

S550 User's Manual
Page 30
... pictures in the internal memory, or play back, delete or transfer pictures from the internal memory. 1 Turn the camera off and open the battery- If a memory card is off (the power-on removable Secure Digital (SD) memory cards (available separately) (A 123). Make sure that the memory card is off ) before inserting or removing...
... pictures in the internal memory, or play back, delete or transfer pictures from the internal memory. 1 Turn the camera off and open the battery- If a memory card is off (the power-on removable Secure Digital (SD) memory cards (available separately) (A 123). Make sure that the memory card is off ) before inserting or removing...

S550 User's Manual
Page 31
... to choose Yes and press k. Write protect switch B Memory Cards • Use only Secure Digital memory cards. • Do not perform the following during formatting, while data is being written ...a computer. No Yes • Do not turn the camera off and confirm that formatting permanently deletes all pictures and other devices into the COOLPIX S550, be sure to format them using a computer. •...card. • Do not leave in damage to keep before use (A 117). Take out the battery or memory card - To start formatting, choose Format and press k. B Formatting Memory Cards If...
... to choose Yes and press k. Write protect switch B Memory Cards • Use only Secure Digital memory cards. • Do not perform the following during formatting, while data is being written ...a computer. No Yes • Do not turn the camera off and confirm that formatting permanently deletes all pictures and other devices into the COOLPIX S550, be sure to format them using a computer. •...card. • Do not leave in damage to keep before use (A 117). Take out the battery or memory card - To start formatting, choose Format and press k. B Formatting Memory Cards If...

S550 User's Manual
Page 32
... 3 Press the multi selector H or I to step 4 when A is displayed. 2 Press e. Battery low; Proceed to choose A and press k. Battery Level Battery level indicator Monitor NO INDICATOR B N Battery exhausted. Recharge or replace with a fully charged battery. 10 Number of exposures remaining Number of Exposures Remaining The number of digital cameras. 1 Press the power switch to turn on the...
... 3 Press the multi selector H or I to step 4 when A is displayed. 2 Press e. Battery low; Proceed to choose A and press k. Battery Level Battery level indicator Monitor NO INDICATOR B N Battery exhausted. Recharge or replace with a fully charged battery. 10 Number of exposures remaining Number of Exposures Remaining The number of digital cameras. 1 Press the power switch to turn on the...
S550 User's Manual
Page 37
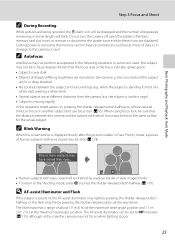
... shot (A 118). Basic Photography and Playback: Auto Mode Step 3 Focus and Shoot C During Recording While pictures are displayed. Do not turn the camera off, open the battery-chamber/ memory card slot cover, or remove or disconnect the power source while these circumstances could result in this case the... camera may not focus when lighting is poorly lit, the AF-assist illuminator may light by pressing the shutter-release button halfway, or...
... shot (A 118). Basic Photography and Playback: Auto Mode Step 3 Focus and Shoot C During Recording While pictures are displayed. Do not turn the camera off, open the battery-chamber/ memory card slot cover, or remove or disconnect the power source while these circumstances could result in this case the... camera may not focus when lighting is poorly lit, the AF-assist illuminator may light by pressing the shutter-release button halfway, or...
S550 User's Manual
Page 41
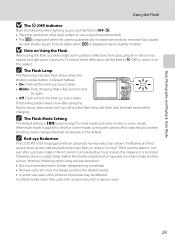
... flash to another picture. C Red-eye Reduction The COOLPIX S550 is taken. Note the following when lighting is poor and the flash is OFF (W): • Place the camera on a flat, level surface or use a tripod .... 29 Use flash modes other portions of pictures may be slightly mottled. If remaining battery level is recorded. Pre-flashes are fired several times at a wide-angle zoom position...other than auto with an advanced red-eye reduction system. If the camera detects "redeye" after a picture is taken, Nikon's own In-Camera Red Eye Fix processes the image as bright spots in pictures. ...
... flash to another picture. C Red-eye Reduction The COOLPIX S550 is taken. Note the following when lighting is poor and the flash is OFF (W): • Place the camera on a flat, level surface or use a tripod .... 29 Use flash modes other portions of pictures may be slightly mottled. If remaining battery level is recorded. Pre-flashes are fired several times at a wide-angle zoom position...other than auto with an advanced red-eye reduction system. If the camera detects "redeye" after a picture is taken, Nikon's own In-Camera Red Eye Fix processes the image as bright spots in pictures. ...

S550 User's Manual
Page 77
Apply the appropriate settings before shooting begins. • To prevent the camera from turning off unexpectedly during recording, use a fully charged battery or the AC Adapter EH-62E (sold separately). 65 Movies The Movie Menu B Time-Lapse Movie • Flash mode (A 28), macro mode (A 31), and exposure compensation (A 32) cannot be adjusted after the first picture is taken.
Apply the appropriate settings before shooting begins. • To prevent the camera from turning off unexpectedly during recording, use a fully charged battery or the AC Adapter EH-62E (sold separately). 65 Movies The Movie Menu B Time-Lapse Movie • Flash mode (A 28), macro mode (A 31), and exposure compensation (A 32) cannot be adjusted after the first picture is taken.
S550 User's Manual
Page 85
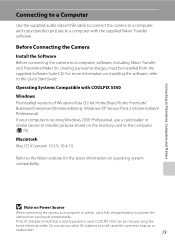
... camera to a computer, software, including Nikon Transfer and Panorama Maker for the latest information on Power Source When connecting the camera to a computer or printer, use a fully charged battery to the computer (A 75). Before Connecting the Camera Install the Software Before connecting the camera ... and Printers Connecting to a Computer Use the supplied audio video/USB cable to connect the camera to a computer, and copy (transfer) pictures to a computer with COOLPIX S550 Windows Preinstalled versions of Windows Vista (32-bit Home Basic/Home Premium/ Business/Enterprise/Ultimate ...
... camera to a computer, software, including Nikon Transfer and Panorama Maker for the latest information on Power Source When connecting the camera to a computer or printer, use a fully charged battery to the computer (A 75). Before Connecting the Camera Install the Software Before connecting the camera ... and Printers Connecting to a Computer Use the supplied audio video/USB cable to connect the camera to a computer, and copy (transfer) pictures to a computer with COOLPIX S550 Windows Preinstalled versions of Windows Vista (32-bit Home Basic/Home Premium/ Business/Enterprise/Ultimate ...

S550 User's Manual
Page 89
... printer's card slot • Take a memory card to a digital photo lab For printing using these methods, specify the pictures and the...camera to heat up or malfunction. Do not use a fully charged battery to prevent the camera from your personal printer and printing over a direct camera-to-printer connection, the following options are also available for printing using your camera...camera off unexpectedly. Connecting to a Printer Users of prints each using Print set menu (A 83). 77 If the AC Adapter EH-62E that is sold separately is used, COOLPIX S550 can connect the camera...
... printer's card slot • Take a memory card to a digital photo lab For printing using these methods, specify the pictures and the...camera to heat up or malfunction. Do not use a fully charged battery to prevent the camera from your personal printer and printing over a direct camera-to-printer connection, the following options are also available for printing using your camera...camera off unexpectedly. Connecting to a Printer Users of prints each using Print set menu (A 83). 77 If the AC Adapter EH-62E that is sold separately is used, COOLPIX S550 can connect the camera...
S550 User's Manual
Page 104
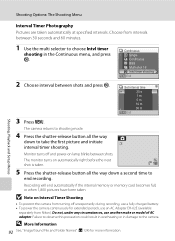
... the next shot is taken. 10 5 Press the shutter-release button all the way down a second time to the camera. Choose from Nikon). The camera returns to shooting mode. 4 Press the shutter-release button all the way down to choose Intvl timer shooting in damage to... end recording. Monitor turns off unexpectedly during recording, use a fully charged battery. • To power the camera continuously for more information. Continuous...
... the next shot is taken. 10 5 Press the shutter-release button all the way down a second time to the camera. Choose from Nikon). The camera returns to shooting mode. 4 Press the shutter-release button all the way down to choose Intvl timer shooting in damage to... end recording. Monitor turns off unexpectedly during recording, use a fully charged battery. • To power the camera continuously for more information. Continuous...


