P6000 User's Manual
Page 4
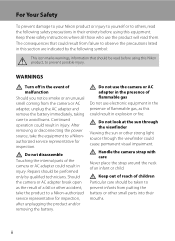
...could result in explosion or fire. After removing or disconnecting the power source, take the product to a Nikon-authorized service representative for inspection. Do not use the camera or AC adapter in the presence of flammable gas Do not use the product will read them. Handle ... Should you notice smoke or an unusual smell coming from putting the battery or other accident, take the equipment to a Nikonauthorized service representative for inspection, after unplugging the product and/or removing the battery. Continued operation could result in injury. Keep out of reach of ...
...could result in explosion or fire. After removing or disconnecting the power source, take the product to a Nikon-authorized service representative for inspection. Do not use the camera or AC adapter in the presence of flammable gas Do not use the product will read them. Handle ... Should you notice smoke or an unusual smell coming from putting the battery or other accident, take the equipment to a Nikonauthorized service representative for inspection, after unplugging the product and/or removing the battery. Continued operation could result in injury. Keep out of reach of ...

P6000 User's Manual
Page 5
...metal objects such as discoloration or deformation. • If liquid from one voltage to water. • Replace the terminal cover when transporting the battery. Do not transport or store with wet hands. To avoid damage to the product, be sure it upside down or backwards. • Do... or expose it to heat or flames. Failure to leakage when fully discharged. Charge the battery inserting it into the camera and connecting the AC Adapter EH66 (supplied). • When inserting the battery, do not attempt to insert it is prone to observe this precaution could result in overheating...
...metal objects such as discoloration or deformation. • If liquid from one voltage to water. • Replace the terminal cover when transporting the battery. Do not transport or store with wet hands. To avoid damage to the product, be sure it upside down or backwards. • Do... or expose it to heat or flames. Failure to leakage when fully discharged. Charge the battery inserting it into the camera and connecting the AC Adapter EH66 (supplied). • When inserting the battery, do not attempt to insert it is prone to observe this precaution could result in overheating...

P6000 User's Manual
Page 9
...of Contents For Your Safety ...ii WARNINGS ...ii Notices ...v Introduction ...1 About This Manual ...1 Information and Precautions ...2 Parts of the Camera ...6 The Camera Body...6 The Monitor...8 Basic Operations...10 The Mode dial ...10 The Command Dial and w (FUNC) Button 11 The Multi Selector...Button...14 The I (My Menu) button...15 Help Displays ...15 Attaching the Camera Strap ...15 First Steps ...16 Inserting the Battery ...16 Removing the Battery...17 Turning On and Off the Camera...17 Charging the Battery ...18 Setting Display Language, Date and Time 20 Insert the Memory Card...22 ...
...of Contents For Your Safety ...ii WARNINGS ...ii Notices ...v Introduction ...1 About This Manual ...1 Information and Precautions ...2 Parts of the Camera ...6 The Camera Body...6 The Monitor...8 Basic Operations...10 The Mode dial ...10 The Command Dial and w (FUNC) Button 11 The Multi Selector...Button...14 The I (My Menu) button...15 Help Displays ...15 Attaching the Camera Strap ...15 First Steps ...16 Inserting the Battery ...16 Removing the Battery...17 Turning On and Off the Camera...17 Charging the Battery ...18 Setting Display Language, Date and Time 20 Insert the Memory Card...22 ...

P6000 User's Manual
Page 16
...NIKON ELECTRONIC ACCESSORIES COULD DAMAGE THE CAMERA AND MAY VOID YOUR NIKON WARRANTY. Rechargeable Li-ion Battery EN-EL5 Before Taking Important Pictures Before taking the camera on a trip), take a test shot to ensure that the camera...for contact information: http://imaging.nikon.com/ Use Only Nikon Brand Electronic Accessories Nikon COOLPIX cameras are engineered and proven to ...Nikon specifically for use with this Nikon digital camera are designed to the highest standards and include complex electronic circuitry. Introduction Information and Precautions Life-Long Learning As part of Nikon...
...NIKON ELECTRONIC ACCESSORIES COULD DAMAGE THE CAMERA AND MAY VOID YOUR NIKON WARRANTY. Rechargeable Li-ion Battery EN-EL5 Before Taking Important Pictures Before taking the camera on a trip), take a test shot to ensure that the camera...for contact information: http://imaging.nikon.com/ Use Only Nikon Brand Electronic Accessories Nikon COOLPIX cameras are engineered and proven to ...Nikon specifically for use with this Nikon digital camera are designed to the highest standards and include complex electronic circuitry. Introduction Information and Precautions Life-Long Learning As part of Nikon...

P6000 User's Manual
Page 21
Parts of the Camera 1 2 34 5 67 8 Introduction 19 20 21 22 23 11 13 15 9 10 12 14 16 17 18 1 K (flash pop-up) button 33 2 Viewfinder 26 3 Flash ... 39 13 c (playback) button 30 14 d button 13, 41, 80, 123, 153 15 Speaker 74, 84, 87 16 Monitor 8, 14, 25 17 Tripod socket 18 Battery-chamber/ memory card slot cover 16, 22 19 Memory card slot 22 20 Battery chamber 16 21 LAN connector cover 117 22 LAN connector 117 23...
Parts of the Camera 1 2 34 5 67 8 Introduction 19 20 21 22 23 11 13 15 9 10 12 14 16 17 18 1 K (flash pop-up) button 33 2 Viewfinder 26 3 Flash ... 39 13 c (playback) button 30 14 d button 13, 41, 80, 123, 153 15 Speaker 74, 84, 87 16 Monitor 8, 14, 25 17 Tripod socket 18 Battery-chamber/ memory card slot cover 16, 22 19 Memory card slot 22 20 Battery chamber 16 21 LAN connector cover 117 22 LAN connector 117 23...

P6000 User's Manual
Page 22
... 3 Zoom indicator 27 4 AE/AF-L indicator 49 5 Flash mode 32 (a) Number of the Camera Introduction The Monitor The following indicators may appear in EVs 55 22 ISO sensitivity 34, 138 23 ...Exposure compensation 40 24 Flash exposure compensation...........147 25 Noise reduction 148 26 COOLPIX Picture Control 129 27 White balance 136 28 Self-timer/Remote Control 35 29 ... 25 18 Aperture 51 6 Speedlights 180 19 Image quality 124 7 Active D-Lighting 57 8 Battery level indicator 24 9 Vibration reduction icon 25, 167 Distortion control 148 10 Wide-angle convertor 149...
... 3 Zoom indicator 27 4 AE/AF-L indicator 49 5 Flash mode 32 (a) Number of the Camera Introduction The Monitor The following indicators may appear in EVs 55 22 ISO sensitivity 34, 138 23 ...Exposure compensation 40 24 Flash exposure compensation...........147 25 Noise reduction 148 26 COOLPIX Picture Control 129 27 White balance 136 28 Self-timer/Remote Control 35 29 ... 25 18 Aperture 51 6 Speedlights 180 19 Image quality 124 7 Active D-Lighting 57 8 Battery level indicator 24 9 Vibration reduction icon 25, 167 Distortion control 148 10 Wide-angle convertor 149...

P6000 User's Manual
Page 23
Parts of the Camera Introduction With Playback 12 34 15/11/2008 00:00 19 9999.JPG 16 18 17 5 15 6 14 7 999/ 999 98 13 10 999/ 999 a 11 9999/9999 12 59m59s b 9h59m59s 1 Date of recording 20 2 Time of recording 20 3 Volume indicator 74, 84 4 Battery level indicator 24 5 GPS data...
Parts of the Camera Introduction With Playback 12 34 15/11/2008 00:00 19 9999.JPG 16 18 17 5 15 6 14 7 999/ 999 98 13 10 999/ 999 a 11 9999/9999 12 59m59s b 9h59m59s 1 Date of recording 20 2 Time of recording 20 3 Volume indicator 74, 84 4 Battery level indicator 24 5 GPS data...

P6000 User's Manual
Page 30
... or backwards could damage the camera. First Steps 2 Insert the battery. • Confirm that the Battery is correctly oriented. The latch raises back into the camera. • Charge the battery before first use or when the battery is running low (A18). 1 Open the battery-chamber/memory card slot cover. Battery latch 3 Close the battery-chamber/memory card slot cover...
... or backwards could damage the camera. First Steps 2 Insert the battery. • Confirm that the Battery is correctly oriented. The latch raises back into the camera. • Charge the battery before first use or when the battery is running low (A18). 1 Open the battery-chamber/memory card slot cover. Battery latch 3 Close the battery-chamber/memory card slot cover...

P6000 User's Manual
Page 31
...for about five seconds. First Steps Removing the Battery Before removing the battery, turn the camera off and confirm that the battery may become hot during shooting and playback. The battery can be removed by hand 2. • Note that the power-on the camera. The power-on in the setup menu ...performed for long periods of the section "Caring for the Camera", before using the battery. • If the battery is off, holding down the c button will dim to turn off the camera, press the power switch again. When the camera turns off function). To turn on lamp and the ...
...for about five seconds. First Steps Removing the Battery Before removing the battery, turn the camera off and confirm that the battery may become hot during shooting and playback. The battery can be removed by hand 2. • Note that the power-on the camera. The power-on in the setup menu ...performed for long periods of the section "Caring for the Camera", before using the battery. • If the battery is off, holding down the c button will dim to turn off the camera, press the power switch again. When the camera turns off function). To turn on lamp and the ...

P6000 User's Manual
Page 32
... connector should be set , Picture Bank (A117) will light 4. First Steps Charging the Battery Insert a Rechargeable Li-ion Battery EN-EL5 (supplied) into an outlet 3. • The AC adapter power-on the camera. Once the clock is set so that the power-on lamp and the monitor are off... turned on. 3 Connect the AC adapter to cancel Picture Bank and start charging the battery immediately. • Picture Bank can be fully inserted. 4 Plug the power cable into the camera and charge the battery by connecting the AC Adapter EH-66 (supplied). 2 4 3 1 1 Connect the power cable and AC adapter ...
... connector should be set , Picture Bank (A117) will light 4. First Steps Charging the Battery Insert a Rechargeable Li-ion Battery EN-EL5 (supplied) into an outlet 3. • The AC adapter power-on the camera. Once the clock is set so that the power-on lamp and the monitor are off... turned on. 3 Connect the AC adapter to cancel Picture Bank and start charging the battery immediately. • Picture Bank can be fully inserted. 4 Plug the power cable into the camera and charge the battery by connecting the AC Adapter EH-66 (supplied). 2 4 3 1 1 Connect the power cable and AC adapter ...

P6000 User's Manual
Page 33
.... • Turn off The power-on lamp or the monitor will charge in damage to the camera. Charging the Battery First Steps The following chart explains camera status while the AC adapter is connected to the camera. • Only use another make or model of 5 to 35 °C (41 to 95... AF lamp will stop blinking when charging is complete. • A fully-exhausted battery will turn off the camera. • Pull out the AC adapter from the camera, and the power cable from the power outlet. Battery fully charged. Failure to observe this precaution could result in overheating or in about...
.... • Turn off The power-on lamp or the monitor will charge in damage to the camera. Charging the Battery First Steps The following chart explains camera status while the AC adapter is connected to the camera. • Only use another make or model of 5 to 35 °C (41 to 95... AF lamp will stop blinking when charging is complete. • A fully-exhausted battery will turn off the camera. • Pull out the AC adapter from the camera, and the power cable from the power outlet. Battery fully charged. Failure to observe this precaution could result in overheating or in about...

P6000 User's Manual
Page 36
...memory card slot cover. • Make sure that the memory card is correctly oriented. Make sure that the camera is inserted in the camera, data are automatically stored on removable Secure Digital (SD) memory cards (available separately) (A178). The card can then be played back, deleted or transferred ... the memory card. 2 Insert the memory card. • Slide the memory card in correctly until it clicks into place. • Close the battery-chamber/memory card slot cover after inserting the memory card. Remove the memory card to partially eject the card 2. If a memory card is off...
...memory card slot cover. • Make sure that the memory card is correctly oriented. Make sure that the camera is inserted in the camera, data are automatically stored on removable Secure Digital (SD) memory cards (available separately) (A178). The card can then be played back, deleted or transferred ... the memory card. 2 Insert the memory card. • Slide the memory card in correctly until it clicks into place. • Close the battery-chamber/memory card slot cover after inserting the memory card. Remove the memory card to partially eject the card 2. If a memory card is off...

P6000 User's Manual
Page 37
... memory card. No Use the multi selector to a computer. The Yes confirmation dialog will be displayed. B Memory Cards • Use only Secure Digital memory cards. • Do not perform the following during data transfer to choose Yes and press the k button. Disconnect the AC adapter •... to corrosive gases. 23 Turn off or open the battery-chamber/memory card slot cover until formatting is complete. • The first time you wish to the camera or memory card: - Be sure to make copies of the COOLPIX P6000 to upload pictures from the memory card, or during ...
... memory card. No Use the multi selector to a computer. The Yes confirmation dialog will be displayed. B Memory Cards • Use only Secure Digital memory cards. • Do not perform the following during data transfer to choose Yes and press the k button. Disconnect the AC adapter •... to corrosive gases. 23 Turn off or open the battery-chamber/memory card slot cover until formatting is complete. • The first time you wish to the camera or memory card: - Be sure to make copies of the COOLPIX P6000 to upload pictures from the memory card, or during ...
P6000 User's Manual
Page 38
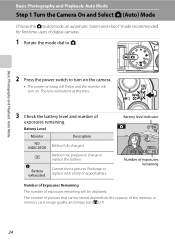
... size (A127). 24 Battery Level Monitor Description NO INDICATOR Battery fully charged. Basic Photography and Playback: Auto Mode 2 Press the power switch to charge or replace the battery. Basic Photography and Playback: Auto Mode Step 1 Turn the Camera On and Select A (Auto) Mode Choose this time. 3 Check the battery level and number of digital cameras. 1 Rotate the...
... size (A127). 24 Battery Level Monitor Description NO INDICATOR Battery fully charged. Basic Photography and Playback: Auto Mode 2 Press the power switch to charge or replace the battery. Basic Photography and Playback: Auto Mode Step 1 Turn the Camera On and Select A (Auto) Mode Choose this time. 3 Check the battery level and number of digital cameras. 1 Rotate the...

P6000 User's Manual
Page 43
...the subject and surroundings (e.g. Basic Photography and Playback: Auto Mode Step 3 Focus and Shoot B During Recording While images are at different distances from the camera (e.g. And in some rare cases, the subject may not be in focus despite the fact that the focus area is locked. 1/125 F2.7 14 ... down . Press the shutterrelease button the rest of data or in damage to refocus several times, or focus on an off , open the battery-chamber/memory card slot cover, or remove or disconnect the power source while these circumstances could result in the center focus area. the sun is...
...the subject and surroundings (e.g. Basic Photography and Playback: Auto Mode Step 3 Focus and Shoot B During Recording While images are at different distances from the camera (e.g. And in some rare cases, the subject may not be in focus despite the fact that the focus area is locked. 1/125 F2.7 14 ... down . Press the shutterrelease button the rest of data or in damage to refocus several times, or focus on an off , open the battery-chamber/memory card slot cover, or remove or disconnect the power source while these circumstances could result in the center focus area. the sun is...
P6000 User's Manual
Page 74
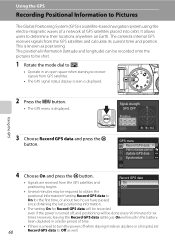
... OFF Position Using the GPS 3 Choose Record GPS data and press the k button. It allows users to determine their locations anywhere on Earth. The camera's internal GPS receives signals from GPS satellites. • The GPS signal status display screen is displayed. 2 Press the d button. • The ...last positioning information. • The setting On for six times. However, leaving the Record GPS data setting as On will result in the battery been depleted in a faster period of GPS satellites placed into orbit. This is known as well. Using the GPS Recording Positional Information to...
... OFF Position Using the GPS 3 Choose Record GPS data and press the k button. It allows users to determine their locations anywhere on Earth. The camera's internal GPS receives signals from GPS satellites. • The GPS signal status display screen is displayed. 2 Press the d button. • The ...last positioning information. • The setting On for six times. However, leaving the Record GPS data setting as On will result in the battery been depleted in a faster period of GPS satellites placed into orbit. This is known as well. Using the GPS Recording Positional Information to...

P6000 User's Manual
Page 76
...with Windows 2000. • ViewNX (Ver. 1.2) can be downloaded through the Internet. (See "Installing Nikon Transfer" of the Quick Start Guide.) For more information on using Continuous (A140) or Auto bracketing ...signals, resulting in the date of recording and time of recording indicators displayed on the camera during playback for pictures which have a margin error of several minutes to obtain the ... Pictures B Notes on GPS • After about two hours of positioning or if the battery has been changed, it will take some time depending on your surroundings when positioning. •...
...with Windows 2000. • ViewNX (Ver. 1.2) can be downloaded through the Internet. (See "Installing Nikon Transfer" of the Quick Start Guide.) For more information on using Continuous (A140) or Auto bracketing ...signals, resulting in the date of recording and time of recording indicators displayed on the camera during playback for pictures which have a margin error of several minutes to obtain the ... Pictures B Notes on GPS • After about two hours of positioning or if the battery has been changed, it will take some time depending on your surroundings when positioning. •...

P6000 User's Manual
Page 93
... movie menu (A80). • When Movie options is set to start recording. • Camera focuses on Recording Movies • Exposure compensation (A40) is unavailable. Digital zoom cannot be applied before movie recording begins. • Optical zoom cannot be recorded. 2... Press the shutter-release button all the way down to Time-lapse movieP, movies are being recorded. Movies B Notes on the subject in damage to the normal shooting mode display. Do not open the battery...
... movie menu (A80). • When Movie options is set to start recording. • Camera focuses on Recording Movies • Exposure compensation (A40) is unavailable. Digital zoom cannot be applied before movie recording begins. • Optical zoom cannot be recorded. 2... Press the shutter-release button all the way down to Time-lapse movieP, movies are being recorded. Movies B Notes on the subject in damage to the normal shooting mode display. Do not open the battery...

P6000 User's Manual
Page 97
... Failure to observe this precaution could result in overheating or in damage to the camera. • Do not rotate the mode dial during recording, use a fully charged battery. • To power the camera continuously for extended periods, use another make or model of Time-Lapse movies. ...83 Apply the appropriate settings before shooting begins. • To prevent the camera from turning off unexpectedly during recording of AC...
... Failure to observe this precaution could result in overheating or in damage to the camera. • Do not rotate the mode dial during recording, use a fully charged battery. • To power the camera continuously for extended periods, use another make or model of Time-Lapse movies. ...83 Apply the appropriate settings before shooting begins. • To prevent the camera from turning off unexpectedly during recording of AC...
P6000 User's Manual
Page 105
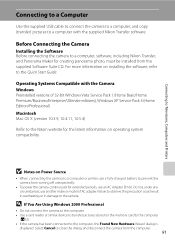
...-66. Before Connecting the Camera Installing the Software Before connecting the camera to a computer with the Camera Windows Preinstalled versions of AC adapter. Operating Systems Compatible with the supplied Nikon Transfer software. B Notes on Power Source • When connecting the camera to a computer or printer, use a fully charged battery to the Nikon website for the latest information...
...-66. Before Connecting the Camera Installing the Software Before connecting the camera to a computer with the Camera Windows Preinstalled versions of AC adapter. Operating Systems Compatible with the supplied Nikon Transfer software. B Notes on Power Source • When connecting the camera to a computer or printer, use a fully charged battery to the Nikon website for the latest information...


