P6000 User's Manual
Page 10
Table of Contents A Basic Photography and Playback: Auto Mode 24 Step 1 Turn the Camera On and Select A (Auto) Mode 24 Indicators Displayed in A (Auto) Mode 25 Step 2 Frame a Picture...26 Using the Viewfinder ...26 Using the Zoom...27 Step 3 Focus and Shoot ...28 Step 4 Viewing and Deleting Pictures 30 Viewing Pictures (Playback Mode...
Table of Contents A Basic Photography and Playback: Auto Mode 24 Step 1 Turn the Camera On and Select A (Auto) Mode 24 Indicators Displayed in A (Auto) Mode 25 Step 2 Frame a Picture...26 Using the Viewfinder ...26 Using the Zoom...27 Step 3 Focus and Shoot ...28 Step 4 Viewing and Deleting Pictures 30 Viewing Pictures (Playback Mode...

P6000 User's Manual
Page 11
...63 Update GPS Data ...63 Synchronize ...64 c More on Playback...65 Viewing Multiple Pictures: Thumbnail Playback 65 Taking a Closer Look: Playback Zoom 66 Editing Pictures ...67 Enhancing Brightness and Contrast: D-Lighting 68 Crop Picture...69 Resizing Pictures: Small Picture...70 Adding Black Frame on ...Pictures: Black Border 71 RAW Processing Using the Camera: NRW (RAW) Processing 72 Voice Memos: Recording and Playback 74 Recording Voice Memos ...74 Playing Voice Memos ...74 Deleting Voice Memos...
...63 Update GPS Data ...63 Synchronize ...64 c More on Playback...65 Viewing Multiple Pictures: Thumbnail Playback 65 Taking a Closer Look: Playback Zoom 66 Editing Pictures ...67 Enhancing Brightness and Contrast: D-Lighting 68 Crop Picture...69 Resizing Pictures: Small Picture...70 Adding Black Frame on ...Pictures: Black Border 71 RAW Processing Using the Camera: NRW (RAW) Processing 72 Voice Memos: Recording and Playback 74 Recording Voice Memos ...74 Playing Voice Memos ...74 Deleting Voice Memos...

P6000 User's Manual
Page 13
...: The Shooting Menu 121 Displaying the Shooting Menu...123 q Image Quality...124 r Image Size...126 a Picture Control (COOLPIX Picture Control 129 a Custom Picture Control (COOLPIX Custom Picture Control 134 B White Balance...136 E ISO Sensitivity...138 G Metering ...139 C Continuous ...140 H Auto ......157 i Hide Image...157 h Copy ...158 Basic Camera Setup: The Setup Menu 159 Displaying the Setup Menu...160 c Welcome Screen ...161 d Date...162 e Brightness...165 f Date Imprint...165 g Vibration Reduction...167 h AF Assist ...168 u Digital Zoom ...168 i Sound Settings ...169 k Auto Off ......
...: The Shooting Menu 121 Displaying the Shooting Menu...123 q Image Quality...124 r Image Size...126 a Picture Control (COOLPIX Picture Control 129 a Custom Picture Control (COOLPIX Custom Picture Control 134 B White Balance...136 E ISO Sensitivity...138 G Metering ...139 C Continuous ...140 H Auto ......157 i Hide Image...157 h Copy ...158 Basic Camera Setup: The Setup Menu 159 Displaying the Setup Menu...160 c Welcome Screen ...161 d Date...162 e Brightness...165 f Date Imprint...165 g Vibration Reduction...167 h AF Assist ...168 u Digital Zoom ...168 i Sound Settings ...169 k Auto Off ......

P6000 User's Manual
Page 20
...... 17, 169 3 Mode dial 10 4 Viewfinder 26 5 Accessory Shoe Cover BS-1 180 6 Accessory shoe 180 7 Built-in flash 32 8 Shutter-release button 28 9 Eyelet for camera strap (×2 15 10 Connector cover 18, 90, 92, 96 11 DC input connector 18, 117 12 Cable connector 90, 92, 96... Zoom control 27 f : Wide 27 13 g : Tele 27 h : Thumbnail playback 65 i : Playback zoom 66 j : Help 15 14 Infrared receiver 36 15 Self-timer lamp 35 AF-assist illuminator 168 16 Microphone 74, 79...
...... 17, 169 3 Mode dial 10 4 Viewfinder 26 5 Accessory Shoe Cover BS-1 180 6 Accessory shoe 180 7 Built-in flash 32 8 Shutter-release button 28 9 Eyelet for camera strap (×2 15 10 Connector cover 18, 90, 92, 96 11 DC input connector 18, 117 12 Cable connector 90, 92, 96... Zoom control 27 f : Wide 27 13 g : Tele 27 h : Thumbnail playback 65 i : Playback zoom 66 j : Help 15 14 Infrared receiver 36 15 Self-timer lamp 35 AF-assist illuminator 168 16 Microphone 74, 79...

P6000 User's Manual
Page 22
...999 59m59s 9999 9h59m59s 19 16 1 Shooting mode 24, 41, 50, 79 2 Focus mode 37 3 Zoom indicator 27 4 AE/AF-L indicator 49 5 Flash mode 32 (a) Number of the Camera Introduction The Monitor The following indicators may appear in EVs 55 22 ISO sensitivity 34, 138 23 Exposure ...compensation 40 24 Flash exposure compensation...........147 25 Noise reduction 148 26 COOLPIX Picture Control 129 27 White balance 136 28 ...
...999 59m59s 9999 9h59m59s 19 16 1 Shooting mode 24, 41, 50, 79 2 Focus mode 37 3 Zoom indicator 27 4 AE/AF-L indicator 49 5 Flash mode 32 (a) Number of the Camera Introduction The Monitor The following indicators may appear in EVs 55 22 ISO sensitivity 34, 138 23 Exposure ...compensation 40 24 Flash exposure compensation...........147 25 Noise reduction 148 26 COOLPIX Picture Control 129 27 White balance 136 28 ...

P6000 User's Manual
Page 25
... D) Mode dial set to A, B, C, D, E or F w + Mode dial set to y Mode dial set to D With Playback Mode Playback mode Full-frame playback or Thumbnail playback Playback zoom w + w + Use w + Movie/Audio playback Description A Change the flexible program. 52 Adjust shutter speed. 53 Adjust aperture. 54 Adjust shutter speed or aperture. (Press the multi... adjusted.) Choose a scene mode. 41 Choose a movie option. 80 Description Switch to select mode or menu quickly and change settings. A 75, 76 30, 65 Change zoom rate.
... D) Mode dial set to A, B, C, D, E or F w + Mode dial set to y Mode dial set to D With Playback Mode Playback mode Full-frame playback or Thumbnail playback Playback zoom w + w + Use w + Movie/Audio playback Description A Change the flexible program. 52 Adjust shutter speed. 53 Adjust aperture. 54 Adjust shutter speed or aperture. (Press the multi... adjusted.) Choose a scene mode. 41 Choose a movie option. 80 Description Switch to select mode or menu quickly and change settings. A 75, 76 30, 65 Change zoom rate.
P6000 User's Manual
Page 29
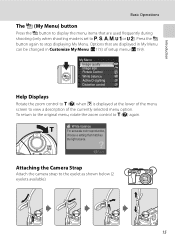
To return to the original menu, rotate the zoom control to the eyelet as shown below (2 eyelets available). 15 Back Attaching the Camera Strap Attach the camera strap to g (j) again. White balance For accurate color reproduction, choose a setting that are used frequently during shooting ... to view a description of setup menu (A159). My Menu Image quality Image size Picture Control White balance Active D-Lighting Distortion control Help Displays Rotate the zoom control to g (j) when M is set to A, B, C, D, E or F). Introduction Basic Operations The I (My Menu) button Press the I ...
To return to the original menu, rotate the zoom control to the eyelet as shown below (2 eyelets available). 15 Back Attaching the Camera Strap Attach the camera strap to g (j) again. White balance For accurate color reproduction, choose a setting that are used frequently during shooting ... to view a description of setup menu (A159). My Menu Image quality Image size Picture Control White balance Active D-Lighting Distortion control Help Displays Rotate the zoom control to g (j) when M is set to A, B, C, D, E or F). Introduction Basic Operations The I (My Menu) button Press the I ...

P6000 User's Manual
Page 39
...default setting) is backlit, be applied to effectively reduce blur, caused by slight hand movement known as camera shake, that commonly occurs when shooting with zoom applied or at the top of camera shake. When memory card is inserted, C is fixed at off and W appears at slow shutter... speeds. Vibration reduction icon Vibration reduction can be recorded to stabilize the camera during shooting. 25 Set Vibration...
...default setting) is backlit, be applied to effectively reduce blur, caused by slight hand movement known as camera shake, that commonly occurs when shooting with zoom applied or at the top of camera shake. When memory card is inserted, C is fixed at off and W appears at slow shutter... speeds. Vibration reduction icon Vibration reduction can be recorded to stabilize the camera during shooting. 25 Set Vibration...
P6000 User's Manual
Page 40
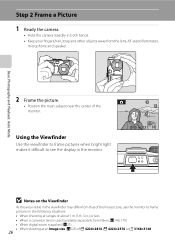
...at an Image size (A126) of I 4224×2816, G 4224×2376 or H 3168×3168 26 Step 2 Frame a Picture 1 Ready the camera. • Hold the camera steadily in .) or less • When a converter lens is applied (A27) • When shooting at ranges of the monitor. Basic Photography and Playback:... Position the main subject near the center of about 1 m (3 ft. 3 in both hands. • Keep your fingers, hair, strap and other objects away from Nikon; A149, 179) • When digital zoom is used (available separately from the lens, AF-assist illuminator, microphone and speaker.
...at an Image size (A126) of I 4224×2816, G 4224×2376 or H 3168×3168 26 Step 2 Frame a Picture 1 Ready the camera. • Hold the camera steadily in .) or less • When a converter lens is applied (A27) • When shooting at ranges of the monitor. Basic Photography and Playback:... Position the main subject near the center of about 1 m (3 ft. 3 in both hands. • Keep your fingers, hair, strap and other objects away from Nikon; A149, 179) • When digital zoom is used (available separately from the lens, AF-assist illuminator, microphone and speaker.

P6000 User's Manual
Page 41
The subject is magnified up to activate optical zoom. Digital zoom is rotated. Step 2 Frame a Picture Zoom out Zoom in Optical zoom Digital zoom Digital Zoom When the camera is not in to the maximum optical zoom magnification, rotating and holding the zoom control at zoom positions beyond the V position, interpolation is applied at g triggers digital zoom. Focus will be on the center of the screen (without...
The subject is magnified up to activate optical zoom. Digital zoom is rotated. Step 2 Frame a Picture Zoom out Zoom in Optical zoom Digital zoom Digital Zoom When the camera is not in to the maximum optical zoom magnification, rotating and holding the zoom control at zoom positions beyond the V position, interpolation is applied at g triggers digital zoom. Focus will be on the center of the screen (without...

P6000 User's Manual
Page 42
.... When the subject is in focus, the focus area will glow green, and the green AF lamp next to the viewfinder will light. • When digital zoom is in effect, and the subject is in red or the AF lamp will flicker when the shutterrelease button is unable to focus, the focus... and blurred pictures. Press the shutterrelease button halfway to the memory card or internal memory. 1/125 F2.7 14 D Shutter-release Button The camera features a two-stage shutter-release button. Do not use force when pressing the shutter-release button, as this may result in the center focus area. ...
.... When the subject is in focus, the focus area will glow green, and the green AF lamp next to the viewfinder will light. • When digital zoom is in effect, and the subject is in red or the AF lamp will flicker when the shutterrelease button is unable to focus, the focus... and blurred pictures. Press the shutterrelease button halfway to the memory card or internal memory. 1/125 F2.7 14 D Shutter-release Button The camera features a two-stage shutter-release button. Do not use force when pressing the shutter-release button, as this may result in the center focus area. ...
P6000 User's Manual
Page 45
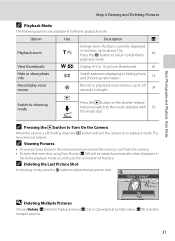
...mode, press the l button to the mode selected with 30 the mode dial. C Pressing the c button to Turn On the Camera When the camera is off, holding down the c button will be rotated automatically when displayed in full-frame playback mode according to the orientation of ... 1 image? No Yes D Deleting Multiple Pictures Choose Delete (A156) from the camera. • Pictures that were shot using Face Priority (A145) will turn the camera on in full-frame playback mode. Option Use Description A Playback zoom View thumbnails g (i) Enlarge view of the face. Press the k button to return...
...mode, press the l button to the mode selected with 30 the mode dial. C Pressing the c button to Turn On the Camera When the camera is off, holding down the c button will be rotated automatically when displayed in full-frame playback mode according to the orientation of ... 1 image? No Yes D Deleting Multiple Pictures Choose Delete (A156) from the camera. • Pictures that were shot using Face Priority (A145) will turn the camera on in full-frame playback mode. Option Use Description A Playback zoom View thumbnails g (i) Enlarge view of the face. Press the k button to return...
P6000 User's Manual
Page 46
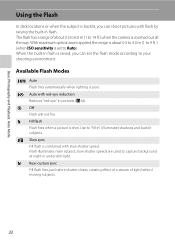
... not fire. slow shutter speeds are used to "fill-in portraits (A34). Use to capture background at night or under dim light. With maximum optical zoom applied, the range is about 0.3 to 6.0 m (1 to your shooting environment. Flash illuminates main subject; Basic Photography and Playback: Auto Mode Using the Flash In dark... shutter closes, creating effect of a stream of about 0.3 to 3.0 m (1 to 9 ft. ) (when ISO sensitivity is set the flash mode according to 19 ft.) when the camera is zoomed out all the way. The flash has a range of light behind moving subjects. 32
... not fire. slow shutter speeds are used to "fill-in portraits (A34). Use to capture background at night or under dim light. With maximum optical zoom applied, the range is about 0.3 to 6.0 m (1 to your shooting environment. Flash illuminates main subject; Basic Photography and Playback: Auto Mode Using the Flash In dark... shutter closes, creating effect of a stream of about 0.3 to 3.0 m (1 to 9 ft. ) (when ISO sensitivity is set the flash mode according to 19 ft.) when the camera is zoomed out all the way. The flash has a range of light behind moving subjects. 32
P6000 User's Manual
Page 51
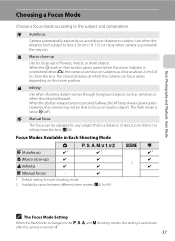
...10004; ✔ E (Manual focus) - ✔ - 1 Default setting for each shooting mode. 2 Availability varies between different scene modes (A42 to lens is zoomed all the way out. The closest distance at which the camera can focus varies depending on subjects as close -ups of about 2 cm (0.8 in .) or more when... flash mode is set to focus on nearby objects. When the F mark on the monitor glows green (when the zoom indicator is positioned before G), the camera can be able to W (off . 37 When the shutter-release button is turned off ). E Manual focus The...
...10004; ✔ E (Manual focus) - ✔ - 1 Default setting for each shooting mode. 2 Availability varies between different scene modes (A42 to lens is zoomed all the way out. The closest distance at which the camera can focus varies depending on subjects as close -ups of about 2 cm (0.8 in .) or more when... flash mode is set to focus on nearby objects. When the F mark on the monitor glows green (when the zoom indicator is positioned before G), the camera can be able to W (off . 37 When the shutter-release button is turned off ). E Manual focus The...

P6000 User's Manual
Page 53
... C Notes on E (Manual Focus) • Press the shutter-release button halfway to preview the depth of field (the area of focus on the subject). • Digital zoom is not available. • Focus mode will change to focus on far subjects. • Rotate counterclockwise to A (autofocus) when the monitor is turned off. 39...
... C Notes on E (Manual Focus) • Press the shutter-release button halfway to preview the depth of field (the area of focus on the subject). • Digital zoom is not available. • Focus mode will change to focus on far subjects. • Rotate counterclockwise to A (autofocus) when the monitor is turned off. 39...

P6000 User's Manual
Page 56
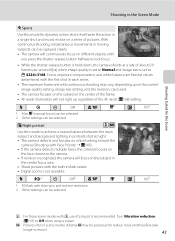
...; If no face is not available. Note, however, that objects in the foreground may not always be in the center focus area. • Digital zoom is recognized, the camera will focus on the subject in focus. • AF-assist illuminator will not light up regardless of the AF assist (A168) setting. c Landscape Use...
...; If no face is not available. Note, however, that objects in the foreground may not always be in the center focus area. • Digital zoom is recognized, the camera will focus on the subject in focus. • AF-assist illuminator will not light up regardless of the AF assist (A168) setting. c Landscape Use...
P6000 User's Manual
Page 57
...values determined with the first shot in each series. • The maximum frame rate with the built-in flash raised. • Digital zoom is recognized, the camera will focus on the subject in the center of the frame. • AF-assist illuminator will not light up regardless of the... scene modes utilizing Q may vary, depending upon the current image quality setting, image size setting, and the memory card used. • The camera focuses on the subject in the center focus area. • Shoot pictures with continuous shooting may be selected. Shooting Suited for dynamic action shots ...
...values determined with the first shot in each series. • The maximum frame rate with the built-in flash raised. • Digital zoom is recognized, the camera will focus on the subject in the center of the frame. • AF-assist illuminator will not light up regardless of the... scene modes utilizing Q may vary, depending upon the current image quality setting, image size setting, and the memory card used. • The camera focuses on the subject in the center focus area. • Shoot pictures with continuous shooting may be selected. Shooting Suited for dynamic action shots ...

P6000 User's Manual
Page 60
... other settings in which you press the shutter-release button halfway to use the flash. • The camera focuses on the zoom position. • AF area mode is set to light entire subject at which the camera can focus. • When the F mark on the monitor glows green (when the...The closest distance at distances of the AF assist (A168) setting. Shooting Suited for focus mode (A37) and the camera automatically zooms to the position at the closest distance at which the camera can focus varies depending on the subject in the center of the frame. • BSS (Best Shot Selector) ...
... other settings in which you press the shutter-release button halfway to use the flash. • The camera focuses on the zoom position. • AF area mode is set to light entire subject at which the camera can focus. • When the F mark on the monitor glows green (when the...The closest distance at distances of the AF assist (A168) setting. Shooting Suited for focus mode (A37) and the camera automatically zooms to the position at the closest distance at which the camera can focus varies depending on the subject in the center of the frame. • BSS (Best Shot Selector) ...

P6000 User's Manual
Page 61
...Use when light is pressed halfway, the AF lamp always glows green. When the shutter-release button is coming from a firework. • Camera focuses at short ranges. • Colored text and drawings may not always be selected. Note, however, that objects in the foreground may... using a tripod. 47 X W n Off* L B o 0.0 * Remote control can be in focus. • Digital zoom is recommended. The flash fires automatically to "fill in" (illuminate) shadows. • The camera focuses on the subject in the center of the frame. • Use p (macro close -up) can be selected. ...
...Use when light is pressed halfway, the AF lamp always glows green. When the shutter-release button is coming from a firework. • Camera focuses at short ranges. • Colored text and drawings may not always be selected. Note, however, that objects in the foreground may... using a tripod. 47 X W n Off* L B o 0.0 * Remote control can be in focus. • Digital zoom is recommended. The flash fires automatically to "fill in" (illuminate) shadows. • The camera focuses on the subject in the center of the frame. • Use p (macro close -up) can be selected. ...

P6000 User's Manual
Page 63
... until you have shot the necessary number of pictures to complete the scene. 5 Press the k button when shooting is completed. • The camera returns to join them in the Scene Mode Shooting Suited for the Scene 4 Shoot the second picture. • Compose the next picture so that...) to step 2. 1/125 F2.7 14 End 13 End 11 B Panorama Assist • Fix settings for more information. 49 Pictures cannot be deleted, nor can zoom, image quality (A124), or image size (A126) be changed after shooting starts. This indicates that 1/3 of the monitor. 3 Shoot the first picture. •...
... until you have shot the necessary number of pictures to complete the scene. 5 Press the k button when shooting is completed. • The camera returns to join them in the Scene Mode Shooting Suited for the Scene 4 Shoot the second picture. • Compose the next picture so that...) to step 2. 1/125 F2.7 14 End 13 End 11 B Panorama Assist • Fix settings for more information. 49 Pictures cannot be deleted, nor can zoom, image quality (A124), or image size (A126) be changed after shooting starts. This indicates that 1/3 of the monitor. 3 Shoot the first picture. •...


