P6000 User's Manual
Page 10
... Mode 24 Step 1 Turn the Camera On and Select A (Auto) Mode 24 Indicators Displayed in A (Auto) Mode 25 Step 2 Frame a Picture...26 Using the Viewfinder ...26 Using the Zoom...27 Step 3 Focus and Shoot ...28 Step 4 Viewing and Deleting Pictures 30 Viewing Pictures (Playback Mode) ...30 Deleting Pictures...30 Using the Flash...32 Available Flash Modes ...32 Setting the Flash Mode...33 Shooting with the Self-timer/Remote Control 35 Shooting with the Self-timer ...35 Shooting with Remote Control...36 Choosing a Focus Mode ...37 Setting the Focus Mode ...38 Using Manual Focus...39 Exposure...
... Mode 24 Step 1 Turn the Camera On and Select A (Auto) Mode 24 Indicators Displayed in A (Auto) Mode 25 Step 2 Frame a Picture...26 Using the Viewfinder ...26 Using the Zoom...27 Step 3 Focus and Shoot ...28 Step 4 Viewing and Deleting Pictures 30 Viewing Pictures (Playback Mode) ...30 Deleting Pictures...30 Using the Flash...32 Available Flash Modes ...32 Setting the Flash Mode...33 Shooting with the Self-timer/Remote Control 35 Shooting with the Self-timer ...35 Shooting with Remote Control...36 Choosing a Focus Mode ...37 Setting the Focus Mode ...38 Using Manual Focus...39 Exposure...

P6000 User's Manual
Page 11
... Memos ...74 Deleting Voice Memos...74 Viewing Pictures by Date ...75 Selecting a Date in Calendar Mode...75 Selecting a Date in List by Date Mode 76 Using Calendar Mode and List by Date Mode 77 Calendar and List by Date Menus...78 D Movies ...79 Recording Movies ...79 The Movie Menu...80 Selecting Movie Options...80 Autofocus Mode...81 Time-Lapse Movies...82 Movie Playback ...84 Deleting Movie Files...84 E Voice Recordings...85 Making Voice Recordings...85 Playing Voice Recordings ...87 Deleting Sound Files...88 Copying Voice Recordings ...89 ix
... Memos ...74 Deleting Voice Memos...74 Viewing Pictures by Date ...75 Selecting a Date in Calendar Mode...75 Selecting a Date in List by Date Mode 76 Using Calendar Mode and List by Date Mode 77 Calendar and List by Date Menus...78 D Movies ...79 Recording Movies ...79 The Movie Menu...80 Selecting Movie Options...80 Autofocus Mode...81 Time-Lapse Movies...82 Movie Playback ...84 Deleting Movie Files...84 E Voice Recordings...85 Making Voice Recordings...85 Playing Voice Recordings ...87 Deleting Sound Files...88 Copying Voice Recordings ...89 ix

P6000 User's Manual
Page 15
... be removed before using the camera. C Internal Memory and Memory Cards Pictures taken with your purchase of a Nikon COOLPIX P6000 digital camera. Symbols and Conventions To make it where all new pictures will be read before use, and keep it easier to as the "default setting." • The names of menu items displayed in the camera monitor, and the names of purchase is available elsewhere in this manual or in the Quick Start Guide. This icon indicates...
... be removed before using the camera. C Internal Memory and Memory Cards Pictures taken with your purchase of a Nikon COOLPIX P6000 digital camera. Symbols and Conventions To make it where all new pictures will be read before use, and keep it easier to as the "default setting." • The names of menu items displayed in the camera monitor, and the names of purchase is available elsewhere in this manual or in the Quick Start Guide. This icon indicates...

P6000 User's Manual
Page 16
...-ion Battery EN-EL5 Before Taking Important Pictures Before taking the camera on digital imaging and photography. About the Manuals • No part of the manuals included with this product may be reproduced, transmitted, transcribed, stored in a retrieval system, or translated into any language in any form, by Nikon specifically for contact information: http://imaging.nikon.com/ Use Only Nikon Brand Electronic Accessories Nikon COOLPIX cameras are engineered and proven to operate...
...-ion Battery EN-EL5 Before Taking Important Pictures Before taking the camera on digital imaging and photography. About the Manuals • No part of the manuals included with this product may be reproduced, transmitted, transcribed, stored in a retrieval system, or translated into any language in any form, by Nikon specifically for contact information: http://imaging.nikon.com/ Use Only Nikon Brand Electronic Accessories Nikon COOLPIX cameras are engineered and proven to operate...

P6000 User's Manual
Page 37
... "lock" position. Note that formatting (A170) permanently deletes all pictures and other devices into this camera, be displayed. Be sure to format them (A170) with a write protect switch. No Use the multi selector to keep before use. Format card? The Yes confirmation dialog will be sure to make copies of data or in damage to upload pictures from the memory card, or during data transfer to corrosive gases. 23 Remove the battery - Turn off or open the battery...
... "lock" position. Note that formatting (A170) permanently deletes all pictures and other devices into this camera, be displayed. Be sure to format them (A170) with a write protect switch. No Use the multi selector to keep before use. Format card? The Yes confirmation dialog will be sure to make copies of data or in damage to upload pictures from the memory card, or during data transfer to corrosive gases. 23 Remove the battery - Turn off or open the battery...

P6000 User's Manual
Page 39
... default settings are displayed. D Note on the Flash When the built-in dark locations or when the subject is fixed at off and W appears at slow shutter speeds. Pressing the d button displays the shooting menu options for image size. Set Vibration reduction to raise the built-in auto mode. Basic Photography and Playback: Auto Mode Shutter speed (A51) 1/125 F2.7 14 Aperture (A51) Internal memory indicator Pictures will be sure to Off when using the flash mode (A32) and self-timer...
... default settings are displayed. D Note on the Flash When the built-in dark locations or when the subject is fixed at off and W appears at slow shutter speeds. Pressing the d button displays the shooting menu options for image size. Set Vibration reduction to raise the built-in auto mode. Basic Photography and Playback: Auto Mode Shutter speed (A51) 1/125 F2.7 14 Aperture (A51) Internal memory indicator Pictures will be sure to Off when using the flash mode (A32) and self-timer...

P6000 User's Manual
Page 48
... red-eye reduction processing; C Red-eye Reduction This camera uses advanced red-eye reduction ("In-Camera Red-Eye Fix"). Basic Photography and Playback: Auto Mode Using the Flash B Shooting When Lighting is Poor or when the Flash is Disabled (W) • Use of a tripod is recommended to stabilize the camera during shooting. • The E icon may be saved even after the camera is turned off. • When shooting mode is set to A, B, C or D, the setting is saved even after the camera is turned off. Pictures shot when E is recorded...
... red-eye reduction processing; C Red-eye Reduction This camera uses advanced red-eye reduction ("In-Camera Red-Eye Fix"). Basic Photography and Playback: Auto Mode Using the Flash B Shooting When Lighting is Poor or when the Flash is Disabled (W) • Use of a tripod is recommended to stabilize the camera during shooting. • The E icon may be saved even after the camera is turned off. • When shooting mode is set to A, B, C or D, the setting is saved even after the camera is turned off. Pictures shot when E is recorded...

P6000 User's Manual
Page 49
... Playback: Auto Mode 2 Use the multi selector to choose Y 10 s or Y 2 s and press the k button. • Y 10 s (ten seconds): Suited for important occasions (such as weddings). • Y 2 s (two seconds): Suited for preventing camera shake. • The mode selected for reducing vibration due to Off when using the self-timer and remote control, use of the shutter-release button. The self-timer lamp blinks while the timer is shot, press the shutter-release button...
... Playback: Auto Mode 2 Use the multi selector to choose Y 10 s or Y 2 s and press the k button. • Y 10 s (ten seconds): Suited for important occasions (such as weddings). • Y 2 s (two seconds): Suited for preventing camera shake. • The mode selected for reducing vibration due to Off when using the self-timer and remote control, use of the shutter-release button. The self-timer lamp blinks while the timer is shot, press the shutter-release button...
P6000 User's Manual
Page 51
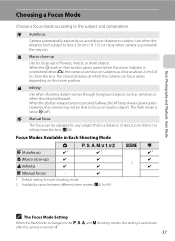
... D shooting modes, the setting is saved even after the camera is zoomed all the way out. C The Focus Mode Setting When the flash mode is changed in Each Shooting Mode A A, B, C, D, E, F y D A (Autofocus) ✔ 1 ✔ 1 ✔ 1 D (Macro close-up Use for each shooting mode. 2 Availability varies between different scene modes (A42 to W (off . 37 D Macro close-up ) ✔ ✔ ✔ 2 B (Infinity) ✔ ✔ ✔ E (Manual focus) - ✔ - 1 Default setting for close as about 2 cm (0.8 in.) to lens...
... D shooting modes, the setting is saved even after the camera is zoomed all the way out. C The Focus Mode Setting When the flash mode is changed in Each Shooting Mode A A, B, C, D, E, F y D A (Autofocus) ✔ 1 ✔ 1 ✔ 1 D (Macro close-up Use for each shooting mode. 2 Availability varies between different scene modes (A42 to W (off . 37 D Macro close-up ) ✔ ✔ ✔ 2 B (Infinity) ✔ ✔ ✔ E (Manual focus) - ✔ - 1 Default setting for close as about 2 cm (0.8 in.) to lens...

P6000 User's Manual
Page 61
...* L B o 0.0 * Remote control can be in focus. • Digital zoom is coming from a firework. • Camera focuses at short ranges. • Colored text and drawings may not show O Slow shutter speeds are used to capture the expanding burst of light from behind your subject, throwing features or details into shadow. X X n Off* L A o 0.0* * Other settings can be selected. Shooting Suited for the Scene Shooting in the Scene Mode m Fireworks...
...* L B o 0.0 * Remote control can be in focus. • Digital zoom is coming from a firework. • Camera focuses at short ranges. • Colored text and drawings may not show O Slow shutter speeds are used to capture the expanding burst of light from behind your subject, throwing features or details into shadow. X X n Off* L A o 0.0* * Other settings can be selected. Shooting Suited for the Scene Shooting in the Scene Mode m Fireworks...

P6000 User's Manual
Page 63
... exposure, white-balance, and focus settings. Shooting in a panorama series have shot the necessary number of pictures to complete the scene. 5 Press the k button when shooting is completed. • The camera returns to step 2. 1/125 F2.7 14 End 13 End 11 B Panorama Assist • Fix settings for more information. 49 End 13 D More Information See "Image/Sound File and Folder Names" (A181) for flash mode, self-timer, focus and exposure compensation before shooting begins. Setting the time allowed to a longer setting...
... exposure, white-balance, and focus settings. Shooting in a panorama series have shot the necessary number of pictures to complete the scene. 5 Press the k button when shooting is completed. • The camera returns to step 2. 1/125 F2.7 14 End 13 End 11 B Panorama Assist • Fix settings for more information. 49 End 13 D More Information See "Image/Sound File and Folder Names" (A181) for flash mode, self-timer, focus and exposure compensation before shooting begins. Setting the time allowed to a longer setting...

P6000 User's Manual
Page 76
... date of the camera's internal clock at the basement of buildings - Positioning will cancel if three minutes pass and positioning cannot be able to On, positioning will be downloaded through the Internet. (See "Installing Nikon Transfer" of the Quick Start Guide.) For more information on using Continuous (A140) or Auto bracketing (A143). During positioning, the power-on the camera. • Positional information will be recorded onto movies...
... date of the camera's internal clock at the basement of buildings - Positioning will cancel if three minutes pass and positioning cannot be able to On, positioning will be downloaded through the Internet. (See "Installing Nikon Transfer" of the Quick Start Guide.) For more information on using Continuous (A140) or Auto bracketing (A143). During positioning, the power-on the camera. • Positional information will be recorded onto movies...

P6000 User's Manual
Page 131
... the camera. 117 Picture upload cannot be initiated when the camera is turned on. 3 Connect the network device with the camera using the LAN cable 3. 4 Connect the AC adapter to the camera's DC input connector 4. • The DC input connector should be fully inserted. 5 Plug the power cable into an outlet 5. • When the camera is turned on and the message Starting upload to Picture Bank is displayed, uploading of the network settings menu...
... the camera. 117 Picture upload cannot be initiated when the camera is turned on. 3 Connect the network device with the camera using the LAN cable 3. 4 Connect the AC adapter to the camera's DC input connector 4. • The DC input connector should be fully inserted. 5 Plug the power cable into an outlet 5. • When the camera is turned on and the message Starting upload to Picture Bank is displayed, uploading of the network settings menu...

P6000 User's Manual
Page 133
... all pictures using the camera, proceed with user registration with voice memos attached, and movie files can be displayed when upload of all Yes copies have been uploaded, press the k button. Choose Yes to start uploading. C File Types Supported by the L icon displayed with this order. Pictures with them again, choose Picture Bank mode and select the desired pictures to the camera and all pictures are recognized by Picture Bank Resume interrupted transfer? Send images Send images...
... all pictures using the camera, proceed with user registration with voice memos attached, and movie files can be displayed when upload of all Yes copies have been uploaded, press the k button. Choose Yes to start uploading. C File Types Supported by the L icon displayed with this order. Pictures with them again, choose Picture Bank mode and select the desired pictures to the camera and all pictures are recognized by Picture Bank Resume interrupted transfer? Send images Send images...

P6000 User's Manual
Page 135
...The shooting menu of recorded pictures. Shooting, Playback and Setup Menus C Continuous A140 Select the option to shoot pictures one at slow shutter speeds. 121 a Custom Picture Control A134 Save adjusted COOLPIX Picture Controls as custom settings to be recorded according to save images with Best Shot Selector (BSS). G Metering A139 Choose how the camera meters exposure. A147 Adjust flash level. r Image size* A126 Choose the image size of A, B, C, D, E and F modes contain the following options. I Autofocus mode A146 Choose how the camera focuses. H Auto...
...The shooting menu of recorded pictures. Shooting, Playback and Setup Menus C Continuous A140 Select the option to shoot pictures one at slow shutter speeds. 121 a Custom Picture Control A134 Save adjusted COOLPIX Picture Controls as custom settings to be recorded according to save images with Best Shot Selector (BSS). G Metering A139 Choose how the camera meters exposure. A147 Adjust flash level. r Image size* A126 Choose the image size of A, B, C, D, E and F modes contain the following options. I Autofocus mode A146 Choose how the camera focuses. H Auto...

P6000 User's Manual
Page 184
...No Format Shooting, Playback and Setup Menus B Formatting Internal Memory and Memory Cards • Formatting the internal memory or memory cards permanently deletes all data. Basic Camera Setup: The Setup Menu l/m Format Memory/Format Card Use this camera. 170 appears in the setup menu. No Format Formatting a Memory Card When the memory card is complete. • The first time you insert the memory cards used in other devices into the COOLPIX P6000, be sure to format them with this option to a computer before formatting. • Do not turn the camera off or open the battery...
...No Format Shooting, Playback and Setup Menus B Formatting Internal Memory and Memory Cards • Formatting the internal memory or memory cards permanently deletes all data. Basic Camera Setup: The Setup Menu l/m Format Memory/Format Card Use this camera. 170 appears in the setup menu. No Format Formatting a Memory Card When the memory card is complete. • The first time you insert the memory cards used in other devices into the COOLPIX P6000, be sure to format them with this option to a computer before formatting. • Do not turn the camera off or open the battery...

P6000 User's Manual
Page 201
... N Press the flash pop-up ) button to be changed at current setting. N mode or list by date All images are not registered in the proper position. Rotate mode dial to E (manual and press the J button while rotating 39 (MF) mode. This file cannot be changed using the current setting. • Check the settings of functions that are hidden. mode. Error Messages Display Description Solution A N File contains no image data. All pictures in internal Disable Hide image setting to view memory/memory card images. 157 are...
... N Press the flash pop-up ) button to be changed at current setting. N mode or list by date All images are not registered in the proper position. Rotate mode dial to E (manual and press the J button while rotating 39 (MF) mode. This file cannot be changed using the current setting. • Check the settings of functions that are hidden. mode. Error Messages Display Description Solution A N File contains no image data. All pictures in internal Disable Hide image setting to view memory/memory card images. 157 are...
P6000 User's Manual
Page 204
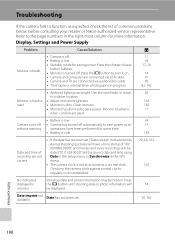
...:00." Date has not been set " indicator blinks during shooting) pictures will 14 monitor. Display, Settings and Power Supply Problem Cause/Solution A Monitor is blank. • Camera is off automatically to save power. operations have a time stamp of common problems below before consulting your retailer or Nikon-authorized service representative. Refer to the page numbers in the x button until shooting data or photo information will have been performed for saving power. be displayed. Troubleshooting If the camera fails to function as...
...:00." Date has not been set " indicator blinks during shooting) pictures will 14 monitor. Display, Settings and Power Supply Problem Cause/Solution A Monitor is blank. • Camera is off automatically to save power. operations have a time stamp of common problems below before consulting your retailer or Nikon-authorized service representative. Refer to the page numbers in the x button until shooting data or photo information will have been performed for saving power. be displayed. Troubleshooting If the camera fails to function as...

P6000 User's Manual
Page 209
... printed are not displayed. Cannot select paper size with movies, small pictures, picture. Paper size cannot be played back. Remove memory card to pictures shot by other cameras cannot be selected from internal memory. or pictures that automatically sets the paper size is running Windows 2000 Professional, camera cannot be used . Insert new memory card. Troubleshooting Problem Cause/Solution Cannot zoom in on Playback zoom cannot be connected to below 320 × 240. Nikon Transfer does not start when camera is connected. • Power is off. • Battery...
... printed are not displayed. Cannot select paper size with movies, small pictures, picture. Paper size cannot be played back. Remove memory card to pictures shot by other cameras cannot be selected from internal memory. or pictures that automatically sets the paper size is running Windows 2000 Professional, camera cannot be used . Insert new memory card. Troubleshooting Problem Cause/Solution Cannot zoom in on Playback zoom cannot be connected to below 320 × 240. Nikon Transfer does not start when camera is connected. • Power is off. • Battery...
P6000 User's Manual
Page 218
... Print set 101 Print Set Date 102 Printer 95 Printing 95 Protect 156 Q Quick adjust 132 R Rear-curtain sync 32 Rechargeable battery 177 Record GPS data 60 Red-eye reduction 32, 34 Remote control 35, 177 Reset 113 Reset all 174 Reset user settings 59 Rotate image 157 RSCN 181 S Saturation 132 Save user settings 58 Scene menu 41 Scene mode 41 Secondary DNS 105, 109 Self-timer 35 Self-timer lamp 35 Sepia movie 80, 81 Setup menu 159 Shooting 24 Shutter sound 169 Shutter speed 51 Shutter-priority auto 53 Shutter...
... Print set 101 Print Set Date 102 Printer 95 Printing 95 Protect 156 Q Quick adjust 132 R Rear-curtain sync 32 Rechargeable battery 177 Record GPS data 60 Red-eye reduction 32, 34 Remote control 35, 177 Reset 113 Reset all 174 Reset user settings 59 Rotate image 157 RSCN 181 S Saturation 132 Save user settings 58 Scene menu 41 Scene mode 41 Secondary DNS 105, 109 Self-timer 35 Self-timer lamp 35 Sepia movie 80, 81 Setup menu 159 Shooting 24 Shutter sound 169 Shutter speed 51 Shutter-priority auto 53 Shutter...


